For as long as I can remember, words have never quite been enough.
They often come out tangled, too late, or not at all. Growing up on the autism spectrum, I struggled with language, both the written word and the spoken one. But there was always something else… something that felt like a native language to me.
Music Photography
Two art forms couldn’t be more different in how they look, but they are the same in how they feel. Both are languages of the soul, bypassing the noise of words and letting something deeper rise to the surface.
A Melody or a Moment Can Say What I Can’t
When I pick up my trumpet, flugelhorn, or cornet, it’s not just to make sound — it’s to make sense of my world. The same thing happens when I lift a camera to my eye. These aren’t hobbies or skills I’ve picked up; they’re how I speak when speaking fails.
Research shows that music and photography light up some of the brain’s emotional and sensory centers. I didn’t need science to tell me that — I’ve lived it. For those of us who process the world differently, structure and creativity aren’t opposites — they’re allies.
A camera has settings, and a trumpet has keys and scales. That structure gives me freedom. I can tell a story and show my feelings without getting lost in sentences that never quite land.
The Power of Being Seen and Heard — Without Speaking
Both photography and music are about noticing the details most people miss:
– A glimmer of light on a face. – The shift in a minor chord that turns happiness into longing. – The moment before the tear falls.
People on the spectrum often have heightened sensitivity to light, sound, texture, and emotion. Some see these as “challenges.” But in the arts, they become superpowers. They allow us to go deeper, to notice what’s underneath the surface, and to bring it into the light or give it voice.
When Friends Say Nothing, It Means Everything
Despite how much I’ve learned, words still have their limits. In moments of deep sadness or grief, I’ve found that the most healing thing isn’t what people say — it’s simply that they show up and sit with me.
Silence, shared presence, a held hand, or a friend just being there — these are often more powerful than any comforting phrase. Just like a photo can speak a thousand words, or a melody can bring tears without lyrics, presence is its language.
This Is Why I Do What I Do
As a storyteller, musician, and photographer, I help others find their voice, especially when words don’t come easily. I work with nonprofits, missionaries, and businesses to help them show the world who they are through images and story-driven visuals.
And maybe… just maybe… I’m not just telling their stories. I’m telling mine too.
Whether it’s through a lens or a brass bell, I’ve learned this:
You don’t have to speak to be heard. You don’t have to write to be understood. And sometimes, the most powerful stories are the ones that live in silence — until we’re brave enough to give them sound or light.
If you’ve ever worked with me, you know I’m constantly learning. That’s not just a professional habit—it’s wired into who I am.
Being on the autism spectrum has given me a deep appreciation for order, patterns, and systems. I always looked at how things worked beneath the surface as a kid. I use that same instinct in my photography, video, and storytelling work today. Once I recognize a pattern—whether it’s how people move through a scene, how a nonprofit connects with donors, or how light transforms a subject—I can build on it, refine it, and teach it.
Over time, I’ve learned how powerful this is in a constantly changing world. Technology, communication styles, and visual trends shift fast. But when you understand the structure underneath them, you don’t get overwhelmed—you adapt, and you help others do the same.
For example, one of the most significant breakthroughs in my work came when I began to study body language. I realized that reading subtle shifts in posture or expression wasn’t just about being aware but about anticipating moments. This allows me to capture authentic emotion in real time, not just take technically correct photos. It’s what helps me tell visual stories that move people.
The same is true when I work with organizations. I don’t just show up with a camera—I show up with curiosity. I ask questions. I dig for the patterns behind your mission. I want to know what drives your team, what stories your audience needs to hear, and how to connect those dots to your larger goals. That comes from a lifetime of seeing systems where others might see noise.
Learning Empathy—and the Value of Blunt Truth
One of the biggest challenges I’ve faced as an autistic person is learning how to read people emotionally. I’ve always been aware that it doesn’t come naturally for me to pick up on subtle emotional cues or to instinctively respond with empathy in the moment. It’s not that I don’t care—it’s that I often have to pause, study, and think my way through what others pick up intuitively.
Growing in this area has taken years of intentional effort, and I’m still learning. But here’s what I’ve discovered: because I’ve had to work at empathy, I now approach people with a more profound respect for their stories. I ask more questions, listen more closely, and do my best to communicate that I’m in your corner.
That said, sometimes I come across as blunt. I speak directly. I say what I see. For some, that’s surprising. But for many of my clients, that’s also why they trust me. I won’t sugarcoat or sell you something that doesn’t serve your story. If I see a better way, I’ll say it—not to criticize, but because I want you to succeed. I’ve learned that clarity, paired with compassion, is a powerful combination.
This is Why I Do What I Do
I’ve realized that what once made me feel different is my greatest strength. Being on the autism spectrum means I notice things others may miss. I look for the rule behind the moment, and once I find it, I can build something meaningful from it. That’s why I’m so passionate about storytelling. It’s how I make sense of the world —and help others do the same.
So if you’re looking for someone who brings skill and deep attention to the “why” behind your story, I do that. And it’s not just work—it’s how I’m wired.
Over the past few years, I’ve walked alongside many of you through conversations, workshops, and stories shared under the name FOCUS. That space was born from a desire to gather with like-minded storytellers, visual creatives, and communicators who want to grow, encourage each other, and ultimately sharpen our craft for something bigger than ourselves.
But like any good story, the journey evolves.
Today, I’m excited to share a fresh chapter: FOCUS is now The Story Thread.
The word FOCUS served us well. It spoke to clarity, direction, and the intentionality we all aim for in our work. But as our conversations have deepened, I noticed a common thread—no pun intended—running through it all: story.
Whether you’re behind a camera, writing copy, coaching a nonprofit team, or working with missionaries on the field, we’re all chasing the same thing. This meaningful story connects people to purpose.
The Story Thread reflects the heartbeat of what we’ve been doing all along. It’s a space for those who don’t just want to create content, but who want to weave stories that matter — stories that bring clarity, stir compassion, and move people to action.
My Journey to This Point
As a storyteller and brand builder working with nonprofits, Christian ministries, and businesses around the globe, I’ve seen firsthand how powerful stories can be when handled with care. But I’ve also seen how isolating the creative journey can feel. Many of us do this work solo—wearing all the hats, figuring things out as we go, and sometimes wondering if we’re making a difference.
That’s why I created this community in the first place.
This name change isn’t just cosmetic. It’s a recommitment to what I hope The Story Thread becomes—a space where people who care about story, truth, and transformation can link arms and grow together.
You’re Invited: The Story Thread Zoom Call
When: May 9, 2025, 10:00 am – 11:00 am EST Where: Zoom (email me for the link) What to Expect:
Introduction to The Story Thread
A chance to share where you are in your own creative/storytelling journey
A discussion around future topics and how we can support each other
Open Q&A
This isn’t just a meeting — it’s the start of a conversation I hope will continue in many directions. Whether you’ve been part of the community for a while or this is your first time hearing about it, you’re welcome here.
If something lights up inside you when you hear “purposeful storytelling,” or you’re hungry for a place where your creative faith and calling intersect, The Story Thread was created with you in mind.
Every face tells a story. Consistent, human-centered storytelling cuts through and connects in a world overwhelmed by noise. It’s not about saying more—it’s about saying what matters, clearly and consistently.
We live in a world overflowing with noise—messages coming at us from every angle, all vying for attention. It’s easy to feel like your voice, no matter how important your mission, is getting drowned out. That’s why consistency in your messaging—and especially in your storytelling—is one of the most powerful tools you can use to rise above the clutter.
And let’s be clear: storytelling isn’t just a marketing tactic. It’s how you shape identity. It’s how you build trust. It’s how you get people to feel something, not just know what you do, but care about why you do it.
Why Consistency Matters
Imagine hearing about a nonprofit that supports vulnerable families. One week, their story is about clean water. Next, it’s about education. Then it’s disaster relief. While all these causes may be related, if the message feels scattered, the audience won’t know what to latch onto. Inconsistent messaging confuses people, and those who are confused are less likely to take action.
On the other hand, the most memorable organizations and brands stick to a core theme. Think of Charity: Water—every story they share ties back to one consistent narrative: clean water changes everything. Or TOMS Shoes—their early success was fueled by the “One for One” story that made every purchase feel like an act of kindness.
That consistency gives your audience something solid to stand on. When people see the same message, the same voice, and the same values reinforced over time, trust grows. They feel like they know you. And when they know you, they’re more likely to support you.
How Storytelling Anchors Your Message
The beauty of storytelling is that it’s flexible enough to showcase different aspects of your work, but focused enough to keep your core message intact. Every story doesn’t have to be identical, but each one should reflect the heart of your mission.
For example, suppose you’re a ministry that helps people find purpose through community. In that case, every story you tell—whether it’s about a food drive, a mentoring relationship, or a worship night—should be framed through that lens. That’s your anchor.
The same goes for your tone and style. If your stories are usually hopeful and uplifting, don’t suddenly shift into fear-based messaging to get attention. That inconsistency will erode trust, not build it.
Tips for Keeping Your Messaging Consistent
Here are a few simple ways to maintain consistency while still keeping your storytelling fresh:
Define Your Core Narrative Know what you stand for. Please write it down. Make sure your entire team is aware of this as well. Everything you create—videos, blog posts, social media updates—should reinforce this central story.
Create a Visual and Verbal Style Guide Use consistent language, colors, and imagery that reflect your brand’s voice and values. Whether you’re showing up on Instagram, YouTube, or a newsletter, your audience should recognize your presence.
Use Real Stories to Highlight One Theme Let your content breathe with variety, but keep it connected. Feature different people and projects, but filter each story through a consistent theme or value, like hope, restoration, or empowerment.
Repeat Without Apologizing Don’t be afraid to say the same thing in different ways. Repetition isn’t monotonous—it’s what builds brand recognition and trust. Your audience often needs to hear the same story multiple times before it sticks.
A Visual Suggestion
Use a photo collage or carousel post showing a series of images that represent your organization’s impact, but with one consistent theme (e.g., “transformation,” “community,” or “hope”) overlayed in text across each image. Bonus: Pair it with a short caption or story to drive the theme home.
Alternatively, a quote graphic works well too. One of my favorite quotes on this topic comes from Simon Sinek:
“People don’t buy what you do; they buy why you do it. And what you do simply proves what you believe.”
Use that as a rallying cry across your content.
Final Thought
In a world full of messages, your goal isn’t just to be louder—it’s to be clearer. Consistency in storytelling helps you do just that. It cuts through the noise and builds a foundation of trust with your audience.
Before sending the following message, ask: Does this reflect who we are and why we exist? When the answer is yes—over and over again—you’ll see a real connection take root.
“People don’t buy what you do; they buy why you do it. And what you do simply proves what you believe.”
—Simon Sinek
In a world bombarded with messages from every direction, it’s easy to feel lost in the noise. But one tool that has always stood the test of time: storytelling. Whether you’re leading a nonprofit, a ministry, or a business, your stories can make all the difference in building lasting, meaningful relationships with your audience.
When we think of storytelling, we often focus on its role in marketing – driving donations, building awareness, or promoting an event. But storytelling goes far beyond that. At its heart, storytelling is about building connections, about creating a space where your audience feels understood, valued, and part of something bigger than themselves.
**Why Relationships Matter More Than Ever ** Let’s step back. Think about the organizations you care about. What makes you stay connected to them? Chances are, it’s not just their products or services, but the relationship they’ve built with you. You trust them. You resonate with their mission. They make you feel like you’re not just a donor, customer, or supporter but part of their community.
For nonprofits and ministries, this relationship-building is essential. You’re not just trying to meet an immediate need; you’re trying to create a lasting impact. You’re cultivating a community that will stand by you through every challenge and every triumph. And the best way to do that? Tell a story that invites your audience into the journey.
Storytelling as a Bridge to Connection
So, why does storytelling work so well for relationship-building? It’s simple: stories are human. They tap into universal emotions like love, fear, hope, and joy. Hearing a story that resonates with their own experiences or values creates an emotional connection. That’s the foundation of any strong relationship – emotional resonance.
Take a moment to think about the stories that have stuck with you. What made them memorable? Was it the plot? The visuals? Or was it the way those stories made you feel? Whetheit’s’s a film, a book, or a personal anecdote, the stories that stay with uaren’t’t necessarily the ones with the most complicated twists or the highest stakesThey’rere the ones that spoke to us on a deeper level, that made us see something in ourselves or the world that we hadn’t noticed before. That’s what storytelling does for your audience. It creates an emotional bond that transcends mere transactions. Your audience will remember how you made them feel, not just the facts or the outcomes. And when you create that connection, your supporters will feel more invested in your cause. They won’t just be passive observers; they’ll be active participants in your mission.
Storytelling as a Tool for Trust
Trust is another essential ingredient in any relationship. People won’t engage with your organization if they don’t trust you, and they won’t stay engaged if they don’t believe in your vision. Stories help build that trust by showing your audience who you are, what you stand for, and why you’re passionate about your mission.
When you share stories about the people you serve, the challenges you face, and the victories you celebrate, you’re being transparent. You’re letting your audience see the real, human side of your work. They get a front-row seat to your journey, with all its ups and downs. This authenticity is what breeds trust. It’s what turns a one-time donor into a long-term supporter.
How to Use Storytelling to Build Relationships: where the rubber meets the road: how can you use storytelling to build stronger relationships with your audience? Here are a few tips:
Focus on the People While your mission is essential, the people behind it are what make it relatable. Share stories about the individuals you serve – their dreams, their struggles, their transformations. Show your audience how their support directly impacts real people, and make them feel like they’re part of those stories.
Be Authentic People can spot a fake story from a mile away. Be honest about your journey – the successes and the failures. Vulnerability builds connection; don’t be afraid to share the challenges and setbacks that come with your work. It’s through those struggles that your audience will relate to you the most.
Use Visuals to Enhance the Story They say a picture is worth a thousand words, and that couldn’t be more true when it comes to storytelling. Powerful imagery can amplify the emotional impact of your story. Whether it’s a photo that captures a meaningful moment or a video that brings the story to life, visuals can create an immediate connection that words alone can’t achieve.
Invite Your Audience into the Story Encourage your supporters to become part of the narrative. Share stories about the impact of their involvement, whether through a donation, volunteering, or simply spreading the word. When people feel part of the story, their connection to your mission deepens.
Be Consistent Building relationships takes time. Make storytelling a regular part of your communication strategy. Whether through social media, email updates, or blog posts, continue to share your story – and ensure it evolves. People want to see how their support is making a difference over time.
The Power of a Good Story
Ultimately, storytelling is not just about sharing information but also about creating a lasting bond with your audience and inviting people to be part of something bigger than themselves. When you build that connection, you make a community that will stand by you, not just for one campaign but for the long haul.
So, the next time you sit down to craft a message, ask yourself: What story am I telling today? And more importantly, how can this story help me build a deeper relationship with my audience? The power of storytelling is not just about marketing; it’s about connection, trust, and creating a community that believes in your mission as much as you do.
One of the most common conversations I have with clients starts with this:
“We need a quick video.” or “Can you come take a few photos for us?”
While it’s always tempting to jump straight to creating content, my experience, through decades of storytelling, has shown me something powerful:
If you don’t start with a clear story, your project will almost always fall flat.
It’s like building a house without a blueprint. Sure, you’ll end up with something — but it might not be strong enough to weather a storm, and it definitely won’t feel like “home.”
In my work, I’ve found that asking a few key questions before anything else makes all the difference:
What’s the heart behind this story?
What emotion do you want people to feel?
What action do you want them to take?
When we slow down just a little to answer those questions, the final video, photo series, or campaign isn’t just beautiful — it works. It connects. It moves people.
Story first. Always.
If you’re gearing up for a new project — whether it’s a new product launch, a fundraising campaign, or a rebranding — the best thing you can do isn’t to book the photographer or videographer right away.
It’s essential to clarify your story first.
I’d be happy to help you with that.
I specialize in guiding brands and organizations to discover their authentic stories and then helping them visually convey them in a way that resonates.
If you’re interested in discussing how I can help your brand stand out, let’s connect.
Caption: A male rose-breasted grosbeak, often called a “cut-throat” for its striking red chest, stops by my feeder during spring migration.
Sometimes the best photography subjects aren’t far away. They’re right outside your window.
Lately, I’ve been reflecting on why photographing birds at a simple backyard birdfeeder feels so therapeutic. I’m not alone in this—many photographers, both hobbyists and professionals, find real peace in spending time capturing these little visitors.
Here’s why I believe photographing birds can be good for your soul:
1. It forces you to slow down.
Birds aren’t in a hurry to pose for your camera. To photograph them well, you have to sit quietly, watch, and wait.
That stillness is rare in today’s world—and it’s powerful.
It draws you out of the constant rush and noise and gently invites you to be for a while.
2. It connects you with nature.
Even if you’re sitting on your porch or peeking through a kitchen window, you’re participating in something wild and beautiful.
You start noticing how birds move, how different species interact, and even the slight changes in their songs.
It grounds you right there in the present moment.
3. It provides a creative outlet.
Photography is storytelling.
Framing the shot, adjusting your settings, reading the light—it’s all part of exercising your creative muscles.
When photographing birds, you’re not just pressing a button; you’re making decisions, crafting a story one frame at a time.
4. It gives you a sense of accomplishment.
Birds are unpredictable.
When you finally capture that sharp, well-lit image, it feels like you earned it.
That little sense of victory can lift your spirits in ways that are hard to explain but easy to feel.
A Gray Catbird, known for its sleek look and incredible songs, perched naturally in the backyard trees.
Should You Create Natural-Looking Perches?
You’ll see a lot of bird photographers setting up beautiful perches near their feeders—branches, flowers, mossy sticks—designed to make their shots look like they were taken deep in the wilderness rather than the backyard.
It’s a clever technique if your goal is to create gallery-worthy images or enter competitions.
A brilliant male Northern Cardinal brightens the snowy day, perched on a branch near the feeder.
But do you need to do that to enjoy photographing birds? Absolutely not.
If you photograph birds simply for the joy, the therapy, and the experience, then the feeder, the railing, the wires—they’re all part of your authentic story.
The birds don’t mind.
They’re just thankful for the seed!
As a storyteller myself, I always come back to this:
It’s not about perfect setups. It’s about meaningful moments.
If you ever want to experiment with natural-looking perches for fun or to challenge yourself, it can be a rewarding next step. But remember—you don’t need a “perfect” scene to create meaningful images. You need to show up, stay still, and enjoy the simple wonder that flies right into your life.
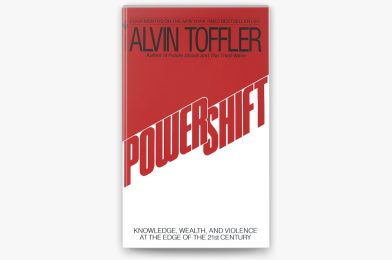
When Alvin Toffler’s book Powershift hit the shelves in 1990, I was one of the many who picked it up, read it with curiosity, and wondered what the future might hold.
Toffler made a bold claim: the balance of power would shift — not through brute force or sheer wealth, but through knowledge. Whoever controlled information would ultimately control the future.
Although I understood what he was saying at the time, I honestly had no idea how to apply that insight in my own work. I was focused on journalism, storytelling, and communication. Those were important, sure, but it felt like the “big powers” (media giants, government, corporations) still owned the narrative. It was hard to imagine a world where individuals, small organizations, or nonprofits could wield significant influence.
Fast forward to today — and I can see how much Toffler got right.
The rise of the internet, social media, smartphones, and AI has leveled the playing field. Today, a small nonprofit with a compelling story can reach a global audience. A business owner can build a brand with nothing more than a good story and a smartphone. A storyteller can influence culture as much — and sometimes more — than a billion-dollar company.
And this is where my work, and the work of so many others like me, comes into play.
As a storyteller and brand builder, I help organizations—whether businesses, nonprofits, or faith-based groups—find and share their stories in a way that cuts through the noise. Today’s world is inundated with messages, yet people still yearn for authentic, meaningful connections.
That’s why the skills of journalists, photographers, filmmakers, and communicators are more important than ever.
We help organizations clarify their message.
We help them connect emotionally with the right audience.
We help them build trust — the real currency of influence today.
In this new Powershift reality, it’s not enough to have information. It’s about how you communicate it — visually, emotionally, and strategically.
Organizations that understand this will thrive. Those who don’t will find themselves lost in the noise.
I’m grateful that Toffler’s book planted the seed all those years ago, even if it took the world— and me —a little time to realize its meaning entirely. Today, I get to help others navigate this new world, crafting stories that inform, inspire action, and build lasting impact.
If you’re an organization looking to build real influence, know this: You don’t just need more information.
You need a storyteller.
You need someone who understands the true power of communication in today’s world.
As someone who helps businesses and nonprofits tell compelling stories to connect with their audiences, I’ve often wrestled with this question: How frequently should I tell my own story?
When you make a living helping others shine, it can feel awkward—or even self-serving—to turn the camera around and share your journey. But here’s the truth: people don’t just hire my camera or my editing skills. They hiredme. And to make that decision, they need to know who I am.
Your Story Builds Trust
In marketing, trust is currency. And trust is built through consistency, clarity—and a bit of vulnerability. Telling your own story gives potential clients a glimpse of the why behind your work. It lets them see the heart behind the lens, the reason you go the extra mile, the values you bring into every project.
When I share a story about a time I failed and learned something important… Or how a client’s transformation deeply impacted me personally… Or what got me into this work in the first place…
…I’m inviting people into something more profound than just a business transaction. I’m inviting them into a relationship.
But Don’t Overshadow Your Clients
At the same time, the bulk of my work is about highlighting others. And that’s where the balance comes in. I aim to keep my personal storytelling about 20–30% of my public content. The rest focuses on client stories, behind-the-scenes insights, tips for visual storytelling, and case studies that showcase the impact of effective communication.
Why? Because potential clients need to see the results I get for others. They need proof that I can effectively tell their story. But now and then, sharing my perspective reminds them that there’s a real person behind the work.
A Healthy Mix
Here’s the rhythm that seems to work:
Client-focused stories (60–70%): Highlight the people and organizations I serve. This builds credibility and trust through social proof.
Educational content (10–20%): Tips, how-tos, or insights on storytelling and communication.
Personal stories (20–30%): Reflections, lessons learned, or behind-the-scenes peeks that show my journey, values, and style.
If you’re a fellow storyteller, I encourage you to find your rhythm. The key is authenticity. Share when you have something meaningful to say—and when it will help your audience connect the dots between your story and how you can help them tell theirs.
Because at the end of the day, people hire people they feel connected to.
And your story—told at the right moment—might be the reason they choose you.
Every day, around the world, nuns, missionaries, aid workers, and volunteers roll up their sleeves and do the quiet work of caring for the hungry, the sick, the lonely, and the forgotten. So, how did one woman — Mother Teresa — rise to become a symbol of compassion recognized in nearly every corner of the world?
It’s not because she worked harder or longer than others. It’s because her story was told.
A Life of Service — Seen
In 1969, British journalist Malcolm Muggeridge produced a documentary for the BBC titled Something Beautiful for God. It featured a petite woman in a white sari with blue stripes, serving the dying in the streets of Calcutta. And that story—that image—spread.
That broadcast became the turning point in Mother Teresa’s global visibility. Muggeridge didn’t invent her story. He saw it, captured it, and shared it in a way that connected deeply with audiences around the world.
The work mattered. The storytelling multiplied it.
As someone who’s spent a lifetime teaching and doing storytelling for nonprofits and missionaries, I want to point something out to both sides of the equation:
Rose Nantonah, the nurse, is setting up an IV for a minor child patient at the Baptist Medical Center in Nalerigu, Ghana.
To Those Doing the Work — Missionaries, Humanitarians, Volunteers:
You’re often so busy doing the work that you don’t think to document it. But stories build bridges. They raise support. They inspire others to act. If you believe your work matters, then helping others see it isn’t vanity — it’s vision.
You don’t have to be Mother Teresa. But you do have to let someone in close enough to witness the transformation happening every day around you.
Once her story reached a global audience—especially through Malcolm Muggeridge’s documentary and later the Nobel Peace Prize in 1979—the response was overwhelming. Donations skyrocketed. Volunteers and staff joined from across the world. The Missionaries of Charity, which began with just a few sisters, has grown into a global movement. While exact fundraising numbers are hard to pin down, the visibility brought by storytelling led to tens of millions of dollars in financial support over the years. That funding didn’t just sustain the work — it multiplied it. Schools, orphanages, hospices, and homes for the dying were built in places that might never have known the name “Mother Teresa” if not for the power of a story well told.
To Those Telling the Stories — Writers, Photographers, Videographers, Producers:
We are not the heroes. But we are the multipliers. Muggeridge’s film didn’t feed the hungry or clean wounds — but it turned a nun in a Calcutta alley into a global voice for the voiceless. That’s the power of a well-told story.
When we approach our work with humility, accuracy, and a heart, we amplify the reach of those already pouring their lives out in service.
Other Icons of Service That Rose Through Storytelling:
Martin Luther King Jr. – His message was powerful, but it was his speeches, media coverage, and iconic photographs that seared his story into global memory.
Princess Diana – Her work with AIDS patients and landmine victims gained traction because she brought the cameras with her, humanizing marginalized people.
Fred Rogers – “Mr. Rogers” used television to quietly but powerfully advocate for the emotional and moral care of children.
Bryan Stevenson – The founder of the Equal Justice Initiative has been doing life-changing legal work for decades, but books like Just Mercy and its film adaptation brought that work to the masses.
Greta Thunberg – A teenage girl with a sign started a movement, but it was the stories — photos, interviews, and headlines — that made her a global icon.
The Lesson for All of Us
You can be in the trenches — feeding the hungry, clothing the poor, visiting the imprisoned — but if no one ever sees or hears those stories, your impact might stay small.
It was the combination of action and storytelling — faithfulness on the ground, and someone with the tools to share that faithfully — that made Mother Teresa an icon.
Her life reminds us that great stories aren’t created, they’re discovered. And it’s our job, as storytellers, to go looking.
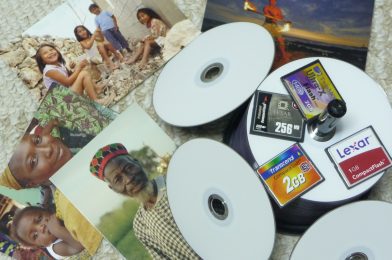
I used to think backing up my photos to CD and DVD was a smart move. I used high-quality discs, labeled them carefully, and even stored them neatly in binders—four per page, front and back. It felt organized and safe.
But years later, when I needed to retrieve some of those images, I hit a wall.
A lot of the discs wouldn’t read. My computer either didn’t recognize them at all, or worse, would hang trying to access files that were no longer recoverable. They’d been sitting on a bookshelf in my basement office all that time—out of direct sunlight, sure, but not protected the way I assumed they were.
Then I received a call from a friend who had over 250 CDs and DVDs that he wanted me to go through to retrieve old photos. Honestly, I expected the worst. Based on my experience, I figured maybe a handful would still work.
To my surprise, every single disc worked, except one. And that one had been burned by a camera store from film negatives, which can sometimes introduce its own set of issues.
So what was the difference?
My friend had stored his discs in proper CD/DVD cases, kept those in metal bins, and then placed the bins inside a media-rated storage safe that regulates temperature, humidity, and protects against magnetic interference.
Why My Discs Failed and His Didn’t
Here’s what I’ve learned:
CDs and DVDs are far more sensitive than we often realize. They don’t need fire or floods to fail—just time, humidity, and mild temperature fluctuations.
My basement office, while convenient, wasn’t climate-controlled. Discs were likely exposed to slow, consistent damage from moisture and heat over the years. Those binders may have also caused micro-scratches from friction every time a page turned.
His discs were protected in every way mine weren’t. Media safes are designed to maintain a stable environment under extreme conditions. They regulate not just heat, but also humidity and even electromagnetic interference. That combination made all the difference.
The Big Takeaway
Backing up to CD/DVD wasn’t the problem—how I stored them was.
If I had treated those discs the way we treat family silver—stored carefully in a protective case and in a cool, dry place—those backups would probably still be working today.
It’s like this: you wouldn’t toss your best silverware loose into a drawer with the hammers and screwdrivers, right? You’d wrap it, protect it, and store it properly.
That’s the metaphor I’ll never forget: Discs are digital silverware. Please treat them with the same care and consideration.
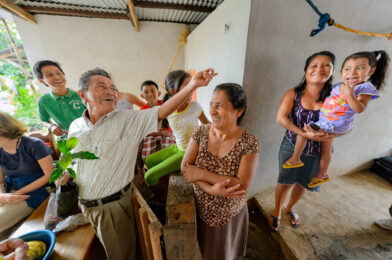
David Cifuentes Velazquez, a coffee grower and member of the Just Coffee Cooperative, shares with visitors how coffee is grown in Salvador Urbina, Chiapas, Mexico. His excitement is contagious, especially as he tells how the cooperative’s success brought his son back home from working in the U.S. to rejoin the family farm. Now, all of David’s children live next door, a testament to how Just Coffee is transforming livelihoods, restoring families, and strengthening communities.
One of the most common challenges I hear from missionaries is this:
“We’ve told the same story so many times. That program is fully funded. I want to highlight some of the newer ministries — but their stories aren’t as powerful.”
I get it. You don’t want to keep promoting a coffee co-op or a business training program that already has the necessary resources. You want to shine a light on the rest of the work God is doing through your ministry.
But here’s the truth: you don’t retire your strongest stories — you repurpose them.
Why Your Best Stories Still Matter
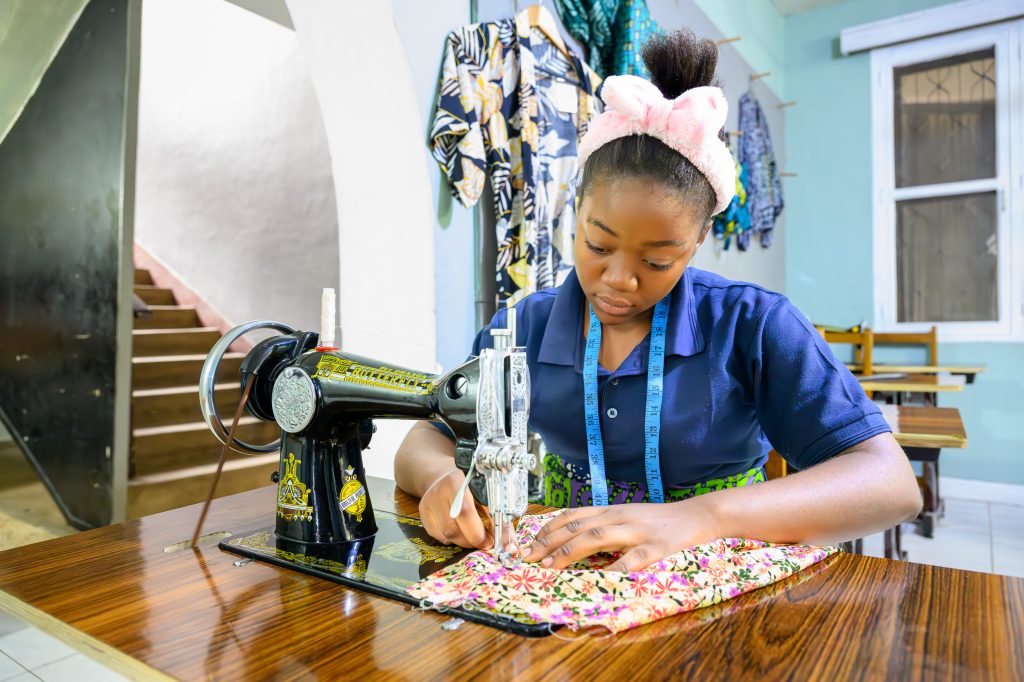
Stories, such as a woman learning to sew, creating her own fabric, and starting a business, are more than just donor appeals. They’re trust builders. They give supporters a clear view of transformation — tangible, emotional, and inspiring.
The impact was undeniable when I worked with a missionary running a sewing and business training program for single women aged 18–28. Women gained skills, confidence, purpose, and a means to support themselves. One woman went on to teach others and even started her small co-op.
That kind of story moves hearts — and opens the door for people to care about your broader ministry.
Use Strong Stories as On-Ramps
If a new ministry doesn’t yet have powerful before-and-after stories, don’t force it. Instead, use your strong stories as a bridge.
Sifa invests in women so they can become successful small business owners who, in turn, will invest in their communities. Sifa is faith-based, gospel-centered, and driven by a desire to see Sifa’s tools used in the hands of women, churches, and businesses in Dar es Salaam and throughout East Africa.
For example:
“You’ve seen how the sewing program helped young women gain dignity and independence. Now, we’re coming alongside those same women as they disciple others in their community — and we’d love your help to make that possible.”
You’re not misleading your audience — you’re helping them see the continuum of transformation. You’re telling a bigger story, with the strongest chapters leading the way.
Don’t Chase Equal Airtime — Chase Engagement
Not every ministry requires the same level of attention. Think of it more like music: some instruments carry the melody while others support the harmony. Let your strongest stories carry the melody, and let newer ministries build the harmony around them.
If you’re working with programs that don’t have a dramatic or visual story (maybe a counseling program, leadership training, or administrative work), link them to outcomes that matter. For instance:
“Behind every successful story we’ve shared is a team that’s been trained, supported, and equipped. That work happens through our leadership development program — and it’s one of the most important ways we ensure sustainability.”
Invite, Don’t Apologize
There’s no need to apologize for leading with the stories that work. Audiences want to know that their support makes a difference. When they see it clearly in one area, they’re more likely to believe in the rest of your work too.
So keep telling the story of the coffee cooperative. Continue to show how a young woman’s life was transformed by learning to sew. But now, let that story invite people into the next chapter.
Do you need any help shaping those transitions? That’s precisely the kind of strategy I love assisting missionaries to build — and it’s what I do every day.