As a professional storyteller and brand builder, part of my craft involves capturing moments in both still and moving images. Often, I need to extract a single frame from a video to use as a standalone image. In this blog post, I’ll share my experiences using Photo Mechanic and Adobe Premiere Pro for this task.
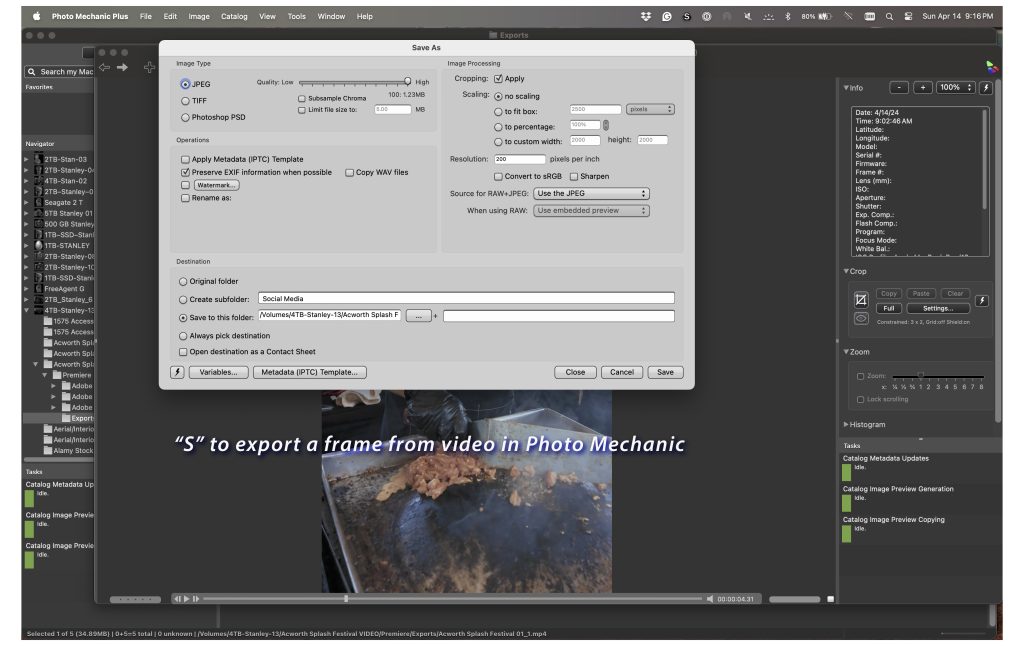
Photo Mechanic: Quick and Simple
Let’s start with Photo Mechanic, a renowned tool among photographers for its speed and efficiency in managing and culling images. While primarily designed for photos, it also offers a handy feature for extracting video frames.
Using Photo Mechanic is straightforward. You scrub across the video until you find the desired frame, then press ‘S’ to mark it. After that, it’s a matter of clicking ‘Save’ and choosing your preferred settings for the JPEG export. The first time you do this, you’ll need to configure the settings according to your preferences, including selecting quality, adjusting size, and specifying the save location.
One of the benefits of Photo Mechanic is its simplicity. However, during my experience using it on my Macbook Pro with Apple’s M1 chip and 32 GB of RAM, I noticed that scrubbing through the video wasn’t as smooth as it could be, especially compared to Adobe Premiere Pro.
Adobe Premiere Pro: Versatility and Integration
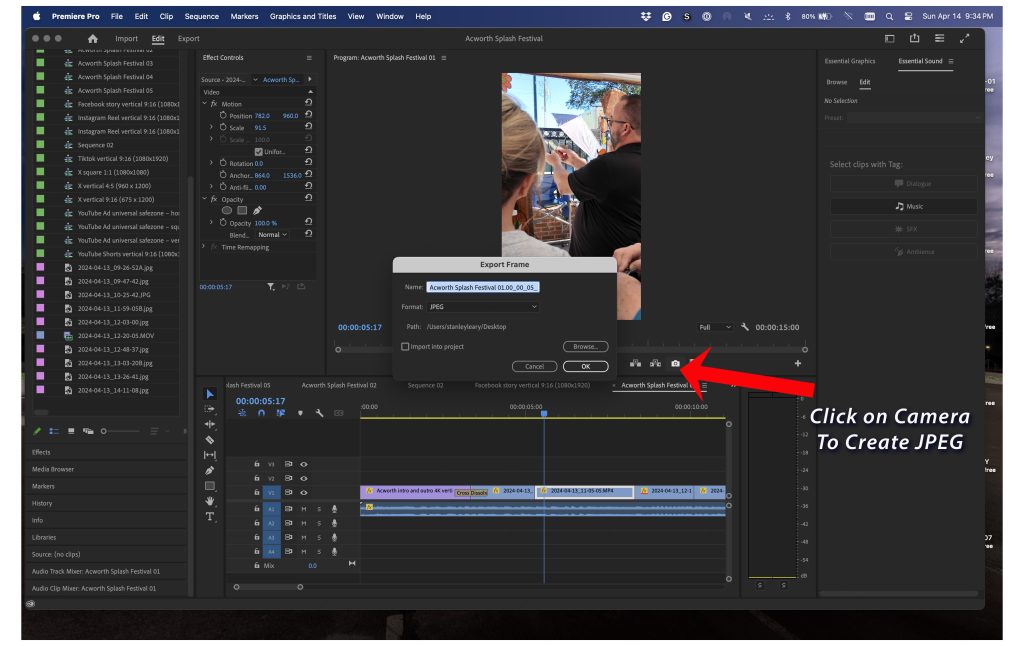
On the other hand, Adobe Premiere Pro, a powerhouse in video editing software, offers a similar feature for extracting frames from videos. Positioning the play head at the desired frame, clicking the camera icon, or shortcut of pressing Shift+E allows you to capture the frame effortlessly. You can then name the frame, choose where it saves, and even import it directly into your Premiere project.
What sets Premiere apart is its seamless integration with video editing workflows. Since I often edit videos in Premiere, being able to extract frames without switching between programs is incredibly convenient. Additionally, I found that Premiere’s performance was superior when scrubbing through the video, making the process more efficient overall.

Choosing the Right Tool for the Job
Ultimately, the choice between Photo Mechanic and Adobe Premiere Pro depends on your specific workflow and preferences. If you’re primarily a photographer who occasionally needs to extract frames from videos, Photo Mechanic is a reliable option that gets the job done. However, if video editing is a significant part of your work and you’re already using Premiere, leveraging its capabilities for frame extraction makes sense.
Since video editing is an integral part of my storytelling process, I prefer using Adobe Premiere Pro for extracting frames. Its smooth performance and seamless integration with my editing workflow make it my ideal choice.
In addition to its frame extraction capabilities, another significant benefit of using Adobe Premiere Pro is its robust suite of editing tools, particularly for color grading. Unlike Photo Mechanic, Premiere allows you to manipulate your footage’s color, contrast, and overall look to achieve the desired aesthetic. This is especially valuable for those who shoot in flat profiles or RAW formats, as it enables precise control over the final image. Whether aiming for a cinematic look, enhancing the mood of a scene, or ensuring consistency across your project, Premiere’s advanced color grading features empower you to elevate the visual storytelling experience. So, if color grading is essential to your video production process, Adobe Premiere Pro offers the comprehensive tools you need to achieve professional results seamlessly.
Final Thoughts
Whether you’re a photographer, videographer, or both, having the right tools at your disposal can significantly streamline your workflow. Both Photo Mechanic and Adobe Premiere Pro offer efficient ways to extract frames from videos, allowing you to capture those perfect moments and incorporate them into your storytelling arsenal.
So, whether you’re scrubbing through footage in Photo Mechanic or seamlessly extracting frames in Adobe Premiere Pro, remember that the goal remains to capture and share compelling stories that resonate with your audience. You can choose the tool that best fits your needs and workflow and let your creativity take center stage.