Still image is still king in social networking

Reading Time: 5 minutes
 
Hotel Avenida Palace, downtown Lisbon, Portugal [Fuji X-E2, 18-55mm, ISO 6400, ƒ/2.8, 1/90]

I am returning after a week-long Visual Storytelling Workshop in Lisbon, Portugal. While doing the workshop, I started watching how the students were already engaging their audience, and then it hit me—The Still Image is King in Social Networking.


You can see how Esther Havens successfully shares a photo and gets more than 86 “LIKES” on Facebook. Note one thing different than most people who share photos—CAPTION!

A short caption with a strong image engages enough people to click on “LIKE,” This doesn’t include all the people who saw the picture and may enjoy it even more, but just don’t click “LIKE.”


My friend John Spink, the Atlanta Journal and Constitution photographer, shares a personal photo and adds a small caption. Look at the number of LIKES—73 total.

Again the key to pushing those likes up is a robust photo and good caption that entertains those that follow him.

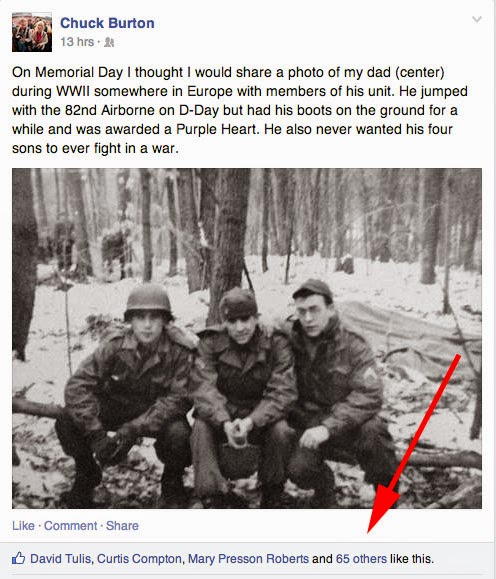
Another friend Chuck Burton, Associated Press Photographer, shares a photo of his dad. Again please notice the image is interesting, and the caption adds more information making the picture more impact. 68—LIKES.

After talking to the students about how they already have an audience, but just to post strong images with a short caption that tells a small story Amanda Ross, one of the students, started doing this and experienced for the first time her posts taking off with “LIKES.”


This screenshot is that post that she shared. WOW, 8,2—LIKES.

Social Networking Tip

People enjoy Social Networking because they enjoy the small snippets to catch up and keep connected. The key to being what Seth Godin calls a sneezer is entertaining. It would help if you kept it brief in the social networking circle. If you want to post longer posts, then you need a blog.

If you want to understand the idea of a sneezer, read Seth Godin’s book Unleashing the Ideavirus.

To show how to make your idea infectious, Seth, in his book, examines what makes a powerful ‘sneezer,’ how ‘hives’ work, and applies the concepts of critical velocity, vector, medium, smoothness, persistence, and amplifiers. As Godin shows, the now-familiar idea of viral marketing is one particular form of Ideavirus marketing. Most businesses will not be able to engage in proper viral marketing, but all can use the Ideavirus approach.

I recommend diving into understanding how social networking operates for successful people. For example, we are no longer living in a world where a marketer can effectively just push their agenda. Instead, it would help if you were interested in creating a following.

Read The Power of Pull, which explains how you must create something of interest for people to pay attention to. Just telling people, they need this is not as effective as creating content that draws them to you.

There is another book I would recommend to those trying to get their work viewed and make them relevant for clients to hire regularly.

Seth Godin wrote another top-seller Tribes:We Need You To Lead Us

“Real leaders don’t care [about receiving credit]. If it’s about your mission, about spreading the faith, about seeing something happen, not only do you not care about credit, you actually want other people to take credit. There’s no record of Martin Luther King, Jr. or Gandhi whining about credit. Credit isn’t the point. Change is.”
― Seth Godin, Tribes: We Need You to Lead Us

Most of the photographers I am meeting are wanting to change the world through their photographs. Many of them call their work humanitarian photography.

If you are wanting your images to change the world let the work speak for itself. Share those images and give people something they can digest in a quick glance on Facebook, Twitter, Pinterest, Instagram or whatever social network you choose. The key is the photo, if strong, will stop them and then read your caption.

When people move from “LIKE” to “SHARE” you are now creating change.

What follows after you do this for a while? People will follow you on Twitter and request to friend you on Facebook. If you goal is to get people to follow you then this is where creating a separate page just for your photography can be a good thing. This way you are able to post those images with captions and create a following separate from your close friends.

You can also just share with your friends or the world. Just choose when you post if you want the Public, everyone, or just your friends to see the post.

Why the Still Image is King?

Twitter is an online social networking and microblogging service that enables users to send and read short 140-character text messages, called “tweets”. The reason for the success of Twitter is the short message. Instagram even in the name communicates that keeping it quick and short will be more successful than a larger post.

Instant Messaging also is successful due to the brevity of the message.

YouTube has grown as well as it’s own social networking platform. My recommendation is to build a following on a project with still images and captions over a period of time that builds up to the release of the video.

Your audience will be more interested in taking the TIME to watch your video if they have an idea about what it is about. Keeping your teaser short is why trailers for movies exist. Think of the still image as quick trailers that will create the audience for the release of your video.

Your audience will more likely stay tuned into the video if they are willing to commit to the time to watch it. If you are successful as a person worth following they will commit to watching it.

When you travel, give yourself a little time to acclimate

Reading Time: 2 minutes
 
Nikon D4, 14-24mm, ISO 100, ƒ/8, 1/500

I am teaching a class with two of my friends Jeff Raymond, from ABWE, and James Dockery, ESPN, this week in Lisbon, Portugal. Our first day of class is Monday, which is today.

Yesterday we let the students shoot around the area just to get acclimated to the time zone change. These photos are while we were going around Lisbon and nearby to see some sights.

Nikon D4, 14-24mm, ISO 100, ƒ/8, 1/500

I shot this one of the palaces while we drove by it. Keeping my shutter speed pretty high helped me not worry about the camera movement due to the van we were in at the time.

Nikon D4, 28-300mm, ISO 100, ƒ/4.5, 1/800

I suggest a little time to acclimate to the location before diving into the story. One of the reasons is if you have never been to that part of the world, you are getting to feel the location and not just react immediately to the subject without context as you would be doing while telling the story.

Nikon D4, 14-24mm, ISO 7200, ƒ/8, 1/100

Here is James Dockey, an ESPN TV editor, enjoying conversing with the lady at the coffee shop and some of the students in the class we are teaching. But, of course, one of the best ways to acclimate is to eat the food and enjoy their coffee.

Nikon D4, 14-24mm, ISO 4500, ƒ/8, 1/100

James is with the ladies who served us the espresso and some pastries. While this was James’ food, I got the same. WOW, that was delicious.

We are now all rested, adjusted to the time zone, and ready to dive into our storytelling on Lisbon for the rest of the week. So stay tuned for some more from Lisbon.

Time of day can have a significant impact on your photo.

Reading Time: 2 minutes
 
Nikon D4, 28-300mm, ISO 800, ƒ/22, 20sec [10:08 pm]

Plan your travel as best you can to make the most of a given location, especially if you want a great photograph that WOWs.

The first photo here is from dusk. Again, the city’s lights are on, giving the image a lot more pop than this photo taken late in the day.

Fuji X-E2, 18-55mm, ISO 500, ƒ/13, 1/500 [7:51 pm]

This morning I woke up and took the exact location early.

Fuji X-E2, 18-55mm, ISO 2000, ƒ/18, 1/500 [8:49 am]

As you can see, the exact location looks quite different at different times of the day.

As a storyteller, which photo best helps you tell the story when you first think of Lisbon, Portugal? By the end of this week of teaching storytelling in Lisbon, Portugal, I might pick a different photo than when I started, but now I have options.

Nikon D4, 28-300mm, ISO 800, ƒ/20, 5sec [10:11 pm]

Here is another perspective from where I was shooting the other photos. Here it is at dusk, and here it is just an hour earlier.

Fuji X-E2, 18-55mm, ISO 2000, ƒ/13, 1/500 [8:59 pm]

I liked the location so much that I made a panoramic of the spot. Click on it to see it larger.

Nikon D4, 14-24mm, ISO 800, ƒ/22, 1.6sec [10:07 pm]

Sigma 70-200mm ƒ/2.8 great lens for party pics

Reading Time: 3 minutes
 
Nikon D4, Sigma 70-200mm, ISO 12800, ƒ/3.2, 1/80 optical stabilization on

I love to watch people and especially across the room. The lens that captures these moments the best for me is the Sigma 70-200mm f/2.8 EX DG APO OS HSM for Nikon. Up to 4 Stops of Optical Stabilization makes hand-holding the lens possible in low light, which I was shooting in tonight.

Nikon D4, 85mm ƒ/1.4 , ISO 450, ƒ/1.4, 1/100

I tried to work the room with the Nikon 85mm ƒ/1.4, but I felt like the lens was too loose most of the time, and since I was further away, the depth-of-field was as silky smooth to me as with the Sigma 20-200mm because I was able to shoot at 200mm and therefore compressed the background.

Nikon D4, Sigma 70-200mm, ISO 12800, ƒ/3.2, 1/50 optical stabilization on

The cool thing is shooting at 200mm, and a wide aperture gives the shallow depth of field, making the subject pop out from the room.

Nikon D4, Sigma 70-200mm, ISO 12800, ƒ/2.8, 1/60 optical stabilization on

While technically, there is a separation of the subject from their environment, you now must wait for a moment where you capture the person’s personality. A technically great photo isn’t what makes the photo, but it just merely helps. It still comes down to capturing the moment.

Nikon D4, Sigma 70-200mm, ISO 10000, ƒ/2.8, 1/100 optical stabilization on

While shooting all these photos, the people know me, but I have been working in the room for a while. I started with 14-24mm and introduced myself to people getting them to know I was here and taking photos.

Nikon D4, Nikkor 14-24mm, ISO 12800, ƒ/3.2, 1/100

I am shooting a full-framed image like the one above, with the 14-24mm putting me less than a foot away from the subjects. After shooting these, I start shooting the tighter shots with the longer lens. So I am now further away and picking moments.

Nikon D4, Sigma 70-200mm, ISO 9000, ƒ/3.2, 1/100 optical stabilization on

Now people are more relaxed at the party. They are now into conversations and enjoying one another. When people are conversing is when I get excellent expressions.

Nikon D4, Sigma 70-200mm, ISO 12800, ƒ/2.8, 1/100 optical stabilization on

I also love creating a layering effect by having something in the foreground and background. I think this helps give more depth to the photo, even with the foreground and background out of focus.

Nikon D4, Sigma 70-200mm, ISO 11400, ƒ/3.2, 1/100 optical stabilization on

I love these expressions. They make you want to know what they are talking about.

Nikon D4, Sigma 70-200mm, ISO 12800, ƒ/3.2, 1/100 optical stabilization on

I love shooting tight and isolating subjects but remember, when I write a blog like this, I teach something. The 70-200mm photos are just part of the coverage; I have plenty of wide-angle lens shots to help capture the context.

I think every photographer would benefit from a 70-200mm ƒ/2.8 lens in their bag. I love my Sigma 70-200mm.

What is TTL Flash, and do I need it?

Reading Time: 3 minutes
 

In my last blog post, I explained three things that affect exposure when using flash.

  • Flash Power—The bright flash will influence if the picture is over, under, or properly exposed. You can control the Neewer flash from 1/128 to full power in 1/3 stop increments.
  • ƒ-stop/Aperture—You control how much of the light is coming into your camera by the camera iris called the aperture. These are fractions—the focal length of the lens over how wide the opening of the lens is.
  • Flash Distance to Subject—The closer you put the flash to the subject, the brighter the subject, and the further away you set it, the darker it gets. Of course, this assumes your Flash Power and ƒ-stop is constant.
TTL—Through The Lens
 
TTL metering has been around for a while with cameras. Your camera helps make the proper exposure settings based on what light hits the camera’s sensor. The TTL flash is a very sophisticated flash system that sends out a flash that tells the camera what to set the camera, and then the flash fires again, taking the photo at those settings. The first flash happens so fast that it looks like one flash went off to the human eye.
 
 
An incident meter is the most accurate way to take a reading for any photo. An incident reading is where you put the meter where the subject is located and take a reading of the light falling onto the subject. The white dome needs to be where the subject is to get an accurate reading.
 
Most incident meters have an available light setting and flash setting where you can measure the light.
 
TTL metering is a reflective reading. You are reading the light that bounces off the subject. If you take a reflective reading of a White Wall, an 18% Gray Wall and a Black Wall, all three photos will look like an 18% Gray Wall.
 
Using the settings, you get from the incident reading meter for all three walls will look like they should.
 
TTL Metering has a variable
 
As you can see, the TTL metering system has one major disadvantage of using a reflective reading to set the aperture, shutter, and ISO on your camera—the color and tone of the subject will influence the exposure and white balance, whereas the incident reading is consistent.
 
Incident vs. Reflective
 

If the situation allows you to use incident metering, you will get the most consistent results. However, there are situations where this is impractical.

At parties where you are moving around the room, getting an incident reading and then taking a photo may be impractical to get the “moment.” Roaming photos is where a flash with TTL can get you close on exposure and white balance. You may have to check the LCD for a histogram and adjust the EV of the camera and the flash. A histogram often is much more practical than incident reading.
 
The TTL will adjust pretty quickly when the subject moves toward you, like a person on a red carpet walking toward you. If you are shooting RAW, you most likely be close enough to fix it in post if necessary.
 
Most seasoned pros have TTL flashes, hot shoe flashes, and some studio strobes that are not TTL. In addition, most pros will have an incident flash meter to adjust the lights and camera.
 
If you do portraits in a studio setting, TTL flash isn’t necessary, but if you shoot pretty fluid situations, then the TTL system can help you get photos that may be impossible without them.
 

White balance 2.0: Saving even more time in post-production

Reading Time: 3 minutes

I recently upgraded my ExpoDisc, which comes with the Portrait Warming Filters. This little addition saves me more steps in Adobe Lightroom and gives me more time to enjoy life.

I have been using ExpoDisc since 2005. George Wallace invented It to help his students at San Jose State better expose themselves to Kodachrome 25. He studied with Ansel Adams and Minor White, where he learned to master the zone system.

I wrote about using the ExpoDisc a while back, but here is the basic idea of how it works.

ExposDisc goes in front of the lens, and then you use it to get an incident reading rather than a reflective reading of the light.
Notice the direction of the light hitting the subject. Next, you move to the same position to get the light reading below.
Could you point the camera toward the direction of the light falling on the subject?

The latest upgraded version has introduced the warming filters you place before the ExpoDisc.


You can adjust the color temperature in Adobe Lightroom’s Develop Module, where I often warm up my photos. Now, I no longer need to do this. I currently use the +1 warming filter, which adds warmth to all my photos. You don’t have to use the filter if you don’t want to do this for any reason. Instead, if you want it even warmer, use the +2 or start stacking the filters. The Auto White Balance [AWB] setting on your camera looks at the scene in front of the lens, and then it will read all the colors it sees and try to make it 18% gray. So if you have a red wall you photograph, the camera will all cyan to make this red wall appear gray. If someone is in that photo, their skin will have a cyan color cast. The problem with 18% gray cards depends on the angle you hold them. You can get a glare, which will shift the camera’s color settings.

I have found that every other system I have tried that uses reflective light reading [you point the camera at the device] is not as accurate as when the camera is put into the light, making an incident reading.  

The second benefit of the newer ExpoDisc V 2.0 is it comes with a carrying case. When I first bought my ExpoDisc years ago, it came in the standard filter case, like all other filters you purchased. This new case you can put on your belt if you like and have it readily available. When I first bought my ExpoDisc, I paid over $120 for the device. Today, it comes with more options and only costs $49.95. If you consistently use ExpoDisc, I promise you that you will notice a consistent skin tone with all your images that will make people see.

Make your photos “DIFFERENT” at events, or don’t get hired.

Reading Time: 3 minutes

I am often hired to cover events. Of course, anyone with a camera could cover these events, but I make my photos look different every time.

I am using off-camera flash to improve the images in these photos. In this first photo, the sun is behind the lady on the left, hitting the man’s face. The sun behind them creates a silhouette, so I had my assistant hold the flash on a monopod up high, pointing down at them.

Nikon D4, 14-24mm, ISO 100, ƒ/7.1, 1/50, off-camera flash using the Neewer TT850 flash & Neewer 433MHz Wireless 16 Channel Flash Remote Trigger

The flash is off to my right, pointing at the ladies on the left. You can see again that I would have created a silhouette of their faces without this flash. If I had used a flash on the camera, I would have flattened the features. However, by having the assistant hold the light up high, I still gave the ladies’ cheekbones some shape.

Nikon D4, 14-24mm, ISO 640, ƒ/5.6, 1/200, off-camera flash using the Neewer TT850 flash & Neewer 433MHz Wireless 16 Channel Flash Remote Trigger

Here, the assistant bounces the flash off the ceiling inside the room. I am just raising the light inside so that the outside is balanced and not washed out with no details.

Nikon D4, 28-300mm, ISO 2000, ƒ/5.6, 1/40, off-camera flash using the Neewer TT850 flash on S2 [slave setting] with the Nikon SB900 and SB800 on PocketWizard TT5 triggered by the TT1 and AC3 to control their output. 
Nikon D4, 28-300mm, ISO 1250, ƒ/5.6, 1/100, off-camera flash using the Neewer TT850 flash on S2 [slave setting] with the Nikon SB900 and SB800 on PocketWizard TT5 triggered by the TT1 and AC3 to control their output. 
Nikon D4, 28-300mm, ISO 800, ƒ/5.6, 1/100, off-camera flash using the Neewer TT850 flash on S2 [slave setting] with the Nikon SB900 and SB800 on PocketWizard TT5 triggered by the TT1 and AC3 to control their output. 

The room has three flashes, all of which sync with the camera. I have the Nikon SB-900 and Nikon SB-800 working on TTL and triggered by the PocketWizard system. The Neewer TT850 has a 2nd flash setting for TTL flashes. The light in the room was so mixed with different color temperatures that I wanted to clean this up with the flash.

Nikon D4, 28-300mm, ISO 10000, ƒ/7.1, 1/100, off-camera flash using the Neewer TT850 flash & Neewer 433MHz Wireless 16 Channel Flash Remote Trigger 
Nikon D4, 14-24mm, ISO 640, ƒ/2.8, 1/25, off-camera flash using the Neewer TT850 flash & Neewer 433MHz Wireless 16 Channel Flash Remote Trigger

The camera was set to Aperture priority for all these photos, and I was using the flash slightly brighter than the ambient light. The same light value, or +1/2 stop, is often more effective for cleaning up the color and giving the images a little pop.

I know that if anyone were shooting with an iPhone or a point-and-shoot camera, they would not get this quality of images. They are different. Having your photos look better than a smartphone camera is very important if you want to work. Why would they hire you if my pictures didn’t look like what they can make with their cameras?

Fuijifilm X-E2 firmware upgrade 2.00 is major for me

Reading Time: 2 minutes
 
Fuji X-E2, 55-200mm, ISO 6400, ƒ/4.4, 1/55

The firmware update Ver. 2.00 from Ver. 1.20 has made a massive difference in my experience when it comes to focusing. While nowhere in the information about the changes is the focusing improvement mentioned, I noticed considerably better performance.

Fuji X-E2, 55-200mm, ISO 6400, ƒ/4.8, 1/150

Frankly, I was getting quite frustrated with the camera when it came to focusing, which was then screwing up my ability to capture “the moment.” Last night at my daughter’s Spring Orchestra concert, I could grab moments like the peak consistently when the conductor had their arms up and where I could capture what reads much more accessible than where you cannot see her arms.

Fuji X-E2, 55-200mm, ISO 6400, ƒ/5, 1/200

The upgraded information said:

The firmware will shorten the display lag** for X-E2’s Electronic Viewfinder (EVF) to less than 1/10 compared to that of the current firmware to the world’s fastest 0.005 seconds for ultimate performance which has been invented as Real Time Viewfinder, featured in X-T1. Also it enhances the frame rate of the viewfinder and the highest frame rate is maintained even in low light conditions or night-time photography, providing smooth live view images through the lens.

My experience before the firmware upgrade was a great deal of focus hunting to lock in on a focus point.

Fuji X-E2, 55-200mm, ISO 6400, ƒ/4.8, 1/550

The camera would take the photo, and then when I would press the shutter again, keeping the same composition and just wanting a second photo, the camera would hunt again to lock in on the focus point. Now the camera was no longer hunting, and the moments were much easier to obtain.

Fuji X-E2, 55-200mm, ISO 6400, ƒ/4.7, 1/180

The framerate was impacting my focus, and I didn’t know this was the problem. However, now I cannot see a good reason to buy the X-T1 since I purchased it to have a smaller profile, which meets that standard.

Fuji is doing what other manufacturers are afraid to do because the other manufacturers fear a loss in sales. For the most part, the firmware upgrade makes the differences between the X-T1 and X-E2 minor and makes me want another X-E2.