Flash can improve your outside and inside photos

The Cows at Roswell Town Center celebrate Cow Appreciation Day 2018 in Roswell, GA. [Nikon D5, Sigma 24-105mm, ISO 400, ƒ/5.6, 1/3200 – Godox V860IIN + Godox X1NT]

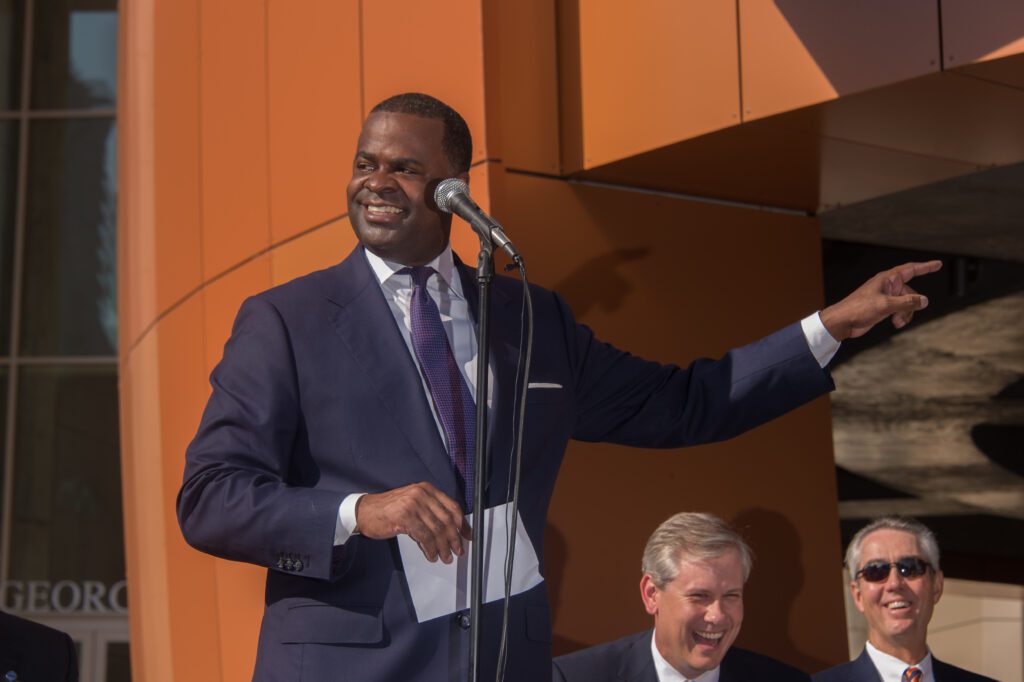
With today’s cameras, you can shoot almost anything without a flash. You know this from using your smartphone. You might not know that professional photographers don’t use flash because there isn’t enough light to complement the light.

Using a flash outside and inside is about knowing why you need the moment and how it can improve the photograph. These photos were from my job yesterday.

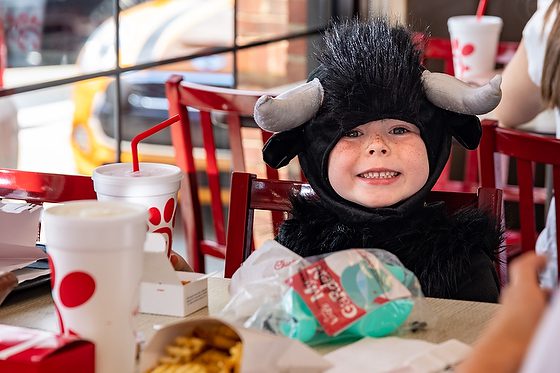
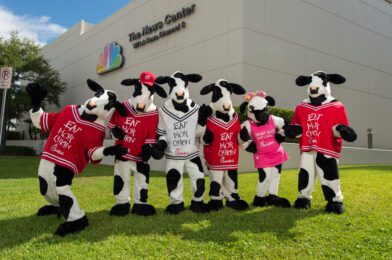
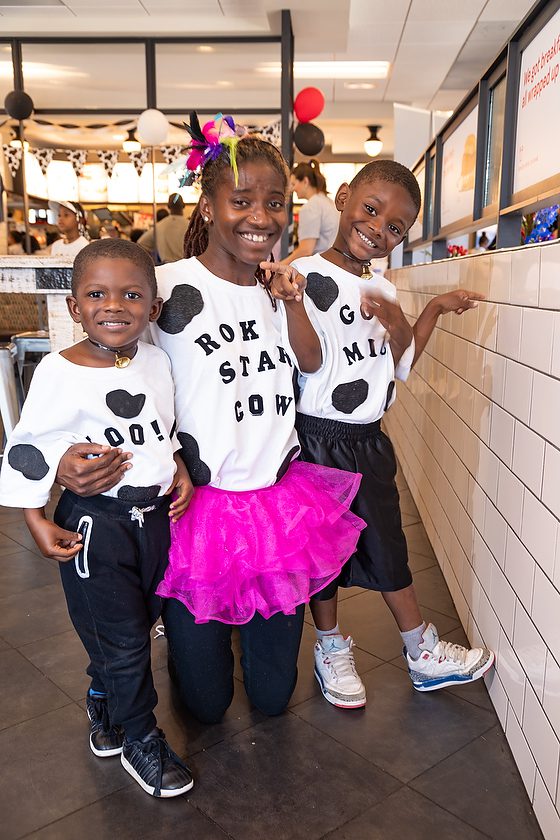
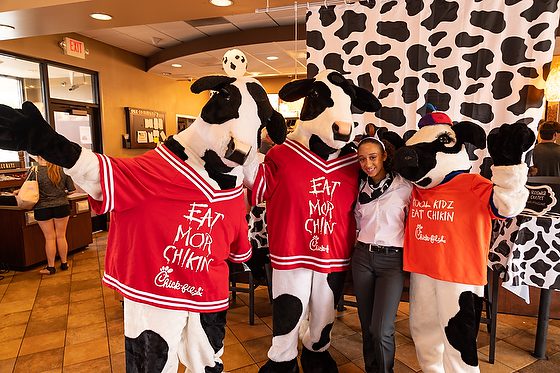
I enjoy Cow Appreciation Day each year. This year I went to five Chick-fil-A restaurants in Metro Atlanta, getting photos of customers dressed up as cows.

Chick-fil-A, known for its iconic “Eat Mor Chikin®” Cows, celebrated the 13th annual Cow Appreciation Day on Tuesday, July 11, 2017. On that day, Chick-fil-A restaurants nationwide offered a free entrée to any customer who visited a restaurant dressed as a cow.

Customers dressed up as cows for Cow Appreciation Day. [Nikon D5, Sigma 24-105mm, ISO 400, ƒ/5.6, 1/50 – Godox V860IIN + Godox X1NT]

I have learned over the years using off-camera flash improves so many photos, especially outside. This one of the customers inside, without the second, the visors would have made their faces much darker. The flash helped open up their faces.

Dorie Griggs, my wife, was my photo assistant for the day. She helped with carrying my light and keeping people from bumping into it, as well as people blocking the flash.

Another super important role she filled was helping me get the all-important Model Release.

A model release form is a legal document between you, the photographer, and the person or the person who owns the property you’re photographing). It is the written form of their permission allowing you to publish their image on your website, blog, and marketing materials.

You need permission to publish the photo for commercial purposes.

The Cows at Roswell Town Center celebrate Cow Appreciation Day 2018 in Roswell, GA. [Nikon D5, Sigma 24-105mm, ISO 400, ƒ/5.6, 1/2500 – Godox V860IIN + Godox X1NT]

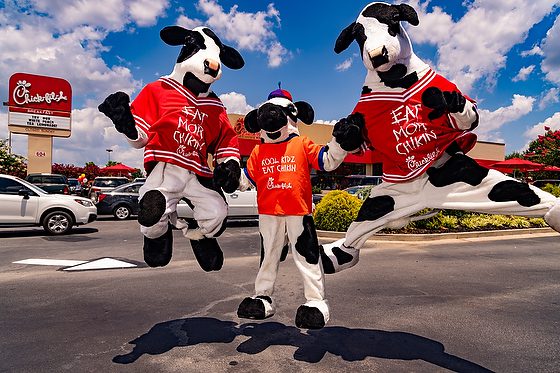
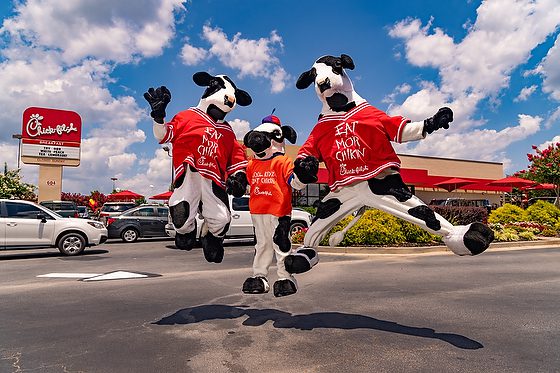
When I did the photo at the top, I first shot this photo of the cows jumping. Well, I didn’t expect the cow to leap with the feet that wide, and I cut off the feet.

My wife made a video of me taking this photo where you can see the off-camera flash Godox V860IIN that I am triggering with the Godox X1NT. Watch here, and you can see both images being made.

These flashes let me shoot at any shutter speed. This let me freeze the cows in the air. Remember that one of the best times to use flash is outside in bright sunlight.

Customers dressed up as cows for Cow Appreciation Day. [Nikon D5, Sigma 24-105mm, ISO 400, ƒ/5.6, 1/50 – Godox V860IIN + Godox X1NT]

Now shooting inside the flash will not overpower the available light when set on TTL. The flash fills in and gives that beautiful catch light in the eyes that make them sparkle.

NO FLASH [Nikon D5, Sigma 24-105mm, ISO 400, ƒ/5.6, 1/30]
Zoomed in view

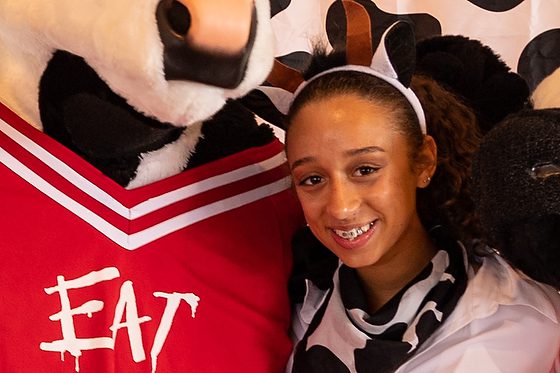
So you can see how the flash adds a little without significantly changing the photo; this first photo of the lady with the cows is without flash. Then look at the one with flash.

WITH FLASH [Nikon D5, Sigma 24-105mm, ISO 400, ƒ/5.6, 1/30 – Godox V860IIN + Godox X1NT]
Zoomed in view

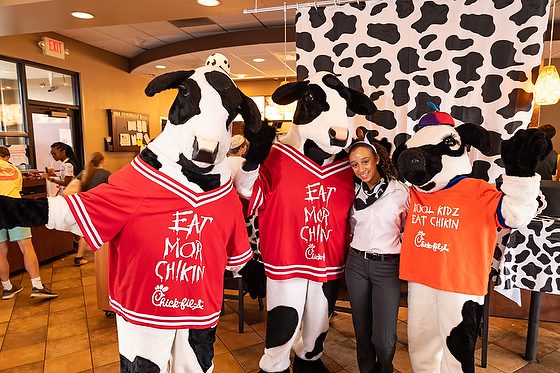
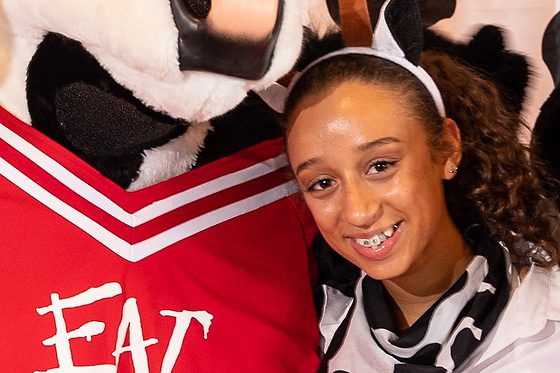
The most significant difference is that the shadows and blacks in the one with flash have more detail.

Customers dressed up as cows for Cow Appreciation Day. [Nikon D5, Sigma 24-105mm, ISO 400, ƒ/5.6, 1/200 – Godox V860IIN + Godox X1NT]

The Walk & Talk Photo Shoot

Nikon D3S, 28-300mm, ISO 200, ƒ/5.6, 1/1000

When you use the flash outside, you can get much better lighting on people’s faces.

No Flash

You can see the difference between these two photos. I demonstrated this technique in Kona, Hawaii, to the YWAM School of Photography class a few years ago. I shot this broad, so you can see how the assistant must walk with the people and stay slightly ahead but close to them.

Here I cropped out the assistant, which when I shoot a job, I have them out of the frame, so I do not have to crop. Hopefully, you can see how the lighting is helping the photo here.

Using Studio Strobe

I showed how to do this with hot shoe flashes and studio strobes. The advantage of the giant strobe was the ability to stay farther away from the subject due to a lot more powerful strobe.

Nikon D3s, 28-300mm, ISO 200, ƒ/14, 1/250

Before walking and talking, I showed the class how a fill flash-off camera works. Here there is no flash, and the subject is backlighted.

Nikon D3s, 28-300mm, ISO 200, ƒ/5.6, 1/8000

Here, just using the hot shoe flash-off camera, I could shoot at a faster shutter speed of 1/8000 due to the HSS [High-Speed Shutter] technology now available for most cameras. This let me darken the sky quite a bit.

I have found that getting the sun behind the subject allows the subject to stop squinting. Then by adding the flash off the camera, the light creates some modeling to the face and lighting up the front.

For the “Walk and Talk,” I ask subjects to stay very close to each other. I even say you should feel the other person touching you every once in a while. I also ask them to make eye contact. I generally have one person talk, and the other person listens.

Try this technique sometimes with your subjects. If you like, you can hire me to work with you or your group to teach this in a workshop.

How to give light to the darkness with volunteers working with NGOs

 
Nikon D5, AF-S NIKKOR 14-24mm f/2.8G ED, ISO 400, ƒ/8, 1/100–Neewer TT850, Neewer 433MHz Wireless 16 Channel transmitter [Exposure Bias: -4/6 EV]

This morning I was shooting volunteers pulling nails out of 2’x4’s. We started early morning because it was sprinkling and a downpour was coming. Meteorologists were predicting a stormy overcast day.

When people bend over and have on ball caps, this is the worst possible situation I can think of shooting where the natural light is working against you.

This morning I avoided getting this type of photo that I had at a football game. See how you cannot see the people’s faces. The light is from above, and when they are facing down, you have total black under those helmets, just like you have under the visor of a baseball cap.

My assistant took one of the Neewer TT850 flashes, and I had the transmitter that controls my camera’s power. Sometimes I was at 1/8 power and other times only needed about 1/64 power to fill in those shadows of the people working.

My camera is on the ground so that I can see their faces, and so is the flash. I asked the assistant to try and stay 45º to 90º from me to create a triangle. I am one corner, the subject is another, and the flash is the 3rd corner of the triangle.

I am also slightly under-exposing from 1/3 to 2/3 and even up to -1. The flash is kicking in and becomes the leading light on the faces.

Nikon D5, AF-S NIKKOR 14-24mm f/2.8G ED, ISO 180, ƒ/8, 1/100–Neewer TT850, Neewer 433MHz Wireless 16 Channel transmitter [Exposure Bias: -4/6 EV]

Had I used an on-camera flash, I would have gotten much better results than without a flash, but by getting the flash off the camera, I created more skin modeling and depth.

Just remember always to have a flash in case you need to do something similar to help the audience connect with the subject.

How to control brightness of the background when using flash

 
Click on the photo to see it larger.

By changing your ISO when using your flash, you can change the look of the background. For example, with the camera on a tripod and using Aperture priority mode, all I did between these three photos was change the ISO from ISO 100 [far left], ISO 400 [center], and ISO 2000 [far right].

I have the flash-off camera to the left, as shown in the diagram below. The flash setting is the normal mode. The flash is in the TTL model, so it is adjusted as needed to the scene.

Click on the photo to see it larger.

I did the same thing in these three and just changed one setting. The flash mode is set on “slow sync mode.”


As the ISO increases, the odds of you blowing out the subject with the flash will increase as you lower the ISO, the darker the background.

As you change the ISO, shutter speed is the only other setting changing since I am in Aperture mode. Now, unless you want a blurred image, you need to keep that shutter speed close to the lens’s focal length. If you have a 35mm lens, try shooting at 1/30 or faster. If you shoot with a 200mm lens, you need to be at 1/200 or 1/250.

I have the flash on the camera with a white dome and bounce for these photos. The images are so similar because the shutter speed adjusts to make the background match the foreground subject.

If these were not on a tripod, you would see much more blur with the first shot at 1/6 shutter speed.

ISO 100, ƒ/1.8, 1/6
ISO 400, ƒ/1.8, 1/25
ISO 6400, ƒ/1.8, 1/500

I suggest doing a few test shots in a room with your eye paying close attention to ensure the background is the ratio of brightness compared to the subject and that the shutter speed is high enough to give me a sharp image. This photo is where I moved the camera during the 1/3 shutter speed. You may want this look.

Are you controlling your camera, or is it controlling you? The more you understand how the camera works, the more creative you can be and decide for yourself what the look will be in the final product.


What is an environmental portrait and what is not


An environmental portrait is not something that has to be formal. I captured Philip Newberry, who had lost both legs and arms to spinal meningitis. Little Philip jumped up on the merry-go-round and was having fun and smiling at his parents. I just composed and had a great “environmental portrait.” of Philip.


This photo could also be used as an “environmental portrait” and may work better since I know a little more about Philip’s loss of feet and hands here. It helps tell the story. Again this is not a “Posed Portrait.”

Sometimes you may have to set up a portrait, as I did here in the man’s kitchen. I added a light to help them see his face better.

Think of setting up the photo without the man and then having the man sit down in the image. That is what I did here.

Vertical photo is often the mistake made by new photographers when they have been assigned to make an environmental portrait. Too often, young new photographers think the picture is the orientation.

They must think of their computer, and when they go to set up their page or print it, they remember there are a “Portrait” and a “Landscape” choices. These refer to vertical and horizontal and not a style of photography. For example, you can have a vertical environmental portrait, but it would not be this photo. Here I have eliminated most of the environment so that the surroundings tell us very little about the subject.

By composing the image so tightly around the subject, you have “eliminated” the environment.

Environmental Portrait Tips

  1. Think first of composing for the environment first. Then, find the angle that best captures the space for which the subject either: works, plays, or lives, for example. 
  2. The environment should be enough to communicate something about the subject.
  3. Let the subject move in the environment as naturally as they usually will if you are not there. Then, sit and wait and take photos until you have a selection of places where the subject has moved in the frame. 
  4. Look for the “moment” and not just the subject’s location in the frame. The moment is more subtle. For example, the subject may turn their head ever so slightly to the light that the light makes their face glow, or there is an expression that best captures their personality. 
  5. Just remember, people have many traits to their character, and the more you shoot, the better the chances you will have more options to choose from to capture the very best of the person.
  6. Use off camera flash, turn on a desk lamp or do something to help be sure you have the best light to help communicate more effectively. You don’t want a silhouette of the subject for an environmental portrait.
 
Here I believe the “expression” of the young boy is the strength of the photo. The environment tells a little, and I would have preferred more surroundings than I have.
 
 
Here I have a father with his children and wife in the background of his kitchen. The photo tells a little about the man that, had I cropped in tight, would have been left out.
 
 
I had very little time at this home, so hanging out in the room with this teenager until I could find a natural moment was not going to happen. However, I have traveled from Atlanta to Chiapas, Mexico, so I had to get what I could. 
 
As you can see, the window behind the teenager would have made him a silhouette, so I am using an off-camera flash to the far left pointed to his face.
 
 
Here I had him stand, and I moved the off-camera flash on a light stand to my right, his left, and then took more photos to show what a typical teenager’s room would look like in Mexico.
 
 
The man on the street is a new pastor who is starting work in the medical center area of Houston, TX. I took almost all my photos of him inside a hotel meeting room. Nothing in the room said “Houston.” I wanted to be sure I had something of him showing that he is working in Houston. 
 
The photo was my intro shot of Ben telling his story in Houston in a slideshow. Here you can see how I used the image to introduce Ben Hays in a package.
 

http://www.stanleylearystoryteller.com/BenHays/_files/iframe.html

Often in print, the space is so scarce that the environmental portrait is the only photo they will use. So you need to capture as much as possible in one picture to help tell a little about the person’s story and introduce them to the audience.

Here is a photo of Philip and Matt Moulthrop, who learned how to turn bowls from Philip’s dad Ed. I wanted to capture pictures of them with their bowls and photos of them making them.

The magazine used my photos in the article. As you can see, sometimes, they need to introduce the person to the audience. The bowls were just as important here, but this was an Alumni magazine package, so the people were the hook for the story.

Sometimes they use your photo as a vertical shot, as they did here for a magazine cover. Notice how this, too, is an environmental portrait.

Here are a few more examples for you and see where I sometimes used artificial light to help the photo.

While this appears to be natural light, it is not. Here is the lighting setup for the man at the desk:

My last suggestion is to use layers in the photograph when possible. Have things in front and behind the subject to create depth.

One light is often better than too many.

 
Nikon D3s, 14-24mm, ISO 400, ƒ/5.6, 1/500—Off-camera fill-flash using the Nikon SB-900. The flash is on the Pocketwizard TT5 and is triggered by the Mini TT1 on the camera with the AC3 to control the flash’s output.

I have been going through my files, preparing for next week when I teach lighting to photography students in Hawaii.

One of the tips we will discuss is learning not to light everything. So here in this photo, I just used the existing light, and the camera is set to -2 EV, and then I added strobes that are zoomed in to just light the subjects. So the strobes are set around +2 EV.

Nikon D3s, 14-24mm, ISO 400, ƒ/3.2, 1/400

Here is the same photo without the strobes. See how the strobes make the subjects “POP” and help saturate the colors.

Click on the diagram to see it larger

Here is the lighting diagram for the top image.

Nikon D3s, 14-24mm, ISO 100, ƒ/5.6, 1/250—Off-camera fill-flash using the Nikon SB-900. The flash is on the Pocketwizard TT5 and is triggered by the Mini TT1 on the camera with the AC3 to control the flash’s output. 

By underexposing the background, I am saturating the colors of the sky. Then the flash helps light the subjects to be correctly exposed and draw your eye to them.

Nikon D3s, 14-24mm, ISO 100, ƒ/5.6, 1/250
Click on the image to see larger.

With no strobes, these photos just don’t “POP” like I want them to do.

Nikon D3s, 14-24mm, ISO 100, ƒ/4, 1/200—Off-camera fill-flash using the Nikon SB-900 & Nikon SB-800. The flash is on the Pocketwizard TT5 and is triggered by the Mini TT1 on the camera with the AC3 to control the flash’s output. 

Now here is an example where using two lights on either side of the subjects starts to create what I call an “unnatural” light setup. Now they look like this is a painted background, and they are on some cruise ship where you get your photo made.

Nikon D3s, 14-24mm, ISO 100, ƒ/4, 1/200

If you want your photos with light to truly “POP,” remember not to light everything. Use light sparingly for more dramatic images.

Shooting in Honduras and need my flash in the sunlight

Nikon D4, 14-24mm, ISO 125, ƒ/14, 1/250, -1.0 EV—Off Camera Neewer TT850 using the Neewer 433MHz Wireless 16 Channel to control the flash.

I am down this week in Honduras working at capturing some stories for the NGO HOI. This is just a quick example of what I have taught a few times on the blog about how off-camera flash makes a HUGE difference in your photos.

Nikon D4, 14-24mm, ISO 125, ƒ/14, 1/250, -1.0 EV

This is what a lot of the tourist capture because first of all they never use a flash outside. There is enough light here why use a flash is their thought.

If your photos look like the one without a flash why would anyone hire you, they can do that without an expert photographer.

Underexpose a scene and flash just the subject

Nikon D4, 14-24mm, ISO 11400, ƒ/10, 1/100—off-camera flash using the Neewer TT850 flash & Neewer 433MHz Wireless 16 Channel Flash Remote Trigger with flash at 1/128 Power

You want your photos to pop, then light the subject but not everything else in your photo.

Where do you put the flash? Off camera and create a triangle between you the flash and the subject.

I continue to tell my assistants to just create a triangle and point the flash at the subjects face.

Nikon D4, 14-24mm, ISO 1800, ƒ/14, 1/100—off-camera flash using the Neewer TT850 flash & Neewer 433MHz Wireless 16 Channel Flash Remote Trigger with flash at 1/8 Power

I just shoot the photo and then look at the LCD on the camera. Couple things I am looking for in the photo.

I want to be sure my flash isn’t overpowering and washing out the skin tones. I do this by seeing the photo and checking the histogram. Here is the histogram for the photo above.

I am watching my shutter speed with the Neewer TT850 since it must sync at 1/250 or slower. I am also trying to be sure the background is not too dark or light.

I typically can just set the camera to -1/3 to up to -1 stop underexposed and then just watch the flash setting on the camera.

The radio remote will change the setting on the flash as long as they are on the same channel. Here the flash is set to 1/32 power. You can adjust the power from 1/128th to full power in 1/3 stop increments. Basically a lot of control.

Nikon D4, 14-24mm, ISO 1600, ƒ/14, 1/100—off-camera flash using the Neewer TT850 flash & Neewer 433MHz Wireless 16 Channel Flash Remote Trigger with flash at 1/8 Power

I have found the when I shoot on the Nikon TTL system I cannot control the flash in manual mode. So the flash is very inconsistent and depends on the scene. I was dialing it up or down by 3 stops, but now with the manual setting on the Neewer system I actually have more control.

I am giving up the high speed sync, but that is only necessary some of the time. Most of the time I prefer manual mode where I am in control.

Nikon D4, 14-24mm, ISO 110, ƒ/7.1, 1/100—off-camera flash using the Neewer TT850 flash & Neewer 433MHz Wireless 16 Channel Flash Remote Trigger with flash at 1/4 Power

I like using the light to direct the audience to what I think is most important in the scene. Available light tends to often light everything equally. I don’t like those type of photos.

Nikon D4, 14-24mm, ISO 100, ƒ/11, 1/160—off-camera flash using the Neewer TT850 flash & Neewer 433MHz Wireless 16 Channel Flash Remote Trigger with flash at 1/32 Power

See the photo above with the flash almost not even lighting the people. I then turn the power up to full and look at the difference.

Nikon D4, 14-24mm, ISO 1800, ƒ/14, 1/100—off-camera flash using the Neewer TT850 flash & Neewer 433MHz Wireless 16 Channel Flash Remote Trigger with flash at Full Power

I like the flash popping a subject out from the scene.

I also used the MagMod system to put a 1/2 CTO gel in front of the flash for all the photos.

Silhouette AND Reveal @ The College Football Hall of Fame Grand Opening

Nikon D4, 14-24mm, ISO 100, ƒ/8, 1/200—off-camera flash using the Neewer TT850 flash & Neewer 433MHz Wireless 16 Channel Flash Remote Trigger With Flash at Full Power

Nikon D4, 14-24mm, ISO 100, ƒ/8, 1/200 NO FLASH

I covered the Grand Opening of the College Football Hall of Fame downtown in Atlanta, Georgia. Here are a couple of photos from today.

To me, there is a HUGE difference between the two photos above. Don’t you agree?

I think your eyes go to the cheerleaders’ faces much more with the flash photo, where I believe the background draws your eyes first.

I like keeping my flash off-camera all I can, and my assistant is holding the flash off to my left and the Cheerleaders’ right.

Here are more examples of using the same technique. The only thing I am watching is keeping my shutter speed sync below 1/250 since I am using the Neewer flash, but I can shoot 600 full-power shots on one fully charged battery. I carried a second battery and barely had to use it.

Nikon D4, 14-24mm, ISO 100, ƒ/11, 1/200—off-camera flash using the Neewer TT850 flash & Neewer 433MHz Wireless 16 Channel Flash Remote Trigger with flash at Full Power

Chick-fil-A is the primary sponsor of the College Football Hall of Fame and was there giving out samples of their new grilled nuggets. Finding someone with a full tray took me a while because they were going so fast at the event.

 Here I wanted to capture them and the CFHOF behind them. 

Nikon D4, 14-24mm, ISO 100, ƒ/11, 1/200—off-camera flash using the Neewer TT850 flash & Neewer 433MHz Wireless 16 Channel Flash Remote Trigger with flash at Full Power

The Georgia Tech cheerleaders and the lady sampling the grilled nuggets were in the shade, and I “Revealed” them with the flash, or they would have been a “Silhouette.” 

Nikon D4, 28-300mm, ISO 125, ƒ/8, 1/200—off-camera flash using the Neewer TT850 flash & Neewer 433MHz Wireless 16 Channel Flash Remote Trigger with flash at Full Power

The light was splitting their faces on the stage where speakers like Bill Curry and Mayor Kasim Reed spoke. One side in direct sunlight and the other in the shade. Using the same small hot shoe flash, I had my assistant stand straight in front of them and give them a classic fill light. 

Nikon D4, 28-300mm, ISO 160, ƒ/8, 1/200—off-camera flash using the Neewer TT850 flash & Neewer 433MHz Wireless 16 Channel Flash Remote Trigger with flash at Full Power

For my departing shot of the day, I saw the ESPN College Game Day bus, but to show the College Football Hall of Fame behind it was challenging; the side of the bus was in the shade, but the CFHOF was in direct sunlight. So I just put the flash on the ground near the bus [I let my assistant go just before I saw this], and on full power, I was able to light up the Sports Anchors of the show on the side of the bus.

[NIKON D4, 14.0-24.0 mm f/2.8, Mode = Aperture Priority, ISO 100, 1/250, ƒ/8, (35mm = 19), off-camera flash using the Neewer TT850 flash & Neewer 433MHz Wireless 16 Channel Flash Remote Trigger with flash at Full Power]

A week from today, the show will be live inside the CFHOF during the Chick-fil-A Kickoff game between Alabama and West Virginia. Why did I use flash so much today? I knew there were be a LOT of media there. My client will be able to see their coverage as well as mine. Like the game of football, I needed to win the quality coverage contest and could not afford ever to have others outdo my coverage. I can afford them to match it, but I can’t afford other media to show better coverage, and I continue to be hired by clients.

Better bird feeder pictures with off camera flash

 
Fujifilm X-E2, 55-200mm ƒ/3.5-4.8, ISO 400, ƒ/5.6, 1/180

I love our birdfeeders. We have two of the Brome 1015 Squirrel Buster Classic feeders. They keep the squirrels from eating the seed, and the birds enjoy it.

When you start taking photos of the birds visiting outside the window, you often have to open up the ƒ-stop by 1 or 2 stops since the house is on the shade side of the bird. This technique can often blow out the background.

The solution is to add a flash, but I didn’t want an on-camera flash for a few reasons. First, it would create a glare if it was on the camera and shooting through the glass.

I put the flash down out another window and shot through another one. The result is what you see above.

I shot this with the Neewer TT850 flash [$104.95] and the Neewer 433MHz Wireless 16 Channel Flash Remote Trigger [$27]. Here is a photo of the system above.

While not a TTL solution, I find it works just fine. Even the TTL solutions have to be tweaked so often that I wonder if they are worth the extra money.

If the flash is too bright or dark, I just adjust the EV up or down on the radio remote, then push [SET], and it sets the flash. Of course, the flash must be on the same channel, but what is remarkable about this system is I can control up to 16 different channels. I have never shot anything with 16 flashes that I set at different power, but I guess I can if I want to.

Try this solution for yourself, and by the way, the technique will work on any camera with a hot shoe flash mount.

When you travel with Super Stars you need off camera flash to make them look good

Nikon D4, 14-24mm, ISO 100, ƒ/8, 1/250—Off camera fill-flash using the Nikon SB-900 & SB800.  The Flash is on the Pocketwizard TT5 and being triggered by the Mini TT1 on the Camera with the AC3 to control the output of the flash.

I am traveling with the famous Chick-fil-A Cow Mascots this week. They are traveling around promoting Cow Appreciation Day this Friday.

Click here to learn more

Dress head to hoof as they like to say at Chick-fil-A and get a free meal. Wear some Cow Attire and get a free entree.

Now let me tell you how I made the top photo. I had two VALS holding the two hot shoe flashes on either side of me. [VALS stands for Voice Activated Light Stand]

Without the flashes the cows would have been somewhat silhouetted and by adding the off camera flash I was able to keep the color temperature on them daylight and then also keep them bright enough to keep the rich colors in the background.

Nikon D4, 14-24mm, ISO 100, ƒ/6.3, 1/4—Off camera fill-flash using the Nikon SB-900 & SB800.  The Flash is on the Pocketwizard TT5 and being triggered by the Mini TT1 on the Camera with the AC3 to control the output of the flash.

Very similar lighting setup, just I am have a subject close to me blocking the light to the left. I dragged the shutter to 1/4 to be sure you saw the photo he was making on his phone.

Nikon D4, 14-24mm, ISO 100, ƒ/6.3, 1/4—Off camera fill-flash using the Nikon SB-900 & SB800.  The Flash is on the Pocketwizard TT5 and being triggered by the Mini TT1 on the Camera with the AC3 to control the output of the flash.

Here you can see one of my VALS holding the hot shoe flash. The other VALS is behind me pointing at the cow. If you look at the Cows eyes you can see the reflections of the two flashes. Notice the shadows on the concrete. This tells you they were all backlighted and the flashes made a huge difference.

Nikon D4, 14-24mm, ISO 100, ƒ/6.3, 1/4—Off camera fill-flash using the Nikon SB-900 & SB800.  The Flash is on the Pocketwizard TT5 and being triggered by the Mini TT1 on the Camera with the AC3 to control the output of the flash.

Here I am behind the flashes and you can see the other VALS here in the foreground. The other VALS is further to the left in the photo.

I don’t generally use these last two photos where you can see the flashes, but kept them to show to you so you can see how simple this is to do.

Cosmic Bowling & Off Camera Flash

Panasonic DMC-TZ5. ISO 1600, ƒ/3.3, 1/30

Here is a photo I took of bowling with a point-and-shoot Panasonic DMC-TZ5. I love the camera, and it had a great Zeiss lens. ISO limit up to about 1600.

It is the type of photo most people will get at the bowling alley during cosmic bowling without a flash.

Nikon D3, 14-24mm, ISO 200, ƒ/2.8, 1/4 with off-camera flash

I shot this of my daughter bowling a few years ago with the Nikon 14-24mm lens at 14mm. The flash and I are close to my daughter bowling. The flash is about 45º to my left. I panned, and the shutter was dragging.

I set the camera on Aperture priority and the flash to slow sync to pick up on all the ambient light. The panning action created the streaks you see across the image.

Nikon D3, 14-24mm, ISO 1250, ƒ/4, 1/15 with off-camera flash

Because the flash is so close to the subject and exposure is set by TTL [Through The Lens] metering, it shuts off and is just winking a light. The camera shutter remains open, picking up the available light in the background, so it doesn’t go black.

Nikon D3, 14-24mm, ISO 1250, ƒ/2.8, 1/15 with off-camera flash

The cool thing about using Slow Sync on the flash is I am capturing the room’s atmosphere, and the flash is putting light on the subject’s face. Just look at that first photo here, and you will see they would be a silhouette without the flash.

My suggestion is to go and try this with your friends. Go to a Cosmic Bowling Night and have some fun. I can tell you will enjoy the images for years to come.

More off-camera flash posts:

Apr 05, 2014
I prefer the off-camera flash any day to the pop-up flash on any camera. I have written many articles on it here on the blog. Just put the phrase “off-camera” in the search field I have on the blog, and you will see many posts …
Jul 05, 2013
Here is a list of what I recommend for those wanting to do off-camera flash with the Nikon TTL system and using the Pocketwizard radio system to fire the flashes. Of course, you can substitute another Nikon TTL or off-brand if you wish to …
Jul 14, 2014
Exposing to the subject can often blow out the background. The solution is to add a flash, but I didn’t want an on-camera flash for a few reasons. First, having it on the camera and shooting through the glass would create a glare. I put the flash
 
Jul 09, 2014
Without the flashes, the cows would have been somewhat silhouetted, and by adding the off-camera flash, I was able to keep the color temperature in the daylight and then also keep them bright enough to keep the rich colors 
Apr 14, 2012
By combining off-camera flash and having people moving, I get two great results; great expressions and good color. The first thing I started with on the assignment was a group photo, but the best results as far as 
Feb 25, 2013
Here is how to use off-camera flash and gels to change the look of the sky. When I get this kind of situation on a cloudy day in Kona, Hawaii, sometimes I fix it with flash. Using an off-camera flash, I set the flash to be 2-stops over the available light and the 
Apr 10, 2012
When I first wrote about doing off-camera flash I realized I needed to come back to this and highlight some points. ISO, Shutter Speed, Aperture, and +/- There are a few things that will affect you getting proper exposure. Let’s set 
 
May 21, 2011
Three things make me choose my Nikon Speedlights over the manual flash: 1) I have no sync speed limitations, 2) quick—I don’t have to pause to take readings and then set the camera, and 3) I can shoot at very 
Jul 06, 2012
You can trigger the off-camera flash in many different ways. I often use the Nikon SU-800, which uses infrared to activate the off-camera flash. I chose to use the PocketWizard Mini TT1 on the camera with the AC3, which lets me …
Jul 05, 2012
I also used my Gitzo carbon fiber tripod to keep the camera rock steady so that I could shoot these at dusk. This way, everyone’s eyes were open and not squinting on the beach. To trigger the flashes, I had the PocketWizard Mini