Shooting Video with your DSLR (Part 4)

Chick-fil-A Kickoff
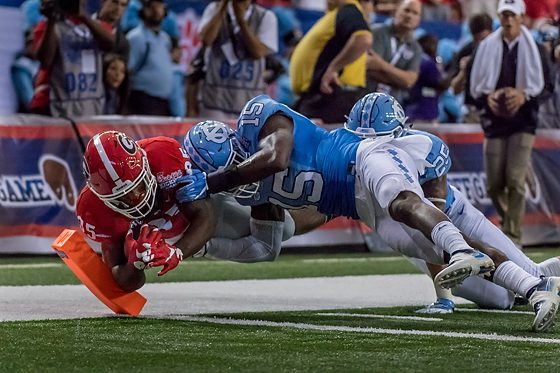
Georgia Tech vs Tennessee

Scoring a touchdown is about knowing where your goals are in the game.

Before the football team steps onto the field, they will practice for many months together. When they execute a play, they know what they are doing and trying to accomplish to win the game.

Alan Alda interviews Rob Michelson about the Aerial Robotics competition he oversees at Georgia Tech.

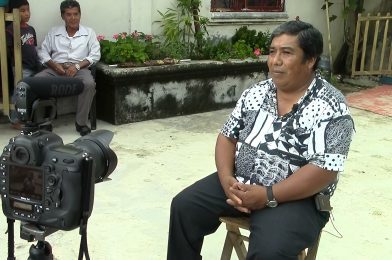
Before you turn the camera on and start your interview, you must practice. You need to interview your subject, and from what you learn, you formulate your questions so that the responses help convince the audience of what you want them to know, just as a lawyer does to convince a jury of what they want them to learn about their client.

You do not want to sit down, turn the camera on, ask the subject, “What is your story?” and expect them to give you a brief, well-thought-out presentation.

Get to know your subject

Even before you sit down and talk to the subject for the first time, do all the research you can on the subject. Sometimes there have been other interviews with the person you can read or watch.

Other than learning about the subject being the person, learn all you can about the story’s topic. If they are a coffee farmer, then learn all you can talk about coffee.

The more you know, the better questions you will ask. I like to say you are peeling an onion. Each question gets you closer to the core of the onion.

You are not just asking questions to find out everything about the subject. You are trying to find the thread that will keep someone interested in them as you reveal more and more about them to the audience.

The Bourne films are a series of action spy thriller movies based on the character Jason Bourne, a CIA assassin suffering from extreme memory loss who must figure out who he is.

To keep the audience’s attention and pull them into your story, you may often hold out on the juicy part of the story towards the end as they did in the Jason Bourne movies.

Your Goal

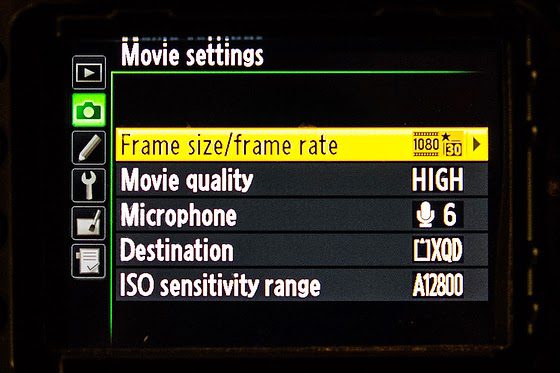
You know you are ready for the on-camera interview when you have your storyline figured out from your informal discussions.

Like a lawyer who calls witnesses and interviews them to reveal in their own words the content that will help build the storyline so that the jury has no choice but to make the right call. Like a lawyer, you may need to put different people on the witness stand to help build your story.

Now it is pretty standard that even when you have done all your homework, in the camera interview, subjects can surprise you with new content that improves or even complicates the story.

Be flexible and be sure you are listening to what they are saying.

Ideally, it would be great if someone could tell you what you need and leave out all those trails that lead nowhere. I have found time and time again that towards the end, I have asked them to summarize what we just talked about, and they often, in one take, say precisely what I need.

Georgia Bulldog’s Freshman Running Back #35 Brian Herrien Scored his first collegiate touchdown. At the same time, UNC’s Safety #15 Donnie Miles could not stop him during tonight’s Chick-fil-A Kickoff Game, September 3, 2016, at the Georgia Dome.

You see, it can be just like a football game. The players have practiced so often that the coach calls the play, and you get the touchdown.

Shooting Video with your DSLR (Part 2)

In Part 1, I suggested the gear you need for your DSLR/Mirrorless camera to do video. This post will do with some basic settings I recommend for the camera when doing a video.

Nikon D5 Video Settings

Camera Video Settings

On my Nikon D5, The Frame Rate, Resolution, and Frame Size all show up in the upper right-hand corner of the Live View on the LCD. We need to address all three.

Resolution – I recommend Full HD 1920×1080

While there are many other resolutions like 2K, 4K, 6K, and even 8K, I believe they are overkill for web distribution. Even my friend Ben Smallbone whose credits include the movies: Priceless, Taken, and Steve McQueen: American Icon, to name a few of his movies told me that when it came to distributing their films to movie houses all over the country, they said not to give them anything bigger than 2K.

There are two resolutions in the video, just as there are two resolutions with stills. You have the capture setting and the exported resolution.

While you can shoot, say, at 4k for similar reasons, you would shoot RAW. Your computer must be a top line to process the 4K files. Unless you want to crop in on your video in post-production, I believe there is little to gain for the average project to shoot higher than the Blue Ray Full HD 1920×1080 resolution.

Frame Rate – I recommend 24 Frames per Second

Here is a good video showing why 24 fps is an industry standard for movies.

24 FPS is the Cinematic Look that is used in motion pictures. There are reasons to shoot other FPS, and one worth mentioning is to shoot super high rate to slow down for that “Slow Motion” effect.

Shutter Speed – I recommend 1/48 or 1/50

As a rule of thumb, you want the denominator of your shutter speed to be approximately double the number of frames per second that you are recording. For example, when shooting at 25fps, your shutter speed should be 1/50 of a second. If you have the 24fps and do not have a 1/48, then pick the closest frame rate, like 1/50 or 1/60.

Manual Mode – Shoot this rather than Aperture, Shutter or Program mode

If anything on the camera is automatic, your exposure can change when something changes in the frame, like your subject moves a little. The camera may think the lighting has changed, and it hasn’t. Shoot manual mode and manual focus as well.

Look – use Neutral

You can pick a picture color mode in the video, just like stills. There are modes on most cameras like Standard, Vivid, Monochrome, Portrait, and Neutral. If your camera doesn’t have a Neutral setting, then pick Standard.

When we cover your post-production, you can do more with a Neutral setting than with Vivid. More on that in later posts on making videos with your DSLR.

Nikon D5 Audio Level

Audio Recording Settings

You want to have your recording levels set manually and not automatic for the same reasons for the video. When someone stops talking, the Auto level will increase the volume and introduce noise.

Most levels on cameras or a separate recording device like the Zoom Digital Audio Recorders have a way to show you it is too loud.

Most video editors agree that the overall audio level of your audio mix (all of your audio combined) should be normalized between -10db to -20db. I level my videos around -12db with occasional peaks to -8db.

What this means for me on my Nikon D5 is I want the level to peak right up to the last line before it goes red. I have a person talk for a while and then set the sound recording level before recording.

I recommend doing a test video for sound. Set your video settings to get good exposure and audio levels for good sound. Record 30 seconds to a minute and then download to your computer and play using Quicktime or other video software that came with your computer.

Play something on your computer to test sound like the music you downloaded. After setting your speakers for proper volume when listening to your music, play your video. You must change your recording levels if you have to adjust the volume to hear the recording. The biggest problem is if it is too quiet or if too loud and giving you distortion.

Headphone Volume

Be very careful that you are not using the headphone volume as a way to see if the audio level is set correctly. Use the levels for audio the same way you use a histogram. Once you put those levels, adjust your headphone volume to where you can hear adequately.

Picking a location to do an interview

When picking a location, you need to pay attention to two things: 1) Sound in the location and 2) lighting/visual.

I recommend turning on your microphone, putting your headphones on, and listening to the environment. Are you trying to do an interview next to a waterfall or water fountain? That will prove to be difficult to impossible.

Finding a tranquil location would be “ideal,” but not always possible.

Make finding the perfect location weighs sound quality over visual.

Stay tuned for more.

Shooting Video with your DSLR (Part 1)

Nikon D5 headphone and microphone jack

I am breaking down the topics you need to cover to start shooting a video with a DSLR. Part 1 will protect the essential gear you need. My assumption is you are interested in Storytelling.

The interview of a subject on camera is the staple of most storytelling. The gear I recommend will help you get a good discussion on video.

You can do many levels of production when recording video with your DSLR. I am taking the approach here to start you as a one-person band doing the show all yourself.

The starting point for all videos is sound. People will not watch a video with poor sound. Sound is the foundation for your production.

Nikon D5 headphone and microphone jack

I recommend not trying to video unless you have a microphone and headphone jack. The microphones built into the camera would only really work for recording interviews within the selfie distance to the camera.

The basic understanding of recording sound for the video is the get the microphone as close to the sound as possible. I use a wireless lavalier system. The system I use costs $500.

Shure FP15/83 Combo Wireless System, H5

You can buy a wired lavalier for under $50. Buy one with a long cable for interviews.

The second principle to understand is that you need to isolate what is being recorded; the best way to do this is with closed-back headphones. Here is what I use.

Sennheiser HD 280 Pro Circumaural Closed-Back Monitor Headphones

You also need a good tripod to keep the camera still. A Pan & Tilt Fluid Head on the tripod is better than a bare head.

Google your camera using a microphone and headphones. Many cameras may have a microphone jack but not a headphone jack. There are some ways to work around that for your camera. Sometimes you will find you need to upgrade your camera.

You can add more gear, but I believe this is the basic kit necessary to create a video.

In other blog posts, I will discuss different microphones, lighting, and gear to help you move your camera during a shoot.

I will also cover the software you need to edit.

Stay tuned.

How to Video Capture more than 29 minutes with a Nikon D5

Fuji X-E2, Fuji XF 55-200mm, ISO 1250, ƒ/5, 1/100

Last night I photographed, and video captured the show Oklahoma! Just a last-minute push to encourage you, if you are in Roswell, GA, to come and see the play. Runs through the weekend. Go here to buy your tickets or at the door.

For video capture, I attached to my Nikon D5 using the HDMI output the Atomos Ninja Blade 5″ HDMI On-Camera Monitor & Recorder.

Why I do, this is a great question. Most all DSLRs that record video have a 30-minute time limit. I understand this has to do with avoiding a double tax in some countries.

So how do you record a musical as I did that goes an hour and a half for just the first Act? This is where the Atomos Ninja Blade comes to the rescue.

Atomos Ninja Blade 5″ PRODUCT HIGHLIGHTS

Key Features

  • 325DPI, 5″ IPS 1280 x 720 capacitive touchscreen monitor/recorder.
  • Waveform RGB & luma parade, vectorscope with zoom, and test pattern generator.
  • Adjustable gamma, contrast, and brightness.
  • HDMI input and output.
  • Real-time monitoring, playback, playout to a PC or Mac with QuickTime, and edit logging.
  • Focus peaking, 0-100% zebra, and two modes of false color monitoring.
  • Records 10-bit, 4:2:2 in ProRes or DNxHD.
  • S-Log / C-Log recording.
  • Trigger REC/STOP from camera (Canon, Sony, ARRI, Panasonic, RED, JVC)
  • Timecode from camera.
  • 2.5″ HDD/SSD media storage.

It records up to 1080 30p/60i resolution via HDMI to an available HDD or SSD using either Apple’s ProRes or Avid’s DNxHD codecs. Recording at 10-bit with 4:2:2 color sampling, this unit provides a monitoring and recording solution in one compact battery-powered unit.

I bought the ADATA Technology 256GB Ultimate SU800 SATA III 2.5″ Internal SSD card.

This setup worked great for last night’s opening night performance.

Fuji X-E2, Fuji XF 55-200mm, ISO 1600, ƒ/4.7, 1/100

While the Nikon D5 will record 4K, I don’t need this most of the time, so the Atomos Ninja Blade 5″ was perfect.

If you want to record at 4K, you can get the Atomos Shogun Flame 7″ 4K HDMI/12-SDI Recording Monitor. They make other higher-end models as well.

Opening Night for Oklahoma! [NIKON D5, 120.0-300.0 mm f/2.8, Mode = Aperture Priority, ISO 5000, 1/250, ƒ/5.6, (35mm = 600)]

If you are not a video shooter and are more of a stills shooter, you need to use more hands-on techniques for capturing video.

What I mean by this is that the exposure and sound vary through a production; you may need to adjust this as you are recording.

With the Nikon D5 attached to the Atomos Ninja Blade, using the HDMI port, siphons this off before it hits the H.264 encoder, and you are recording in ProRes format. This isn’t registering in the RAW video but is more like a TIFF file than a JPEG.

Now I cannot share Oklahoma! Video because of copyright. [I am recording it for the Shuler Awards in Georgia]

The cool thing is you can now buy the Atomos Ninja Blade 5″ for $395 without a hard drive which gives you the 5″ monitor. I would recommend purchasing an SSD hard drive of your choice in size.

Nikon D5, Sigma 120-300mm ƒ/2.8 DG OS HSM | S, Sigma TC-2001 2x, ISO 5000, ƒ/5.6, 1/250

There are three more performances for me to tweak my exposure and sound to capture the best quality possible from my setup. At the same time, each version traditionally gets better each time.

Fujifilm X-E2, Fuji XF 55-200mm, ISO 2000, ƒ/5, 1/100

By the way, Aunt Eller is my daughter Chelle. This is her senior year and last production. She also taught the choreography to the cast.

Fuji X-E2, Fuji XF 55-200mm, ISO 1000, ƒ/4.5, 1/100

I hope these tips will help you think of ways to use your DSLR to do more than take photos. I wanted to use the high-quality CMOS chip to get an excellent keepsake video of our daughter to cherish for the rest of her life.

Stanley’s Compact Lighting kits for the road


Here is my lighting gear for travel when flying.

  • (2) Manfrotto 5001B Nano Black Light Stand – 6.2′ (1.9m)
  • (2) Interfit Metal Umbrella Bracket with Adjustable Flash Shoe
  • (2) Cowboystudio 33-inch Photography Studio Translucent Shoot Through White Umbrella
  • (2) Neewer TT850
  • (2) Neewer 433MHz Wireless 16 Channel Flash Remote Trigger
  • (2) ThinkTank Strobe Stuff
  • (2) MagMod flash modifier system
  • Gitzo GT0531 Mountaineer 6X Carbon Fiber Tripod Legs – Supports 11 lbs (5kg) & Manfrotto ball head.
  • ProMaster XC525 Tripod
Just keep it simple.
 
 
When Shooting Video, I just bring in my suite case these two lights.
I also bring one extension cord to use with the lights as well.
 
There is a simple light kit to travel the world shooting stills and video. 
 

Are you stuck in Ground Hog Day like Bill Murray’s character Phil was in the 1993 movie?

Back in 1993, Bill Murray and Andie MacDowell starred in Groundhog Day. It was a story where a weatherman repeatedly found himself living the same day.

He is learning from his mistakes and even intentionally makes terrible choices due to his bad attitude.

While I would love to wake up each day looking like I did in college, that just isn’t happening.

Here I am with my Nikon FM2 and the Nikkor 80-200mm ƒ/4. The ƒ/2.8 would come later.

The lesson of Groundhog Day was elementary; you don’t get 2nd chance, so do your best to make your actions positive. You reap what you sow, as the saying goes.

“Moore’s law” is the observation that the number of transistors in a dense integrated circuit has doubled approximately every two years. The observation is named after Gordon E. Moore, the co-founder of Intel and Fairchild Semiconductor, whose 1965 paper described a doubling every year in the number of components per integrated circuit,[note 1] and projected this rate of growth would continue for at least another decade. In 1975, looking forward to the next decade, he revised the forecast to doubling every two years. – Wikipedia

From 1975 until a couple of years, this still holds pretty true. Moore’s law had an incredible impact on the rest of society and particularly on photography.

In the last 14 months, Sony has introduced 11+ top-end mirrorless cameras. A few years ago, we were talking about short-duration flash to stop objects, and now we are talking about High-Speed Sync as a way to stop action using strobes.

photo by Robin Rayne Nelson

Education

How much have you spent on gear the last few years, and then how much have you spent on education? Most of us would benefit by spending more on education than on equipment.

Here are some great educational opportunities I recommend, for example:

photo by Robin Rayne Nelson

I believe the best way to learn is by doing and having someone with you teaching you as you are doing. The workshops I lead are about hands-on experience and the instructors speaking about your project as you work on it. Bill Murray’s character Phil in the movie Groundhog Day used the repeat of a day as a workshop where he learned from his mistakes. Since Groundhog Day movie is fictional, we have to look for other ways to learn how to make the best choices so we can stop the insanity of not growing but just feeling miserable. I would love to work with you and help you develop some new skills to help you be better prepared and anticipate what clients need. Give me a call or write to me so I can save a spot for you this January in Chiapas, Mexico.

Nikon D4 Video Settings

This is based on my experience, and others may have other suggestions that might contradict my comments.

I recommend a few settings when shooting a video on your Nikon D4. When this becomes critical, you decide to shoot multiple cameras and need everything to match when you get into post-production.

I think editing RAW images in Adobe Lightroom and getting ideas to match from different cameras is much easier and more accurate than using the video editing software of Adobe Premiere or Final Cut Pro X.

Before you go to the Movie settings on the camera, I recommend creating a menu bank for Video, as I have done here. This way, once you have made all the settings, they are saved.

In the movie Settings, choose your Frame Size/Frame Rate. The standard Frame Rate for movie theaters and TV is 24 fps.

When you pan or right to left, you will see Frame Rate affect the look and feel of the image. The public is so used to 24 fps that this is the best default. Some use 30 fps.

People often shoot higher Frame rates to make a slow motion by slowing it down to 24 fps.

Your shutter speed on the camera should be set to twice the Frame Rate for the movie settings. If you shoot 24 frames, you will be at 1/60 since this is the closest. If you hit 60 fps, then 1/125 should be your setting.

I usually shoot on 1080/30fps and set it for high quality.

Most of the time, the microphone setting must be set manually, and the sound levels must be used to adjust the recording volume. I highly recommend using headphones and looking at the audio meter on the viewfinder. Be careful because the recording level and the headphone volumes are set separately.

I have my color space set on Adobe RGB. You also want to set the Picture Control, then.

Some of this is personal preference, but the key is if using more than one camera, all the settings are set the same, or you will have trouble matching the Video, and color can look off switching between the cameras.

You can adjust your microphone levels and exposure when you go to Live View in movie mode. To prevent light entering via the viewfinder from interfering with exposure, close the viewfinder eyepiece shutter.

It would help if you went to manual mode to have the most control over the settings. A subject’s movement can change the exposure even when the light stays the same. Use manual mode.

As you can see from this chart, you can control more in manual mode.

Regarding focus, I use autofocus when I have a subject framed and then go to the manual guide.

The motor for the lens tends to make a noise I don’t want to pick up.

Microphone

I recommend using a Lavalier microphone for interviews, and for natural sound and quick-moving situations, I recommend a shotgun microphone.

Here is an earlier blog post I did to help you with the audio recording.

Stills + Video | NOT Video OR Stills

 
A client wrote to me the other day. Here was her question:

CLIENT:  A production company did a video on cup recycling, and I noticed this evening that if we could get stills from the video, we’d actually have most of the images we need. I recall you saying once that stills from video on are not high res/print quality. But I went back and asked, and they assured me because they shot it in high def, they could create hi res stills. In your opinion, is that accurate?

I responded first with these two sentences:

STANLEY: First I am really impressed you remembered my comment. My comments were not so much about the resolution, but how they are shot. 

Then I went on and talked about these points below here. But to inspire you to read on, here was the client’s response to my comments:

CLIENT: This is AWESOME, Stanley. I hear every word of what you are saying. All  of it. I am taking it to heart and will influence this on my own team.

Aesthetic
Video is about movement, and stills are about a moment. So you need to preplan if you are the one doing stills and videos. Often many moving shots are not very compelling when you freeze them to one frame from that movement.
Getting both by one is impossible is why on every movie set has a still photographer. Capturing stills is slightly different than the video. 
 
The Technical
If the video camera is 4k, you might have a high-resolution image that is usable. However, if I were to grab a frame from my video DSLR camera, it still isn’t the resolution when the camera is set for still photography.
Today many crews use a 4K camera that is a usable high-resolution still image for print and the web. I want to be sure the image is sharp. Sometimes, the sharpness of a single frame isn’t that noticeable during the movement until you grab just one frame.
If you like the image in the video and it was shot on a 4K video, then the frame may work.
Know who is pitching to you
There is way too much emphasis on video. Those promoting it are selling themselves on this as a replacement to stills—BIG MISTAKE!!!
Those motion capture guys [new name for videographers] that are promoting this as a replacement are showing a lack of industry knowledge.
The News Media
The news media have gone through many changes due to digital and, most importantly, since 1995, the web.
 
For the first ten years, the issue that slowed the progress was the bandwidth. It took a while to get us from dialing up to the ability to stream HD video on the web.
Once the ability to deliver video became possible, many naïve PR folks started to think this was the new standard and that the still image was dead.
I recommend it before reading. Further, you go to these television websites where you expect the video to be king. Take a moment and do the following.
  1. When looking at the main page, notice how many images, in general, are used and how big the photos are as compared to the text.
  2. Pay special attention to the visual promotion of a video link.
  3. Click on a few of those links to the videos.
  4. How often did the still image you clicked on show up in the video?
  5. Do your survey of a few of the stories on the website.

Here are the links. I recommend that you take a few minutes to do your research and then come back and read the rest of this blog. [FYI, to avoid copyright infringement, I did not copy the screens and post them here]

Newspapers even realize after trying to lead with video for a while that the numbers don’t lie. People will click on the still image galleries more than they will watch a video.
A good article addressing the use of stills as engaging  Photos on Facebook generated 53% More Likes Than the Average Post.  
Notice that even when all these news articles talk about Photos and Video, they are using only stills or graphics for engaging you and not video Photos and videos drive the most engagement on social media.
My point is you have video production companies overselling and burning chunks of your budget on video when your media may need that but need still first. Video is in addition and not a replacement for stills.
So think about it this way. You have the opportunity to supply all that an editor needs to post to their website in the way they post their own stories. Sure, they may grab a frame from a video in a pinch, but this is the exception and not the rule for even TV.
PR needs to start supplying the package as the media shoots it. Way too many PR firms continue to operate the way they did in the 1970s. They continue to pitch, assuming new media outlets have the budget to come and cover their event. Instead, get them to like the story and let them go and cover it; that was the mentality back 30 years ago.
Today is 2014, when their slashing budgets. I worked at Georgia Tech, where we supplied the entire package. Text, Stills, and Video for packages are standard all over the media. On average, we were in the AJC every day of the year. 
Georgia Tech is still ranked one of the top schools, and it had a great deal to do with the PR office I worked in for more than ten years created. John Toon, director of communication for many years, was the master of getting stories placed. He knew not to pitch something just because a researcher or professor wanted it promoted. Instead, he vetted those requests and helped get the crop’s cream.
When John Toon’s material went to a news director’s desk, they opened it because he was known for giving them great content, and in a way, they could use it with minimal effort or budget.
Both—Not Either/Or
Please don’t hear me saying don’t use video and stills instead. I am saying you need stills and video. I think video production companies do a disservice when they tell you they can do it all, and they never have their material in significant magazines or news outlets regularly.

Many of these companies produce high-end videos used in meetings and events. Their work is superb. But it isn’t what the media creates and runs. 

How will your audience see your photos?

Print

When you shoot for print, especially a magazine, you will compose some photos for the cover. As a result, you leave a little more space than you would have if you had not been trying to make room for the text that needs to be on the cover.

Most editorial photographers benefit financially if the photo runs bigger and for how many images they use in the printed piece. Getting a double-truck [two total pages–side by side] also will give you more money. Here you have to consider the gutter, where the two pages are divided.

Sometimes they use one photo that bleeds off the pages or sometimes a grouping like here above. However, most designers are aware of the gutter and minimize this effect on the image.

Knowing you are shooting a photo story, most pros will do all they can to make the images so good that the editor feels the account must be on the cover and get extra pages. More variety helps the storytelling, and the photographer benefits from a more extensive paycheck.

The designers used to joke with my mentor, Don Rutledge; they thought he had templates inside the viewfinder to help him help them with the layout. But, really so many variables in situations that for any position, he usually had a cover shot, a double truck, some variation of the double truck, and then some tighter shots for impact.

Computer

Today the most likely place your photos will be on the web. The web is a horizontal space, and the general rule of photography is to fill the camera’s frame and watch the corners. The flat area also applies to your photo when filling the hole the designers are working with on the computer screen.

Here is how a vertical shot will look in the space for a designer. The horizontal layout for the desktop is the space it would fit within a video. The video format is about 16:9 in proportion.

Now the photo of the man here is the full 3:2 frame from the camera placed inside the 16:9 format with no cropping. While this is much better, the designer would prefer to fill their space, and so does the video editor.

I suggest shooting a little looser, giving some room for cropping. Some photographers will even put guides over the LCD screens to help them with their framing.

If you want to grow your business, be the guy that not only shoots for the use that the project is intended for but to meets other uses. Thinking beyond the immediate need is excellent stewardship because you can show the client that they can now use your photos for many different things, from brochures, newsletters, displays, PowerPoint, websites, and more.

Besides understanding the proportions, you need to consider what the audience uses to view your work. Knowing your audience is where your demographics can help you plan the coverage better.

You need to consider photos in a video on a website. Now, if your audience is mainly going to the web through a desktop or even laptop, you would shoot this differently than if they are using a Smartphone.

Shoot tighter if the experience is on a mobile device like an iPad or iPhone. For example, a panoramic shot with a person in the corner doesn’t read well on a 3″ screen. A smaller screen is where intimate photos of faces and objects are better for the space.

Think of how you tell time. Be sure the face of the clock fits the space to be able to tell the time.

As you can see, the photo of the watch makes it easy to tell the time.

As you can see in this photo, the watch and clock are about the same size. So if you want to see what time it is, get closer than this photo. In a video playing full speed on an iPhone, this image would lose its ability to communicate.

Are you asking the client, “What is the end use of the photos?” If not, you need to do this, and then you need to plan to be sure your photos make the best use of the space. 

Is all your company communication treated the same?

Are you a good steward of your communication budget for your company? What am I asking?
First, we need to understand what stewardship is all about. Webster’s Dictionary defines it as “the conducting, supervising, or managing of something; especially:  the careful and responsible management of something entrusted to one’s care.”

This week’s headlines and spreading all over the web, “Corporate profits almost double the historical norm.” Check out this article by Jay Bookmen on it here.

When things are going well, and you are not pinching pennies, you are most prone to wasteful spending.

Be strategic and plan out your corporate communications. Do this using the pyramid above. Every corporation has main objectives for the year, and other things still need to be done but are always behind those key initiatives.

A Level 

In your top category, put those things that are the most important. Now, this is where you will dedicate more time, space, and budget to communicating this than all the other items. For example, you would have this lead or be in every newsletter you send out. You will make videos here because you know you will use those over and over again. You commit to writing about this in different ways. It may even be a special place on your company’s main webpage.

B Level

These are items that, had it not been for those in A Level, would be. You commit to only communicating regularly on these topics, maybe once a month in the newsletter rather than the weekly newsletter. You will make fewer videos on this because they will not get used as often.

C Level

This level means that you are committed to the topic and may do a quarterly story or project to keep this in the company’s mind.

You still may do a few pieces that do not fit in A, B, or C, but those are more of a one-off and not committing the resources at a level to tax the budget. You may also have departments coming to you for help, but if they don’t fit into the plan, you may turn them away, explaining how they are not part of what the company has decided as a priority. Maybe they fund that themselves.

Possible Scenario

Your company is rolling out a new product. You decide to produce a video for the company’s internal people to get everyone on board. In addition, you choose to use this piece in the annual, quarterly, and department meetings. Due to the wide use of the project and its importance, you want to be sure it is a high-impact piece. In addition, the production quality is essential for large screens.

Contrast this to one of the many C Level projects that go up on your company website every week and come down after a week. Do you commit the same production level to something with a short life span?

Gold, Silver, or Bronze

Many companies like a certain quality of video when producing what amounts to a small Hollywood Film. The problem is they are making this quality all the time when the simple newscast quality we see each night on the six o’clock news would work as acceptable and perfect for communicating our message.

Consider in your communications about creating levels of product and when using them for your tiered communication strategy. For example, you may have a newscast, documentary, and Hollywood-produced videos all used in the A Level. However, you may only have documentary and newscast quality in the B Level. You may be okay with using a newscast quality or non at all for the C Level.

Being a good steward is putting the right resources to accomplish the goal. Don’t overdo it, even if it is A Level.

Just because you have the money, don’t always spend it all. Instead, pay what you need and no more.

Nikon D4 Audio recording in video mode

While I read all the manuals, it takes some practice to refine your results when shooting with any camera gear.

My first recommendation is to choose manual sensitivity on your microphone. When the microphone is set to Auto, and your subject stops talking, the Auto setting will crank up the gain [volume], introducing noise or hum in the background.

After much trial and error, I have noticed that if you move above seven on the microphone setting, you will introduce noise.

My recommendation is to buy an external microphone. I have two. I usually record all my interviews with two cameras. One camera that is pointed straight onto the subject has the shotgun Røde Video Pro microphone on that camera. The second camera, left or right of the primary camera, has a wireless lavalier Shure FP1 microphone. WL183 (Omnidirectional): Recommended for general purpose sound reinforcement, recording, or remote monitoring applications. Low handling noise. Pickup angle: 360 degrees. Clip on the subject and keep it close to their mouth. 

Both of these microphones work with DSLR video cameras. First, they have a stereo 1/8″ plug to put the mono sound on both channels. Next, both of these microphones let you boost the gain so that the sound coming out of the microphones, so you do not have to turn your gain up too high on the camera.

The Røde microphone has a +20 dB gain. I recommend using this setting and then listening through your headphones to adjust the input gain level. By doing this, you will avoid most of the time going above the seven gain level on the Nikon D4.

On the Shure FP1 lavalier, there are transmitter and receiver gain controls. My mistake early on was I only adjusted the receiver. If you turn both of these up, just like with the Røde microphone, you can avoid going above seven on the gain setting with the Nikon D4.

If you continue to find that you need more than seven regularly, you need to get an amplifier on the line to increase the volume so you can keep that number lower than seven on the Nikon D4.

You may want something like the Beachtek DXA-SLR PRO HDSLR Audio Adapter, which will let you increase the volume so you can keep the gain level lower on the camera.

Multimedia is the way to go when going back in time

I am working on a project this year where I am interviewing graduates of the IMPACT 360 gap year program located in Pine Mountain, Georgia.

The audience for these videos is high school graduates who have not gone to college or have completed only one year of college, as well as their parents.

While there are many questions that this audience will have depending on their situation, there are a couple of questions that most will have for a person who completed the program.

I think the best question about anything you do is WHY? Why is the question that gets to the heart of most any story? Why should the audience care?

So the first question I asked Nathan McFarland was why he chose the IMPACT 360 gap year program.

The second question was how did IMPACT 360 help him in his ultimate purpose for college–getting a job.

The last question I wanted him to address was how this impacted his college plans. Did this one-year gap program add more time to his college years?

I wrote to Nathan, gave him the overall questions, and asked him if he could try and answer these questions in two or three minutes.

The first take was great, except for people walking by and talking over him. After that, the only reason I needed to do more takes was so I could get my assistant to help keep people quiet for the three-minute interview. So take a look and see what we did for this interview.

Thank goodness for the Ken Burns effect. While Ken Burns did not invent this technique, he made it famous with documentaries like the one he did during the Civil War.

Here is a screen grab from Final Cut Pro X, where I edited a still image into the video. The great thing about this technique is you can find photos of people before you talk with them. So, for example, we asked Nathan for pictures of himself at Florida State University that we put into the package, and IMPACT 360 had some photos of Nathan in the program that we also included.

The effect of moving around a still image helps create a motion that helps move the story along. You do not need to use this; sometimes, it works against you. I think sometimes we overuse this technique, but it is helpful.