
In Part 1, I suggested the gear you need for your DSLR/Mirrorless camera to do video. This post will do with some basic settings I recommend for the camera when doing a video.
Camera Video Settings
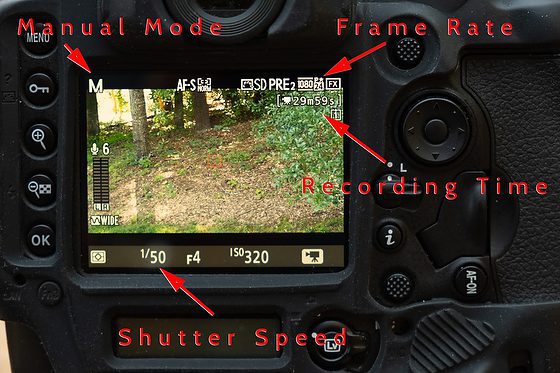
On my Nikon D5, The Frame Rate, Resolution, and Frame Size all show up in the upper right-hand corner of the Live View on the LCD. We need to address all three.
Resolution – I recommend Full HD 1920×1080
While there are many other resolutions like 2K, 4K, 6K, and even 8K, I believe they are overkill for web distribution. Even my friend Ben Smallbone whose credits include the movies: Priceless, Taken, and Steve McQueen: American Icon, to name a few of his movies told me that when it came to distributing their films to movie houses all over the country, they said not to give them anything bigger than 2K.
There are two resolutions in the video, just as there are two resolutions with stills. You have the capture setting and the exported resolution.
While you can shoot, say, at 4k for similar reasons, you would shoot RAW. Your computer must be a top line to process the 4K files. Unless you want to crop in on your video in post-production, I believe there is little to gain for the average project to shoot higher than the Blue Ray Full HD 1920×1080 resolution.
Frame Rate – I recommend 24 Frames per Second
Here is a good video showing why 24 fps is an industry standard for movies.
24 FPS is the Cinematic Look that is used in motion pictures. There are reasons to shoot other FPS, and one worth mentioning is to shoot super high rate to slow down for that “Slow Motion” effect.
Shutter Speed – I recommend 1/48 or 1/50
As a rule of thumb, you want the denominator of your shutter speed to be approximately double the number of frames per second that you are recording. For example, when shooting at 25fps, your shutter speed should be 1/50 of a second. If you have the 24fps and do not have a 1/48, then pick the closest frame rate, like 1/50 or 1/60.
Manual Mode – Shoot this rather than Aperture, Shutter or Program mode
If anything on the camera is automatic, your exposure can change when something changes in the frame, like your subject moves a little. The camera may think the lighting has changed, and it hasn’t. Shoot manual mode and manual focus as well.
Look – use Neutral
You can pick a picture color mode in the video, just like stills. There are modes on most cameras like Standard, Vivid, Monochrome, Portrait, and Neutral. If your camera doesn’t have a Neutral setting, then pick Standard.
When we cover your post-production, you can do more with a Neutral setting than with Vivid. More on that in later posts on making videos with your DSLR.
Audio Recording Settings
You want to have your recording levels set manually and not automatic for the same reasons for the video. When someone stops talking, the Auto level will increase the volume and introduce noise.
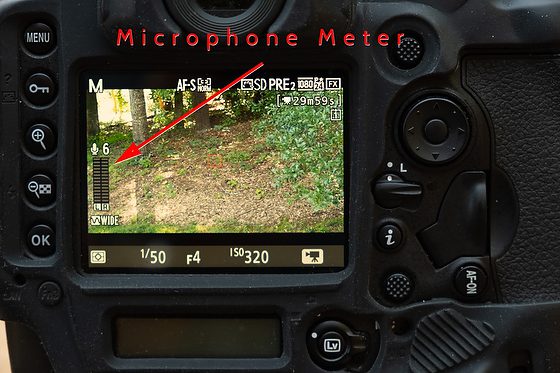
Most levels on cameras or a separate recording device like the Zoom Digital Audio Recorders have a way to show you it is too loud.
Most video editors agree that the overall audio level of your audio mix (all of your audio combined) should be normalized between -10db to -20db. I level my videos around -12db with occasional peaks to -8db.
What this means for me on my Nikon D5 is I want the level to peak right up to the last line before it goes red. I have a person talk for a while and then set the sound recording level before recording.
I recommend doing a test video for sound. Set your video settings to get good exposure and audio levels for good sound. Record 30 seconds to a minute and then download to your computer and play using Quicktime or other video software that came with your computer.
Play something on your computer to test sound like the music you downloaded. After setting your speakers for proper volume when listening to your music, play your video. You must change your recording levels if you have to adjust the volume to hear the recording. The biggest problem is if it is too quiet or if too loud and giving you distortion.
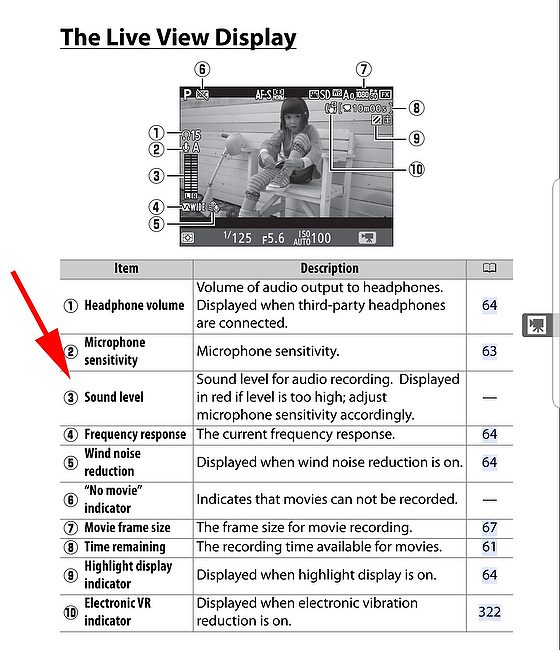
Headphone Volume
Be very careful that you are not using the headphone volume as a way to see if the audio level is set correctly. Use the levels for audio the same way you use a histogram. Once you put those levels, adjust your headphone volume to where you can hear adequately.
Picking a location to do an interview
When picking a location, you need to pay attention to two things: 1) Sound in the location and 2) lighting/visual.
I recommend turning on your microphone, putting your headphones on, and listening to the environment. Are you trying to do an interview next to a waterfall or water fountain? That will prove to be difficult to impossible.
Finding a tranquil location would be “ideal,” but not always possible.
Make finding the perfect location weighs sound quality over visual.
Stay tuned for more.