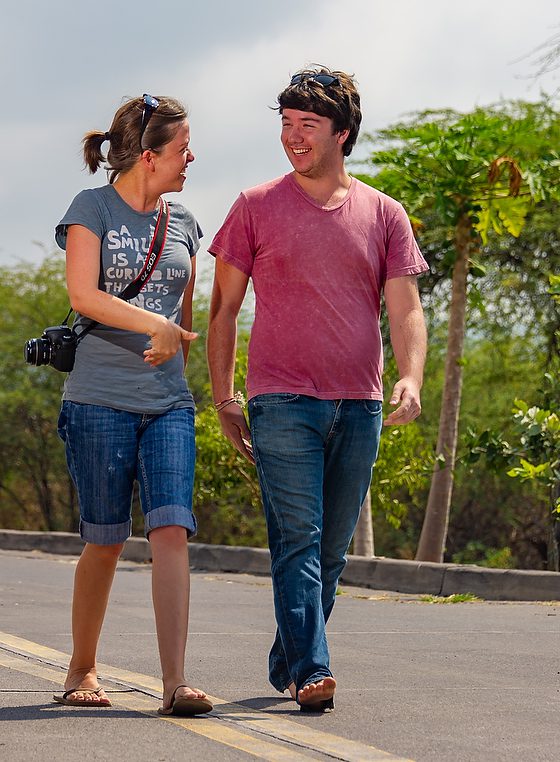
Reading Time: 3minutesNikon D3S, 28-300mm, ISO 200, ƒ/5.6, 1/1000
When you use the flash outside, you can get much better lighting on people’s faces.
No Flash
You can see the difference between these two photos. A few years ago, I demonstrated this technique to the YWAM School of Photography class in Kona, Hawaii. I shot this broad so you can see how the assistant must walk with the people and stay slightly ahead but close to them.
Here, I cropped out the assistant, which, when I shoot a job, I have them out of the frame, so I do not have to crop. Hopefully, you can see how the lighting is helping the photo here.
Using Studio Strobe
I showed how to do this with hot shoe flashes and studio strobes. The advantage of the giant strobe was the ability to stay farther away from the subject due to its much more powerful strobe.
Nikon D3s, 28-300mm, ISO 200, ƒ/14, 1/250
Before walking and talking, I showed the class how a fill flash-off camera works. Here, there is no flash, and the subject is backlighted.
Nikon D3s, 28-300mm, ISO 200, ƒ/5.6, 1/8000
Due to the HSS [High-Speed Shutter] technology now available for most cameras, I could shoot at a faster shutter speed of 1/8000 using the hot shoe flash-off camera, which let me darken the sky quite a bit.
I have found that getting the sun behind the subject allows the subject to stop squinting. Then, by adding the flash off the camera, the light creates some modeling of the face and lights up the front.
For the “Walk and Talk,” I ask subjects to stay very close to each other. I even say you should feel the other person touching you every once in a while. I also ask them to make eye contact. I generally have one person talk, and the other person listens.
Try this technique sometimes with your subjects. If you like, you can hire me to teach this in a workshop with you or your group.
SOBERING statistics published earlier this month show that the annual rate of suicide in the US has risen by almost 28 percent between 1999 and 2016.
I believe this is affecting businesses as well as individuals.
Both celebrities, Anthony Bourdain and Kate Spade committed suicide this month and helped open the can of worms many people today are experiencing. That topic is depression.
For this topic, I believe many of us are experts. Almost everyone will go through events that cause upheaval and crisis.
Depression causes one to look for relief. Unfortunately, many who are dealing with addiction start with depression.
I believe that in today’s economy, companies are showing signs of depression.
Today many are trying to be the one-person band and do it all. Just look at some advertising campaigns that are not as cohesive as everywhere.
When you are depressed, you are prone to reach for things that give you pleasure but are not always the best. Ask any addict.
So many of us are looking for Likes or comparing our life to other people’s Facebook feeds.
We have gone from liking a post to loving, laughing, wow, sad, and even mad.
We are losing our compasses on how to navigate life. Instead, we are now looking to measure what is good or bad based on skewed analytics.
Opioids are primarily used for pain relief, including anesthesia. Many in business reach out for things like an opioid to make them feel better. That person has more followers than us. Let’s hire them. They can make it better. Remember, opioids not only can relieve pain, but they can also anesthetize you. I think many in business today are operating in a fog.
Communications departments have moved away from a solid story to choosing to use work based on the content providers’ social media feeds of likes and several followers.
Teaching in college and workshops, I experience more students who feel like they are already good photographers based on their social media likes from friends.
Brandon Stanton, the creator of Humans of New York, said, “Photography felt like a treasure hunt, and even though I sucked at it, I’d occasionally stumble upon a diamond. And that was enough to keep me wanting more.”
Stanton’s success is based on one simple truth–Everyone Has A Story!
People were drawn to his storytelling, which led to his massive following, but he didn’t go out and find someone doing something and copy it. Instead, he just went with his interest in the people on the streets of NYC. At first, he focused on visually exotic people, but slowly he discovered that everyone had a story.
Instead of trying to find the next “Cool Trend,” why not go with storytelling?
Stories allow the listener to learn vicariously and discover lessons seemingly on their own.
Stories make us feel a part of the situation.
Storytelling is tapping into people’s emotions that will help you to influence or persuade them.
Stories build connections between people. Those who tell stories are the ones making solid connections with their audience.
Storytelling is powerful because it engages the entire brain. A story, if broken down into the simplest form, is a connection between cause and effect.
Let me work with you and make your stories visual to be more engaging.
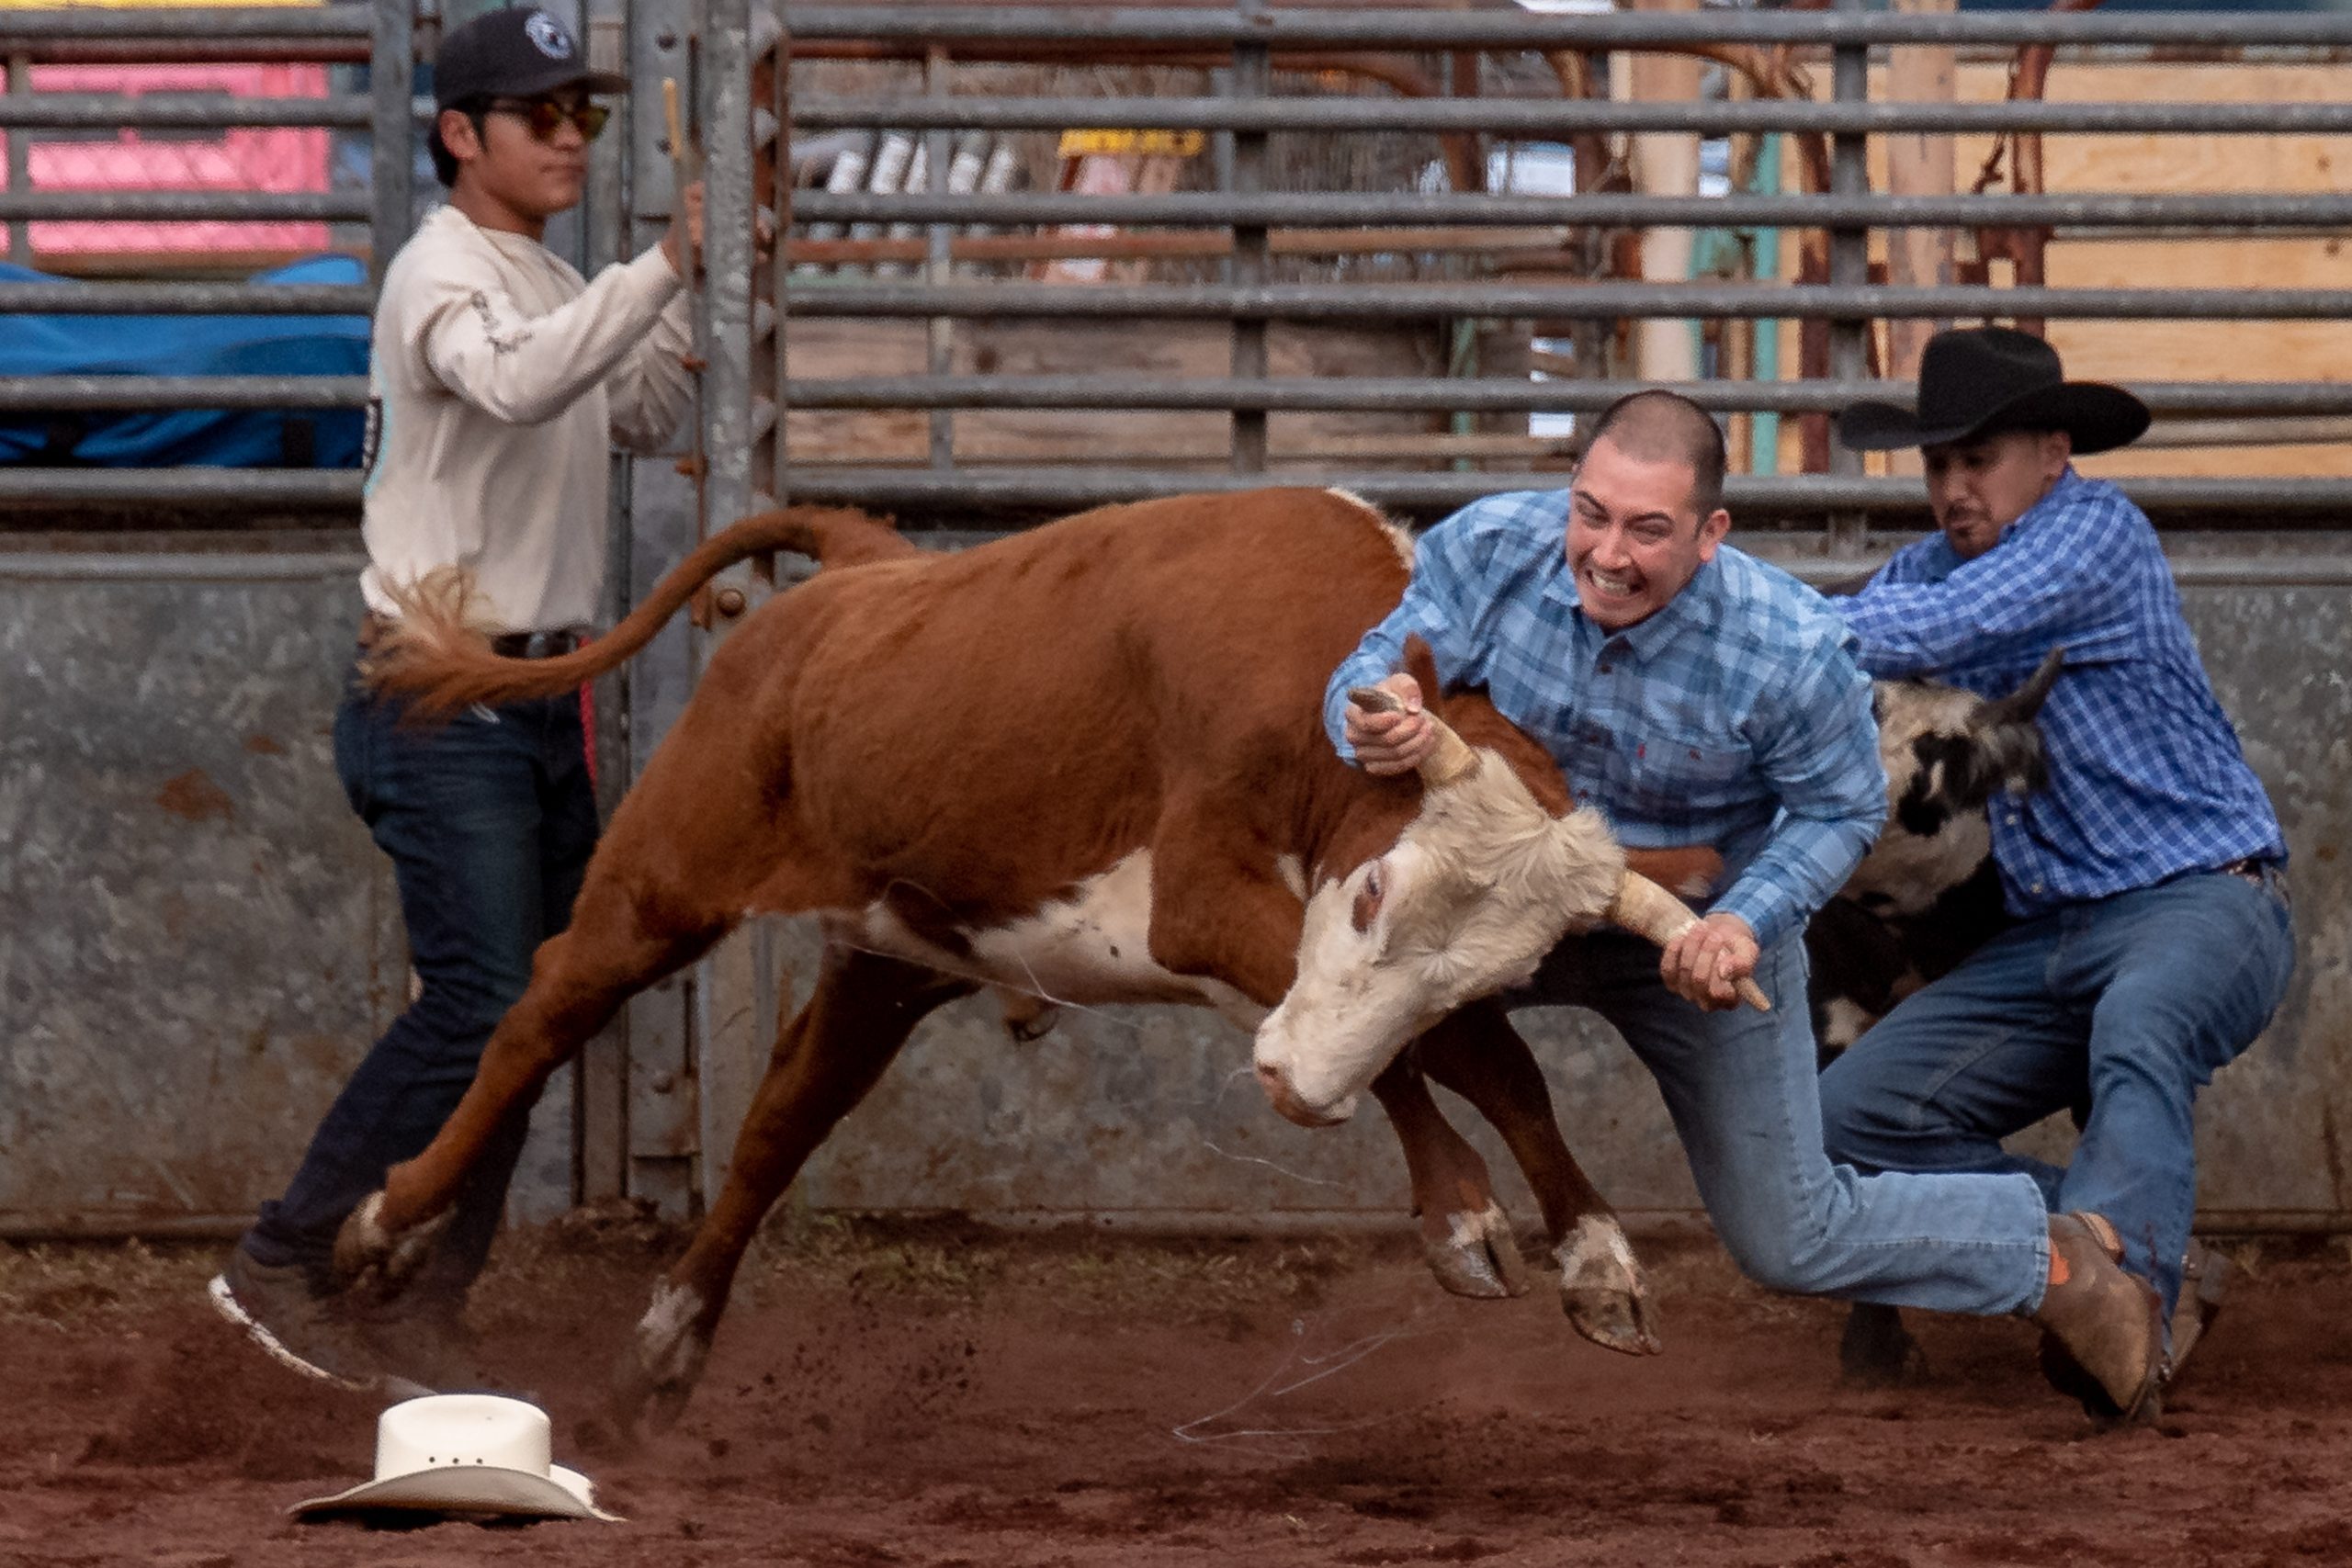
Cowboys compete in steer wrestling at the 27th Annual Pana’Ewa Stampede Rodeo put on by the Hawaii Horse Owners in Hilo, Hawaii, on February 18, 2019. [NIKON D5, 28.0-300.0 mm f/3.5-5.6, ISO 1600, ƒ/5.6, 1/4000, Focal Length = 210]
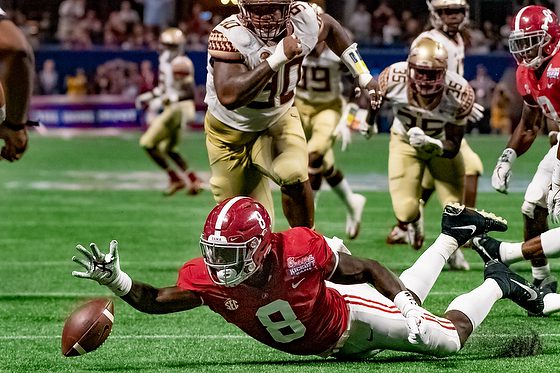
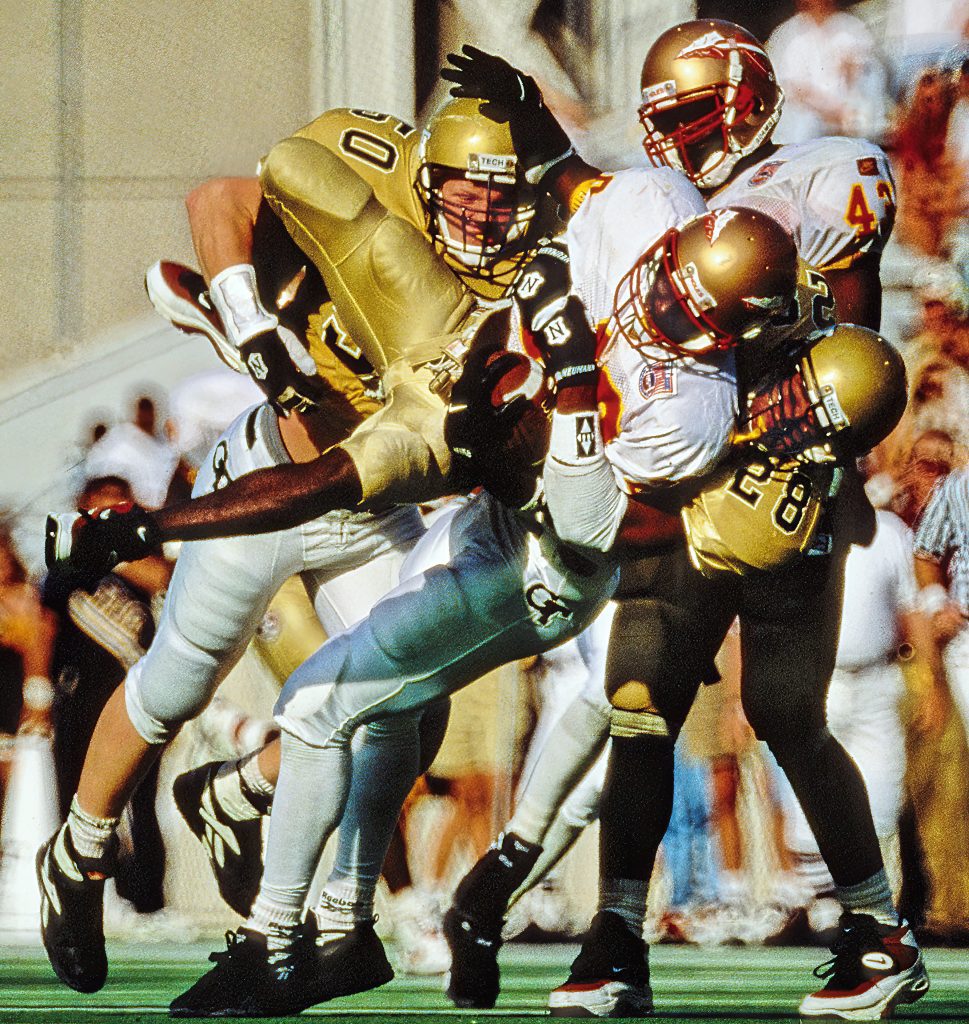
Alabama linebacker (8) Dylan Moses recovers a blocked punt. No.1 Alabama defeated No. 3 Florida State 24-7 in the Chick-fil-A Kickoff Game, the first college football game ever to be played in the new Mercedes-Benz Stadium. [Nikon D5, Sigma 120-300mm ƒ/2.8, TC-2001, ISO 16000, ƒ/5.6, 1/2000]
The number one problem with people’s photos has always been blurry photos.
The four leading causes of blurry photos are:
The subject moves while the shutter is open
The camera moves while the shutter is open
Out Of Focus
The Depth Of Field is too shallow
Addressing the first two by using a proper shutter speed.
If you have a 200mm lens on your camera, then the slowest you want to handhold the camera to take an in-focus photo is 1/200.
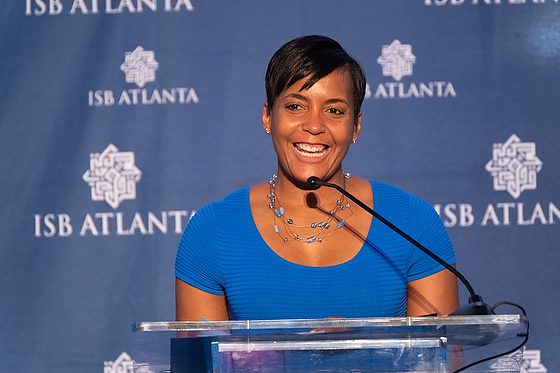
Mayor Keisha Lance Bottoms speaks at the Ramadan Iftar with ISB Atlanta [Nikon D5, Sigma 120-300mm ƒ/2.8, TC-2001, ISO 6400, ƒ/5.6, 1/100]
Now, in this case, where the mayor of Atlanta, Keisha Lance Bottoms, is speaking,g I am on a tripod shooting at 600mm. Since she is not moving all that much, I was able to shoot at 1/100 because the camera is on a tripod.
When you are shooting something where the subject is moving, and the camera is moving to capture an image, as in sports, you need a breakneck shutter speed.
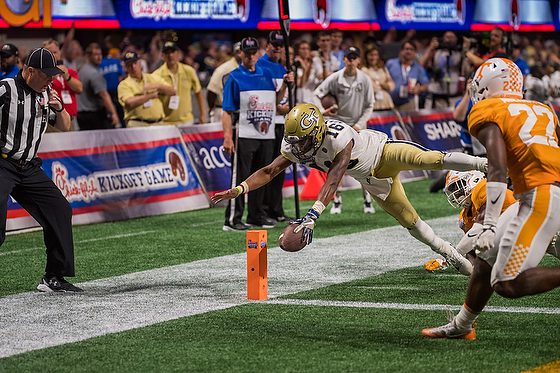
Chick-fil-A Kickoff Georgia Tech vs. Tennessee [Nikon D5, Sigma 120-300mm ƒ/2.8, ISO 5000, ƒ/2.8, 1/4000]
In this photo, the football players are moving very fast. Over the years, I realize I need to speed up the shutter speed to get sharp images.
When I started shooting sports with film, the highest ISO I could shoot was ISO 1200. Film’s ISO kept me shooting around 1/500 for most sports.
[Nikon F4, Nikkor 500mm ƒ/8, ISO 1/100, ƒ/8, 1/500]
Only during day games was I able to get genuinely razor-sharp images.
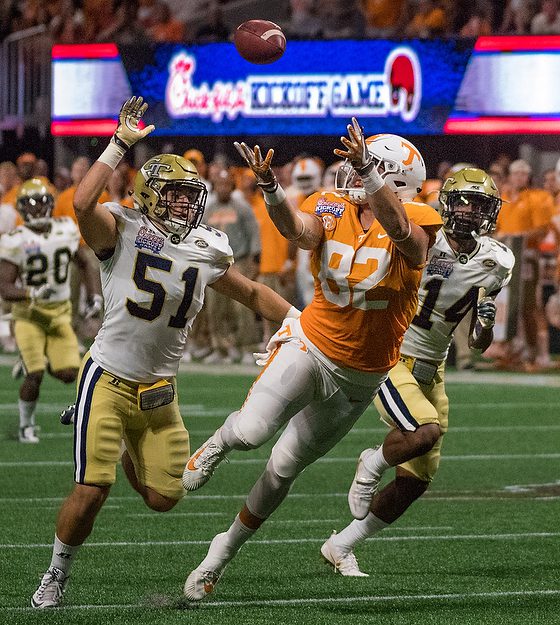
Tennessee’s tight end (82) Ethan Wolf is pursued by Georgia Tech’s linebacker (51) Brant Mitchell, who drops the pass during the Chick-fil-A Kickoff at the new Mercedes-Benz Stadium in Atlanta, GA. [Nikon D5, Sigma 120-300mm ƒ/2.8, TC-2001, ISO 18000, ƒ/5.6, 1/4000]
Besides shooting at 1/4000 shutter speed, I am also using a monopod.
Daniel Shirey has a photo assistant working with him during the game.
Most photographers on the sidelines of a football game use a monopod to help steady the camera.
Out of Focus
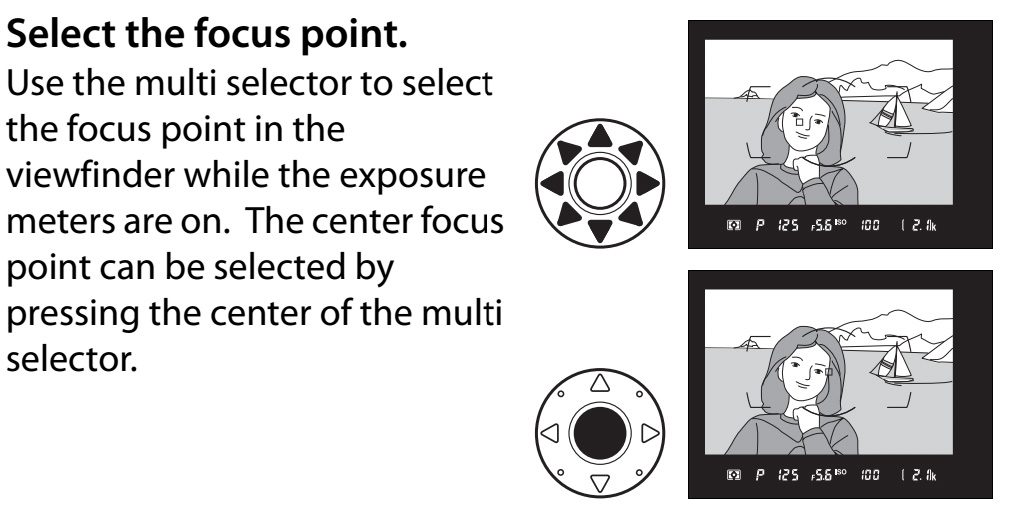
If your subject isn’t moving that much, like my person speaking, start by switching from multi-point to single-point focusing. There is either a joystick or pad on many cameras that lets you move your focus point around. Move this to the person’s face and as close to the eyes as you can.
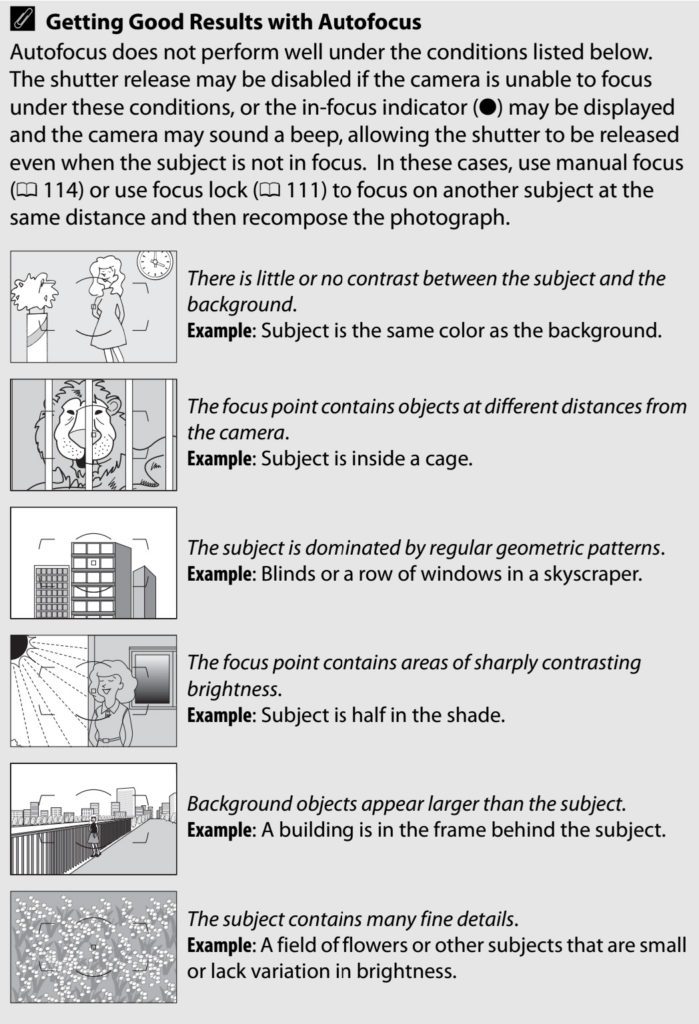
You need to know that your camera has limits and that certain situations are difficult for the camera’s technology to work correctly. Here are some for you from my Nikon D5 camera manual.
Too Shallow Depth-of-Field
If your lens is wide open at an aperture of ƒ/2.8 or wider ƒ/1.4, then the depth-of-field is relatively shallow. The other piece affecting this is how close you are to the subject.
The closer you get, the more depth of field will get even shallow.
The top-of-the-line cameras tend to have the best focusing systems, which will track subjects allowing you to get that razor-sharp image. In addition, combining the best quality lenses and cameras can let you shoot wide open and get sharp photos.
However, if you cannot afford a 300mm ƒ/2.8 lens and have a 300mm ƒ/5.6 lens while you think that the depth-of-field is greater, your photos may not be in focus because the lens is too dark for the camera sensors to focus.
The other problem is a fast lens, but the focus system is struggling to keep the subject in focus. Difficulty focusing is where you close down the aperture to give you a little more wiggle room in the depth-of-field that your photos are still sharp.
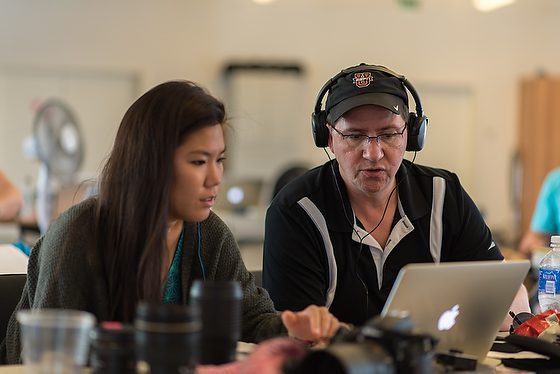
Keziah Khoo gets some help from James Dockery, editing her story in Adobe Premiere Pro.
B-Roll
B-roll is supplemental or alternative footage intercut with the main shot in film and television production. These can be still images, videos, and even graphics.
Your video’s overall goals and pace should help determine the length of your B-roll shots. Say you have a longer support video demonstrating a specific process to your customers. Those illustrative shots might be 20 to 30 seconds long, depending on what you’re trying to achieve.
A still image up for 20 – 30 seconds can be made more interesting by zooming in or out and panning across the image. The Ken Burns effect is a type of panning and zooming effect used in video production. The name derives from the extensive use of the technique by American documentarian Ken Burns.
Just like music has a beat, most interviews have a similar feel. The very best editors have a good feel for finding that beat and pacing to then know when to start and stop B-Roll clips.
Hawaii Tropical Botanical Gardens [Fuji X-E2, 18-55mm, ISO 6400, ƒ/8, 1/80]
Literal vs Abstract B-Roll
When I took a course in church music during my seminary days, the professor helped me understand how a creative [organist, for example] can help lead people in worship. He divided music that an organist plays when people are coming into worship, leaving, or during the service can be literal or abstract.
When the organist plays “Amazing Grace,” this is literal because people so know the song that they begin to sing it in their heads and sometimes even out loud when they hear the music.
However, if the organist starts to play something like Mendelssohn wrote, which is often music that isn’t associated with words, then the people can let their minds wander. The organist can create a mood, but how the people hear it individually will let their minds wander. This is an abstract type of music.
I suggest using a literal B-Roll when you can show something that relates directly to what the person is talking about. For example, if they are talking about their parents, a pan across their dresser with photos of them works pretty well.
Now often during interviews, people talk about things in the past or even the future. This is where abstract B-Roll usually works great.
When someone reflects on growing up somewhere, this is a great time to use nature shots from that area. It is like helping the audience dream with them as if they are thinking back and looking out their window or like they are driving down the road looking out the car window.
Flowers blowing in the wind or a person’s hand moving through a field of flowers can work as an abstract. Seeing rain hitting a puddle or a stream of water flowing can be pretty soothing.
Closeups of tools can work great as well. Seeing the blade cut wood versus a wide shot of a person cutting wood can often look more abstract. A closeup of welding that goes from out of focus to in focus is another way to create an abstract B-Roll.
Nikon D5, Sigma 24-105mm f/4 DG OS HSM Art Lens, ISO 800, ƒ/4, 1/4000
Transition B-Roll
You often need to transition the audience from one scene to another in the storyline. This is where a B-Roll of a door opening and closing or having someone walk through a location can help you transition to a new thought.
Video portraits are pretty famous today for B-Roll. They can work with transitions as well. This is where you roll for 20 to 30 seconds on a person with video versus the still portrait. I would advise getting a lot of different takes if using this technique. Have the person look out a window. As they look out the window, have them turn and look into the camera. Reverse that and do another take.
Have people look into the camera and they then walk away with the camera following and another time staying still.
Have them go from pretty expressionless faces to anger or smile. Start your shot out of focus and then go in a direction. Start in focus and then go out of focus.
[Fuji X-E2, 18-55mm, ISO 400, ƒ/4, 1/100]
Movement
With video, you are capturing motion. You can keep the camera still and have the environment moving, or you can move the camera within the environment.
Car scenes are notorious with showing motion. You can have camera stationary on the person while they are driving. The windows are like cinema screens showing life happening around them as they are driving.
Shooting from another vehicle, you can drive alongside them to give a sense of context.
Type of shots
You have a variety of shots which I encourage you to get lots in each category for easier editing later.
Wide Shot – helps to establish the context. Medium Shot – often two people close together or where you see the subject’s hands type of distance. Tight Shot – This is often where you are just showing the face. You are letting the facial expressions help tell the story. More than 50% of most movies are tight shots. Close-up – These are the detailed shots. Where you see someone’s ring on their finger, pouring a cup of coffee, the cork on a bottle of champaign being opened.
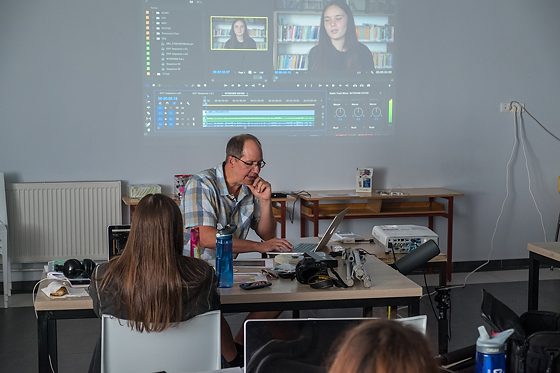
James Dockery is introducing Adobe Premiere Pro to the students. [Fuji X-E2, 18-55mm, ISO 2500, ƒ/5, 1/100]
You can never have enough B-Roll. I have never heard this said in an edit suite. That what were they thinking giving me all this B-Roll. I do listen to it over and over that there is not enough.
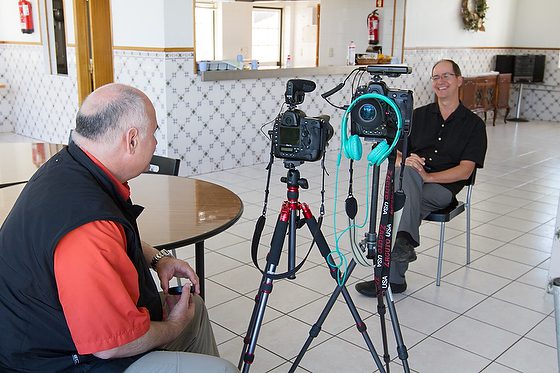
Stanley is interviewing James Dockery, senior editor for ESPN. Photo by: Jeff Raymond
Two Cameras
When I do my interviews, I always try to use two cameras. There are many benefits like:
Backup of the interview if one camera fails
Different looks using a slightly wide shot and a tight shot
Helps with editing
Let me talk briefly about how much two cameras can help with editing. Almost all the time, you need to edit someone’s comments. This means you cut something out, and when you do it, the person’s head will jump on the video and give us the telltale sign that you just cut something.
Now, if you have two cameras, you can switch camera angles, and it doesn’t tip the audience that you cut something. It will just look like you went to a different angle.
Now, if you have a slightly wider shot that includes the hands when the person is quite talkative with their hands and not just their mouth, it is good to include them.
Besides cutting out a long comment that doesn’t add to the storyline, there are times you need to rearrange their remarks. Maybe the last thing they said would make the most substantial lead for the story.
Again having that second camera lets you change angles, and it will look like they started with this thought.
In the end, you will help the subject sound more coherent and look like this was just a straight take and more accessible for the audience to absorb.
Reasons to redo the interview
The first time you interview someone, be sure and tell them you may need to come back the next day or two for a second interview.
Unless you are a seasoned pro most people will not catch everything happening in real time and will notice missing information during the post processing editing time.
If this happens, I highly recommend having the subject redo the parts you liked for several reasons.
They often have changed clothes.
Matching the lighting and camera angles is difficult
Matching the sound can be difficult as well
You may even want to play the video parts you liked and have them rehearse a few times before you redo them. I have found that often the person realizes they can even say it better now that they have heard themselves.
I must tell you this funny story about a seasoned photographer learning to do a video for the first time. He thought of locations he wanted to use as the background for his subject’s interview.
We realized that we failed to tell people to do their interviews in one place while teaching. While in a still photo, that would make sense to show your subject in the different locations, when it came time for editing, the sound didn’t match, the lighting was so different, and when you finished editing the content and put the takes in the logical order of how it best told the story the guy was jumping all over the city back and forth.
It was so funny. Just imagine the evening news where it was the same person instead of going to Washington to listen to the correspondent there and then to the West Coast correspondent or maybe an East Coast correspondent. That was what it looked like.
If you do an excellent job with the interview and have a well-thought-out storyline told by the subjects, you should be pleased with the results. If this is all the audience saw and heard, it will work.
One strategy for editing almost any type of production is to do a “radio” edit. Focusing your cuts and the assembly of your timeline on the dialog [AUDIO] places the story’s content as the highest priority.
Once you have this done, you will work on getting visuals to supplement the audio—more on that in the next part of Shooting Video with your DSLR.
Some more technical tips
I recommend a magnifier for your LCD. It would help if you were sure your shot was in focus.
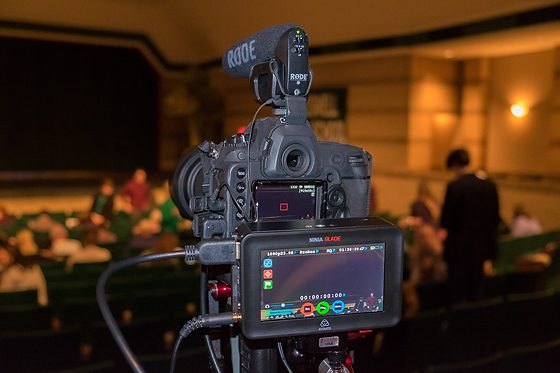
Another option is using a video monitor. The advantage of an external monitor is not just a bigger picture for focusing and exposure control, but with some monitors like this Atomos Ninja Blade 5″ HDMI On-Camera Monitor & Recorder is recording for more extended periods than the time limits on most DSLR cameras. You are only limited to the size of the hard drive you use.
Atomos Ninja Blade 5″ PRODUCT HIGHLIGHTS
Key Features – 325DPI, 5″ IPS 1280 x 720 capacitive touchscreen monitor/recorder. – Waveform RGB & luma parade, vectorscope with zoom, and test pattern generator. – Adjustable gamma, contrast and brightness. – HDMI input and output. – Real-time monitoring, playback, playout to a PC or Mac with QuickTime, and edit logging. – Focus peaking, 0-100% zebra, and two modes of false color monitoring. – Records 10-bit, 4:2:2 in ProRes or DNxHD. – S-Log / C-Log recording. – Trigger REC/STOP from camera (Canon, Sony, ARRI, Panasonic, RED, JVC) – Timecode from camera. [Nikon has no timecode] – 2.5″ HDD/SSD media storage.
It records up to 1080 30p/60i resolution via HDMI to an available HDD or SSD using either Apple’s ProRes or Avid’s DNxHD codecs. Recording at 10-bit with 4:2:2 color sampling, this unit provides a monitoring and recording solution in one compact battery-powered unit.
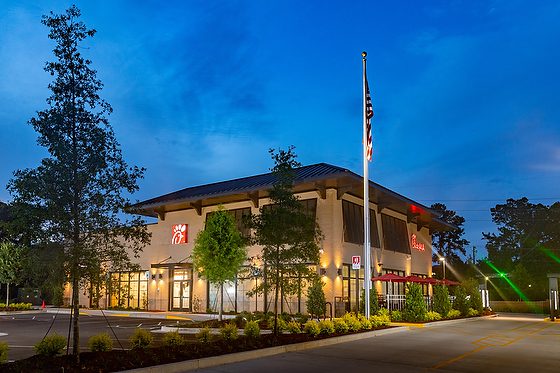
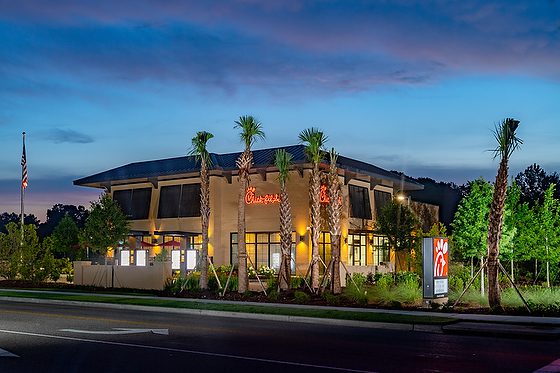
Chick-fil-A Long Point Road FSU, Mount Pleasant, SC [Nikon D5, Sigma 24-105mm ƒ/4, ISO 400, ƒ/5.6, 1/6 – (3) Godox V860IIN + Godox X1NT]
I am enjoying capturing some of the Chick-fil-A restaurant designs around the country. The designers are restrained in some ways to create a space that is an efficiently run restaurant and fits within a community.
The new restaurant in Mount Pleasant, South Carolina, used a lot of landscaping to help the building fitting within the community.
The palmetto has been a symbol for South Carolina since the American Revolutionary War when it was used to build a fort on Sullivan’s Island that withstood British attack—putting these on the property helped tie to the state’s traditions.
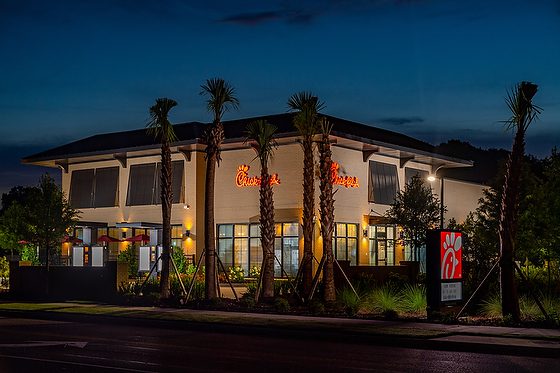
Chick-fil-A Long Point Road FSU, Mount Pleasant, SC [Nikon D5, Sigma 24-105mm ƒ/4, ISO 400, ƒ/8, 1/3 – (3) Godox V860IIN + Godox X1NT]
The second photo may do a better job of showing the design of the building, but when you eliminate some of the landscape architecture, it loses a sense of place. Now the building could be anywhere other than in Mount Pleasant, South Carolina.
Chick-fil-A Long Point Road FSU, Mount Pleasant, SC [Nikon D5, Sigma 24-105mm ƒ/4, ISO 400, ƒ/8, 1/6 – (3) Godox V860IIN + Godox X1NT]
Now the thing about this view is even tho I am showing more of the landscaping; it still could be almost anywhere in the US.
Chick-fil-A Long Point Road FSU, Mount Pleasant, SC [Nikon D5, Sigma 24-105mm ƒ/4, ISO 800, ƒ/5.6, 1/8 – (3) Godox V860IIN + Godox X1NT]
This last angle is where I started shooting before sunrise. I also was lighting just the building when I started. The trees and shrubs around the building were silhouetted. My first thought was that it would work since this is how the palmetto tree appears on the flag [silhouetted]. Well, the trees were new to the location, had been trimmed, and didn’t read as clearly as I wanted them to appear.
Chick-fil-A Long Point Road FSU, Mount Pleasant, SC [Nikon D5, Sigma 24-105mm ƒ/4, ISO 400, ƒ/5.6, 1/8 – (3) Godox V860IIN + Godox X1NT]
I took the flashes and located them further back, lighting up the foliage and the building before sunrise.
The only thing I think would have dramatically improved the photo is if the flag waving in a breeze.
Hopefully you are seeing here that it is not just setting a camera on a tripod and pushing the shutter release. You need to often add light to help accentuate and draw out the elements in the photo to help add to the photo.
Photography combines two Greek words, Photo, and Graph, which mean “drawing with light.” Sometimes the light is just perfect naturally and other times, the photographer adding or subtracting light in a scene makes a more powerful image.
Scoring a touchdown is about knowing where your goals are in the game.
Before the football team steps onto the field, they will practice for many months together. When they execute a play, they know what they are doing and trying to accomplish to win the game.
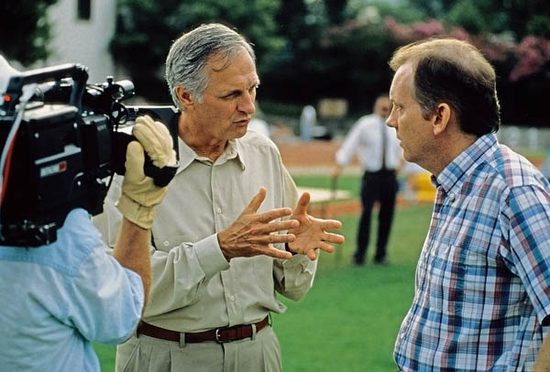
Alan Alda interviews Rob Michelson about the Aerial Robotics competition he oversees at Georgia Tech.
Before you turn the camera on and start your interview, you must practice. You need to interview your subject, and from what you learn, you formulate your questions so that the responses help convince the audience of what you want them to know, just as a lawyer does to convince a jury of what they want them to learn about their client.
You do not want to sit down, turn the camera on, ask the subject, “What is your story?” and expect them to give you a brief, well-thought-out presentation.
Get to know your subject
Even before you sit down and talk to the subject for the first time, do all the research you can on the subject. Sometimes there have been other interviews with the person you can read or watch.
Other than learning about the subject being the person, learn all you can about the story’s topic. If they are a coffee farmer, then learn all you can talk about coffee.
The more you know, the better questions you will ask. I like to say you are peeling an onion. Each question gets you closer to the core of the onion.
You are not just asking questions to find out everything about the subject. You are trying to find the thread that will keep someone interested in them as you reveal more and more about them to the audience.
The Bourne films are a series of action spy thriller movies based on the character Jason Bourne, a CIA assassin suffering from extreme memory loss who must figure out who he is.
To keep the audience’s attention and pull them into your story, you may often hold out on the juicy part of the story towards the end as they did in the Jason Bourne movies.
Your Goal
You know you are ready for the on-camera interview when you have your storyline figured out from your informal discussions.
Like a lawyer who calls witnesses and interviews them to reveal in their own words the content that will help build the storyline so that the jury has no choice but to make the right call. Like a lawyer, you may need to put different people on the witness stand to help build your story.
Now it is pretty standard that even when you have done all your homework, in the camera interview, subjects can surprise you with new content that improves or even complicates the story.
Be flexible and be sure you are listening to what they are saying.
Ideally, it would be great if someone could tell you what you need and leave out all those trails that lead nowhere. I have found time and time again that towards the end, I have asked them to summarize what we just talked about, and they often, in one take, say precisely what I need.
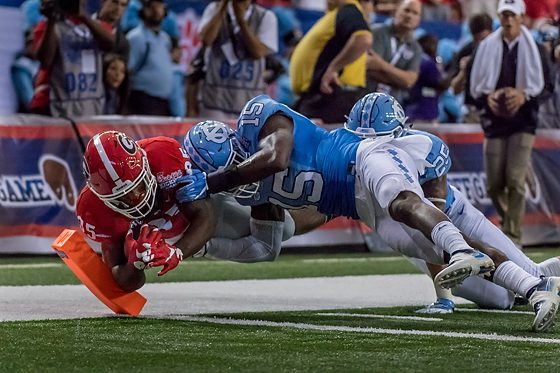
Georgia Bulldog’s Freshman Running Back #35 Brian Herrien Scored his first collegiate touchdown. At the same time, UNC’s Safety #15 Donnie Miles could not stop him during tonight’s Chick-fil-A Kickoff Game, September 3, 2016, at the Georgia Dome.
You see, it can be just like a football game. The players have practiced so often that the coach calls the play, and you get the touchdown.
When doing an interview, you need to do a few things every time.
Fill the frame
When doing an interview, you must carefully choose good composition and background. Pay attention to everything inside the frame.
Get tight on the person you are interviewing.
Kill the Noise
Once you put the microphone in place and have your headphones on, you can hear all the ambient sounds. This is where everyone is quiet for a moment while you listen.
Let’s say you hear the ceiling fan or the air conditioner running. I would turn these off for the interview.
Move to a quiet location if you cannot turn off something like a water fall or water fountain.
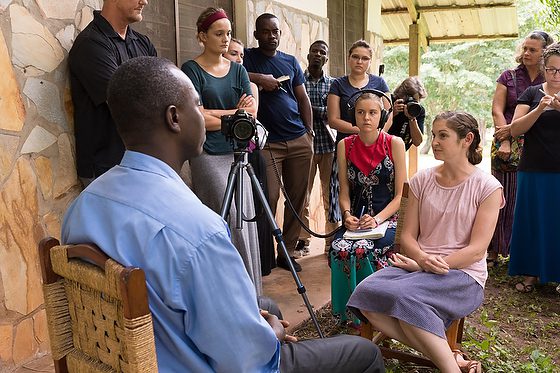
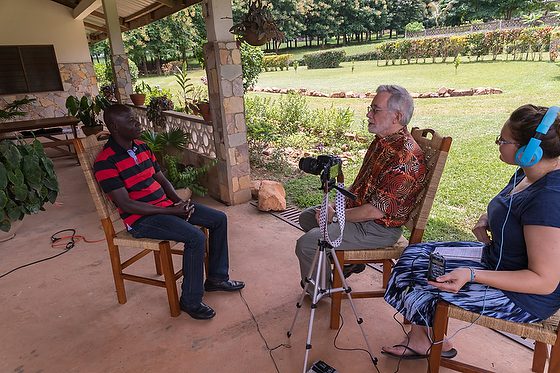
Togo, West Africa
Steady the Camera
Use a tripod or put the camera on a table. Just keep your primary camera for the interview still. If you have a second camera to use, you can maybe put that camera on a slider or fluid head that will let you move the camera during the interview.
I believe you always need one locked camera on a tripod for the interview.
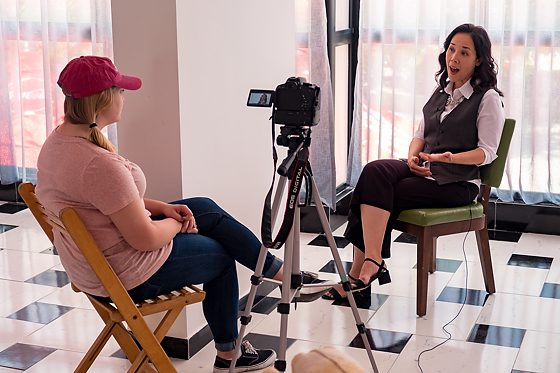
Togo, West Africa
Light the Subject
I suggest finding a great place with light, so you don’t have to use lights. I find the open shade on the side of a building works as well as porches, as you see in these two photos of interviews we were doing in Togo, West Africa.
Audio is King
There are times for different microphones, just as for additional lenses. You need to know the difference between a lapel, camera & shotgun microphone.
Sharpness is Queen
Sharp focus is critical. I advise against shooting ƒ/1.4 for video unless this is your second camera perspective. Have a depth-of-field that is forgiving if the person moves during the interview.
Use manual focus and not Auto-Focus.
Lock Down the lens
Don’t zoom in and out on your primary camera. You can do some of this with a second camera, but be sure at least one camera is locked down, and you have a solid framed shot that is in focus and has enough depth-of-field that the person can move a little and still be in focus.
In Part 1, I suggested the gear you need for your DSLR/Mirrorless camera to do video. This post will do with some basic settings I recommend for the camera when doing a video.
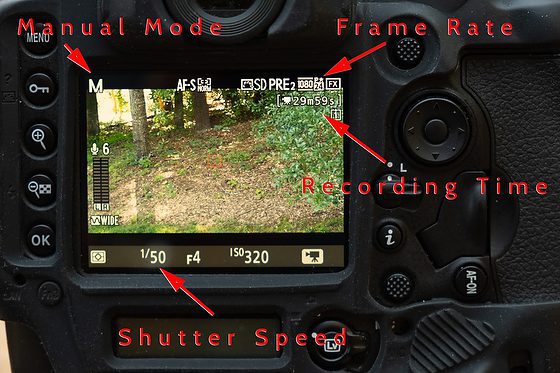
Nikon D5 Video Settings
Camera Video Settings
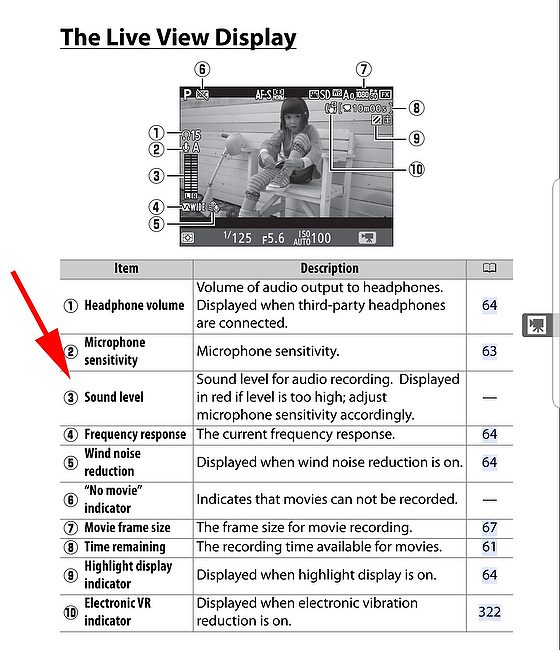
On my Nikon D5, The Frame Rate, Resolution, and Frame Size all show up in the upper right-hand corner of the Live View on the LCD. We need to address all three.
Resolution – I recommend Full HD 1920×1080
While there are many other resolutions like 2K, 4K, 6K, and even 8K, I believe they are overkill for web distribution. Even my friend Ben Smallbone whose credits include the movies: Priceless, Taken, and Steve McQueen: American Icon, to name a few of his movies told me that when it came to distributing their films to movie houses all over the country, they said not to give them anything bigger than 2K.
There are two resolutions in the video, just as there are two resolutions with stills. You have the capture setting and the exported resolution.
While you can shoot, say, at 4k for similar reasons, you would shoot RAW. Your computer must be a top line to process the 4K files. Unless you want to crop in on your video in post-production, I believe there is little to gain for the average project to shoot higher than the Blue Ray Full HD 1920×1080 resolution.
Frame Rate – I recommend 24 Frames per Second
Here is a good video showing why 24 fps is an industry standard for movies.
24 FPS is the Cinematic Look that is used in motion pictures. There are reasons to shoot other FPS, and one worth mentioning is to shoot super high rate to slow down for that “Slow Motion” effect.
Shutter Speed – I recommend 1/48 or 1/50
As a rule of thumb, you want the denominator of your shutter speed to be approximately double the number of frames per second that you are recording. For example, when shooting at 25fps, your shutter speed should be 1/50 of a second. If you have the 24fps and do not have a 1/48, then pick the closest frame rate, like 1/50 or 1/60.
Manual Mode – Shoot this rather than Aperture, Shutter or Program mode
If anything on the camera is automatic, your exposure can change when something changes in the frame, like your subject moves a little. The camera may think the lighting has changed, and it hasn’t. Shoot manual mode and manual focus as well.
Look – use Neutral
You can pick a picture color mode in the video, just like stills. There are modes on most cameras like Standard, Vivid, Monochrome, Portrait, and Neutral. If your camera doesn’t have a Neutral setting, then pick Standard.
When we cover your post-production, you can do more with a Neutral setting than with Vivid. More on that in later posts on making videos with your DSLR.
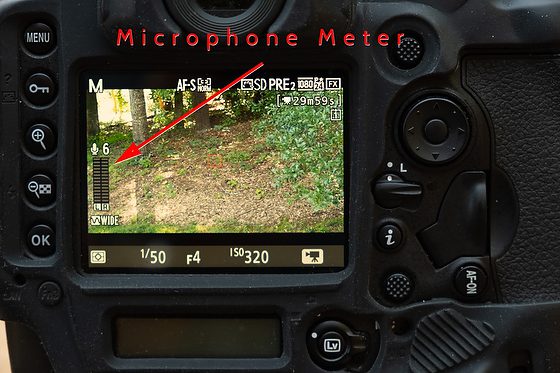
Nikon D5 Audio Level
Audio Recording Settings
You want to have your recording levels set manually and not automatic for the same reasons for the video. When someone stops talking, the Auto level will increase the volume and introduce noise.
Most levels on cameras or a separate recording device like the Zoom Digital Audio Recorders have a way to show you it is too loud.
Most video editors agree that the overall audio level of your audio mix (all of your audio combined) should be normalized between -10db to -20db. I level my videos around -12db with occasional peaks to -8db.
What this means for me on my Nikon D5 is I want the level to peak right up to the last line before it goes red. I have a person talk for a while and then set the sound recording level before recording.
I recommend doing a test video for sound. Set your video settings to get good exposure and audio levels for good sound. Record 30 seconds to a minute and then download to your computer and play using Quicktime or other video software that came with your computer.
Play something on your computer to test sound like the music you downloaded. After setting your speakers for proper volume when listening to your music, play your video. You must change your recording levels if you have to adjust the volume to hear the recording. The biggest problem is if it is too quiet or if too loud and giving you distortion.
Headphone Volume
Be very careful that you are not using the headphone volume as a way to see if the audio level is set correctly. Use the levels for audio the same way you use a histogram. Once you put those levels, adjust your headphone volume to where you can hear adequately.
Picking a location to do an interview
When picking a location, you need to pay attention to two things: 1) Sound in the location and 2) lighting/visual.
I recommend turning on your microphone, putting your headphones on, and listening to the environment. Are you trying to do an interview next to a waterfall or water fountain? That will prove to be difficult to impossible.
Finding a tranquil location would be “ideal,” but not always possible.
Make finding the perfect location weighs sound quality over visual.
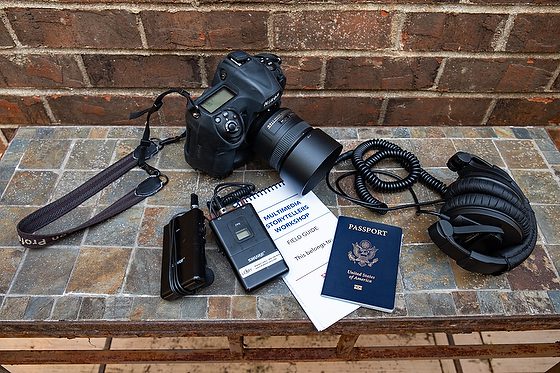
I am breaking down the topics you need to cover to start shooting a video with a DSLR. Part 1 will protect the essential gear you need. My assumption is you are interested in Storytelling.
The interview of a subject on camera is the staple of most storytelling. The gear I recommend will help you get a good discussion on video.
You can do many levels of production when recording video with your DSLR. I am taking the approach here to start you as a one-person band doing the show all yourself.
The starting point for all videos is sound. People will not watch a video with poor sound. Sound is the foundation for your production.
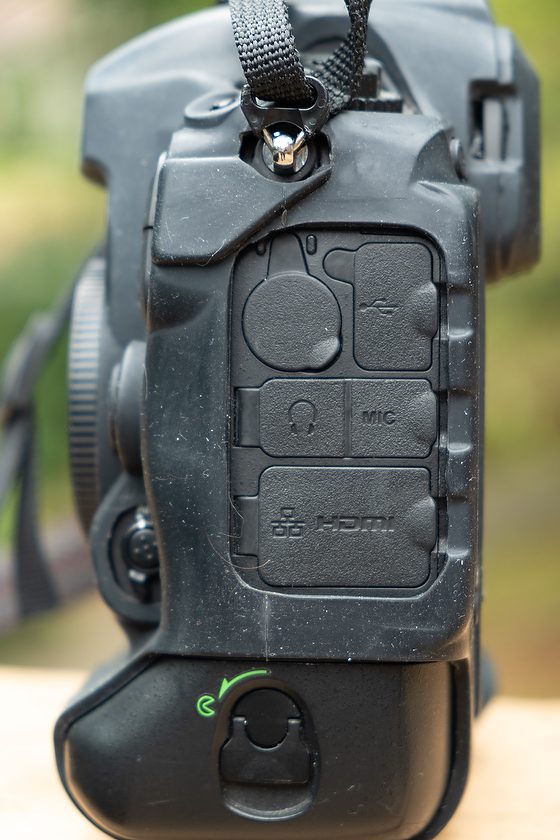
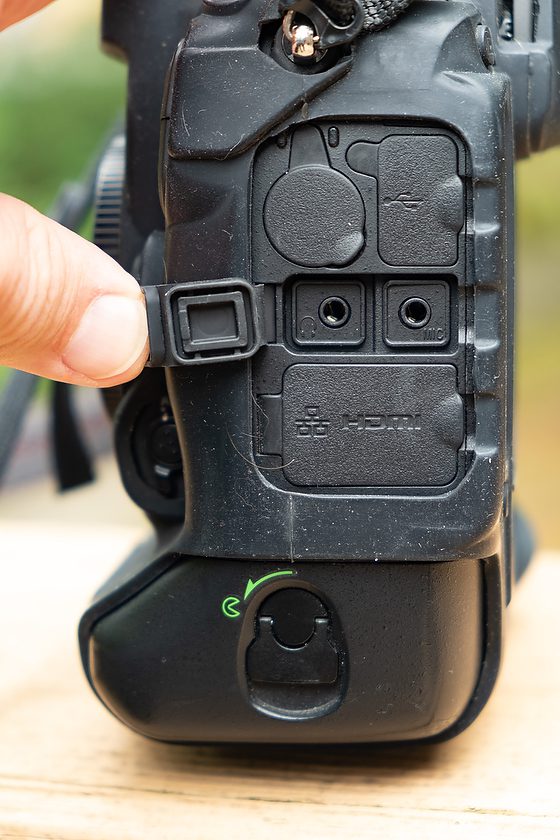
Nikon D5 headphone and microphone jack
I recommend not trying to video unless you have a microphone and headphone jack. The microphones built into the camera would only really work for recording interviews within the selfie distance to the camera.
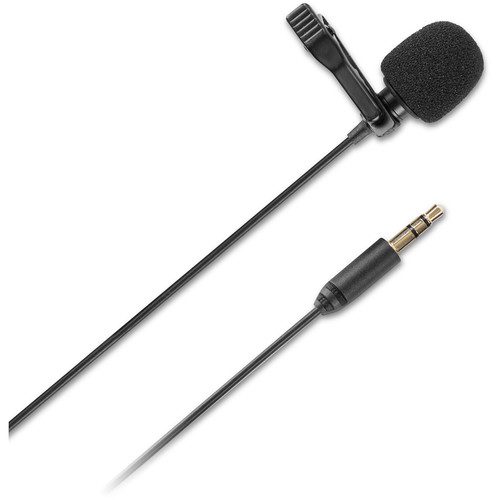
The basic understanding of recording sound for the video is the get the microphone as close to the sound as possible. I use a wireless lavalier system. The system I use costs $500.
Shure FP15/83 Combo Wireless System, H5
You can buy a wired lavalier for under $50. Buy one with a long cable for interviews.
The second principle to understand is that you need to isolate what is being recorded; the best way to do this is with closed-back headphones. Here is what I use.
Sennheiser HD 280 Pro Circumaural Closed-Back Monitor Headphones
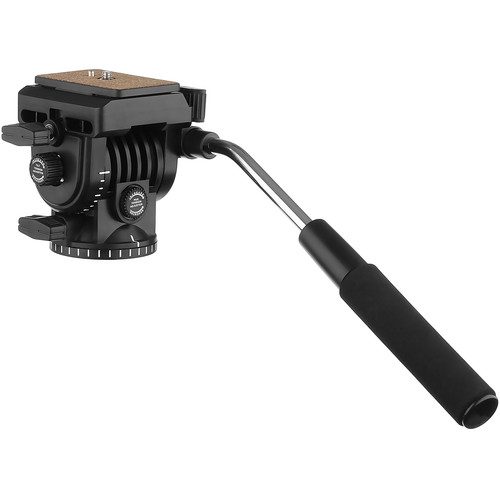
You also need a good tripod to keep the camera still. A Pan & Tilt Fluid Head on the tripod is better than a bare head.
Google your camera using a microphone and headphones. Many cameras may have a microphone jack but not a headphone jack. There are some ways to work around that for your camera. Sometimes you will find you need to upgrade your camera.
You can add more gear, but I believe this is the basic kit necessary to create a video.
In other blog posts, I will discuss different microphones, lighting, and gear to help you move your camera during a shoot.
I will also cover the software you need to edit.
Stay tuned.
Cookie Consent
We use cookies to improve your experience on our site. By using our site, you consent to cookies.