Storytelling using multimedia to tell the story

How many times have you been called to talk to a group, and you have either said or wanted to say, “You just had to be there to know what I am talking about?”

When I traveled to see the coffee growers in Salvador Urbina in the southernmost part of Mexico in Chiapas, I was there to help tell their story.

Here is one of the latest packages I just had translated into English from Spanish. The video is David Velázquez, the current president of the cooperative Just Coffee. Please go there and buy their coffee. For those who are coffee enthusiasts, it is premium arabica coffee.

[youtube https://www.youtube.com/watch?v=TAUNXl1IBUQ]
I decided to use primarily still photos for the b-roll for a reason. I think those moments allow you to pause and listen to David simultaneously.

The human voice is the most powerful audio I know for video, especially when you can hear it in their voice. Here the voice-over talent Craig Carden did a great job capturing the mood of David Velázquez.

I am blending Video, Audio, and Still, images which I think together is a better package than any of these alone would be by themselves.

I let David tell his story, and then I went through the shooting days and picked as many images as possible that related to what he was talking about.

I hope you enjoyed it. Then, call me if you want to take a class from me on how to do storytelling using multimedia.

Photographers: Three ways to direct the audience

 
Nikon D4, 14-24mm, ISO 1100, ƒ/3.2, 1/100 Custom White Balance with ExpoDisc

Composition/Graphics

You can use compositional elements like leading lines in the photo above to help direct your audience through a scene to where you want them to look. For example, I have the lines from the shirt directing me back into the photograph to the guy talking.

Nikon D4, 14-24mm, ISO 2000, ƒ/6.3, 1/100 with off camera flash with Nikon SB-900 with MagMod 1/4 CTO Gel syncing by PocketWizard TT1 and Flex TT5 with AC-3 zone controller

Light

Now with this photo of the kids watching down the incline, the balls racing each other, I am using the pitch to lead your eye, but I am also using another element to help direct your attention—Light.

Using an off-camera flash, I can put more light on the man at the top of the incline and also light the kids. As the light drops off to the background, it is slightly darker, so your eye doesn’t go there first.

Nikon D4, 28-300mm, ISO 2000, ƒ/6.3, 1/100 with off camera flash with Nikon SB-900 with MagMod 1/4 CTO Gel and 20º Grid triggering by PocketWizard TT1 and Flex TT5 with AC-3 zone controller

I knew that if I didn’t use a light on the subject holding the weight, you might drift to anyone of the people in the background.

Nikon D4, 14-24mm, ISO 2000, ƒ/6.3, 1/100 with off camera flash with Nikon SB-900 with MagMod 1/4 CTO Gel triggering by PocketWizard TT1 and Flex TT5 with AC-3 zone controller

In this photo, you can see my photo assistant being a VALS [Voice Activated Light Stand]. The flash is helping me pop the subject out from the crowd.

Now on the flash, I am using a 1/4 CTO gel that works well with the available light. I started with 1/2 Plusgreen gel, but even with color correcting using the ExpoDisc, the color never looked right on the faces compared to the background.

Nikon D4, 28-300mm, ISO 11400, ƒ/6.3, 1/100 Custom White Balance with ExpoDisc

Color

You can also use color to draw your eye into a photo. Here the lady in pink draws your attention because she is wearing Pink. Unfortunately, the same image in Black & White loses the directing quality of the color.

To make a B&W photo work, photographers will burn and dodge to direct your eye with available light photography. Here I have burned in some photo areas, so the lightest area leads your eye.

Light is the greatest influence in photography

Photography is writing with light. That is what the word means. Now take a moment later, I decided to add light to the situation above. Watch how much I am currently directing your eye with the light.

While the lady in pink is drawing some of your attention, I have more light on the scientist here holding a brain model.

I have now really isolated where I want you to look in black and white. So I have removed the color influence of the pink jacket, and you are now because of introducing a spotlight on the subject, a way for me to influence where the audience looks.

Put it all together

Here I am using the off-camera flash and a longer lens of 90mm to come close to the two little girls. But, most importantly, I am capturing a moment where their eyes are communicating interest, and this is the second most important part of a photograph—The Moment.

Here I am using the off-camera flash to light the young boy and make the background darker. The mother’s orange jacket is a complimentary color to the blue jacket, and I am also using the color to help direct you. I am using the hand of the scientist holding the brain model. In contrast, the mother’s hands continue to lead you toward the boy’s expression on his face—this moment of interest by his eyes and mouth expressions showing interest. The mom’s expression also compliments her son’s expression.

Here I am again using the off-camera flash to brighten the people in the foreground and the background is now darker. I am still using composition to help direct you and, most important, looking for the moment that tells the story. The embroidery on the scientist’s sleeve almost replaces the need for a caption.

The off-camera flash enhances capturing a moment with a father and daughter. In addition, the photo reads faster than had I relied solely on composition alone.

As seen in this last photo, your eye will wonder if the photographer hasn’t used all the tools necessary to direct your attention.

When you look back at your photos from something you attended, and nothing stands out, there is a reason. Are you using all the tools at your disposal to capture moments? Of all the tools you can use, off-camera flash maybe the best weapon you have. Do you know how to use one?

Give me a call for a personal class for some one-on-one instruction if you would like to master this technique.

Storyline involves a Plot

Fujifilm X-E2, 18-55mm, ISO 6400, ƒ/3.6, 1/250, custom white balance with ExpoDisc

A plot “ensures that you get your character from point A to point Z.”

The shooting of the story is often not in the order of telling the story. It is standard in Hollywood when they are making a movie to shoot a story all out of order for budget reasons.

You may need to go ahead and shoot the ending because it takes place in the spring, and you are now in the Spring time.

Fujifilm X-E2, 18-55mm, ISO 6400, ƒ/9, 1/45, custom white balance with ExpoDisc

Yesterday I was working with my intern/photo assistant. I sat down for a few minutes to talk about what I was doing and why. He is going to Lisbon, Portugal, with me and will be shooting his own visual story.

One thing I talked to him about was how every situation I shot was as if it were a stand-alone story.

Fujifilm X-E2, Nikon 85mm ƒ/1.4 D AF, using Nikon G to FX adapter, ISO 500, ƒ/1.4, 1/60

Yesterday I photographed a Georgia Tech Management student. I followed him around for the day. While in the classroom with him, I photographed each situation as if the whole story had to come out. I was shooting stills and videos. I shot an overall shot of the classroom, some of the teacher and some of the students, and everything else you could think of in between.

Nikon D4, Nikon 85mm ƒ/1.4 D AF, ISO 1100, ƒ/1.4, 1/250 Custom white balance with the ExpoDisc

I shot each situation as if it were a stand-alone package because it is easier to sequence the overall package with the best photos to tell the complete story.

Nikon D4, 14-24mm, ISO 12800, ƒ/6.3, 1/500, custom white balance with ExpoDisc

If you didn’t shoot the variety, you might end up with all close-up shots when you finally were editing. Then the array of the photo starts to work against you by shooting to get good tight, medium, and overall pictures and varieties of each of those; you then are picking from each situation and then putting these into a sequence that moves the viewer through the plot of events to tell the story.

Nikon D4, 28-300mm, ISO 8000, ƒ/4.8, 1/250, custom white balance with ExpoDisc

Unlike fiction writers who can create their content, the visual storyteller who captures the story must grasp it before it is sequenced and told. The writer can design and make it work and not worry if they have images to move you through the plot. They create it.

Fujifilm X-E2, 18-55mm, ISO 400, ƒ/10, 1/500

I even did the environmental portrait as a safe shot of the student in front of the Georgia Institute of Technology sign.

During our interview with the subject, he mentioned that he would be working with Wells Fargo Securities this coming summer. So just to have something we could drop in for a visual, we found a sign to put him in front of for the story.

Fujifilm X-E2, 18-55mm, ISO 200, ƒ/10, 1/180 and -1 EV on the pop-up flash

The bottom line is that you need to have a storyline in mind while shooting. Then for each point of the outline, you shoot it like it will be the complete story. Then, you create another sub-outline of the design that makes this a full report.

It is almost impossible to overshoot for a visual storyteller. Those who undershoot will have to rely on other communication like text or audio to help tell the story.

The best way to tell a story is to show the audience rather than say it to the audience. Don’t be caught without enough visuals when putting the final package together.

Storytelling involves Setting The Scene

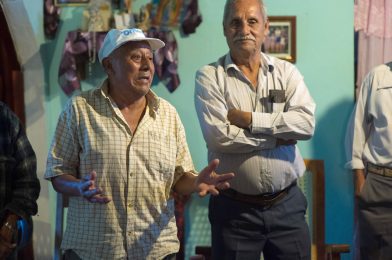
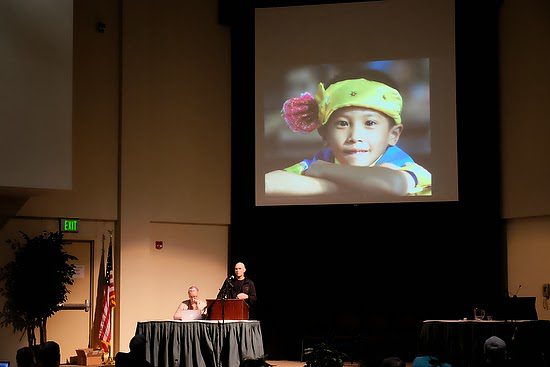
Layering is one of the best techniques I know for helping to set scenes. Layering is where you have a foreground, something in the middle, and a background. For example, in this photo above, I am using layering to help engage the viewer with the little boy and the interaction with his parents in the overall concert scene.

Here is another scene setter, but notice how it is more of just a wide shot saying “here it is” rather than the above photo that engages the viewer in something going on much more effectively. The lower image has two people walking closest to the camera.

Here I am using the lady taking a photo with her phone that lets me pull the reader into the scene.

The photo I loved the most and used as the scene setter for this event is one of the couple dancing. Even without seeing the stage, the couple dancing, and people in the background facing in one direction, you can sense the band playing. Hopefully, you see the critical piece that the photo needs to be powerful enough to engage the viewer. In this photo, the romantic moment is what is engaging.

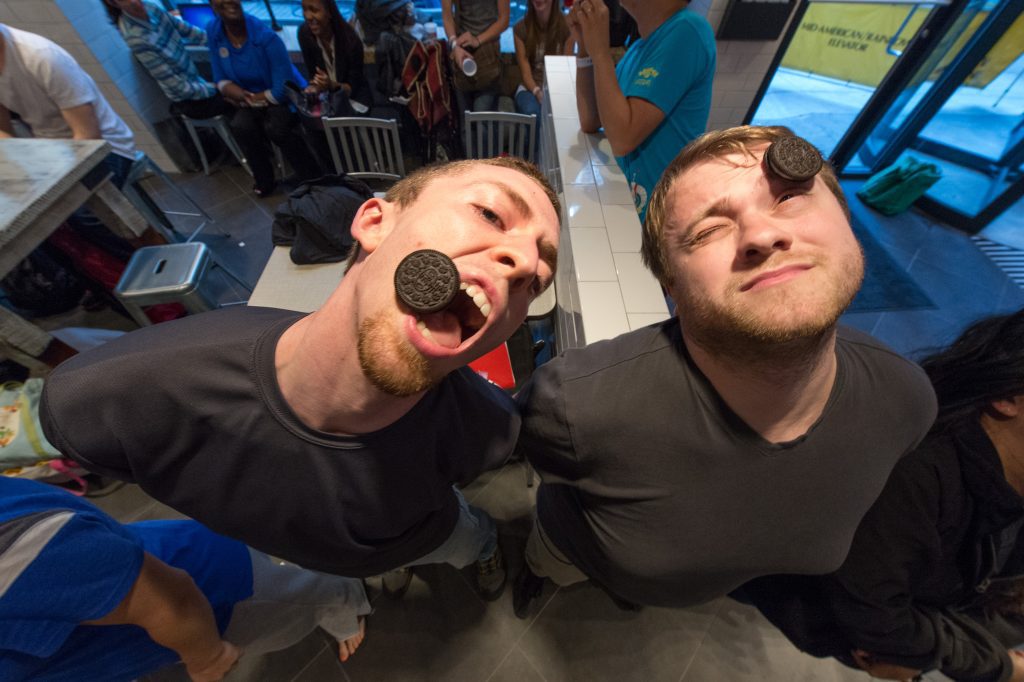
I have the couple enjoying themselves in this photo,  but it isn’t a scene-setting type of photo. Yes, it captures the mood of a party, but I am missing the feeling that the earlier photos give the audience.
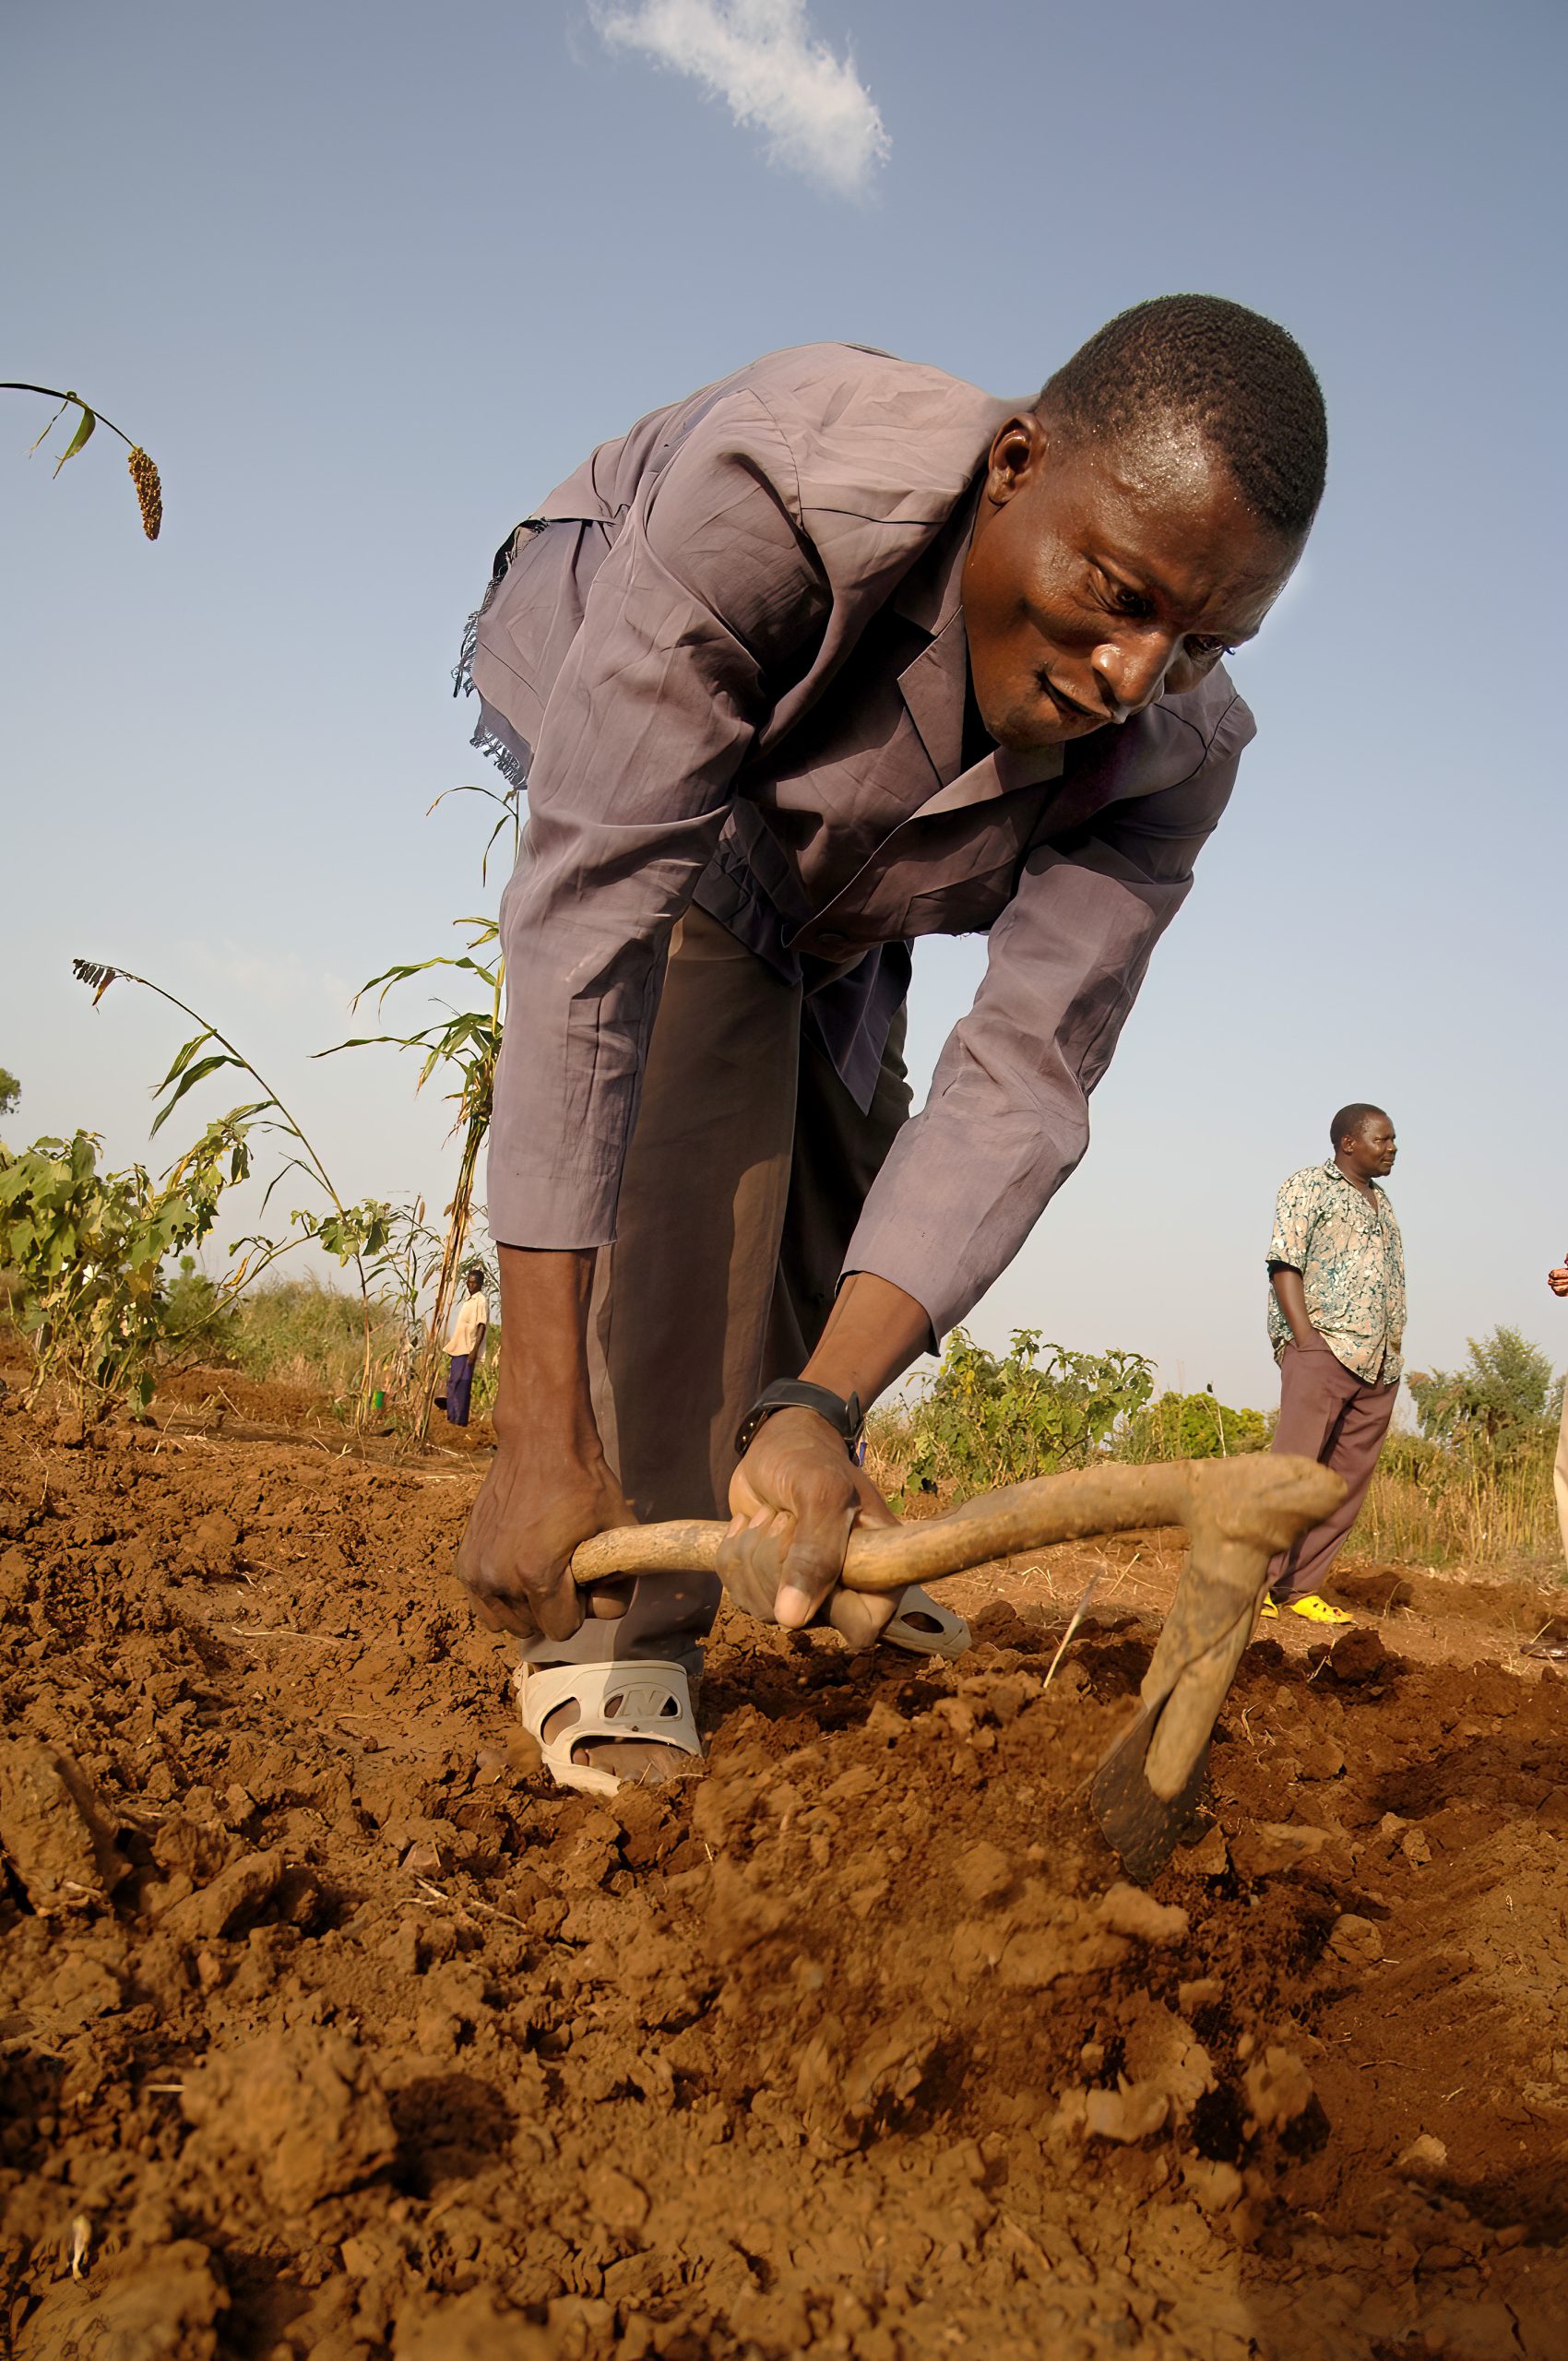
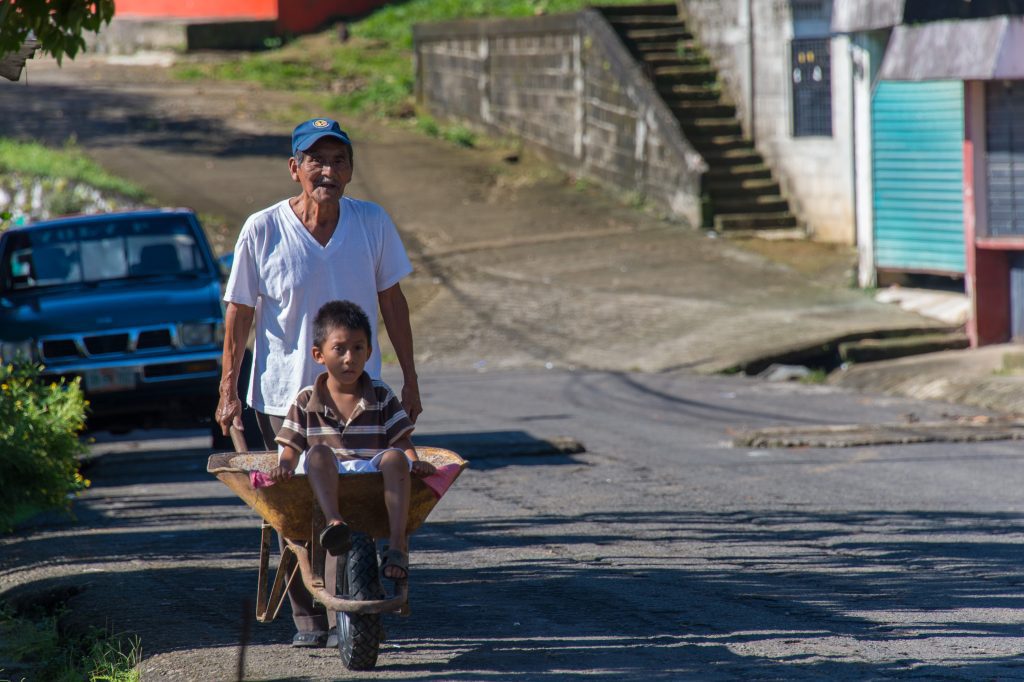
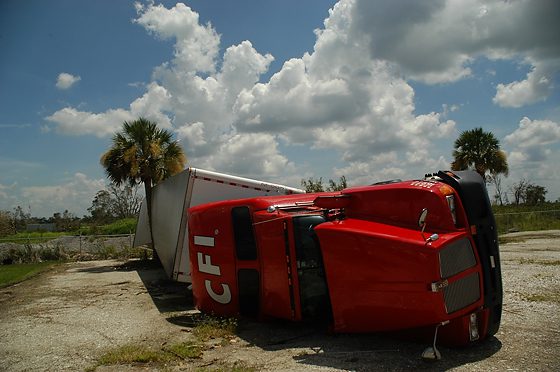
Here is a more cliche scene-setting photo. It establishes the location. It does so from a low angle.

Here is another way to introduce a story on Saint Martin: getting up high on the road and shooting down into the bay, where you capture the community.

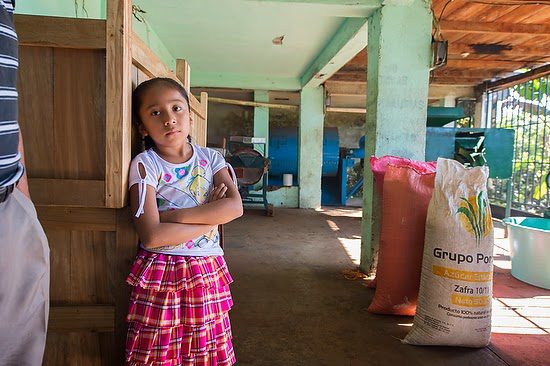
Often we think of scene-setting photos as the overall shot like this of the arabica coffee growing in Salvador Urbina, Chiapas, Mexico. But sometimes, you can set the scene with a tight trial just as well.

The tight shot of the arabica coffee and the wide shot help introduce the topic of coffee being grown. So often, photographers make the mistake of trying to put everything into their scene setter and lose the impact of what the setter is doing—introducing the topic.

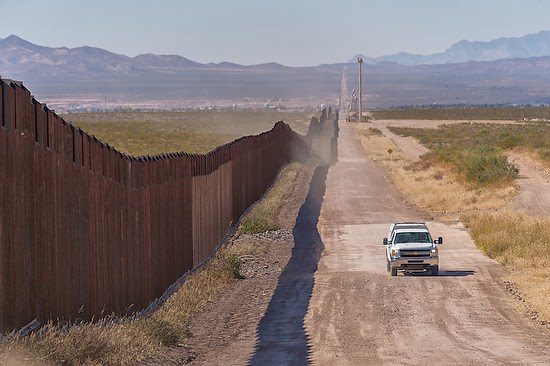
This photo of the fence along the border between Agua Prieta, Mexico, and Douglas, Arizona, is also a great scene setter for the story on coffee; however, using this photo starts with the reason for the report—illegal immigration.

When I think of The Citadel, I think of the pageantry of the parades. I got low with a wide-angle lens to show the beginning of the Friday afternoon parade.

Another time I went across the parade field and captured a more compressed photo with a longer telephoto lens.

Tossing the hats at graduation is another excellent scene for a story on The Citadel.

Just as significant to the graduate of The Citadel is the long gray line that the seniors do when they graduate. They form one long line and walk across the parade field for the last time.

Class of 1967, Pat Conroy immortalized the sentence “I wear the ring” in his novel The Lords of Discipline, published in 1980. So which of these photos would work for the beginning of the book The Lords of Discipline?

I think any of the three can work, and that is the point. Your establishing shot could be a closeup photo like the one of the ring and start your story just like Pat Conroy.

I like the last photo for a different reason. Most of the guys in the image picked going to The Citadel after reading The Lords of Discipline.

So you can shoot mindlessly and get over all shots that most likely will not engage the viewer, or you can work at getting overall shots that engage people.

Probably the most crucial point about finding your establishing shot is to have an idea of what the story is all about; otherwise, you will lose the overall or closeup picture you need to help set the scene because you were paying too much attention to capturing a subject or just capturing the climax of the story. Remember, you need sequences of different photos to move someone through the plot of your account.

Take the time to think about the story and how you can best establish the scene for the audience.

Storytelling Involves Characters

Here is one way to introduce a character running straight at the audience.

The show, don’t tell.

It is essential when introducing your character to share an experience with the audience of the essence. With the football players, this is an easier way to introduce a character into the story. But, again, the action helps to tell us about the character.

Student Omar Yougbare in Koudougou, Burkina Faso.

While this might be a lovely portrait of the story’s character, you can see that because the man is just looking at the camera, it does little to tell the audience about the man. So now the story must rely more heavily on the storyteller’s telling rather than showing to introduce the character.

Paul Tiendeno is a student at the theology school in Koudougou, Burkina Faso. They teach theology and farming to help the pastors feed their families while they minister as bi-vocational pastors. 

Contrast the photo of the man just looking into the camera lens to this one where you see the man working in the field and tending his crops.

Which photo helps to establish the characteristics of the person?

Just Coffee Cooperative

Here is the matriarch of her family pouring hot water over coffee grinds to make coffee. Showing her working in her kitchen is an excellent way for me to introduce the mother and wife of coffee farmers in my story on a coffee cooperative.

Just Coffee Coop in El Aguila Adan Roblero

The theme of the story I was working on about a coffee cooperative is how the success of the cooperative depends on the coffee drinkers getting to know their coffee growers. One of the Arizona coffee drinkers plays with a coffee farmer’s son in El Aguila, Chiapas, Mexico. Here I am telling a small story within the photo introducing the character into the storyline.

Doug Parkin, a volunteer pediatrician from Arizona, sees patients during his two-month service at the Baptist Medical Center in Nalerigu, Ghana. (Photo by: Stanley Leary)

Here is a doctor who donates some of his vacation time to serve in the Baptist Medical Centre in Nalerigu, Ghana. The story tried recruiting doctors to become full-time missionaries in this hospital. But, unfortunately, when I visited, they had only two doctors.

Surgeon Danny Crawley is in theatre doing a hernia operation, and Comfort Bawa, the theatre assistant, helps him at the Baptist Medical Centre in Nalerigu, Ghana. (Photo by: Stanley Leary)

Danny Crawford is one of those two doctors and the only surgeon. So this was a way to introduce him into the storyline.

Just Coffee Cooperative

Pushing the boy is one of the coffee farmers with his grandson in Salvador Urbina, Chiapas, Mexico. I think this is a great way to introduce the coffee farmer and show the value of family to the people of the coffee cooperative.

Recording artist Soulja Boy poses for a portrait at his Atlanta Buckhead Penthouse on Thursday, April 23, 2009.

While you may have a lovely portrait of a person like this, a shot of Soulja Boy does little to introduce the character compared to if he was doing something.

Just Coffee Cooperative

The people can even have beautiful smiles, but you still know little about the characters when you have them stop and look at the camera.

Kalyn Wood

The portraits can be pretty powerful, but they are not the same as introducing the character when they are doing something. , So yes, they can be powerful images and capture your attention, but what is the story?

State and Lake In-Line Rob Meier, Operator

Don’t you think this photo of the two guys competing on who can move the Oreo Cookie from their forehead to eat is a much more exciting and character-revealing photo to introduce a character?

The Archbishop of Atlanta, His Excellency The Most Reverend Wilton Daniel Gregory, S.L.D., presides over the Eucharist during The Mass of Canonical Installation of His Excellency The Most Reverend Wilton D. Gregory, S.L.D. at the Georgia International Convention Center in Atlanta, Georgia on January 17, 2005.

This moment during the celebration of the Eucharist in Mass is a great way to introduce Archbishop Gregory into the storyline.

Clayton State University Campus Scenics

Only as a last resort should you use the posed portrait to introduce your character. Let the visuals tell the story—SHOW, don’t TELL!

Storytelling involves conflict

My last post was on the elements of the story. This is just on one of those elements: CONFLICT.Here are some tips on capturing that for the visual storyteller.

Conflict—The major problem of the story

There are two categories

  1. External—Happens outside the character, involves more than 1 person, can be observed
  2. Internal—Happens inside of the character, involves only 1 person, can only be observed in the thoughts and feelings
Three types of conflict
  1. Man vs Nature [External]
  2. Man vs Self [Internal]
  3. Man vs Man [External or Internal]
Looking at the photos can you decide which of the types of conflict they are communicating?

Using the visual to create conflict is what a visual storyteller does to help move the audience into and through the storyline.

Breaking composition Rules

Breaking the rules of composition to help create even more tension is one way photojournalists help you feel the conflict of a news event like this one of the car wreck.

Natural Barriers

Sometimes you can just photograph using the natural environment to help create a tension. I use this a lot.

Body Language

Now just how the subject looks and carries themselves can help with establishing the conflict necessary in the storyline.

It isn’t always over the top and hitting you with a hammer, often the body language is more subtle.

Here it is just the eyes of the child who is suffering from Malaria that grab you.

Competition

Sports are great for where you can see conflict.

You can show the offense and defense in one photo.

Expressions

Just the grimace of a person can introduce some tension into a moment and make you want to know more about the situation.

Have you been in school wondering what is going on or just struggling?

Don’t shy away from the photos with tension, they are needed in the storyline.

Not all photos are about a place of peace and calm. Stories require a conflict—are you capturing it? If you are not then are you telling stories?

Visual Storytellers: The elements they use to tell a story

 
To help with the conflict portion of the plot for my story on coffee growers in Mexico, I had to talk about the immigration issue. Why did coffee farmers risk illegally crossing the border before they formed a coffee cooperative? I think this photo with the border patrol is one way to help establish the conflict.
Elements of the Story
 
Storytelling has five main elements of a story: setting, plot, characters, conflict, and theme. Whether you’re studying a short story, a novel, an epic poem, a play o,r a film, if you don’t find these five elements, you’re not looking hard enough.
 
This photo is of a group of illegal immigrants on their journey with a coyote on the Mexican side of the border, hiding from the border patrol before they break across the border. I ran into them while trying to find images to talk about the border. This photo shows one way to show the characters of a story.
Definitions
 
The setting is the place for the story.
 
The plot is the action, the quest for satisfaction, what’s going down, and what’s going to happen. It is a series of events. Every story is a series of events. So the way you order these to create an account is called the plot.
 
The characters are the people in the story who act. All the characters in a story have a history and details about their pasts that are important to understand their personality and present lives. The audience must know some of these details to understand the story. These details are called the exposition. Explaining the characters of a story are early in the story. Often this is the first part of the plot.
 
Conflict is that something has gone wrong! Conflict happens when characters are against each other, like teams in a game or two groups fighting on the playground. 
 
The resolution of the conflict is the story’s climax, the plot.
 
A theme is the hardest to get out of the five main elements of a story. That’s because a story’s main idea or message is usually something abstract. And authors rarely come out and state the main message. Instead, they imply the theme through the other elements of the story. Themes usually explore timeless and universal ideas.
 

This photo could be a scene setter for the story on the coffee cooperative. The red beans are arabica coffee is grown in Salvador Urbina, Chiapas, Mexico.
Fill in the blanks
 
Take each of those elements and identify what those are in your story before you start to shoot. Even in breaking news, you need to understand these elements. Many great photojournalists do this instinctively because great storytellers quickly find the storyline.
 
Create an outline
 
With the experience of storytelling, you may no longer create an outline that you reference formally, but starting this is the best way to ensure that when you get ready to put the package together, you are not missing an element crucial to the story.
 
Luis “Pelayo” Diaz is a coffee grower and one of the founders of Just Coffee. Today his son is studying to be a Dentist, which was made possible through the coffee cooperative.
Here is a list of some shots you will use to help tell your story.
  1. Opener: Sets the scene for the story 
  2. Decisive moment: The one moment that can by itself tell the story
  3. Details:  Besides being like visual candy to the report, help often with transitions–especially in multimedia packages
  4. Sequences: give a little variety to a situation
  5. High overall shot: Gives a good perspective on how the elements all fit together
  6. Closer: Besides the classic shot of the cowboy riding off into the sunset, there are other visual ways to help bring the story to a close
  7. Portraits: These photos are great for introducing the characters of the story
It is easier to start with knowing the different elements and having an outline before you begin shooting your story. But, it will also change from what you started—because things change.
 
All these people are waiting to see one doctor in Ghana. So my story was to help tell the story of the need for doctors, and hopefully, through the telling of the story, some doctors would feel the call to go and work at this hospital.
Audience
 
I kept the audience broad when I was telling the cooperative coffee story. I could have easily just targeted the Presbyterian Church and given money to support the missionary who was instrumental in funding the cooperative. I could have also targeted the Catholic Church because they had a role in starting the cooperative.
 
I kept it broad enough, yet I had those audiences in mind. I told the story to those concerned about immigration and looking for a solution. The story was to establish the conflict of illegal immigration, with the resolution being cooperative. 
 
So many patients are on the floor of the patient wing of the hospital. If you look closely, some of those beds have two patients on one bed. I wanted to help show the “conflict” of the story.
I have worked on stories for mission organizations many times through the years. The goal of those stories was to get the audience to Give; Go, or Pray for missions. 


Even in sports, there is a story. Here is one photo you see the conflict. You have offense and defense battling, and the story’s climax is where the hero slams the basket past the defender.
 
Can you look at your photos and find storytelling elements? Are you thinking about the story elements when you are shooting?
 
How can you tell a story if you do not understand what makes up a story? Hopefully, this will point you in the right direction on your next project.

Fujifilm X-E2: Using only available light for meeting

Fujifilm X-E2, XF 55-200mm, ISO 6400, ƒ/3.5, 1/90

Assessment

I walked into the room and a wall with handprints along one side. The wall has lights on it and is the brightest spot in the room.

The problem, as seen in the first photo, was the speakers’ background. They might have been standing in front of a window with sunlight coming in. There were no lights on the speakers except for the room lights, which were much darker than the wall.

The first thing I do in any situation—looks around and see where the light is and isn’t. I then pay attention to the type of light in the room.

I am assessing the direction and the quality of the light in the room.

Fujifilm X-E2, XF 55-200mm, ISO 6400, ƒ/4.4, 1/70

As long as I wasn’t photographing the speakers, the rest of the room didn’t present the same issues as the backlit speakers.

Custom white balance

To get the best possible color in photos, I rely first on ExpoDisc. I bought the original version in the 77mm size. I hold this in front of the lens to set the white balance.

In the new version, you can get filters that you put over the ExpoDisc, which let you warm up or cool down your color temperature.

If you use a slightly blue filter, your camera will add the opposite color, yellow, to try and color correct the image. This process will warm up your photos.

If you use a slightly yellow filter, the camera will add blue, making your photos cooler.

Since the ExpoDisc is going over the lens and capturing the light as it hits the filter, this gives you an incident light reading.

A general rule is an incident light reading is more accurate than a reflective reading. It is better because it just reads what the amount of light is hitting or the color of the light.

The camera set the Kelvin to 3650 and added 30+ magenta for my photos.

Since I was under fluorescent/sodium vapor type of lights, I had to use a shutter speed slower than 1/100 to avoid color banding in the photo.

Fujifilm X-E2, XF 55-200mm, ISO 6400, ƒ/4.6, 1/70

Exposure Value Adjustment

I shot the photos using the aperture priority mode on the Fujifilm X-E2. First, I picked the A for the shutter speed and then shot wide open with the aperture. I am using the MULTI metering mode for the Fujifilm X-E2.

I had the camera set to use AUTO ISO. On the camera, I set the low-end ISO to ISO 100 and the high-end ISO 6400. I put the shutter speed to 1/100 since I didn’t want to go above this due to the fluorescent/sodium vapor lights.

I am using the electronic viewfinder (EVF) while shooting. The EVF gave me a significant advantage over my DSRL because I saw what I would get later. The minute I put the camera on the speaker, all that backlight was silhouetting my speaker.

To get the correct exposure on the speaker, I adjusted the EV dial by +2.7, which is what you see above.

Fujifilm X-E2, XF 55-200mm, ISO 6400, ƒ/4.8, 1/50 [focal length 200mm & 35mm equivalent 300mm]

I am handholding the Fujifilm X-E2 with the XF 55-200mm. This speaker photo’s lens is equivalent to a 300mm lens on my full-frame DSLR. So shooting at 1/50 shouldn’t be this sharp. The reason is the lens has optical image stabilization (OIS). The image stabilization function allows the use of shutter speeds 4.5 stops slower. As you can see, the photo looks pretty sharp for 1/50.

OIS cannot help you if the subject moves a lot while you are taking the photo. It just helps keep your camera steady.

Fujifilm X-E2, XF 55-200mm, ISO 6400, ƒ/4.7, 1/30 [RAW image processed through Adobe Lightroom]
Fujifilm X-E2, XF 55-200mm, ISO 6400, ƒ/4.7, 1/30 [JPEG from camera no Adobe Lightroom]

Why not ISO 12800 or 24600?

Frankly, I am not thrilled with how the Fujifilm X-E2 handles skin tones. They tend to come out just a little waxy for my taste. Also, to use an ISO greater than ISO 6400 on the Fujifilm cameras, you must shoot JPEGs, not RAW.

If the photos were not working, I would have shot at a higher ISO and lived with the trade of the waxy skin tones versus not-so-sharp images.

Fujifilm X-E2, XF 55-200mm, ISO 6400, ƒ/4.8, 1/75

For Comparison

Nikon D4, 28-300mm. ISO 12800, ƒ/5.6, 1/125

The one thing I still like about the Nikon D4 over the Fujifilm X-E2 is shooting raw at even higher ISO settings. As a result, the photo above is in available light like the Fuji, and the lens also has image stabilization to help with camera motion.

How about strobes?

Nikon D4, 28-300mm. ISO 6400, ƒ/5.6, 1/200 [2 Alienbees B1600 lights bounced on 1/32 power]

I also shot photos using two Alienbees B1600 lights with Pocketwizard Plus II on the lights receiving the radio signal from the Pocketwizard MiniTT1 Transmitter on the Nikon D4.

The flashes helped a great deal with the quality of the image, but at what sacrifice? They announced to everyone in the room when I was taking a photo. It made the people too aware and less relaxed.

No question that you get better quality light with strobes, but unless you are dealing with professional actors/actresses, you will not get the best expressions during a meeting. Sure, you will get some, but I believe available light is the way to go—if possible.

Nikon D4, 28-300mm. ISO 6400, ƒ/5.6, 1/200 [2 Alienbees B1600 lights bounced on 1/32 power]

Here are a couple more photos for you

Fujifilm X-E2, XF 55-200mm, ISO 6400, ƒ/4.6, 1/110
Nikon D4, 28-300mm. ISO 6400, ƒ/5.6, 1/160 [2 Alienbees B1600 lights bounced on 1/32 power]

Hair bit more excellent color with the flashes, but if I am getting the photo with the Fujifilm X-E2 that looks this good without flash, why use flash?

Saint Patrick, Spring & Migration

Fujifilm X-E2, XF 55-200mm, ISO 2500, ƒ/5.6, 1/500 [Eastern Bluebird]

Imagery used as symbolism

In Native American culture, animals have specific meanings. For example, they attribute the bluebird to happiness, joy, and contentment.

Seeing bluebirds is a sign of Spring. This Thursday, March 20th, is the first day of Spring.

Fujifilm X-E2, XF 55-200mm, ISO 1250, ƒ/5.6, 1/500 [Red-bellied Woodpecker]

Many woodpeckers are protectors of the trees and refer to people who are protective of nature and their surroundings. It refers to an apparent surge of power and a dynamic outlook toward life. They are also symbolic of prophetic and mystic powers.

Most cultures use those things we see to help communicate truths through stories. However, when those things in nature are not always with us but come just during certain seasons, they help to remind us of values in our culture.

Fujifilm X-E2, XF 55-200mm, ISO 800, ƒ/5.6, 1/500 [Yellow-rumped Warbler]

Saint Patrick’s Day

Saint Patrick used the three-leaved shamrock to explain the trinity and helped establish Christianity in Ireland.

When he was about 16, he was captured from his home in Great Britain and taken as a slave to Ireland, where he lived for six years before escaping and returning to his family. After becoming a cleric, he returned to northern and western Ireland. In later life, he served as an ordained bishop, but we know little about the places where he worked. By the seventh century, he was the patron saint of Ireland.

We observe Saint Patrick’s Day on March 17th, the date of his death.

What is powerful to me about his story is that he went back to Ireland after being treated as an enslaved person by them.

Migration

Birds and people migrate in search of work—the adage of the early bird getting the worm is why they look to work.

Nikon D3S, 24-120mm, ISO 4000, ƒ/6.3, 1/1000

This coffee farmer used to migrate to Atlanta from Mexico to find work to support his family. However, he no longer must migrate due to fair trade for his coffee.

Nikon D3S, 24-120mm, ISO 12800, ƒ/5.3, 1/60

Tommy Bassett heard the story of the migrant coffee farmers from Daniel Cifuentes in 2001, and by 2002 they had formed a cooperative.

Saint Patrick and Tommy Bassett traveled not to find work but to liberate people. Saint Patrick brought Christianity to Ireland, and Tommy helped to bring hope to the coffee farmers in Salvador Urbina and El Aguila, located in the Chiapas region of Mexico.

Today JustCoffee.org has changed the lives of more than sixty farmers, their families, and their communities.

Today many of us will Wear Green and avoid the tradition of getting pinched for not wearing it. The symbolism is to draw our attention back to Saint Patrick today. He migrated to Ireland to do God’s work in telling the good news of Jesus Christ.

Fujifilm X-E2, XF 18-55mm, ISO 6400, ƒ/8, 1/35

March is the time of year when our family craves ice cream. So one of the places when I drive by often get me to pull in, is Bruster’s Real Ice Cream.

Power of images

Today I hope every photographer takes a photo that will help remind people of something about the world in which we live that calls people to action. That is the power of the photograph.

The LCD: The Ides of March

The LCD has become the best friend for way too many photographers. Today we are reminded to be aware of those closest to us. It wasn’t good for Julius Caesar — he got stabbed 23 times by his trusted friends on this day in 44 B.C.

Those who rely solely on the LCD will most likely die a terrible death when they pull these same incredible photos into their computer and enlarge them on their much larger computer screens.

There are a couple of things that the LCD will consistently let you down on, and you need to know what they are, or you will be burned.

Focus can appear sharp on the small LCD on the back of the camera. This is especially true if you never zoom in on the photo to check the image at 100%.

I can tell you from experience that even zooming in on the LCD may not be accurate regarding the final image.

Camera movement may not show up either on this small LCD.

Not seeing details on the camera’s LCD is why they have a computer on location on significant advertising photo shoots. They pull the images up on the larger screens so the creative and art directors can approve the photos.

What are you to do in the field?

Professional photographers have always used some benchmarks to set the camera for camera movement.

First, they consider the focal length lens they are using. Depending on the focal length as w ll, you should consider your shutter speed. For longer focal lengths, you will probably need faster shutter speeds. Without image stabilization, you are best to use a shutter speed denominator larger than the length. So, your ideal rate for a 200mm lens would be 1/250 for a good-quality photograph.

Today many people are shooting with long focal length lenses like 500mm and 800mm due to the popularity of those bridges. Bridge cameras fill the niche between the single-lens reflex cameras (SLRs) and the point-and-shoot camera.

The other thing affecting the focal length is crop factors due to the size of the smaller sensors.

You may need to shoot 1/2000 of a building just because of the focal length.

Nikon D4, ISO 12800, ƒ/5.6, 1/1250, Sigma 120-300mm ƒ/2.8 with 1.4 converter

Second, you need to consider the movement of the subj ct. Athletes in sports are not standing still. My rule is to shoot sports whenever possible at 1/2 00. If you can shoot faster, you will increase the likelihood that the photo is razor sharp.

Do use the histogram on the  CD. It will help you. If it doesn’t look sharp on the LCD, it will only look worse when you enlarge the image.

Your LCD can help, but realize that you cannot depend on it to give 100% accuracy. Do zoom in on your images to check for sharpness, but know you may be close, but it could be sharper due to camera movement or focus.

Hopefully, you are now aware of the LCD being potential “The Ides of March” for the photographer.

Missions Storytelling Workshop in Lisbon, Portugal

The Missions Storytelling Workshop is an excellent opportunity for you, but you need to move quickly. They will accept up to only 11 people. Deadline is 3/18/2014

Host: ABWE is an unaffiliated, independent Baptist missions agency providing like-minded churches with vital services to expedite their Great Commission ministry.
Where: Lisbon, Portugal
Dates Needed: 5/14/14–5/28/14
Cost: $2,800
Duration: 15 Days

Go here to register

http://www.abwe.org/serve/opportunities/photo-workshop

For questions, check with Jeff Raymond @ mailto:[email protected].

Your Teachers

• Jeff Raymond, ABWE Director of Visual Communications
• Stanley Leary, Visual Storyteller
• James Dockery, ESPN Video Editor


Requirements:

Requirements are that you know your way around your camera. We will consider you if you have been a freelancer or shooting on staff and have no college background. So this experience will count for your college requirement.

While we would prefer that you know your software, this will not keep you out of our selection. We expect you to understand how to get the pictures off your camera and your computer. We recommend that you have photo editing software like Adobe Lightroom or Photoshop. Also, you will need some software to put together a complete package. Most PCs and Macs come with a basic editing video package. For the Mac, it is iMovie.

You can also use the more advanced Final Cut Pro or Adobe Premiere if you like.

You can also use software like Soundslides, ProShow Gold, or FotoMagico to put your package together.

Gear

Bring your laptop computer with the photo editing software and some video/slide show software.

I recommend the camera gear for moderate wide-angle to moderate telephoto lens coverage. This would be like 28mm to 200mm on a full-frame camera. Also, a flash that you can bounce or take off the camera will sometimes be necessary for your coverage.

Who are the subjects?

You will be working with ABWE missionaries. Some might be doctors, evangelists, teachers, and many other roles. We will assign you a person for your story. You will be working alone on a story, with our coaching you all the way.

You will meet the people you will be covering and then spend some days capturing their lives and the people they come into contact with.

The Audience for the story

These missionaries will use your stories to help them communicate with their supporters. The Audience may also include the larger ABWE Audience of churches and supporters.

Stanley’s Thoughts on this opportunity

I have gone on many mission trips and grew up on the field. When people go on a mission trip, they go with a group. This makes for terrible photos, in my opinion. You are tagging along with the group and often do not have time to capture the everyday life of people.

This is one of the best opportunities I know of where you can get in-depth coverage without your group rushing you to the next timed event.

If you feel called to do mission photography and are unsure how to do it, this is a perfect opportunity.

If you already enjoy shooting and want the opportunity to shoot missions and don’t know how to hook up with missionaries, then this is also perfect for you. This way, ABWE people can get to know you, and then you can understand their requirements. The workshop can lead to more opportunities for you.

Comparing “Bokeh” on Nikon, Sigma and Fuji lenses

Which camera and lens took this first photo? Here are the choices

  1. Nikon D4, Nikon 85mm f/1.4 AF-D [Lens $969]
  2. Nikon D4, Sigma 70-200mm f/2.8 EX DG APO OS HSM [Lens $1249]
  3. Nikon D4, Sigma 120-300 mm f/2.8 DG EX APO IF HSM [Lens $2500]
  4. Nikon D4, Sigma 120-300 mm f/2.8 DG EX APO IF HSM, with Sigma 1.4 converter [converter $249]
  5. Nikon D4, AF-S NIKKOR 28-300mm f/3.5-5.6G ED VR [Lens $897]
  6. Fujifilm X-E2, FUJINON XF 55-200mm f/3.5-4.8 R LM OIS [Lens $699]
  7. Fujifilm X-E2, FUJINON XF 18-55mm f/2.8-4 OIS Zoom [Lens $694]
It might surprise you. For this exercise, I shot each lens wide open at the most extended focal length and the closest distance the lens would focus. There is a slight focus issue due to my skills in placing the tripod and subject, but you can see for yourself and pick the photo that matches the above image.
Nikon D4, Nikon 85mm f/1.4 AF-D
Nikon D4, AF-S NIKKOR 28-300mm f/3.5-5.6G ED VR
Nikon D4, Sigma 120-300 mm f/2.8 DG EX APO IF HSM
Nikon D4, Sigma 120-300 mm f/2.8 DG EX APO IF HSM, with Sigma 1.4 converter
Nikon D4, Sigma 70-200mm f/2.8 EX DG APO OS HSM
Fujifilm X-E2, FUJINON XF 18-55mm f/2.8-4 OIS Zoom Lens
Fujifilm X-E2, FUJINON XF 55-200mm f/3.5-4.8 R LM OIS Lens
If you had difficulty figuring out the top photo, it is the Fujifilm X-E2 with the FUJINON XF 55-200mm f/3.5-4.8 R LM OIS Lens.
When photographing people for portraits, I love the Nikkor 85mm f/1.4 AF-D. While I can get closer with many other lenses, as you can see above, any closer with the 85mm, you are too tight.
I hope this exercise also points out that using a longer lens can give great “BOKEH” if you back up a little and zoom in all the way.
The one lens that wasn’t all that great was the FUJINON XF 18-55mm f/2.8-4 OIS Zoom because it zoomed all the way in at 55mm; the ƒ/4 is just too much depth of field. So If I had the Fujinon XF 55mm ƒ/1.2, I would see something similar to the 85mm ƒ/1.4.
The lesson I hope is that you might try some longer lenses for portraits to get some smooth, silky “Bokeh.”