Hand held light/flash meter

Reading Time: 3 minutes

Flash/Light Meter simplifies lighting.

Anyone using studio strobes will greatly benefit from a flash meter. Here is the older Sekonic Meter I use most of the time. 

The primary thing I use the flash meter for is getting the exposure for my subject. I always start here when shooting. The light I am measuring is the main light because it is lighting my subject, not because of how bright it is.

Once you have this reading, you can take other readings. If you have two lights hitting the subject, as in the photo below, I wanted to control the contrast in the photo, and using a flash meter was very helpful.

This is Masha, one of the School of Photography 1 students I taught in Hawaii a couple of weeks ago. She was my model as I taught the class how to use ratio lights.

In a very classic lighting setup like this, the main light is 45º to the axis of the camera and subject. The sun and light are on the same axis as the camera, perpendicular to the background.

I took a reading first of the main light that is 45º to the right of the camera. ƒ/8 was the reading for the main light on ISO 100 and sync speed of 1/250. I turned this light off and then worked on setting the second (fill light) behind the camera to ƒ/5.6, which is 1/2 the power of the first light.

Once this was set, I turned the lights on and took another reading, and the combined ƒ-stop was ƒ/f/9.

Taking a reading of the background for the top photo of the soldier

When I made the photo of the soldier, I knew I wanted the background, which was white, to be two stops brighter than the subject. The subject was ƒ/16; therefore, the background is ƒ/32.

Some people prefer to read a reflective passage from the background, but either way, the reading needs to be two stops greater than the subject.

Many photographers will measure the background with the lights at full power and then set the main light on the subject by underexposing by 2 ƒ-f-stops.

For the portrait of Masha, I used a black background, put a blue gel over the flash, and metered the background to be 2 ƒ f-stops underexposed compared to the subject. In the photo of Masha, the background was just a tad brighter than ƒ/4, which was 2 ƒ-f-stops darker than the ƒ/9 of the two lights combined hitting her face.

You can do all this using your histogram, but the explanation of how to do it is much more complex than when using the flash meter.

Lighting Setup: Table-top Product Photography

Reading Time: 2 minutes

White or transparent objects on a white background can be very challenging to photograph and can become quite frustrating for even the most experienced photographers.

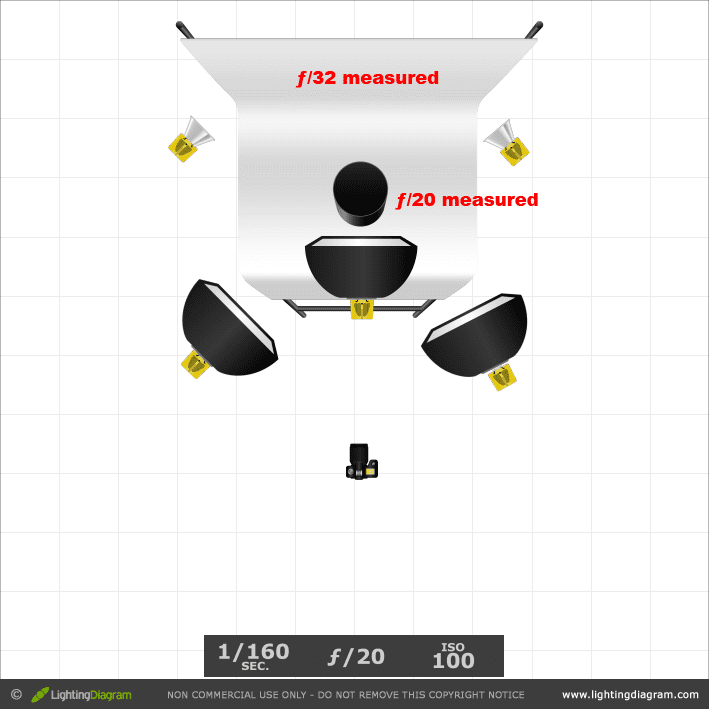
This is a basic setup for a catalog photo shoot where the object needs to be the focal point. 

I have a couple of examples here. You have the lighting diagram of the setup, and finally, there is a list of what I used.

Nikon D4, 28-300mm, ISO 100, 1/160, ƒ/20


Lighting Ratio

The key to this lighting setup lies in striking a balance between the background and the subject. I recommend adding one f-stop more light to the background than to the subject.

You measure this with a flash meter. Always start with the light on the subject.   Measured the light at f/22 on the subject and then measured it on the background at f/32.   Then bracketed shots from ƒ/16 to ƒ/32 and pulled them up in Lightroom. After carefully examining the details in the subject and the background, I chose to shoot at f/20.

I also recommend evenly lighting the object for this type of catalog photography. This is why there are two 32″ x 40″ soft boxes at 45º angles from the camera to help wrap the object in light.

The middle 30″ x 60″ soft box in the diagram below is suspended flat over the table using the Manfrotto boom arm.

To avoid lens flare in this setup, be sure the camera is ever so slightly not perpendicular to the background. Straight on can give you a lens flare.

Supplies

Here is a list of the supplies I used to make the photo.

  • Sequentia 1/8-in x 4-ft x 8-ft White Fiberglass Reinforced Wall Panel

  • BESSEY 2-in Metal Spring Clamps

  • Savage Background Port-A-Stand Kit

  • 30″ x 60″ soft box from Paul C. Buff

  • Manfrotto 024B Boom

  • JTL1200 Chrome Air Cushioned Stand (5016)

  • Sekonic L-308S Flashmate – Digital Incident, Reflected, and Flash Light Meter