Changed my Digital Workflow & Why you should too!

How do photographers add more value to their work so that clients love them?

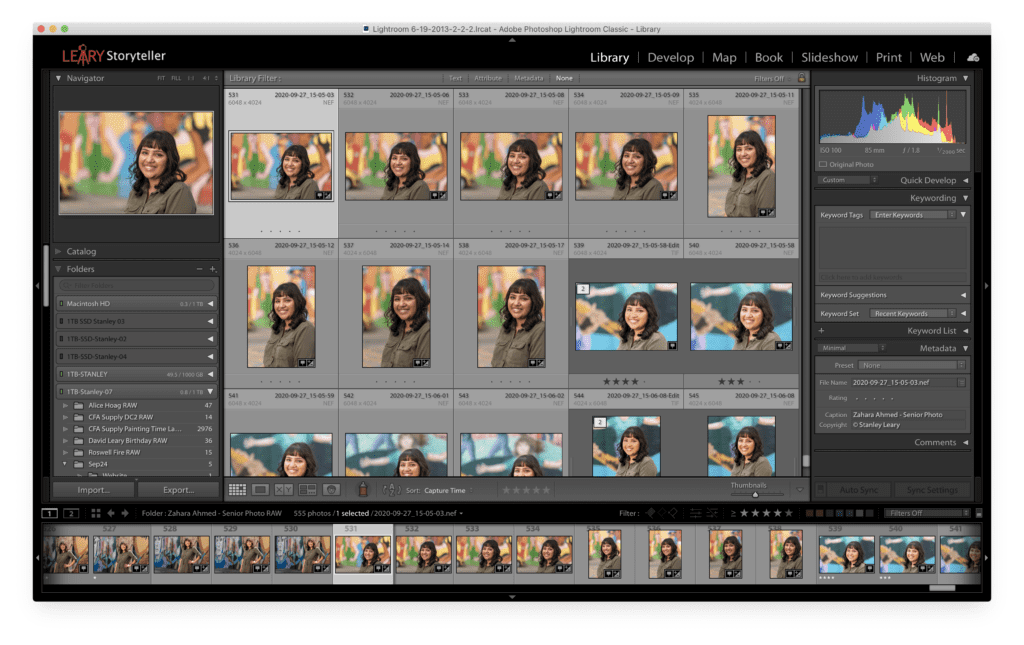
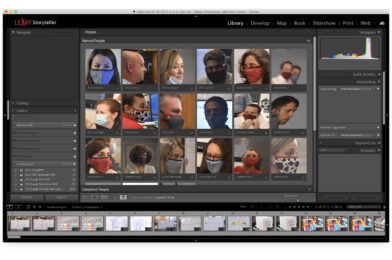
Lightroom Classic CC 7.3 (April 2018 release) has been optimized for more accurate detection of faces in your catalog photos. This means it will search all the images in the filmstrip of a folder or what you have ingested.

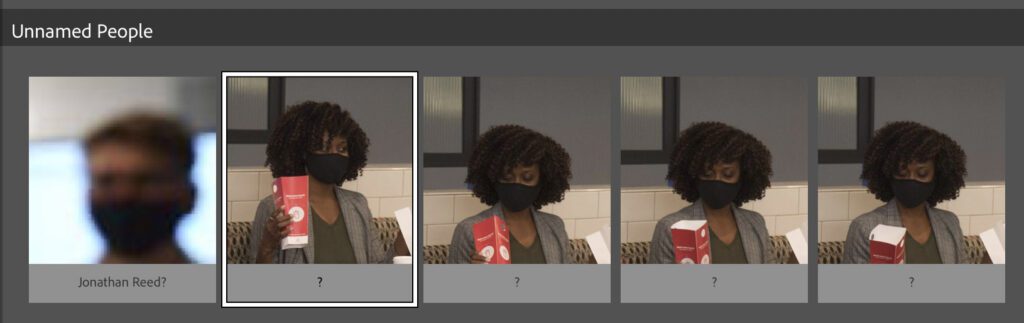
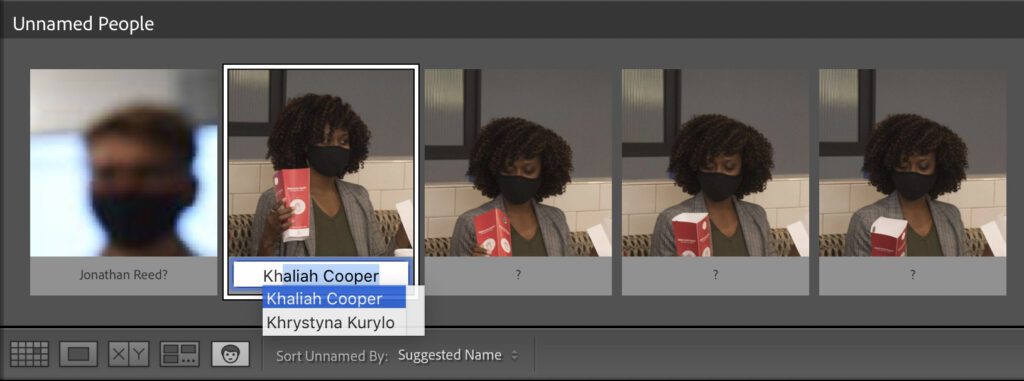
After it has found the faces, it puts them in an “Unnamed People” section. Just click on the “?” and fill in the correct name.

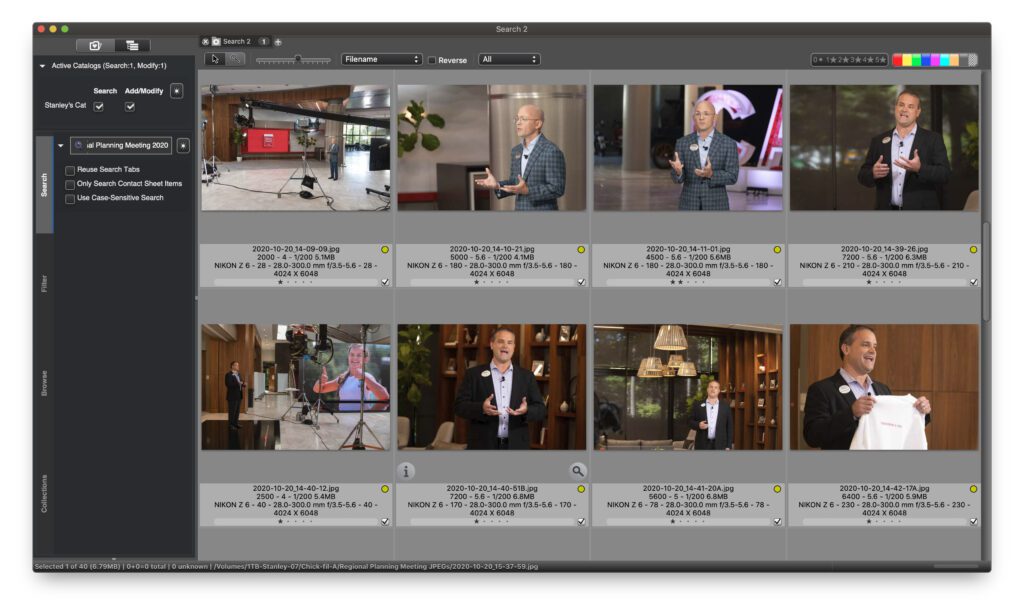
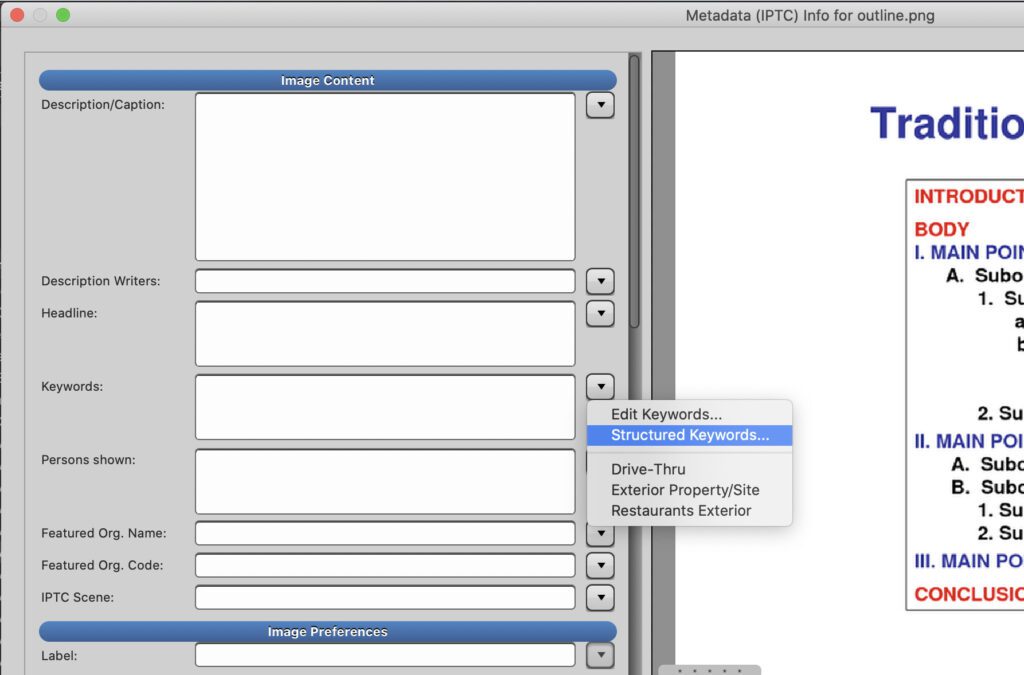
This information is written to the Keywords and a field called the “Persons Shown” area, which I worked with later in Photo Mechanic Plus.

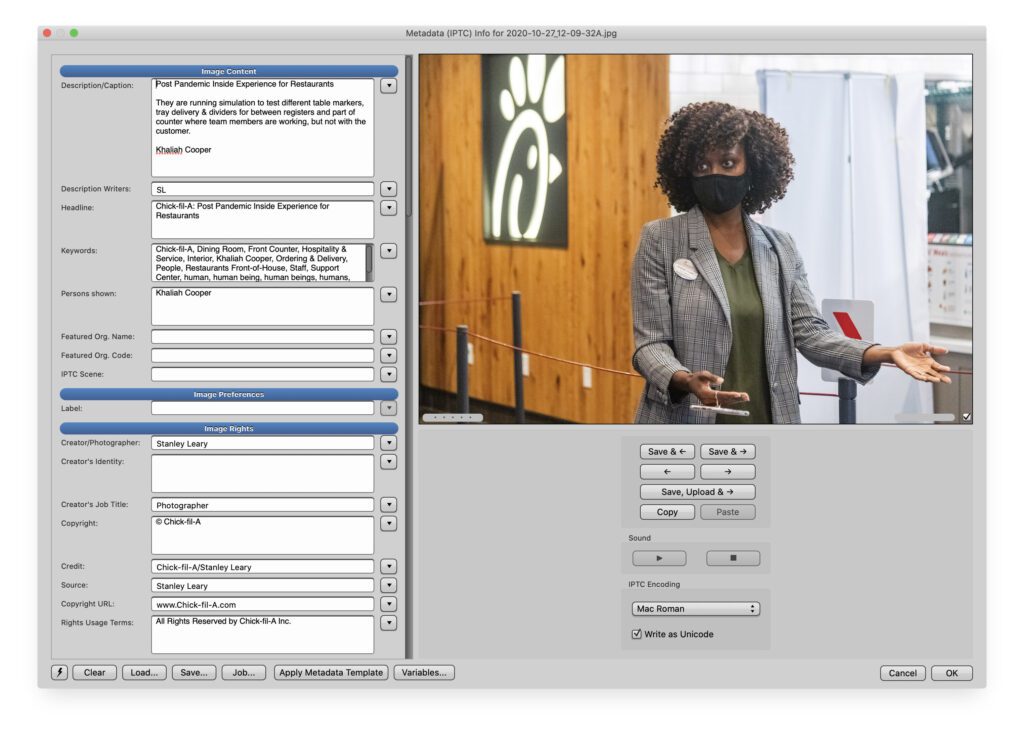
Here, that field is just below the Keywords in Photo Mechanic Plus.

Here is my “Digital Workflow” before the changes I say I need to make to add value to your already awesome photos.

Post Processing

Here is my “Digital Workflow” before the changes I say I need to make to add value to your already awesome photos.

Post Processing
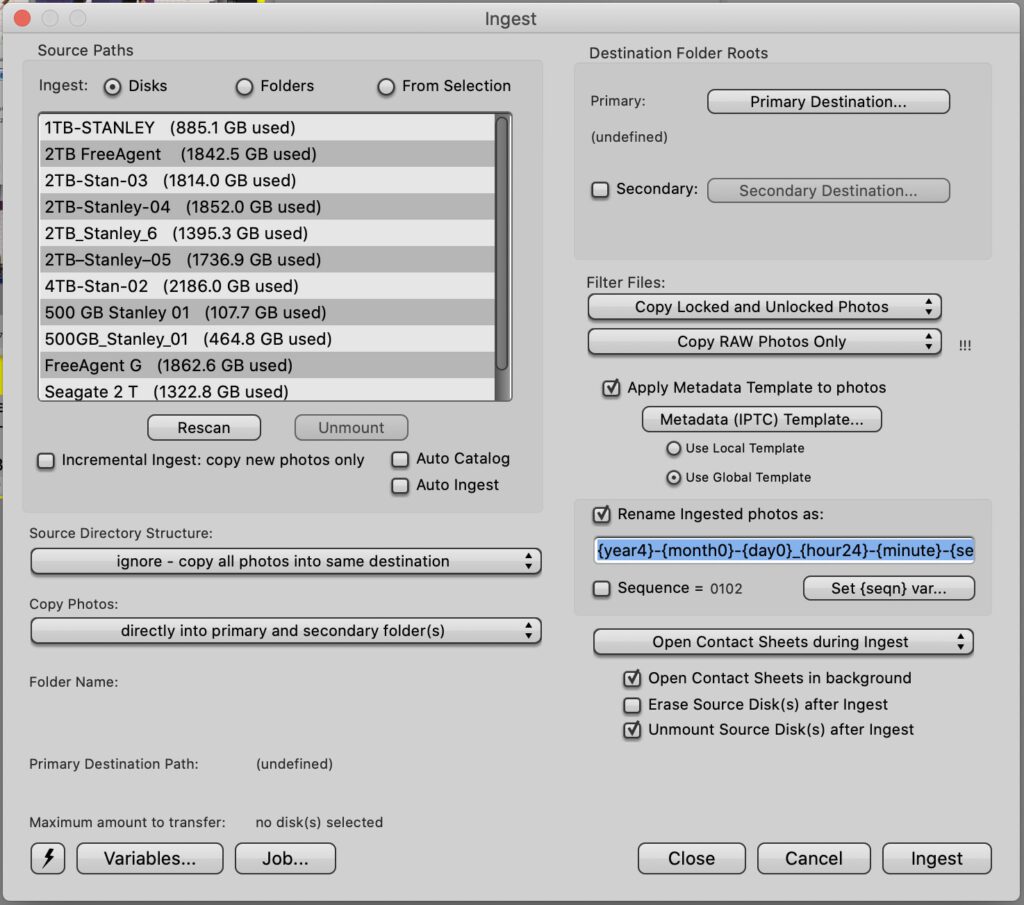
  1. Ingest to PhotoMechanic
  2. IPTC information is filled out and part of the ingesting process
  3. Select the keepers
  4. Delete all untagged images
  5. Import into Lightroom because I am shooting RAW
  6. Using metadata, I select all the photos with the same lens.
  7. Select all with the same lens
  8. Go to Develop Module “D” shortcut.
  9. On the far right, go to lens correction.
  10. Go back to Library, pick another lens, and do the same until all photos have been lens corrected.
  11. Click on profile and enable profile for Adobe Color or select another more appropriate profile by using browsing in the menu.
  12. Tip for selecting multiple images shot in the same scene and do a correction to all at once
  13. Go to settings and then tell it to Match Exposure on all those selected.
  14. ⌘D unselect
  15. Go one by one and check those correctly. Repeat this step for different scenes
  16. Correct for blown-out highlights
  17. Pull in blacks if necessary.
  18. I am often using the Dehaze and Texture sliders.
  19. For sharpening, I use this technique.
  20. Export all images to sRGB JPEGs Quality 80
  21. Open PhotoMechanic
  22. Upload to my PhotoShelter account for the client

After step 21, where I open the processed JPEGs, I now work on the IPTC metadata.

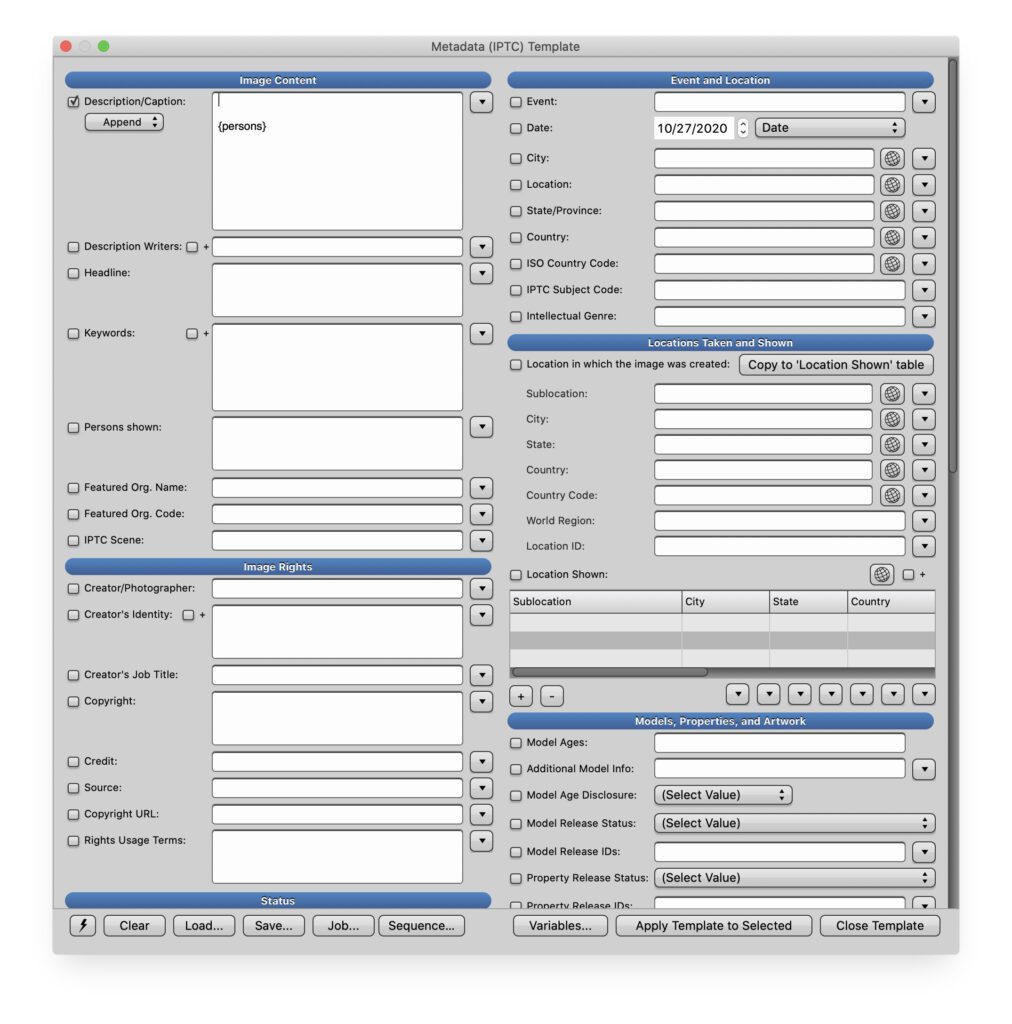
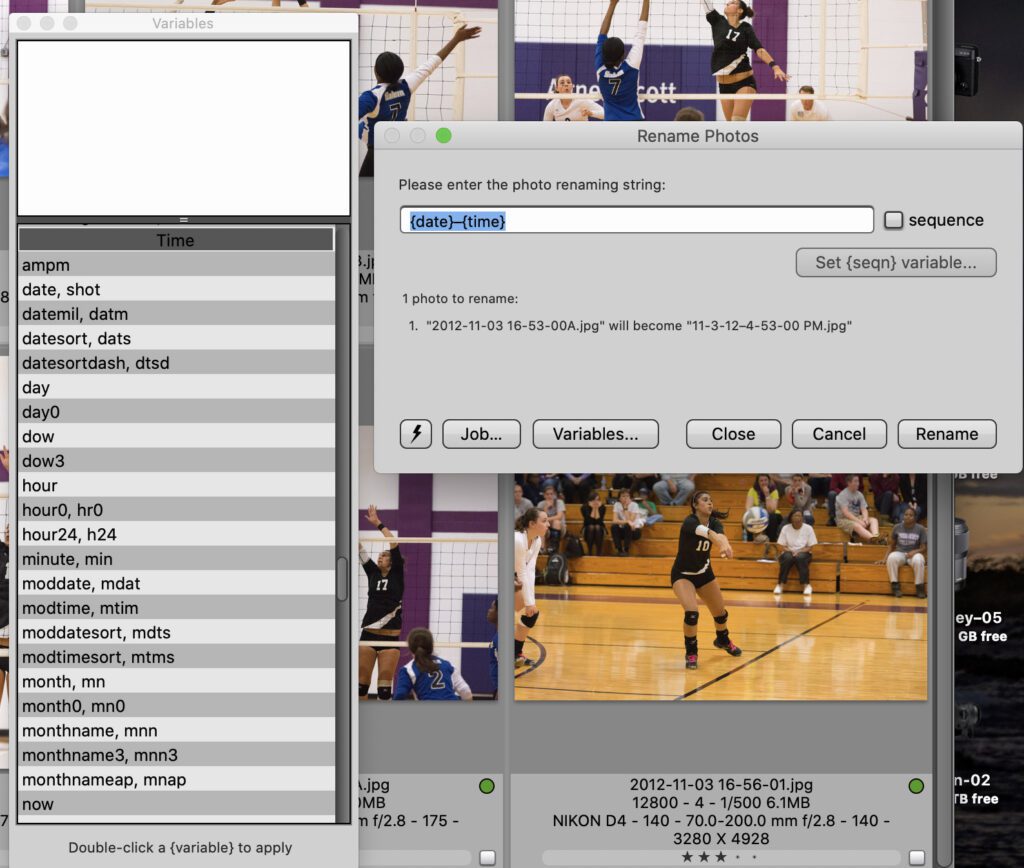
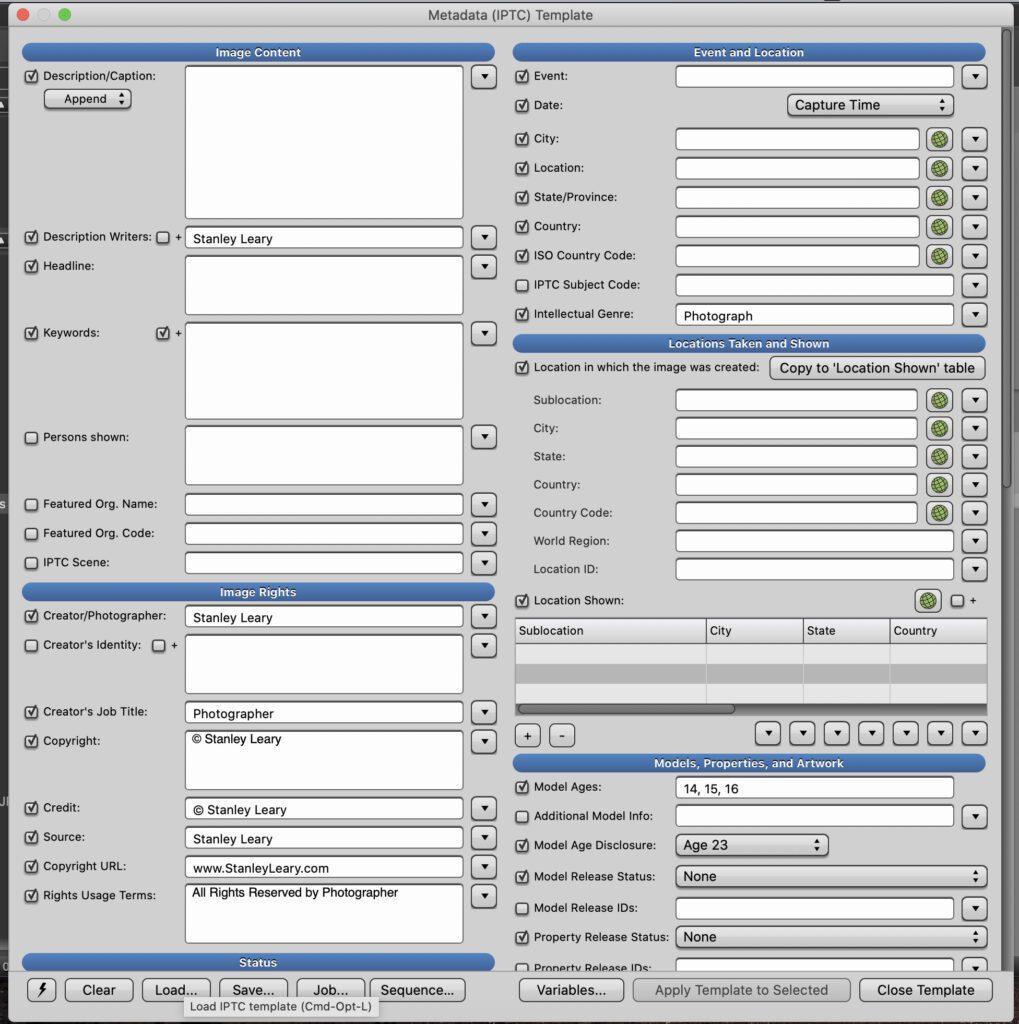
I select all the images and then use the shortcut “⌘+I,” which gives me the IPTC Metadata Master Template. Now I click into the Caption field and hit a few returns. I select “Append” from the pull-down menu on the left. Then I click on “Variables” down on the bottom, find “persons,” and click on it. It puts {persons} in the Caption field.

If I have other changes that would be easy to apply to all the images at once, I often do that here. Let’s say the same basic caption or keywords could be used. I go ahead and make those changes as well. Then at the bottom, next to “Close Template,” I click on “Apply Template to Selected.”

This takes all those identified in Lightroom’s Face Recognition and puts them into the caption field, making them easily searchable with any computer.

While Lightroom does put their names in the Keywords, I wouldn’t say I like that. So I overwrite that with my new keywords that I go and apply one by one or by selecting multiple images using the master template that I clear and apply each time if doing this to various photos.

If you are using the same changes a lot of the time, go ahead and save this template, and then you can load it when needed.

New Digital Workflow for Post Processing
  1. Ingest to Photo Mechanic Plus
  2. IPTC information is filled out and part of the ingesting process
  3. Select the keepers
  4. Delete all untagged images
  5. Import into Lightroom, because I am shooting RAW
  6. Use Face-Recognition to help identify people
  7. Using metadata I select all the photos with the same lens
  8. Select all with the same lens
  9. Go to Develop Module “D” shortcut
  10. On far right go to lens correction
  11. Go back to Library and pick another lens and do the same until all photos have been lens corrected
  12. Click on profile and enable profile for Adobe Color or select another more appropriate profile by using browsing in the menu
  13. Tip to select multiple images shot in the same scene and do correction to all at once
  14. Go to settings and then tell it to Match Exposure on all those selected
  15. ⌘D unselect
  16. Go one by one and check those correct. Repeat this step for different scenes
  17. Correct for blown out highlights
  18. Pull in blacks if necessary
  19. I am often using the Dehaze and Texture sliders
  20. For sharpening I use this technique
  21. Export all images to sRGB JPEGs Quality 80
  22. Open Photo Mechanic Plus
  23. Select all Images
  24. Append caption to include {persons]
  25. Go through all images being sure caption [“Caption” field contains the specifics about a photo]
  26. Using structured keywords apply them to each photo. [“Keyword” field is limited to generic terms]
  27. Upload to my PhotoShelter account for the client

Please send a note with your images telling the client how they can search their images on their Mac or PC.

How to search on a Mac computer?
  1. On your Mac, click the Spotlight icon in the upper-right corner of the menu bar or press the Command-Space bar. …
  2. In the search field, type what you’re looking for—results appear as you type.
How to search on a PC computer?
  • Click the Start button to go to the Start screen,
  • then start typing to search for a file.
  • The search results will appear on the right side of the screen. Click a file or folder to open it.

Any text put into the IPTC Caption or keyword fields is searchable, and they can find those photos.

Do this often enough, and they will no longer be calling your competition for those jobs. Why? They can find your photos and not your competition’s. That is how you increase your value to your customers.

Time for Senior Portraits

I love shooting senior photos for a few reasons. One of the best reasons is meeting young people ready to transition into adulthood.

Max Boggus [NIKON Z 6, 85.0 mm f/1.8, Mode = Aperture Priority, ISO 100, 1/320, ƒ/1.8, (35mm = 85)]

Today I just enjoyed my time with Max Boggus. Last year at this time, I shot his older sister.

We enjoyed shooting these photos in the “Golden Hour of Light.” The next few weeks are prime time to do outside portraits in Atlanta.

Max Boggus [NIKON Z 6, 85.0 mm f/1.8, Mode = Aperture Priority, ISO 100, 1/80, ƒ/1.8, (35mm = 85)]

We did take one photo with the mask to remember this year of COVID-19. No other generation has had this as the norm during their high school years since the “Spanish Flu.”

Max Boggus [NIKON Z 6, 85.0 mm f/1.8, Mode = Aperture Priority, ISO 100, 1/320, ƒ/1.8, (35mm = 85)]

Do you have a senior? Do you have plans to get their senior photo?

Max Boggus [NIKON Z 6, 85.0 mm f/1.8, Mode = Aperture Priority, ISO 100, 1/500, ƒ/1.8, (35mm = 85)]

I like to go to different locations that are important to a senior. Take some time and think of places that mean a lot to you. Here Max is in front of his school.

Max Boggus [NIKON Z 6, 35.0 mm f/1.4, Mode = Aperture Priority, ISO 100, 1/100, ƒ/1.8, (35mm = 35)]

Be sure you take lots and lots of photos when you schedule your time. This is once in a lifetime photo shoot.

Max Boggus [NIKON Z 6, 85.0 mm f/1.8, Mode = Aperture Priority, ISO 100, 1/125, ƒ/1.8, (35mm = 85)]

Give me a call, and let us plan this critical time in your family’s life.

Young or Old has it’s own advantages in this industry

Bill Bangham is working as a coach/mentor with Jennifer Nelson on her story she is doing in Santiago, Chile, as part of the Storytellers Abroad Workshop. [NIKON Z 6, VR Zoom 24-105mm f/4G IF-ED, Mode = Aperture Priority, ISO 8000, 1/100, ƒ/5.6, (35mm = 62)]

Having children in your twenties allows you to do more than in your thirties physically; studies show that living longer gives you an advantage.

A 2015 study showed that women who have their last child after age 33 are more likely to live to 95.

“For the unlearned, old age is winter; for the learned, it is the season of the harvest.” 

~Hasidic saying

When I worked on communications projects in my twenties, I was trying to cover the basics. I didn’t understand how any of what I was doing was helping the bigger picture.

The offering bags are two different colors, one for the levy and one for the offering at Bon Berger (Good Shepherd) Baptist Church in Ouagadougou, Burkina Faso. (Photo by: Stanley Leary) [NIKON D2X, Sigma 18-50mm F2.8 EX DC, Mode = Aperture Priority, ISO 400, 1/15, ƒ/2.8, (35mm = 60)]

Financial experts tell you to put money away early because it compounds interest over time.

While we often only look at money, we have experiences that go into our “EMORY BANK” daily. That, too, is growing with compounded interest.

At the age of twenty, I am just learning to shift those gears, and now, in my fifties, I am looking around and seeing those around me in the race. I look for opportunities.

Clients

When you hire someone new, they have unique things to bring. Their youth and lack of experience are likely flexible because they are not locked into a process.

When you hire someone with experience, they bring all that to the table. They can anticipate your needs better than you can often. They have been there before. Just because they are older doesn’t mean they are not flexible. Usually, those with experience are more flexible. They made the mistake in the past of not listening to the client when they should have.

Creatives

Never be ashamed of your experience level. Use whatever you have to your advantage.

When you are young, you realize you don’t have experience. That is OK. Many clients want to give new people a break to discover new talent.

When you are old, let the client know you are taking care of them. In your correspondence, use all that experience to ask better questions to help the client achieve their goals and to let them know you are thinking ahead and anticipating them.

“Getting old is a fascinating thing. The older you get, the older you want to get.”

~Keith Richards

Database Advantage of Photo Mechanic Plus vs Lightroom

One of the most significant advantages I have found for using the Database of Photo Mechanic Plus compared to Lightroom’s Library is not having the original file connected to the computer when doing searches.

[!] is the symbol you see when your originals are not online when using Lightroom. While you can see a small thumbnail, you cannot zoom in and see details of the photo unless you have the original image online.

With Photo Mechanic Plus, if you have put the image into your database and it is not online, you get a yellow circle in the right-hand corner next to the filename as in the photo above.

When I look for a photo, I first want to know what the image looks like. While you can look at the picture in Lightroom as a thumbnail and full size for one photograph at a time, you cannot look at them at 100% unless you brought them into Lightroom at 1:1 in the “Build Previews” during the import.

The tips for Lightroom say: “The best option to pick is Auto. With Auto, Lightroom builds previews that match your monitor resolution. Lightroom takes longer to build Standard previews than to create Minimal or Embedded & Sidecar previews. But the benefit is that the Library module runs much faster.”

One of the main reasons so many photographers use Photo Mechanic with their Lightroom is that when it comes to culling RAW images, it is so much faster.

In my opinion, it is the same in the catalog.

I like that I can zoom in 1:1 even with the images offline.

If you want to do this with Lightroom, then you have to select 1:1 when you ingest into the Library.

I love the Catalog function of Photo Mechanic Plus.

Speed up your workflow with Photo Mechanic Plus

I have found that when you take advantage of some features, Photo Mechanic Plus makes the images more valuable.

When you INGEST, be sure to rename your files to a system that works for you and, at the same time, apply what I call the IPTC template for your photo shoot.

Your camera may use the same file names over and over after each format. I recommend using the Date+Time shot as the file name.

Go to the IPTC fields and fill in all the fields you will use for all your photos. Things like your name, address, that you are the creator and most crucial copyright information.

I recommend that you use this function under the location if you have a camera that can capture GPS. It helps when applying the IPTC. You can now know where you took all the photos. I click on the world, and it will look for the GPS data when it is green.

Once you have all the essential information, go and save this as a template. I have many templates because there are some places I regularly go where I need to change a few things. Say you always shoot college sports. Then that location, some of the captions, and even keywords will be the same. Maybe you shoot a wedding at the same venue. Save that venue.

If you have been saving templates, your first step is to open the template and then modify it with the specifics for the caption, keywords, or something else. If you always shoot at the same wedding venue, go in and put the Groom and Bride’s names in the caption.

Under “Edit>Settings>Set Code Replacements,” you can select a TXT document. You have two columns. When you first type on the document, put in a shortcut like “bride” and then “TAB” and write the bride’s full name. Now imagine complicated spelling. This will save you a lot of time.

When you hit “RETURN,” the next row does the same thing by saying “groom.” In sports, shortcuts can be jersey numbers that will help you identify players and their positions in games.

Pay attention to the “Delimiter Character” left-hand corner of the Code Replacement screen. You put that symbol in front and behind the shortcut text. When you put the final symbol in, says the caption, the computer puts all that long text in. You can use a shortcut for a long sentence if you like. This is to save you time.

If you create a taxonomy of keywords using this outline without the numbering, this can be used in what Photo Mechanic refers to as a “Structured Keyword.” It will look like this below, minus the bullet points.

  • North America
    • United States
      • Alabama
    • Mexico
    • Canada

You can use Microsoft Excel and create your list as well. A column and indent would be the B column and so on. If you save it as a TXT, it can be used as a Structured Keyword list.

Click on the drop-down menu on the right of keywords in the IPTC screen. Pick the Structured Keywords.

This is the default that comes with Photo Mechanic. I have written my own for different clients.

This lets you quickly add keywords to a photo.

When you have done this just once, the keywords will be under the Structured Keywords, so you don’t have to recreate it if you want to use the same or another one you created. It keeps those as another shortcut.

My last tip is that you can simultaneously apply any of these to multiple images.

Select all the images or selects and then CMD+I to bring up the IPTC. You change anything in this and then tell it to apply to your selection.

You can do the same thing by selecting images and CMD+M to rename all the photos you have chosen.

On average, going one image at a time can take about 5 minutes to write a caption telling us the Who, What, Where, When & How, as well as adding Keywords. But using code replacement, structured keywords, and applying those to multiples when you can–will save you an incredible time.

The last tip. Do this enough, and your speed will increase over time.

Listen, Ask Questions, Listen More

Lennox Boodram, a ministry partner, saved from drug and alcohol addiction, runs a Christian drug and family rehab center (Turning Point) that has been operating for the past five years. He is talking with some of the students from Cedarville University taking the workshop this week in Trinidad. [NIKON Z 6, 24.0-105.0 mm f/4.0, ISO 11400, ƒ/4, 1/250, Focal Length = 105]

When we run our Storyteller’s Abroad Workshops, we teach how to listen and ask questions, followed by more listening and asking even more questions.

Naz Mohammad [Blue Shirt] – Pastor of a church plant in St Augustine, born and raised in St Augustine. He is talking with some students who will be doing a story on him this week. Ñ at St Helena Shiv Mandir. [NIKON Z 6, 24.0-105.0 mm f/4.0, ISO 12800, Ä/4, 1/250, Focal Length = 28]

I believe this is the step more people miss than any other part of the process of telling stories.

What are you listening for?

I do this with all my clients, no matter the project. Before we even tell a story, we ask the organization/client what problem they need to solve. If we do our job as professional communicators, what will success look like to them?

Often I must start with other questions to finally get to the answer to the first question.

Who is the audience?

You would be shocked when you discover often they have never thought about who they are trying to communicate with. It is much easier for any communicator to know if they are speaking to a child or an adult.

Call to Action?

What do you want them to do once they have heard this story?

Where in the process are YOU working?

Often you are just part of the story process. They need you to take a photo of the groundbreaking. Your image goes along with the written story.

In this case, I want to know if the photo is online, used in print, or just how big it will be. This could influence what resolution I need to shoot the picture.

When I set up the photo for a groundbreaking, it helps to know who all the people are in the image. Sometimes it is better to have people line up in order of importance based on how the caption is written.

The client has identified a person for the story.

When we do the workshops, we talk to the team to ask how we can help them. This usually involves a few meetings where we find out about one significant initiative. They are raising money for the hospital to be updated. It hasn’t had any updates for more than 40 years.

The team has identified some former patients who received care in the past. Some of the workshop participants will now help tell those individual stories.

This is often how to say a producer is hired. They ask some questions to help them get up to speed on the strategy and know how this person’s story helps raise funds for the hospital.

In the blue shirt, Jay York is interviewing Elvira Cuevas, in a pink shirt to tell her story. Andrea Carhuachîn, in the back, is helping by translating from Spanish to English for Jay. This is one of the stories we did during the Storytellers Abroad Workshop in Lima, Peru. [NIKON Z 6, 24.0-105.0 mm f/4.0, ISO 2200, ƒ/4, 1/200, Focal Length = 24]

Our storytellers ask their subjects to tell them their stories. Most of the time, they listen about how they had a problem for which the client helped them.

I like to try and get the story into a basic storyline that works within one sentence.

  • The SUBJECT had this PROBLEM.
  • The CLIENT had a solution.
  • The SUBJECT took the advice and
  • PROBLEM was solved.

Before recording with video or writing the story, I verify with the subject if I have the story correct. I tell them their story.

Now when I work on capturing the story through quotes by writing, video, or audio in addition to visuals, I am very aware of who the audience is and what I want them to be able to do once they have seen the story.

In journalism, I want to inform the audience so that they understand the problem. Often that is where I stop. There was a fire, and people lost their homes—end of the story. I want the public to be informed so they can choose how to respond.

In advocacy work, I am taking it a step further and saying they can give to the Red Cross and help people like this family who lost their home.

All through this process of listening, you are trying to understand your role as a communicator. You should know your part and be able to tell anyone what you are doing and why.

Remember, the role you play is not defined by you but by the client. Your job is sometimes to help the client know what you need to know to help them achieve their goal.

Often you will discover that if you do your job as a communicator, you have to help the client understand they need a strategy and that the tactic you are doing for them helps to achieve their goal.

“That’s not your job!”

When we first start to work, sooner or later, most of us hear from our bosses, “That’s not YOUR job.”

The other mistake we make is when we push back and say, “That’s not MY job.”

Nicaragua [NIKON D5, 24.0-105.0 mm f/4.0, Mode = Aperture Priority, ISO 100, 1/640, ƒ/4, (35mm = 95)]

We soon learn that the person paying us determines our role. That is why virtually every good job description has, or should have, a clause that reads, “Other duties as assigned.”

If you don’t like what they are asking you to do, you have two choices; 1) comply, or 2) quit.

Many of us then dream of being our boss one day. When you become your boss, you join 54 million other people who enjoy the flexibility and perks of working independently. However, it is a mistake to think you have no boss.

Your boss, in many ways, becomes the customer/client. Following the money trail will reveal who you must please to earn a living.

You are always in control. You choose what you will and want to do. Sometimes quitting is necessary. Sometimes entrepreneurs fire clients.

Nicaragua [NIKON D5, 24.0-105.0 mm f/4.0, Mode = Aperture Priority, ISO 32000, 1/100, ƒ/14, (35mm = 24)]

Missionaries & Nonprofits

When you go to supporters and raise funds, you tell them what you will do with their money. You must be ethical in your fundraising. It would help if you were transparent. There are even laws about where you spend that money.

Churches define missions and ministry differently. They are not interchangeable.

Missions are about being outwardly focused. This is all about reaching out to those outside the church and bringing them inside the church to be members.

Ministry is all about being inwardly focused. This is all the programming you do for your members. Bible study, choir programs, worship services, and small groups are just a few things you do for your members.

No matter what you are doing, you must be clear about the funds being raised.

While I will talk mainly about missionaries, it applies in many ways to any nonprofit.

The very first missionary of the church was the Apostle Paul. He went to a new community and spoke to them about Jesus. Many believed that once there was a core group, Paul moved on. He had accomplished his mission.

Storytellers Abroad Workshop Bucharest, Romania Herăști, Giurgiu, Romania [NIKON D4, 14.0-24.0 mm f/2.8, Mode = Aperture Priority, ISO 12800, 1/80, ƒ/3.2, (35mm = 15)]

Those local groups of Christians may have Paul come back and speak occasionally, but for the most part, his goal was to tell enough people about Jesus and form a group that would become a church.

Those who supported Paul were supporting him in that process. They were not helping him to become a pastor of that local group of believers.

Today, many missionaries struggle with what I call the grey area. What is the difference between, say, a pastor and a missionary?

Follow the money is how often this is distinguished. If a local group pays you, you are doing ministry most of the time. However, if a group delivers you from a different location, you are most likely doing missions.

It is about establishing a process to fund you.

I find many missionaries need to be told, “That’s not your job!” The sad thing to me is there are many ‘missionaries’ who lack accountability to their supporters. They are so far removed that seldom are their held accountable. I often comment that some of these missionaries could never survive back home.

When a person wants to be a missionary, they have two choices. To become an employee of a mission agency or to raise their funds. If they are employees, the organization monitors them and even visits them on the field.

So many who raise their funds lack clarity of their job role regarding their funding.

Over and over, I work with mission teams overseas. I ask how I can help with their marketing pieces. Often they bring up ideas that are not about the supporters supporting them to do missions.

People who support missionaries are giving to have them do like Paul. They offer to pay for his living expenses and materials needed to carry out his role as a missionary. They are not giving money to pay a local pastor through them.

The local congregation, for the most part, relies on their people to give to build a building. People from outside may want to give to the building fund, but this is the exception, not the rule.

Now supporters will help build a church building, a hospital, and even a school to support missionaries. A missionary lives in a small apartment with their family and needs a meeting place to host people. That is often where supporters will help them “get started,” but once they have a small congregation, most supporters see that as the locals now doing the same thing, they are expected to do in their local churches. It is called growing up.

Most working professional communicators talk about how often people come to them wanting a brochure. A good communicator will ask questions like this:

  • Why do you need the brochure?
  • What is the brochure going to help you to accomplish?

A few questions in, and most communicators uncover a total lack of a strategy.

Strategy is an overarching plan or set of goals. Changing strategies is like turning around an aircraft carrier—it can be done but not quickly. Tactics are the specific actions or steps you undertake to accomplish your strategy.

A brochure is a tactic

While working for the International Mission Board during the 1980s, the president was Keith Parks. The biggest thing Parks did was to have the organization revisit its purpose.

Like the Coke commercial in 1985, “I’d like to buy the world a Coke,” Keith Parks wanted to teach the world about Jesus by 2000.

This would change their tactics. With the help of David B. Barrett, who wrote the “World Christian Encyclopedia,” they came up with a formula. The missionaries could move on when they had more than 2% of Christians. The local congregations should have the resources to reach out to their communities.

Parks realized too many of their “missionaries” lost sight of their call. They were living in places that had enough churches. They were sending out their missionaries.

They started pulling people from places they said had reached their goal and moving them to areas unreached.

There was a lot of pushback because these missionaries loved their lifestyles. Not much different than their supporters. They were acting as pastors of large congregations. They were no longer outwardly focused.

Storytellers Abroad Workshop in Lima, Peru [NIKON Z 6, 24.0-105.0 mm f/4.0, Mode = Aperture Priority, ISO 1800, 1/200, ƒ/8, (35mm = 24)]

What prompted this blog post

For the past several years, I have been visiting the locations where we would be doing Storytelling workshops. On each visit, we met with the local missionary team to see what they needed help with and who would make for good stories to communicate their needs.

Every time, at least one person wanted us to do a story on a local person or project, who had nothing to do with what supporters give money. One missionary wanted to tell a story of a congregation pastor who wished to cash to add to their building.

This would be like Paul saying to his supporters to give money for a group of believers to call a pastor. That is about being inwardly focused and doing ministry and not outwardly focused missions.

If the missionary wants help to tell a story of a deaf community of nonbelievers and they need money to start a school to teach braille, then that is their role. Missionaries are not funded raisers for local congregations.

When asking supporters for money

Always know your role and what you are asking people to support. Be sure you have clarity in this process.

With nonprofits, you need to know the purpose of your nonprofit. You need to know your role within that nonprofit. You also need to know when you reach your goal, your nonprofit needs to close down or find a new vision.

Say your nonprofit is putting in wells to help people have safe drinking water worldwide. That goal most likely will never be reached.

If you are to help eradicate Guinea worms around the world, then you might be very close to reaching that goal. The Carter Center has that as one of its objectives. I think they only lack Ghana in the world to finish.

Fundraising works when you communicate a need to a supporter. Seldom do supporters give to wants.

Photo Mechanic Plus: Now Available!

Keeping track of your photos has never been more accessible or more affordable.

First, let me give some background on how we got here today.

Dennis Walker is the President and Founder of Camera Bits.

He started the company in 1996 after his initial exposure to digital photography after his previous job showed him a need for improved image quality and workflow solutions.

Dennis is co-author of the award-winning game Dungeon Master.

Dennis released the first version of Photo Mechanic in 1998. An instant classic was born. Because everyone in the photojournalism business used IPTC standards, Dennis also became an accidental expert on metadata, incorporating tools like batch captioning and variables in Photo Mechanic to simplify and expand the application and usage of metadata in photography.

Photo Mechanic isn’t just for photojournalists; its speed and organizational tools now help all professional photographers work faster and more efficiently. For over 20 years, Photo Mechanic has remained the go-to software for professional photographers worldwide.

External Hard Drives

Like me, you have been embedding your photos with metadata. You most likely have a vast library of digital images. A card catalog system for all your photos was missing for many years.

On February 19, 2007, Adobe introduced Lightroom, which had a Library module. While the Library module of the program is a catalog, it doesn’t work for me for several reasons.

Lightroom VS Photo Mechanic Plus

  • My Lightroom has RAW images that were ingested and therefore takes a long time to bring up galleries and click from one image to the next.
  • All the images are RAW in Lightroom, and when I am in a hurry and need a photo, it needs to be a JPEG, not a NEF or RAW image.
  • Every time I finish processing all my NEF Nikon RAW images in Lightroom, I export them as JPEGs to a folder that is given to the client, and I have them on my hard drive. I include all these processed folders of JPEGs into my Photo Mechanic Plus catalog, which is now faster to search and retrieve images
  • Photo Mechanic Plus is a one-time fee and not a monthly subscription.

Photo Mechanic Plus

Photo Mechanic Plus is a new application that includes all the speed and features of Photo Mechanic with the addition of a premium image database for making catalogs of every photo you’ve ever taken.

  • Scroll A Million Photos Without A Pause
  • Search gives you the power of simple or complex searches to find what you’re looking for across multiple drives.
  • Craft exact advanced searches and then save them always to be able to find what you need
  • Browse by date, camera, lens, rating, color class, anything you need!
  • Use, search, or browse multiple catalogs at once. Keep yourself organized among several projects or search through everything!
  • Use collections to combine images from multiple folders or drives into cohesive units to keep yourself organized or present to clients.

New License
US $229.00
Upgrade from Photo Mechanic Version 5
US $179.00
Upgrade from Photo Mechanic Version 6
US $90.00

Go here to learn more!