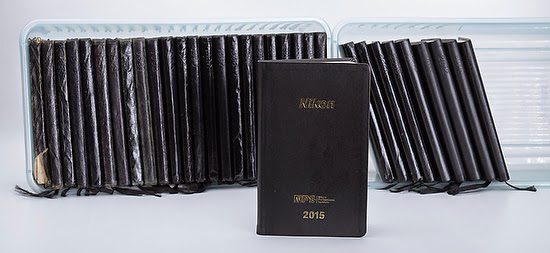
Nikon NPS 2015 Calendar came in, and time to reflect once again.


This afternoon my Nikon NPS pocket calendar arrived. I have been able to put the 2014 calendar in my collection since 1983.

I enjoy looking back, seeing what I did in the past, and counting my blessings. This is the time for reflection at the end of the year.

In the spring of 1984, after I was offered my first job at The Hickory Daily Record, I had to get some new camera gear. Here are the two pages I used to research all the prices at the time.

My parents got me my first gear as my graduation present from East Carolina University. It was a blessing to have my parents help me with college and my gear. I went to my first job debt free–no college loans, car loans, or credit card debt from having to buy equipment.

Here is my first week of work hours at The Hickory Daily Record, with my first day being May 21, 1984.

September 3, 1985, Don Rutledge called me about a job in Richmond, VA. I would drive up that Sunday, September 8, and interview the following day with Warren Johnson. They offered me the job on September 13.

Little did I know how huge of an impact The Hickory Daily Record and working on The Commission Magazine would be in my life. What a blessing it was for me.

On May 7, 1993, I was offered the job work at Georgia Tech in the communications office.

As you can see, after turning the pages, I would graduate the following week with my M.A. in communications from Southwestern Baptist Theological Seminary. Then, I would pack the next day and start my drive to Atlanta, where I have lived ever since.

Sometimes you have to look back, celebrate the milestones, and remind yourself of all you have gone through. Looking back reminds me of how God has provided opportunities for my family through the years.

I leave you with this scripture verse:

Matthew 6:25-34 

[ Do Not Worry ] “Therefore I tell you, do not worry about your life, what you will eat or drink; or about your body, what you will wear. Is not life more than food, and the body more than clothes? Look at the birds of the air; they do not sow or reap or store away in barns, and yet your heavenly Father feeds them. Are you not much more valuable than they? Can any one of you by worrying add a single hour to your life? …

Education and Journalism have a lot in common.

There are a lot of similarities between education and journalism. Just take the storyline and the learning curve, for example. Above is the storyline, and below is the typical learning curve.

I believe the connection between the two is people find themselves in crisis and looking for solutions. Education and a good story both have problems and answers given. How the main character responds in a story can be either a comedy or tragedy.

Storyteller & Educator

The storyteller and teacher must master their content before creating content for their audiences.


I have always liked this illustration for helping me to grasp how learning takes place. While working on my master’s in the education department, the school taught these stages.

I learned that when you teach if you don’t know what level your students are in and what class you are teaching, you will create a problem for the learning environment.

The storyteller and teacher must master the subject. Then, they must be able to go to the highest level of learning, which is a synthesis or the ability to create something new.

The storyteller and the teacher must be able to look at their audience and know how to lead them through the crisis to understand eventually.

Nikon D4, 28-300mm, ISO 7200, ƒ/6.3, 1/250

Great teachers and storytellers have three things in common:

  1. Know their subject as an expert
  2. Know their audience
  3. Know their craft to connect the audience with the subject
If you are a teacher or storyteller and find yourself struggling, it is with one of these three things most often.
 
When I was in the education classes, I noticed we spent a lot of time learning about our audience. We learned educational psychology, which helped me learn how we know and what we can learn depending on the audience’s age.
 
In my communication classes, we worked on the craft of telling the story. Either we were learning how to write, use visuals, or design to help get across the message of the subject.
 
Both education and communications emphasized our need to know the subject well, but both education and communications classes were weak in one of the other two areas.
 
Recommendations
 
Teachers and storytellers, you both need to dedicate your life to learning more about all three of these areas. Your subject will evolve as well as the audience.
 
There are endless ways to engage your audience. It would help if you mixed things up, or your style can get in the form of learning or storytelling. You become predictable and boring.
 
Most of all, keep the passion and curiosity vibrant.

Photographers may need a class in IMPROV

 
Nikon D750, Sigma VR Zoom 120-300mm  ƒ/2.8 IF-ED, ISO 4500, ƒ/2.8, 1/640

All these photos were taken at Roswell High School’s Improv Troupe “What’s the Buzz?” performance on December 5, 2014. That’s my daughter in the blue shirt on the left above. I guess you can tell I am proud of her.

In business today, it pays more than ever to be able to think on your feet. So what better way to train yourself than to learn how to do IMPROV?

Tina Fey is an alumnus of The Second City, an improvisational comedy enterprise in Chicago.

Tina Fey boils down the rules here in her book Bossypants.

The first rule of improvisation is AGREE. Always agree and SAY YES. When you’re improvising, this means you are required to agree with whatever your partner has created.

Now, obviously in real life you’re not always going to agree with everything everyone says. But the Rule of Agreement reminds you to “respect what your partner has created” and to at least start from an open-minded place. Start with a YES and see where that takes you.

Nikon D750, Sigma VR Zoom 120-300mm  ƒ/2.8 IF-ED, ISO 4500, ƒ/2.8, 1/640

Robert Kulhan is an adjunct assistant professor at Duke University’s Fuqua School of Business and said to CNN, “Improvisation isn’t about comedy, it’s about reacting — being focused and present at the moment at a very high level.” So the first rule of improv is a Worldview perspective that lets you join the client where they are at the moment.

In business, you don’t have control over what happens. IMPROV teaches you how to work as a team and learn to go with the flow.

Tina Fey says the second rule of improvisation is not only to say yes, but YES, AND.

The YES, AND principle in performance improvisation means listening to what someone else says, accepting what they say, and then building on that. In business terms, it means getting any idea brought to the table and then taking that idea further.

Nikon D750, Sigma VR Zoom 120-300mm  ƒ/2.8 IF-ED, Sigma 2X, ISO 4500, ƒ/2.8, 1/640

Critical Thinking

The problem with many people in business is they put Critical Thinking often in front of brainstorming and creative thinking. It would help if you had an unconditional acceptance atmosphere for new ideas to come forward. The analysis paralysis occurs if you jump too quickly to critical thinking.

Tina Fey says, “Always ensure you’re adding something to the discussion.”

The third rule Fey talks about is one I get tripped up on in business situations.

Third Rule is MAKE STATEMENTS. This is a positive way of saying “Don’t ask questions all the time.” If we’re in a scene and I say, “Who are you? Where are we? What are we doing here? What’s in that box?” I’m putting pressure on you to come up with all the answers.

In other words: Whatever the problem, be part of the solution. Don’t just sit around raising questions and pointing out obstacles.

Try and be the fly on the wall in your business situations. Listen to yourself and self-audit your comments and body language.

Rule four–THERE ARE NO MISTAKES, only opportunities.

Nikon D750, Sigma VR Zoom 120-300mm  ƒ/2.8 IF-ED, Sigma 2X, ISO 4500, ƒ/2.8, 1/640

Better Listener

You will not know how to respond to others when they finish if you have not listened to them. For example, how often do you talk to someone that is just waiting for you to finish speaking so they can say what they already are planning on saying? Improv teaches us to listen attentively, not just for words but for emotion, intention, point of view, and much more.

Saying yes to things you would typically sabotage will help you believe in yourself and your ability.

IMPROV also teaches you to embrace your emotions. These emotions in business help to connect with others.

“Some people misunderstand improv….It seems that improv is all about being funny. But it is not. Improv is about being spontaneous. It is about being imaginative. It is about taking the unexpected and then doing something unexpected with it….The key is to be open to crazy ideas and building on them. And funnily enough, this is exactly what is needed if we are going to make our enterprises more creative and agile.”

– Paul Sloane

The Leaders Guide to Lateral Thinking Skills

Rules of Improv

1. Always Agree and Say Yes–You are required to react to whatever your partner has created. In real life, you will not agree to everything, but this helps remind us to respect whatever our partner has created. At least start from an open-minded place. Start with a yes and see where that takes you.
2. Yes AND–Add something of your own. Don’t be afraid to contribute. Always make sure you are adding something to the discussion.
3. Make Statements–Asking questions always make your partner have to come up with all the answers. Statements are your way of being part of the solutions. Don’t stand around pointing your finger at obstacles. Make statements with your ACTIONS and your VOICE.
4. There are no MISTAKES, just OPPORTUNITIES–In improvement, there are no mistakes, only beautiful happy accidents.

Nikon D750–Wreaths Across America

 
Nikon D750, 28-300mm, ISO 125, ƒ/8, 1/125

Today is National Wreaths Across America Day. Owner of Worcester Wreath Company formed this organization in 1992 to:

REMEMBER the fallen
HONOR those that serve and their families and,
TEACH our children the value of freedom.
– See more at: http://www.wreathsacrossamerica.org

Nikon D750, 14-24mm, ISO 320, ƒ/9, 1/30

These are the ceremonial wreaths. The ceremonial wreaths represent each branch of the military service, including the POW/MIA and Merchant Marines. The one closest to the camera is the MIA, which I had the honor of presenting.

The letter sent to my grandparents stated that the U S Marine Corps “regretted to inform that 2nd Lt. James Stanley Leary, Jr., 2-G-23 Fourth Marine Division..had been declared Missing in Action while engaged against the enemy on the Island of Saipan, Marianas, in the Pacific.”

[To get this photo, I used the tilting Vari-angle LCD to put the camera way low and look through the LCD to compose on the back of the camera. I love this feature and used it again in the photo below.]

Nikon D750, 28-300mm, ISO 100, ƒ/8, 1/125

I shot the photo in RAW and recovered the shadows and highlights in Lightroom. Here is what it looked like before I adjusted the image:

While Nikon has many settings that will get some pretty great JPEGs out of the camera, they still do not compare to shooting RAW and then working on the image to tweak and fine-tune your vision.

Nikon D750, 28-300mm, ISO 360, ƒ/8, 1/500

I didn’t use a flash in this photo because I was too far away. This photo is 250mm full-framed but put me a good 20 or more feet away. However, with the dynamic range that the camera caught, I was able to again open up the shadows and tone the highlights for a good photo.

Nikon D750, 28-300mm, ISO 140, ƒ/8, 1/250

I did increase the saturation using Adobe Lightroom’s vibrance and set all the photos to +27.

Nikon D750, 28-300mm, ISO 100, ƒ/8, 1/125

After ingesting the photos into Adobe Lightroom, one more thing I do first enable profile corrections.

Lens Corrections is a tool within Lightroom’s Develop Module that allows fixing such lens problems as distortion, chromatic aberration, vignetting, and perspective correction “non-destructively” without leaving Lightroom. Note that lens correction is not a simple fix that applies to any lens – corrections are lens-specific. In addition, since each lens model design has a unique optical formula, you must uniquely customize lens corrections for each model.

Nikon D750, 28-300mm, ISO 100, ƒ/8, 1/200–Popup flash used 0 EV

One family asked for a photo, and when I saw the man’s hat, I took the lens shade off the 28-300mm, popped the flash up on the Nikon D750, and filled in the shadows. Unfortunately, while I could have done an OK job using Adobe Lightroom to open the shadows, the flash added a catch light in their eyes.

Making the most of your Fuji X system


If you are reading this because you saw this might apply to the Fuji X system, then you need to invest in Bill Fortney’s A User’s Guide to the Fuji X-System ebook. If you are thinking about the Fuji system, this is the best $9.95 you will spend. It will help you navigate all their cameras and lenses. The best part is Bill speaks as a pro, and his words of wisdom may help you from purchasing something that you might regret, and then he gives you tips on things you might need.

Most people who write this kind of book have drunk the Kool-Aid of the company and oversold the brand. Bill Fortney loved Nikon, and I never felt like he was overselling Nikon.

If you have ever been to photo shows, you may have met Bill. I often remember standing at a trade show across the table, talking to Bill about the latest cameras and lenses.

The book A User’s Guide to the Fuji X-System is the same voice I have listened to for many years.

“Nope, not yet!” is one of the quotes about the system. Honest that the camera doesn’t do all that his Nikon System does.

Fortney even says, “What kinds of photography is the X-System not my first choice for Heavy duty sports shooting Birds in flight – extreme wildlife action. I didn’t say you can’t do this; I think there are better systems for it!”

He is honest, and his advice will save you lots of time and money in figuring out how to get the most out of the Fuji System.

He goes on and tells you all the great reasons Fuji is worth the investment and how it saves his back for one.

With Bill’s permission, here is one of the pages to give you a sneak peek into the ebook.


There are a lot of examples of everything he talks about in his illustrations.

Bill’s Nikon Gear

By the way, Bill still owns his Nikons. He just wrote a blog to ensure you understand how the Fuji system is a tool and not the only one he uses. Here is that blog link [http://billfortney.com/?p=12572]

Nikon D750 available light ISO 12800, 25600 & 51200 @ Wedding

Nikon D750, AF-S NIKKOR 28-300mm f/3.5-5.6G ED VR, ISO 51200, ƒ/4.5, 1/100

I attended a wedding for a friend yesterday as a guest. I thought I would take some photos and give those to the bride and groom from the day. I stayed out of the way of the hired photographers and just shot photos I saw.

Nikon D750, AF-S NIKKOR 28-300mm f/3.5-5.6G ED VR, ISO 12800, ƒ/5.6, 1/50

The service occurred at the Ritz Carlton Hotel Buckhead in Atlanta, GA. The room for the wedding was pretty dark. I used ExpoDisc to get a custom white balance, and then the settings on the camera were ISO 12800, ƒ/5.6 @ 1/50.

Nikon D750, AF-S NIKKOR 28-300mm f/3.5-5.6G ED VR, ISO 12800, ƒ/5.6, 1/60

After the service, we moved to the hallway between the two rooms they had reserved for the wedding and the reception for a formal receiving line. The light here was about the same at the wedding. Now, the canned spotlights in the ceiling occasionally would make the quality of the light suffer and sometimes help. Here, the bridesmaids weren’t thrilled with the hot light in the background.

Nikon D750, AF-S NIKKOR 28-300mm f/3.5-5.6G ED VR, ISO 12800, ƒ5.6, 1/40

Sometimes, the light was just fine on the subjects’ faces, as my wife and the bride’s parents for this photograph.

Nikon D750, AF-S NIKKOR 28-300mm f/3.5-5.6G ED VR, ISO 12800, ƒ/5.3, 1/15

I took just a few photos of the bride and groom on their first dance when I realized the AUTO ISO I had set up to peak at ISO 12800 would not cut it. When shooting at 1/15 shutter speed, I also realized that raising this one ƒ-stop wasn’t enough. Thankfully, the Nikon D750 let me raise the ISO to 51200.

Nikon D750, AF-S NIKKOR 28-300mm f/3.5-5.6G ED VR, ISO 51200, ƒ/5.6 1/60

The cool thing is while the ISO 51200 noise is noticeable, this is far superior to the film days when you shot above ISO 800.

Nikon D750, AF-S NIKKOR 28-300mm f/3.5-5.6G ED VR, ISO 51200, ƒ/5.6, 1/60

At the highest ISO, I noticed the noise in the shadows, and there, you could see the grid pattern of the pixels.

Nikon D750, AF-S NIKKOR 28-300mm f/3.5-5.6G ED VR, ISO 28735, ƒ/3.8, 1/80

Since I had the camera’s ISO set on AUTO, the camera ISO of 28735 while taking this couple’s photo, there was a carving station to my back. I intentionally put the couple there to take advantage of the extra light in that dark room.

Nikon D750, AF-S NIKKOR 28-300mm f/3.5-5.6G ED VR, ISO 32254, ƒ/3.8, 1/80

Then, another couple joined them, and they stepped back just a bit. This raised the ISO to 32254, and I got another excellent photo without using Flash.

Nikon D750, AF-S NIKKOR 28-300mm f/3.5-5.6G ED VR, ISO 51200, ƒ/4.5, 1/100

Then, when my wife asked for a photo with some friends, I knew that the lack of that carving station behind me and the stage behind them wasn’t the best lighting. So I took a photo first, looked at it, and decided for the first time that day to use the pop-up Flash at a slow shutter speed.

Nikon D750, AF-S NIKKOR 28-300mm f/3.5-5.6G ED VR, ISO 28735, ƒ/4.5, 1/100

Notice how the noise almost disappears with the added Flash. This is because the camera change was only less than a stop.

You would think I could have done this all night, but remember, I am not the official photographer. So, I do not want to go around flashing and drawing more attention than I was doing.

I think the ISO 51200 on the Nikon D750 is excellent when you need a high ISO in that range. You will be able to get photos that you wouldn’t be able to do without high ISO.

I would say the noise wasn’t just due to high ISO but rather to the quality of the light and the dynamic range of that light. The Flash illustrated that the noise disappears when used at high ISO.

The direction of the light has more to do with the noise than just high ISO.

By the way, I posted these photos on social media throughout the wedding. The Nikon App on my Android phone lets me sync using the Wi-Fi on the Nikon D750.

I was shooting just RAW files, so the app would create a smaller JPEG that was big enough for Social Media as the recommended size to transfer to the phone.

The guests enjoyed seeing photos just a few minutes after I shot them on Facebook. Then, I would tag the bride, and all her friends could see the images.

When I tried to set the custom white balance, what I would do for the Nikon D4 wasn’t working with the Nikon D750. Well, I also put the Nikon Manual Viewer App on my phone. It has the Nikon D750 manual and the Nikon D4 manual. So you can search and find whatever you need.

I think searching makes this more straightforward to use than the printed manual.

I typed in White Balance and found the instructions. I was doing everything just as recommended, but the blinking pre was only viewable on the top LCD closest to the shutter release and not blinking on the big LCD on the back.

Tips Summary:

  • Use AUTO ISO. I keep it maxed to ISO 12800, but if needed, then adjust it to 25600 or even 51200
  • Use ExpoDisc for custom white balance. http://www.expoimaging.com/product-overview.php?cat_id=1
  • Use Slow Sync Flash–To avoid the background going completely black when using Flash.
  • Watch light direction–Move people to take advantage of the existing light on their faces.
  • Carry the camera manual on your smartphone
  • Use Wi-Fi and Camera App to post photos on social media while shooting.

Storytellers need a high Curiosity Quotient more than Intelligence Quotient

You may know about I.Q. [Intelligence Quotient] and E.Q. [Emotional Quotient], but there is a third C.Q. [Curiosity Quotient] that also plays into our success. I argue that the most important of these three for the entrepreneur and storyteller is C.Q.

C.Q. is the ultimate tool for producing simple solutions to complex problems. Curiosity is what a journalist does when they investigate a story and then distill it down to those digestible nuggets by their audience.

Albert Einstein famously said, “I have no special talents. I am only passionately curious.”

“People with high C.Q. are more curious and open to new experiences. They find novelty exciting and are quickly bored with routine. As a result, they tend to generate many more original ideas and are counter-conformists,” says Dr. Tomas Chamorro-Premuzic. He is an international authority in personality profiling and psychometric testing.

Last year, Thomas Friedman wrote an Op-Ed piece in the New York Times called It’s P.Q. and C.Q., as Well as I.Q. Friedman says, “…the skill required for every decent job is rising as is the necessity of lifelong learning… those with more P.Q. (passion quotient) and C.Q. (curiosity quotient) to leverage all the new digital tools not just to find a job, but to invent one or reinvent one, and not just to learn but to relearn for a lifetime.”

Did you know that for every job opening, three people are unemployed? When finding your dream job, this isn’t the best news for job seekers. However, this does present an opportunity: to create a job that doesn’t exist yet.

Seeing opportunity is a new way of thinking for those entering the job market today. Curiosity should lead the way all storytellers think. They must think about pitching ideas rather than waiting for editors to give them an assignment.

Fuji X-E2, 55-200mm, ISO 25600, ƒ/4.6, 1/60

Amy Toensing has been a regular contributor to National Geographic magazine for over a decade and was one of the keynote speakers for the Atlanta Photojournalism Seminar just a couple of weeks ago.

Listen to her in this interview:

Getting out of your comfort zone is what those with high C.Q. motivate daily. For example, Toensing shared how her curiosity about the artists who drew hieroglyphics on the rocks in Australia thousands of years ago had piqued her interest. So she started to ask questions, which led to a lifelong journey of a story about the Aborigines for National Geographic Magazine.

My mentor, Don Rutledge, talked about how photographers must approach their work like a child, asking, “Why is the sky blue?”

We are all born with curiosity. Curiosity causes us to use our senses to touch, smell, and explore the world. Unfortunately, sometimes adults discourage this curiosity. But without interest, there is little motivation to discover and explore. As a result, apathy can set in for us, and we can become depressed.

Curiosity is the key to learning. Curiosity also involves risk-taking.

If you find yourself in depression and apathy, maybe the key is rekindling your curiosity. So take some risks today, explore your world, and ask why.

Found my Kodak Master Photoguide

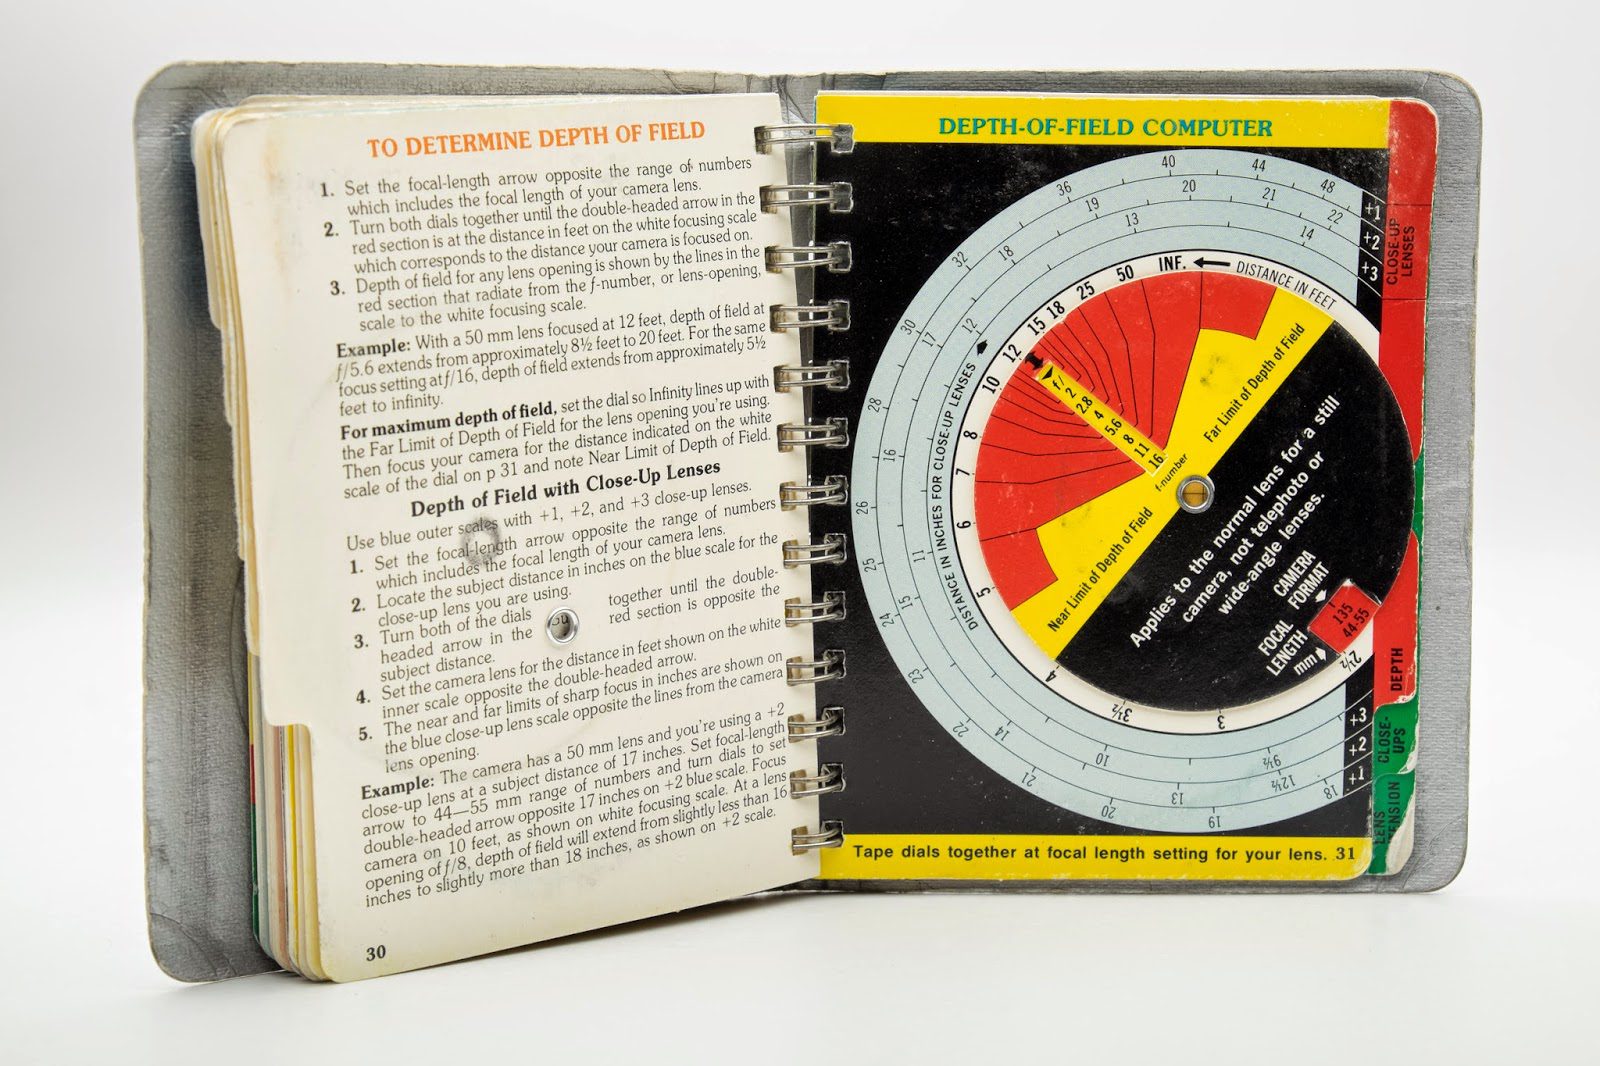
Found this in the drawer today, and it took me down memory lane. What is it, you might ask?

Well, while this Kodak Master Photoguide has been gathering dust, the book’s insides are burned into my brain from years of using this book over and over to help me learn the principles of photography.

Here is what is on the first page of the book to tell you how to use it and what I did:

You can carry this Photoguide with you when you take pictures so it will be handy when you need it. It’s just the right size to fit in your pocket, purse, or camera bag. The Master Photoguide contains in compact form a great deal of information normally found in photo books. You’ll find it useful whether or not you have an exposure meter or an automatic camera. This Photoguide will help you set your camera for the correct exposure, select filters, use supplementary lenses for close-ups, determine depth of field and much more.
In addition, the Photoguide is especially helpful for planning purposes to show you in advance what the photographic requirements will be for the pictures you want to take.

The “Sunny 16 Rule” is on the Daylight Exposure Dial. I often used this dial because my earliest camera didn’t have a meter. You lined up your ISO with one of these:

  • Daylight or Hazy Sun
    • On light sand or snow
    • Average
  • Weak, Hazy Sun
  • Cloudy Bright
  • Heavy Overcast
  • Open Shade
On light sand or snow, dial your ISO, and the corresponding ƒ/16 would be the exposure, and the shutter speed would be the closest to 1/ISO.
 
 
I would often pull this little book out when planning a new adventure, find the tap, and then flip to the page. The text says, “the Photoguide is especially helpful for planning purposes.”
 
 
Click on the photo to see it larger.

Click on the photo above to see the existing light choices.

Click on the photo to see it larger.

The little book even helped you figure out your depth of field. Say you were to put a lens on the backboard in a basketball game. What ƒ-the number will you need to be sure the rim to the player’s faces is in focus. The calculator for depth of field would help you in planning. Back then, you would have to buy the proper ISO film for such a situation. The Kodak book helped you preplan.

Even planning on doing some macro work with extension tubes or bellows would help you figure out the proper exposure because we couldn’t take the photo and adjust immediately. Instead, you would have to go and process the film and then see the results.

For those of you starting, you need to know for most of us; we had to work at understanding the principles because the learning curve over time was longer with film. You didn’t click and look at an LCD to see your results. Sometimes it would be weeks after you got back from traveling for coverage for a month or so on the road.

While this book isn’t as necessary to the photographer’s bag, it is still relevant for those wanting to see principles of exposure on a dial. In addition, it is great for planning what you might need on your next assignment.

The best part is this book was like a cheat sheet for photography.

Fuji X-E2 helped me to capture memories in Hawaii

 
Fuji X-E2, 18-55mm, ISO 1600, ƒ/3.2, 1/500

Back in June this year, I was in Hawaii teaching 30+ students who were going to travel the world using photography as a way to engage with people.

I had my Fuji X-E2 on me at all times. The Fuji X-E2 helped me to capture moments like this when, on the last night of the classes before they departed for Panama, Turkey, and Thailand, they captured moments with each other.

Fuji X-E2, 18-55mm, ISO 6400, ƒ/4, 1/500

While I also own the Fuji XF 55-200mm, I found many times that the 18-55mm inside was a long enough lens for many situations.

Fuji X-E2, 55-200mm, ISO 3200, ƒ/4.4, 1/500

I used the Fuji XF 55-200mm when I needed the longer lens as here with the people on the stage.

Fuji X-E2, 55-200mm, ISO 200, ƒ/5.6, 1/500

I also used it to compress the scene here in Kona, Hawaii. I love using the lenses with the OIS turned on because I usually hand-held these when making most photos.

Fuji X-E2, 18-55mm, ISO 6400, ƒ/3.6, 1/210

The dynamic range of the sensor is also excellent. Here you can see that the people are well exposed, but the curtains and the TV are good exposure. I was able to hold the details from the highlights to the shadows.

Fuji X-E2, 18-55mm, ISO 6400, ƒ/2.8, 1/6

This moment was my favorite photo from my entire trip. Getting this photo is just not going to happen with your smartphone. Again I am holding together from the exceptionally bright screens of the computers to the shadows of the chairs where they are sitting.

I love the Fuji X-E2 because it is small enough, yet I am not giving up the ability in low light that many other cameras do that are this small.

Shooting scenics on dirt roads out of moving Toyota Land Cruiser

 
Fuji X-E2, Fujinon XF 18-55mm, ISO 400, ƒ/4, 1/1700

While in Honduras, I spent a long time in a Toyota Land Cruiser on dirt roads feeling like a bobblehead doll.

Fuji X-E2, Fujinon XF 18-55mm, ISO 2500, ƒ/7.1, 1/500–Raindrops got on the lens.

We would be on dirt roads like this one for a couple of hours at a time.

I was in the front seat riding shotgun because I was 6’2″, and the others were much smaller in the back seat. The others had been here many times before and were astonished that I was getting any usable pictures. They had terrible experiences in these situations.

So how was I able to get sharp photos?

Fuji X-E2, Fujinon XF 18-55mm, ISO 1250, ƒ/7.1, 1/500

How I did it

1) Image Stabilization

I was shooting with my Fuji X-E2 camera and 18-55mm lens, which has integrated four-stop image stabilization that helps to minimize the appearance of camera shake normally inherent to low-light conditions and with longer focal lengths. The image stabilization made a huge difference and allowed me to use technology to compensate for my tossing around like a rag doll in the Land Cruiser.

2) Shutter-Speed

When you choose the Auto ISO on the camera, the camera automatically selects a sensitivity between the default and maximum values. Sensitivity is only raised above the default value if the shutter speed required for optimal exposure is slower than the value selected for MIN. SHUTTER SPEED.

Suppose the value selected for DEFAULT SENSITIVITY is higher than that chosen for MAX. The DEFAULT SENSITIVITY setting to the value specified for MAX. SEN
SITIVITY.

The camera may select shutter speeds slower than MIN. SHUTTER SPEED if pictures would still underexposing at the chosen value for MAX. SENSITIVITY.

I have set my AUTO ISO range of 200 to 6400. The one thing I do go to change regularly is the minimum shutter speed. I have it set for 1/500 when taking the photos from the moving vehicle.


Looking at the captions, you will notice that sometimes the camera would go even faster than 1/500. That is because I was in Aperture Priority and chose a ƒ-stop that bumped the shutter speed up.

I could have stayed in AUTO ISO and just gone manual, and the camera would then let me choose any shutter speed and aperture and adjust the ISO for a good exposure.

Fuji X-E2, Fujinon XF 18-55mm, ISO 800, ƒ/9, 1/500


3) Hold the Camera Steady

Do your best to hold the camera still. I tried not to rest my arms on the window but to float, so the camera bounced as hard as we hit a bump.

4) Depth-of-field

In general, you will not be close to subjects, so shallow depth-of-field is not a significant concern, but I recommend capturing the sweeping landscape to shoot high aperture as I did on some of these photos. 

In the first photo, I shoot at ƒ/4, and some pictures ƒ/10. So experiment and be sure you are not shooting at such a large aperture that your shutter speed goes down. 

5) Roll down the window

I see many people trying to shoot through glass, and sometimes you have no choice. If you can roll down the window or slide it open, do so. The glass will degrade your photos’ colors, saturation, and sharpness.

Fuji X-E2, Fujinon XF 18-55mm, ISO 1250, ƒ/10, 1/500


This would be difficult to do with your camera phone since most come with no controls such as shutter speed or aperture. Camera defaults will give you poor results, which is why you need to learn how to use your camera to adjust it to maximize it for each situation.

Honduras in Context

 
Nikon D4, 14-24mm, ISO 10000, ƒ/5, 1/100

This young Honduran teen is hanging just outside the door and watching the leader for Young Life lead the group of youth. Michael Aguilar and his wife, Daniela Perez, lead the Young Life program. They have only been in Honduras for less than five months from Nicaragua.

I love this photo because it symbolizes a new youth program where they have many teens peering in from outside and not sure about if they want to join or not.

I learned this technique from Don Rutledge.

Nikon D4, 14-24mm, ISO 400, ƒ/6.3, 1/100

Here I am showing one of Honduras Outreach Inc’s schools at Agalta Valley, Olancho, Honduras. Again, I stepped back with the 14mm lens to capture the two classrooms going on simultaneously and help the audience see how they teach in an open-air building.

Nikon D4, 14-24mm, ISO 500, ƒ/9, 1/100

Here I chose to shoot through a window and a door rather than just two doors. Again, I am trying to place these students in these photos in context.

Nikon D4, 28-300mm, ISO 280, ƒ/5.6, 1/100

Here is a photo of Ubaldo Ponce teaching how to rope cattle. He is also one of the drivers for the Honduras Outreach program.

See how I am not using left and suitable composition elements to show the context, but now a front to back where the cattle help show what Ubaldo is doing.

Nikon D4, 28-300mm, ISO 5600, ƒ/6.3, 1/250

 While this photo is a little tighter shot, it, too, has some context. You see the girl in the background watching the other girls at the board. Hey, I want to know if she is impressed, cheating, or what?

Nikon D4, 28-300mm, ISO 5600, ƒ/6.3, 1/250

 Here you can see another girl in the classroom working. I love the expression of her sounding out what she is reading. I also like the repetition of her classmates behind her in the class.

Nikon D4, 28-300mm, ISO 7200, ƒ/5.6, 1/250

This little boy was sitting so still and behaving himself while we waited for more than 2 hours for a program to start. I love his expression.

Now here, I didn’t give you many contexts in the photograph. You don’t need it in every picture, which would be a problem if you did. Mix it up.

WHY? is the key to great storytelling photos

Great Photos Often Ask WHY?

Looking at the photo above, I want to know what they are doing. The more critical question is: WHY?

My mentor, Don Rutledge, talked about how photographers must approach their work like a child, asking, “Why is the sky blue?”

I have written a few times on this blog about the importance of WHY.

When I meet photography students, I like to ask what interests them other than photography. I am asking this because when I look at their portfolios, none of the photos have a passion in them. I don’t feel the photos.

We choose what we are going to photograph. If you understand WHY you like to photograph something, you are understanding what is the core emotional connection between a subject and the audience.

I recommend watching this TED talk by Simon Sinek on the importance of WHY

I like the simplicity of understanding and reversing our usual way of talking. Getting to the heart of the matter is what he is saying.

When I meet those college students, they often tell me what they like to do and how they like to do it, but they seldom tell me WHY.

This key to not just storytelling is at the core of finding the PURPOSE in your life. Once you understand why you like to do something, it is much easier to chart the course for the rest of your life.

Key to a successful story:

  • Why should the audience care?
  • Why does this matter to the subject?
  • Why does it matter to you?

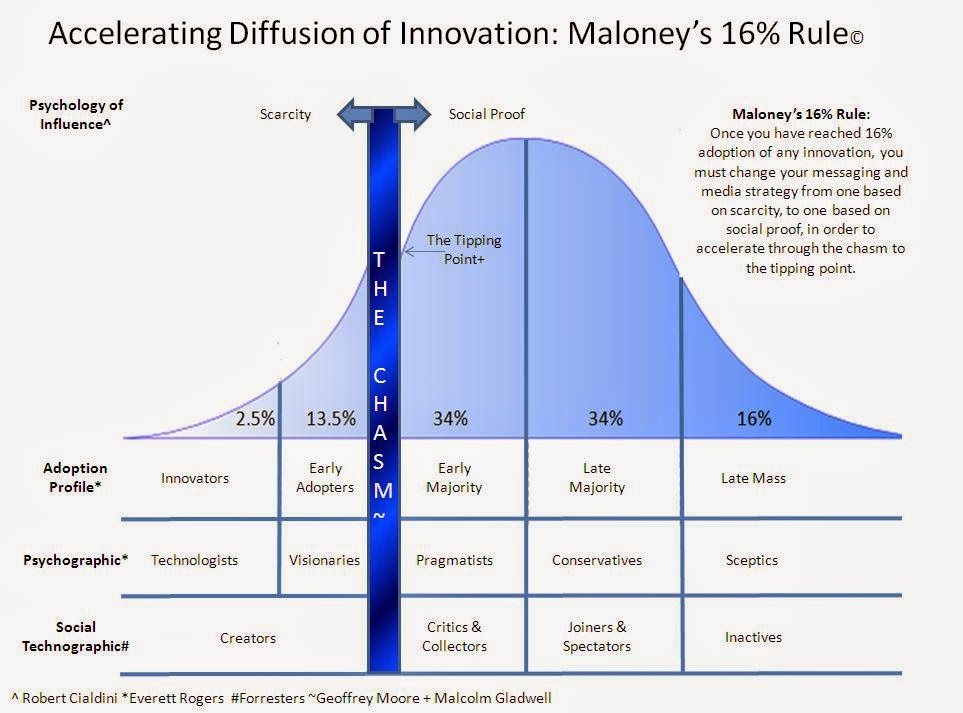
Here is the Law of Diffusion and Innovation that Simon Sinek talks about in the video

Click on the image to see a more extensive and to read more. Here is a link