

|
Getting your Trinity Audio player ready...
|
The gear and software I used to convert 35mm color negatives to digital JPEGs
- Nikon Z9
- Nikon FTZ II
- Nikkor 60mm ƒ/2.8
- Nikon ES-2 Film Digitizing Adapter Set
- Light Panel MicroPro LED Light for Light Source
- Smart Shooter Plugin
- Negative Lab Pro
- Lightroom
Here are the basic steps to follow:
- Mount the 60mm ƒ/2.8 macro lenses on your camera and attach the Nikon ES-2 Film Digitizing Adapter Set to the lens.
- I use the Auto ISO with ISO 64 for the lowest setting, 1/60 shutter speed, and Aperture Priority of ƒ/8. Matrix metering and the one thing that changes with exposure is your ISO. It will hover around ISO 100-200 most of the time. I am shooting RAW and exporting it to JPEGs.
- I have the camera tethered to my computer using a USB-C cord and the software Plugin. Go to that website for instructions. Once the plugin is installed, you will restart Lightroom when you select tethering.
- Put a light [Light Panel] to light up the diffuser. See photo.
- Do a custom white balance. The white plastic diffuser will serve as the grey card.
- Insert the color negative into the negative holder, ensuring it is properly aligned and focused.
- Compose the shot and adjust the focus as needed. I liked seeing just around the negative. You can shoot tighter if you choose.
- Take a test shot and check the exposure with Lightroom.
- Once you are satisfied with the composition and exposure, start copying away.
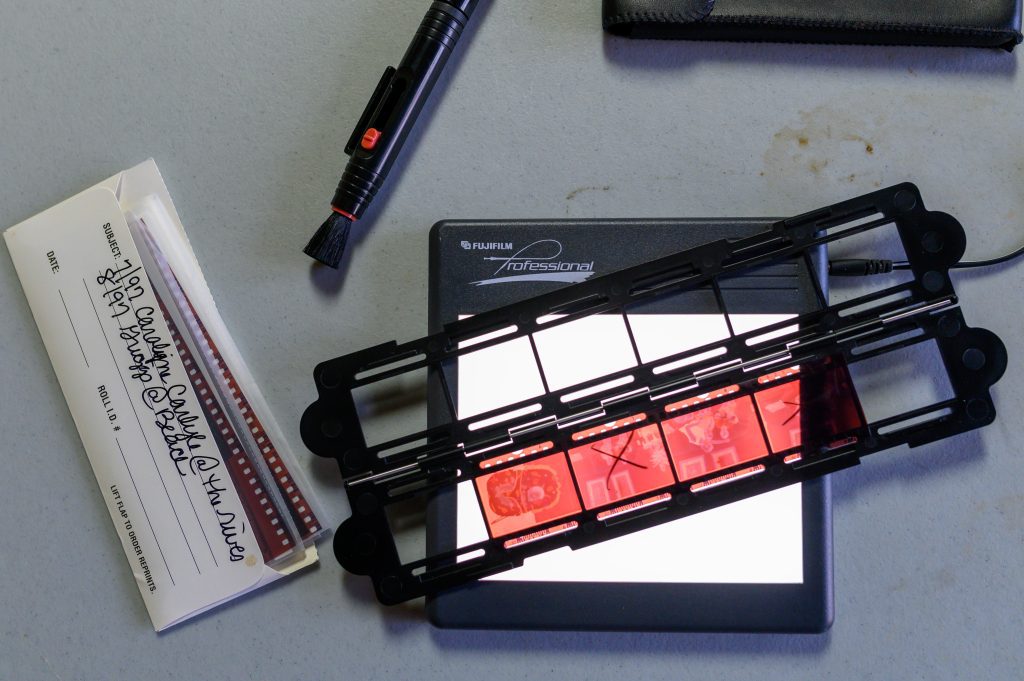
It’s a good idea to use a tripod for stability and take some test shots before the final copy. I used a copy stand.
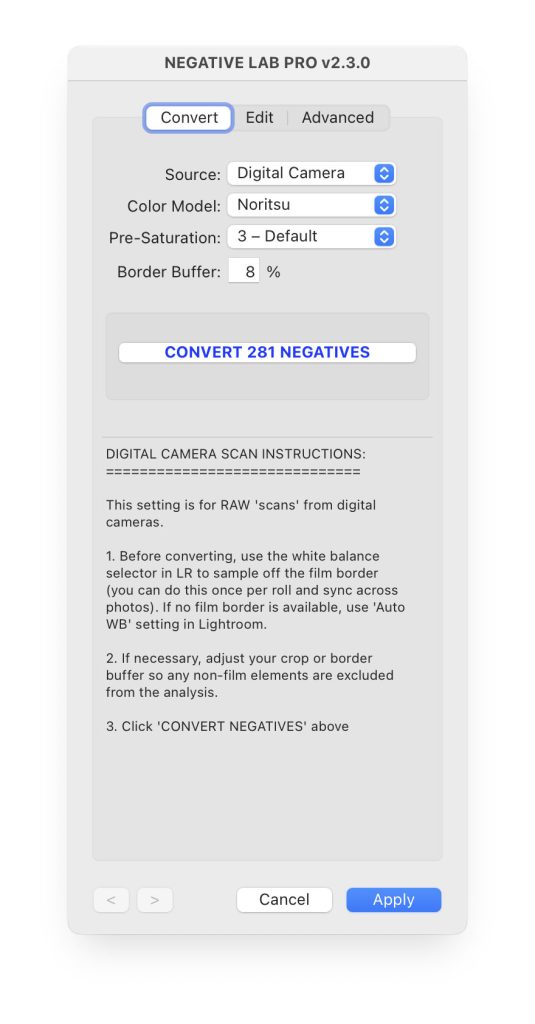
Once your negatives are prepared, go to Lightroom and select the negative CMD+A on Mac or CTRL+A on PC (or group of negative) you want to convert, and open Negative Lab Pro.
On the Mac, you can open Negative Lab Pro by hitting the CTRL + N shortcut key. Or by going to File -> Plug-in Extras -> Negative Lab Pro.
On Windows, go to File -> Plug-in Extras -> Negative Lab Pro to open. Or if you have the Windows Hotkey running (new in v1.2), use the hotkey combo for the nationality you have selected in your Lightroom language preferences:
Conversion Settings
Before you begin the conversion process, you have a few options to help shape your final conversion. This happens BEFORE the conversion process because Negative Lab Pro needs the data as input for calculating the conversion itself.
Don’t worry too much about getting it right the first time. You can always experiment later. Just un-convert your negative, try different settings, and re-convert. And since this is all non-destructive, you can also make virtual copies in Lightroom if you want to compare!
COLOR MODELS
Color Models help get your scans closer to the classic colors that were previously only attainable through pro lab scanners.
Basic
This color model offers a more neutral rendition of colors (for those who do not want to emulate lab scanners and are more interested in color accuracy).
Frontier
Based on the Fuji Frontier scanner. This model produces beautiful the teal-blues, golden yellows, and warm tints, which are widely associated with the film.
Noritsu
This color model is based on the Fuji Noritsu scanner. While it shares many of the qualities of the frontier scanner, it is generally not as warm.
B+W
You should use this mode whenever you’re working on the black-and-white scan (or you want to convert a color negative to black-and-white).
NONE
This turns off all the settings affected by the color model section and defaults to your profile before opening Negative Lab Pro. This is useful if you want to use your own profile/calibration/color settings, as this will ensure that NLP doesn’t override those existing settings when you open it.
Once ready, just hit the “CONVERT NEGATIVE” button to initiate the conversion.
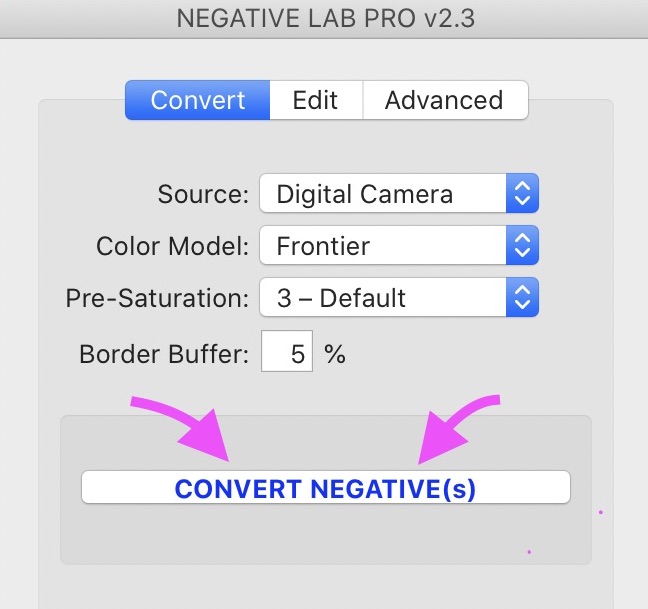
Depending on your computer, this can take a while, especially the more photos you choose to run at one time.
When it is finished, you can go one by one and adjust each photo. I suggest playing with all the sliders to get a feel for what each one does. The idea is to get the best color and exposure before clicking on the Apply button. I clicked on the arrows in the bottom left and went one photo at a time, color correct, exposure and contrast, etc. So I was working with about 280 images. It takes a little time to finish all of them, but when I click on apply, you can always select an image in Lightroom, relaunch Negative Lab Pro, and change your settings.

Workflow Tips & Tricks
There are a couple of little “hidden” features of Negative Lab Pro that can speed up your workflow and help in a pinch:
- To reset any individual setting, just single-click on the setting name. For instance, if you want to zero out the “Brightness” slider, click “Brightness,” and it will be reset to zero. (Several users have suggested a “double-click” on the slider itself, but this isn’t feasible in the SDK)
- Where you see it, click the ⟳ button to cycle through dropdown options. It can be unpleasant to repeatedly click on the dropdown box to see the different options. It’s much faster to click the ⟳ button and cycle through the options until you find the one you want!
- Hover your mouse cursor over most setting names to get more details about that setting. For instance, hover over the “Tones” setting name to see a description for the tone profiles.
- You can get more accuracy over the sliders by clicking the number box beside it and using the UP and DOWN arrow keys to change it. Holding the SHIFT key while you do this will make larger steps.
- Once you select an edit box, you can use the TAB and SHIFT-TAB shortcuts to jump between boxes.
- For many of the controls, even if you reach the max of the slider, you can still push it further by directly changing the number in the box. For instance, even though the “Brightness” slider maxes out at 30, you can now edit the number up to 50.
Once you click Apply, you are back in Lightroom.
All the sliders in Lightroom will not behave the same way with the color negatives you have converted. This is why Negative Lab Pro suggests doing all this work in their software. Fixing dust, burning, dodging, and other touches up are best done in Lightroom.