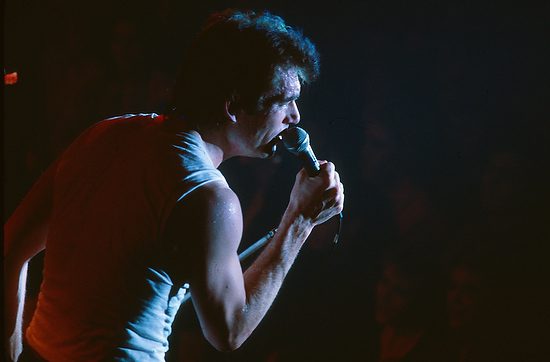
Nikon D4, 14-24mm, ISO 100, ƒ/10, 1/100, off-camera flash using the Neewer TT850 flash & Neewer 433MHz Wireless 16 Channel Flash Remote Trigger
I am often hired to cover events. Of course, anyone with a camera could cover these events, but I make my photos look different every time.
I am using off-camera flash to improve the images in these photos. In this first photo, the sun is behind the lady on the left, hitting the man’s face. The sun behind them creates a silhouette, so I had my assistant hold the flash on a monopod up high, pointing down at them.
Nikon D4, 14-24mm, ISO 100, ƒ/7.1, 1/50, off-camera flash using the Neewer TT850 flash & Neewer 433MHz Wireless 16 Channel Flash Remote Trigger
The flash is off to my right, pointing at the ladies on the left. You can see again that I would have created a silhouette of their faces without this flash. If I had used a flash on the camera, I would have flattened the features. However, by having the assistant hold the light up high, I still gave the ladies’ cheekbones some shape.
Nikon D4, 14-24mm, ISO 640, ƒ/5.6, 1/200, off-camera flash using the Neewer TT850 flash & Neewer 433MHz Wireless 16 Channel Flash Remote Trigger
Here, the assistant bounces the flash off the ceiling inside the room. I am just raising the light inside so that the outside is balanced and not washed out with no details.
Nikon D4, 28-300mm, ISO 2000, ƒ/5.6, 1/40, off-camera flash using the Neewer TT850 flash on S2 [slave setting] with the Nikon SB900 and SB800 on PocketWizard TT5 triggered by the TT1 and AC3 to control their output.
Nikon D4, 28-300mm, ISO 1250, ƒ/5.6, 1/100, off-camera flash using the Neewer TT850 flash on S2 [slave setting] with the Nikon SB900 and SB800 on PocketWizard TT5 triggered by the TT1 and AC3 to control their output.
Nikon D4, 28-300mm, ISO 800, ƒ/5.6, 1/100, off-camera flash using the Neewer TT850 flash on S2 [slave setting] with the Nikon SB900 and SB800 on PocketWizard TT5 triggered by the TT1 and AC3 to control their output.
The room has three flashes, all of which sync with the camera. I have the Nikon SB-900 and Nikon SB-800 working on TTL and triggered by the PocketWizard system. The Neewer TT850 has a 2nd flash setting for TTL flashes. The light in the room was so mixed with different color temperatures that I wanted to clean this up with the flash.
Nikon D4, 28-300mm, ISO 10000, ƒ/7.1, 1/100, off-camera flash using the Neewer TT850 flash & Neewer 433MHz Wireless 16 Channel Flash Remote Trigger
Nikon D4, 14-24mm, ISO 640, ƒ/2.8, 1/25, off-camera flash using the Neewer TT850 flash & Neewer 433MHz Wireless 16 Channel Flash Remote Trigger
The camera was set to Aperture priority for all these photos, and I was using the flash slightly brighter than the ambient light. The same light value, or +1/2 stop, is often more effective for cleaning up the color and giving the images a little pop.
I know that if anyone were shooting with an iPhone or a point-and-shoot camera, they would not get this quality of images. They are different. Having your photos look better than a smartphone camera is very important if you want to work. Why would they hire you if my pictures didn’t look like what they can make with their cameras?
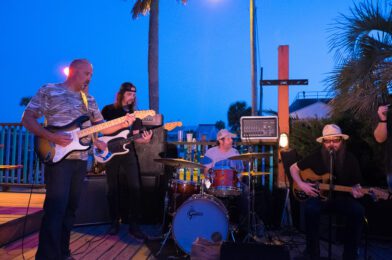
This past weekend I was photographing Bottles and Cans performing at North Beach Bar & Grill on Tybee Island. There were no lights on the band; therefore, they performed as a silhouette as the night went on.
[X-E2, XF18-55mmF2.8-4 R LM OIS, Mode = Aperture Priority, ISO 6400, 1/30, ƒ/5.6, (35mm = 27)]
This photo of my wife and daughter shows no lights on the band. I added a flash later. I put it on the table where they were sitting and pointed directly at the band.
This photo is from the back of the venue, where I shot with an off-camera strobe that if you look at the table just in front of the band, you will see a bright patch where the flash went off. The flash is our table while we were eating and enjoying their music.
As you can see by the flash being on the table, it allowed me to have the light hit the singer under his hat and the other guys in the band wearing hats. This light position is what foot lights will also do at Broadway musicals.
Do your photos look like this sometimes? It is good exposure, and correcting the image by opening up a stop or two for the faces will wash out the color for the rest of the photograph.
Photography is writing with light. Therefore, adding light to a photograph is pretty standard to emphasize where you want the audience to look.
By just putting a flash off the camera to the left, I could not change the exposure but put light on what was a silhouette of the subject. Then, using an off-camera flash, I could “reveal” the subject with the light.
To capture the clouds and all their glory in this photo makes those subjects close to the camera silhouetted.
By adding light to the subject in the foreground, I can retain the clouds and rich colors in the photograph, but now the subject is the person in the picture, not the background.
I see photos like this all the time in recruiting guides for colleges. The photographer is just capturing what anyone can do with even their smartphone.
Take the time and carry a light stand with a flash. It is more equipment, but look at the difference it makes in the photo.
You will not balance a projected image and the speaker that often without using the off-camera flash. Here I used the flash on the speaker to help me show they had a large enough crowd that they needed to project him on the big screen.
If you don’t have a way to do off-camera flash, you need to invest in something, or you will always have what everyone else can get with their smartphone or point-and-shoot camera. Remember, photography is writing with light. So take control and be the author of your photos.
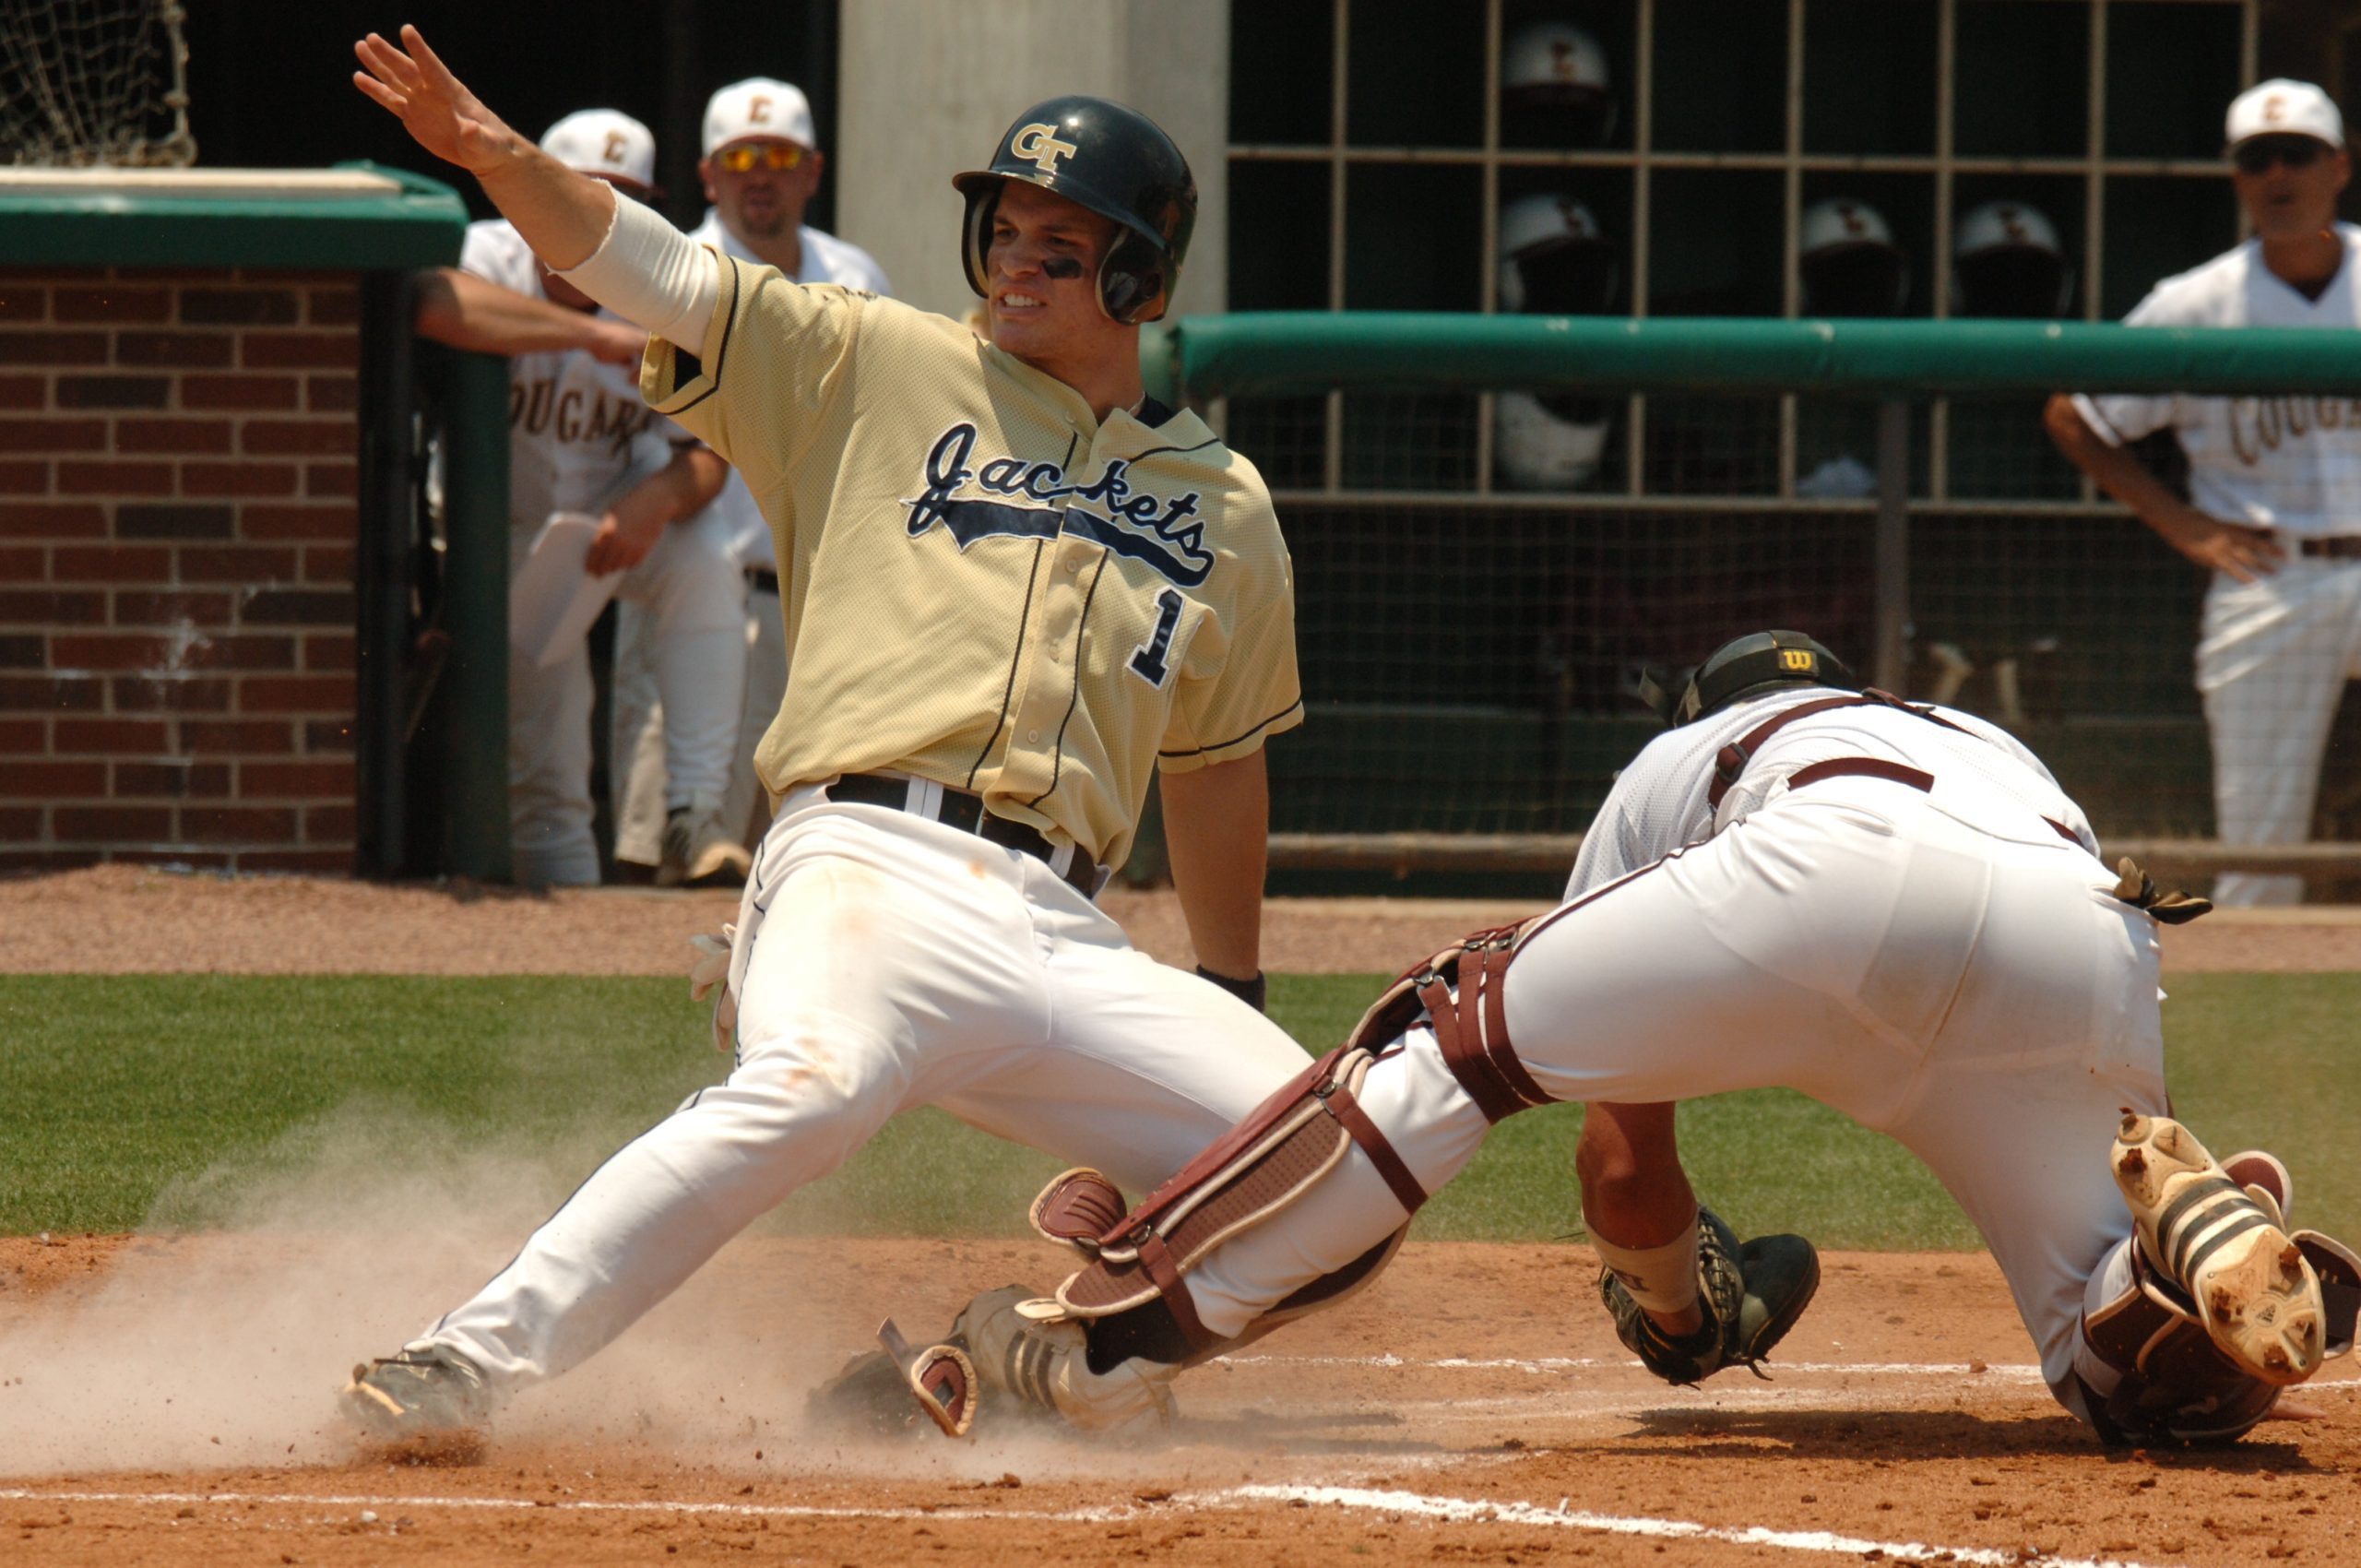
You may think that sitting around a room where people are just talking; things move at a much slower pace than, say, a baseball game.
You would be wrong. I think the action moves just as fast as in any sporting event.
Nikon D2X, 120-300mm ƒ/2.8, ISO 400, ƒ/8, 1/1500
Sports photographers are not pushing their shutter on the motor drive and then picking a significant moment in sports any more than they do with people sitting around in a room. The motor drive is to take the photos after the moment the photographer is capturing them. Concentrating on after is because you don’t know if the ball will pop out of the catcher’s mitt, and the player sliding home then is safe.
Nikon D2X, 70-200mm ƒ/2.8, ISO 400, ƒ/5, 1/160
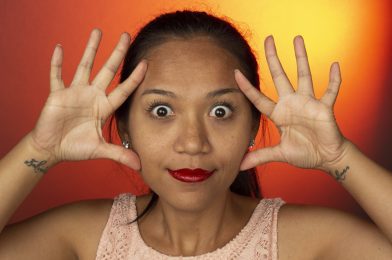
The ever-so-slight head tilt or body posture can communicate so much. It doesn’t have to be a big gesture like one of the men with the hand gestures. It can be ever so subtle as the lady in the photo above.
Nikon D2Xs, 18-25mm ƒ/2.8, ISO 400, ƒ/6.3, 1/100
Can you see the moment?
One thing that can kill a great moment is not being able to see it.
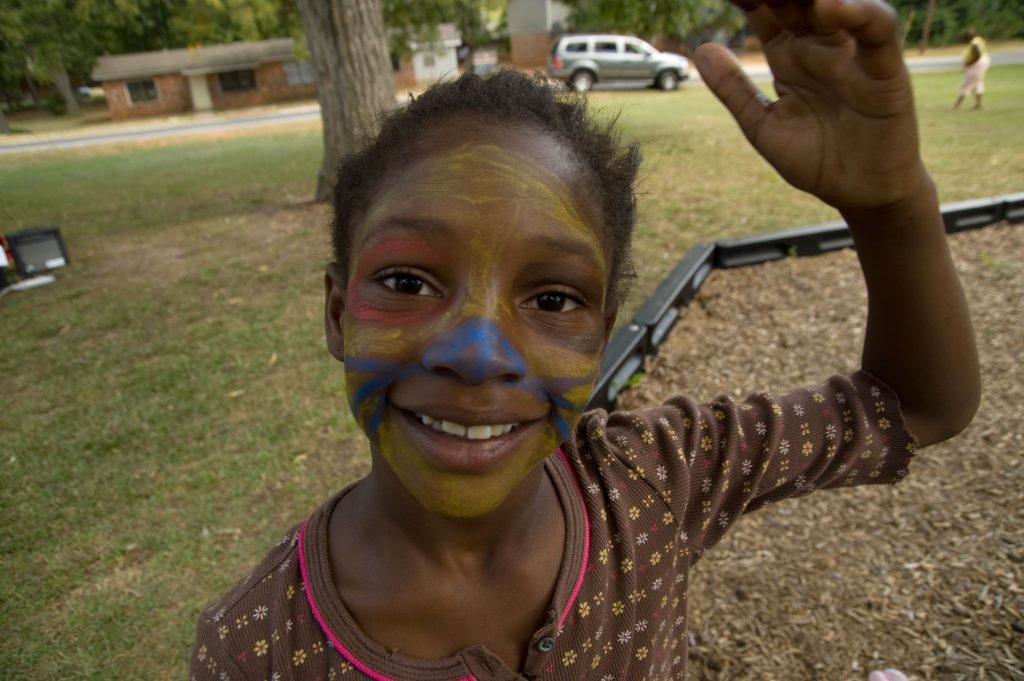
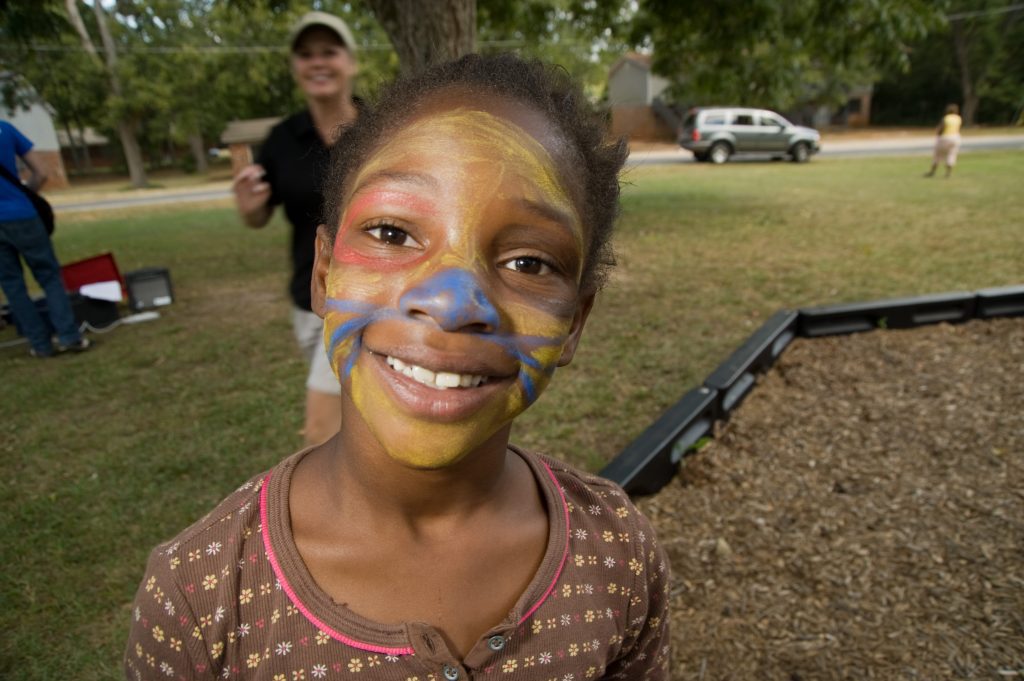
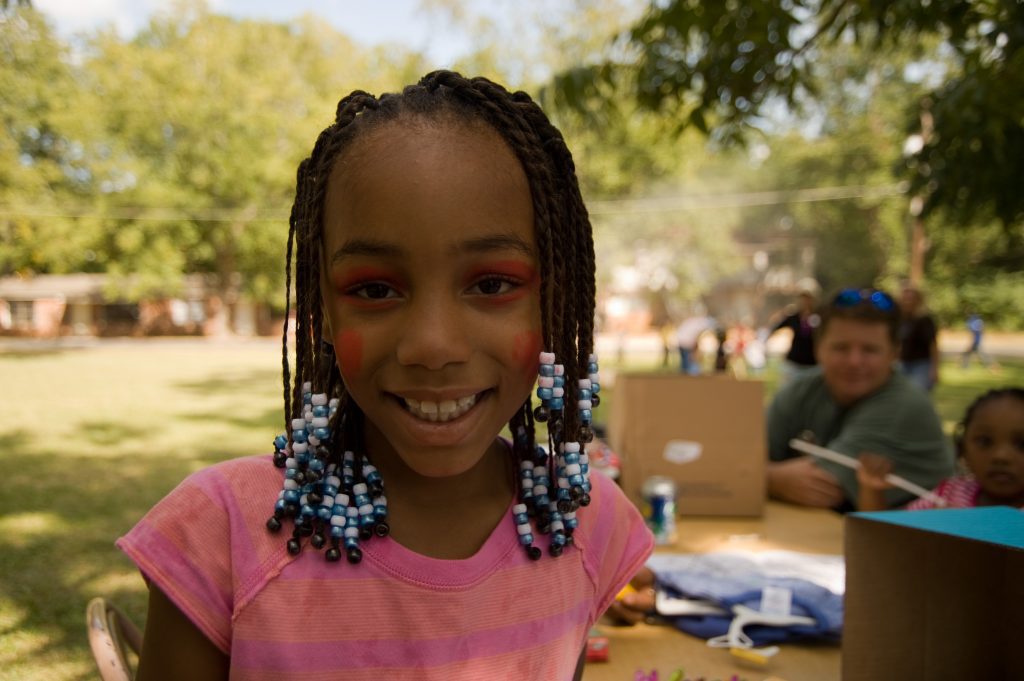
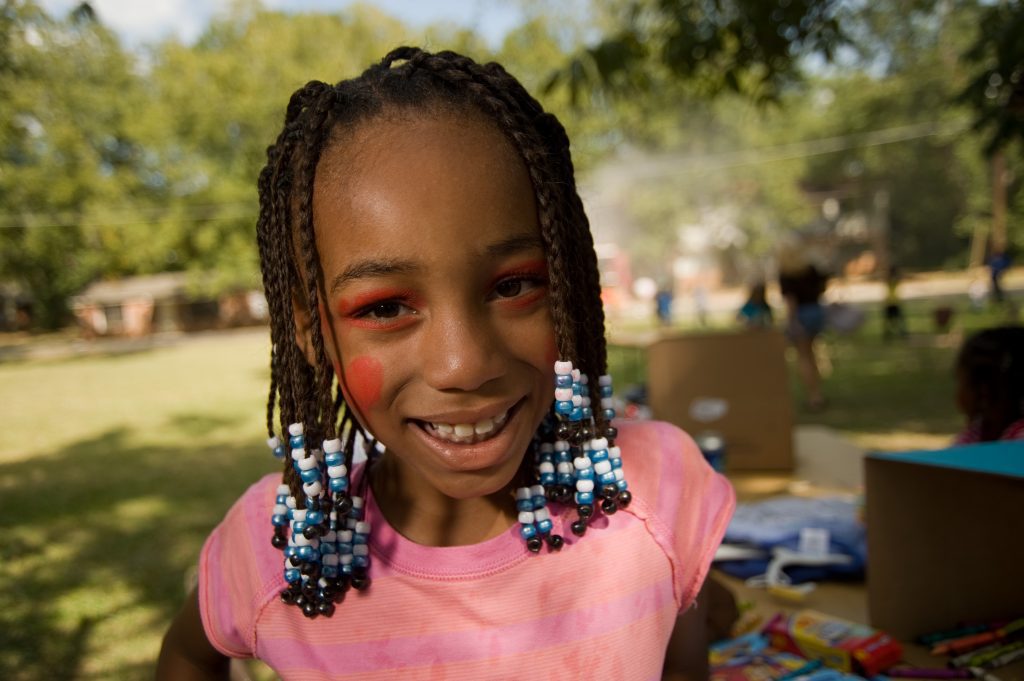
Impact 360 Block party for Pine Mountain Apartments.Impact 360 Block party for Pine Mountain Apartments.
As you can see in these two photos of the young girl, the off-camera flash adds life to the face giving more dynamic range and, therefore, more color and energy to the photo. However, capturing the moment is more than just squeezing the shutter at the right moment.
Impact 360 Block party for Pine Mountain Apartments.Impact 360 Block party for Pine Mountain Apartments.
Can you see how much more “POP” this photo has with the off-camera flash?
Impact 360 Block party for Pine Mountain Apartments.Impact 360 Block party for Pine Mountain Apartments.
Photographers do all they can when they are telling a story. However, they must get the best light to help communicate the report on the subject and the best moment.
Kurtis Fitz-Ritson and John Wesolowski painted a fire hydrant as part of their community service in the IMPACT 360 program in Pine Mountain, GA, on November 28, 2007.
Sometimes I crawl on the ground to get into a position so you can see the subjects’ faces, and then since sometimes the best location for the issue has the sun right behind their heads, as in the photo of the guys painting the fire hydrant [fire plug for those out west] I again use an off-camera flash to fill the subjects faces with light, so they are not just silhouettes.
Other times I get as high as I can to look down on the subject to capture the expanse of surroundings and their faces.
IMPACT 360: Graduation
I rarely have people pose and hold it for me, as in this photo of the two ladies. There was just a moment, and I shot it. It worked well, and I liked the moment but had I said hold it just a second, OK now 1 …, 2 …, 3 … this would have killed the expressions. So even when people pose for you, if they hold their face, it isn’t as good as just before they hit their peak smile. I love to shoot just before they reach it.
Nikon D4, 14-24mm, ISO 1100, ƒ/3.2, 1/100 Custom White Balance with ExpoDisc
Composition/Graphics
You can use compositional elements like leading lines in the photo above to help direct your audience through a scene to where you want them to look. For example, I have the lines from the shirt directing me back into the photograph to the guy talking.
With this photo of the kids watching the balls race each other down the incline, I am using the incline to lead your eye, but I am also now using another element to help direct your attention—light.
By using an off-camera flash, I can put more light on the man at the top of the incline and also light the kids. As the light drops off to the background, it is slightly darker, so your eye doesn’t go there first.
In this photo, you can see my photo assistant, a VALS [Voice Activated Light Stand], helping me pop the subject out from the crowd.
Now, I am using a 1/4 CTO gel that works well with the flash’s available light. I started with 1/2 Plusgreen gel, but even with color correcting using the ExpoDisc, the color never looked right on the faces compared to the background.
Nikon D4, 28-300mm, ISO 11400, ƒ/6.3, 1/100 Custom White Balance with ExpoDisc
Color
You can also use color to draw your eye into a photo. Here, the lady in pink draws your attention because she is wearing Pi. The same photo in bland white loses the directing quality of the color.
The Atlanta Science Festival
To make a B&W photo worth, photographers will burn and dodge to direct the eye with available light photography. Here, I have burned in some of the areas of the photo so the lightest area directs the eye.
The Atlanta Science Festival
Light is the most significant influence in photography.
Photography is writing with light. That is what the word means. No, wait a minute. I decided to add light to the situation above. Watch how much I am now directing your eye with the light.
The Atlanta Science Festival
While the lady in pink is attracting some of your attention, I have more information on the scientist holding a brain model.
The Atlanta Science Festival
In black and white, I have now really isolated where I want you to look. I have removed the pink jacket’s color influence, and you are now, because of the introduction of a spotlight on the subject, a way for me to influence where the audience looks.
Put it all together
The Atlanta Science Festival
I used an off-camera flash and a 90 mm lens to get close to the two little girls. Most importantly, I was capturing a moment when their eyes communicated interest, which is the second most important part of a photo—the Moment.
The Atlanta Science Festival
Here, I am using the off-camera flash to light the young boy and make the background darker. The mother’s orange jacket is a complementary color to the blue jacket, and I am also using the color to help direct you. I am using the hand of the scientist holding the brain model while the mother’s hands continue to direct you towards the boy’s expression on his face. His eyes and facial expressions catch this moment of interest. The mom’s expression also complements her son’s expression.
The Atlanta Science Festival
I am again using the off-camera flash to brighten the people in the foreground, and the background is now darker. I am still using composition to help direct you, and most importantly, I am looking for the moment that tells the story. The embroidery on the scientist’s sleeve almost replaces the need for a caption.
The Atlanta Science Festival
Capture a moment with a father and daughter. The photo reads faster than if I had relied solely on composition.
The Atlanta Science Festival
As seen in this last photo, your eye will wander if the photographer doesn’t use all the necessary tools to direct your attention.
When you look back at your photos from an event and nothing stands out, there is a reason. Are you using all the tools at your disposal to capture moments? Of all the tools you can use, an off-camera flash may be your best weapon. Do you know how to use one?
If you would like to master this technique, contact me for a personal class with one-on-one instruction.
These are examples of the student’s work from this past week on lighting that I taught in the School of Photography 1, which is part of Youth With A Mission’s University of the Nations campus in Kona, Hawaii.
This class was the first time most of the course used studio strobes.
Without flash — Photo by Andrea Klaussner
With flash — Photo by Andrea Klaussner
They learned how to use off-camera flash on location. The assignment required them to hand in one photo without a flash and one with it. Some of the student’s photos looked better without a flash, and sometimes you don’t need a flash.
Without flash — Photo by Lizz Busby
With flash — Photo by Lizz Busby
The bread and butter assignment for a photographer is the environmental portrait. Taking a poor lighting situation and improving it was the purpose of the assignment, as well as knowing how to make it.
The students took a baseline photo without a flash and below the sync speed for their camera. Then they made a flash reading setting the strobe to be one stop greater than the aperture reading without the flash. They then only changed the aperture to the great one-stop aperture that was the flash setting. They were also encouraged to see if more power from the flash was better for the photo.
1:3 Lighting Ratio Assignment
In an earlier blog post, you can see the students’ assignments. First, they needed the leading light [key] at 45º from the camera, with the model looking straight into the camera. We did this to help them see the shadow across the nose. They then had a fill light one stop less than the leading light.
They could use different backgrounds from White, Gray, or color.
Photo by Debbie Smit
Photo by Erik Wuesthoff
Photo by Keziah Khoo
Photo by Lizz Busby
Photo by Oo Shinoda
Photo by Melissa Kelsey
I think the students all did a great job, and in less than a week, each person had a potential of a couple of photos to add to their portfolios.
A couple of years ago, I made environmental portraits of the students in the executive MBA program at Georgia Tech. I would take about 15 minutes to walk around with the student at the campus and create the photos you see here.
The setup for all these photos is pretty simple and not all that different in each image.
KISS Method
Keep It Simple Stupid: I think TTL off-camera flash is effortless to use. If it is too bright, turn down the flash by adjusting the flash compensation to -1, -2, or whatever. If too dark, go in the opposite direction of +1, +2, or more.
You can make the background darker by underexposing the camera by adjusting the exposure compensation the same way you did the flash, except this time, you change the camera and not the flash.
Nikon D3S, 85mm ƒ/1.4, ISO 1000, ƒ/1.4, 1/8000
I cranked up the ISO a bit in this photo to lighten the background, and the flash is just winking.
Nikon D3S, 85mm ƒ/2.8, ISO 200, ƒ/1.4, 1/125
The basic setup never changed, and I moved around to get the three different looks. However, I still wanted some variety, so we moved.
Nikon D3S, 85mm ƒ/1.4, ISO 200, ƒ/1.4, 1/1600
I moved him to the street from the courtyard. I thought this caught the “executive” look a little better.
Nikon D3S, 85mm ƒ/1.4, ISO 200, ƒ/1.4, 1/1000
I like the shallow depth of field so that I am helping the subject “pop out” from the background. Shallow depth of field is a way to take a busy background and still use it but subdue it.
Nikon D3S, 85mm ƒ/1.4, ISO 200, ƒ/1.4, 1/1600
Other than changing locations and keeping the depth-of-field shallow, I kept the camera below eye level. This is because I wanted the audience to look up to him. This is my way of trying to create a sense of authority.
While the flash helped add catch light in his eyes and give some shape to his face, it also had another benefit. It assured me that I was using a full spectrum of light, helping me render the best skin tones.
Take your camera, find a subject, and shoot your own “executive” portraits.
I remember being in the darkroom, looking through my concert photo shoot, and struggling to find one image I could give to the editors.
When I was photographing bands in the 1980s, I was starting this career. Every time I pushed that button, it cost me about 50¢ to 75¢ a photo. The cost depended on if I was shooting black and white, color negative, or color transparency film. It was standard for me to avoid a concert with only a handful of keepers’ images.
The learning curve for me was pretty steep compared to today. You had to wait to see your results.
Joe Jackson, 1983 at Great Adventure in Howell, NJ.
With film, the time from me taking the photo to see if it was usable was a few hours at best and, usually with color transparency, a couple of weeks.
I should have written down all my camera settings and, when looking at the photos, know what I did, but I didn’t. So I knew the shutter speed was too slow, and my images were not sharp.
Brice Street at the Attic in Greenville, NC, 1983
The camera’s metering systems were not as sophisticated as today. So getting a good reading on the face of the singer using a spot meter in your camera that we have today was not on those Nikon FM or FM2 cameras I had back then.
I was shooting tungsten color transparency film since tungsten temperature lights lit most stages. I was shooting ISO 160 being pushed to ISO 320. I had a Nikon 80-200mm ƒ/4 lens and got a few usable images back then.
I made a lot of mistakes in those first five years. Sometimes I hunted through contact sheets for just one image that could run in the school paper. I remember a time or two handing in photos that were slightly out of focus or had more motion blur than I should have.
Charlie Daniels Band at East Carolina University 1984
The Attic in Greenville, NC, had a good number of rock bands come through, and since it was such a small venue, the lights were closer, and the light was decent. However, the light wasn’t much better when the school had concerts like the Charlie Daniels Band.
I was getting very few usable images in those days. But, you see, shooting in the bright sun was much easier than going into some nightclubs where the light was scarce.
Late Night Reading at Swayze’s in Marietta August 2012 [Using off-camera strobes]
Even with today’s cameras, you will not walk into the venue and walk out with all your photos in focus, sharp, and well lighted because of the new cameras. So I am drawing upon all those years of mistakes today. I am showing up with lights in my car, so I can get to set up as needed.
When I went to Swayze’s in Marietta, GA, to photograph a boy band, I walked into worse lighting than I had in the 1980s. So, after trying to shoot with the available light, I went to the car to get some strobes. I knew that was the only way to get usable images like the one above of the bass player from the band Late Night Reading.
Five lights in the ceiling on the band. Four in front and one behind the drummer. Also, there were footlights in cases that the guitar and bass player jumped on, lighting them more than the lights in the ceiling. [Nikon D4, 28-300mm @ 125mm, ISO 5000, ƒ/5.6, 1/60]
Here is the overall shot of the stage showing their lighting. I had a few photos in focus because they were a punk band. They didn’t stay still like some bands. Their heads were banging as fast as the music. My experience told me to shoot the available light and get all I could see without lights before setting up lights. Too many photographers jump too quickly to strobes and try to shoot at low ISO all the time.
[Nikon D4, 14-24mm @ 14mm, ISO 5000, ƒ/5.6, 1/60, with off-camera strobes firing] You can see the footlights here.
What I learned through the years
If I had not been shooting bands on stage for years, I would not know what stage lighting should look like. I realized some concerts; the bands paid attention to the lighting. Huey Lewis and the News, the lighting was excellent. For a Rita Coolidge concert, the lighting was great. For the Charlie Daniels band not so great. With Charlie Daniels wearing a hat and the light from above, he never had a good morning on his face.
Rita Coolidge 1983
Later, when I didn’t use a flash to photograph Marc Brousard, I was equally screwed until he looked up into the light as here below.
Knowing what good light looks like makes it much easier to understand how to create it later with strobes or hot lights. I learned from shooting stage lighting that I wanted good morning on the performer’s face, which often meant a light that wasn’t being blocked by hats.
I have learned to consistently shoot the available light first before adding lights.
I learned that the light changes as the artist move around the stage. So sometimes the light is excellent, and sometimes it sucks–depends on your timing and luck.
I try to shoot faster shutter speeds for sharp photos. Then, of course, I may experiment with slower shutter speeds to show motion, but when I do, I know that is what I am looking for in the photo.
I shoot more variety of shots today–wide, medium, and tight photos.
I shoot the reaction to the stage as well as the stage.
I shoot each type of shot until I have some variety, not just a photo here and one there.
While shooting what is on stage from different angles can give your clients some variety, what happens off the stage is just as compelling when put into a package.
You don’t get credit for lighting professional productions as a photographer. However, not getting good skin tones and technically in-focus, sharp, and well-exposed photos will keep you from making a living in this profession.
By shooting the crowd, you are visually capturing how they sound. The group is into it if they are good, as we see above, with their hands in the air. Getting people up and dancing is another way to show how the music moved people. The point is the action isn’t always on the stage.
I can tell you from my earlier years I didn’t know how to shoot the crowd’s reaction to the music. That is one of the best signs of the seasoned pro–broad coverage.
I am thrilled when the light is excellent, like when I photographed the comedian Tim Hawkins. My job is so much easier. I don’t have to light the stage. You don’t get credit for the lighting if you have great shots at venues like this.
Comedian Tim Hawkins. [Nikon D4, 70-200mm @ 135mm, ISO 5600, ƒ/5.6, 1/500]
When you start, you will be terrified when you show up at events with little or no light. You will make mistakes and lots of them. Most likely, the people hiring you don’t know how difficult the job is. They hired you to shoot.
You will be sick as you edit your work, hoping you have enough images to show the client and pray they are satisfied enough.
As you get more experience, your anxiety will diminish. You will come to jobs with more gear for those difficult moments you anticipate. You now know how bad it could get.
Just know all professions have a lifecycle that you grow into becoming a veteran.
The lifecycle for the professional photographer
First five years–Lots of mistakes and primarily the way we learn
Second five years–Still making mistakes, but now learning to round out our coverage
Third five years–Have a style that is established that is professional.
Forth five years–Nailing most assignments and not just delivering what is expected, but now experimenting with stretching beyond
Fifth five years–Going after new markets and often trying new things to add to our portfolio of skills.
You will notice that every five years, you will have mastered a new skill you started and added this to your portfolio of skills. This is because to remain competitive, you add a new skill every five years and take about five years to perfect it.
The total package cost of $1,067.01 Prices based on July 5, 2013
This is just a list of what I recommend for those wanting to do off-camera flash with the Nikon TTL system and using the PocketWizard radio system to fire the flashes.
You can substitute another Nikon TTL or off-brand to lower the price.
$17.98 on Amazon External Flash Battery Power Pack for SD-9A Nikon Speed light SB910 Whenever you shoot with Nikon Speedlights, you cannot shoot continuously forever. It would be best to shoot in small bursts of under 10 frames at a time to let the flash cool. If you do not, you will send it to Nikon for repair. The external battery will just give you more flashes, which is how I use it rather than shooting faster.
When I get this kind of situation on a cloudy day in Kona, Hawaii, sometimes I fix it with flash.
By using an off-camera flash, I set the flash to be 2 stops over the available light, and the camera I underexposed by -2 stops.
While this made the photo much better, the color didn’t pop in the background.
Here I added a CTO +1 and did a custom white balance for the flash on the model’s face. I could have dialed the white balance to tungsten and been very close.
I put a CTB +1 on the flash in the last photo and then did a custom white balance. Because the camera compensates for the blue in a flash, it adds orange to the scene. So where the flash hits the model is now the proper color temperature.
So, which one do you like the best? Do you want a flash or add a blue or orange filter to change the background?
Tom Butler, coffee farmer on the Big Island of Hawaii. Tom sells the incredible 100% Kona coffee.
Nikon D4, 28-300mm (300), ISO 2000, ƒ/10, 1/200 – Off camera fill-flash using the Nikon SB-900 pointed at the coffee farmer. The Flash is on the Pocketwizard TT5 and being triggered by the Mini TT1 on the Camera with the AC3 to control the output of the flash. Flash is 0 EV and the camera is 0 EV. A second Flash is setup the same way but on different channel at -3 EV pointed at the coffee on the branch.
Before I start this blog I want to thank Tom Butler for letting me photograph him. If you want some great 100% Kona coffee you can go to his websitehttp://paradisefoundhawaii.com.
The environmental portrait is the bread and butter of the working photojournalist. I wanted to show you three options I did for a portrait of a coffee grower in Hawaii.
I had to really look for the cherry looking coffee berries on the trees. It wasn’t the time for harvesting, that had already been done earlier. This is the season for pruning.
This first choice you see here I tried to tie the coffee plant in with the coffee farmer.
The second choice has the coffee farmer in front of the plant rather than behind it as in the first photo.
The last choice I asked him to pick some of the coffee and present it to me for the photo.
You most likely like one of the three better than the other. However, the professional photographer will give options to the photo editor. The editor knows then that I worked the situation and tried to give them some options.
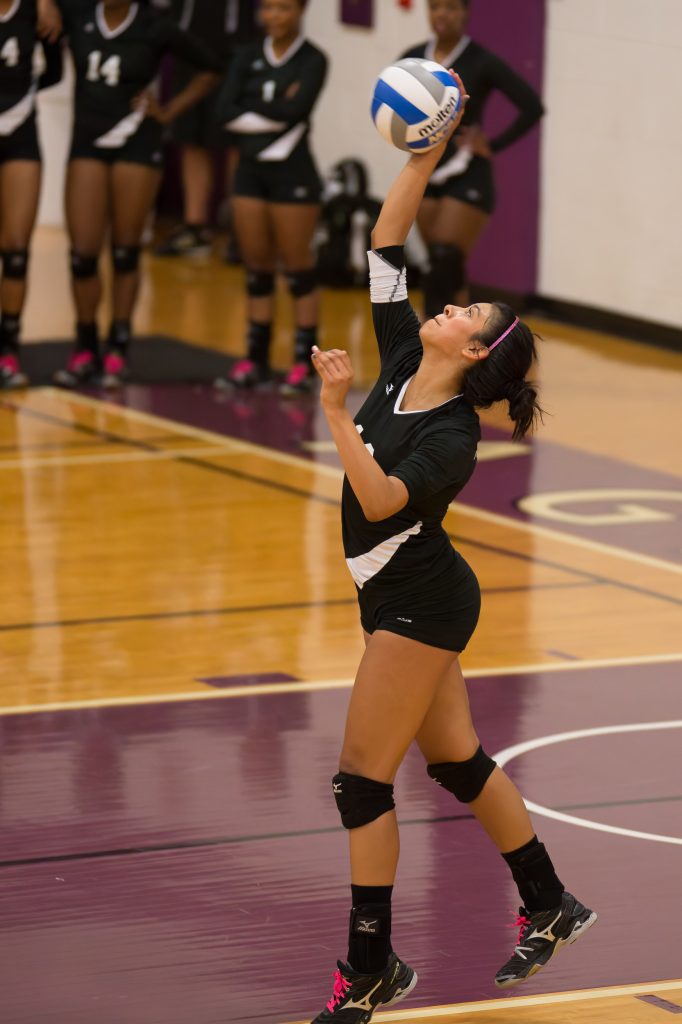
Caption: Nikon D4, 28-300mm, ISO 12,800, ƒ/5.6, 1/400 — Flashes used (4) Alienbees B1600 with 11″ long throw reflectors with PocketWizard Plus II receivers and being triggered by the PocketWizard Mini TT1. with DXO Pure RAW 4 & Lightroom
High-Speed Flash vs. No Flash
In the photo above, I used a flash with an output about the same as the existing light.
This is the histogram for the above photo.
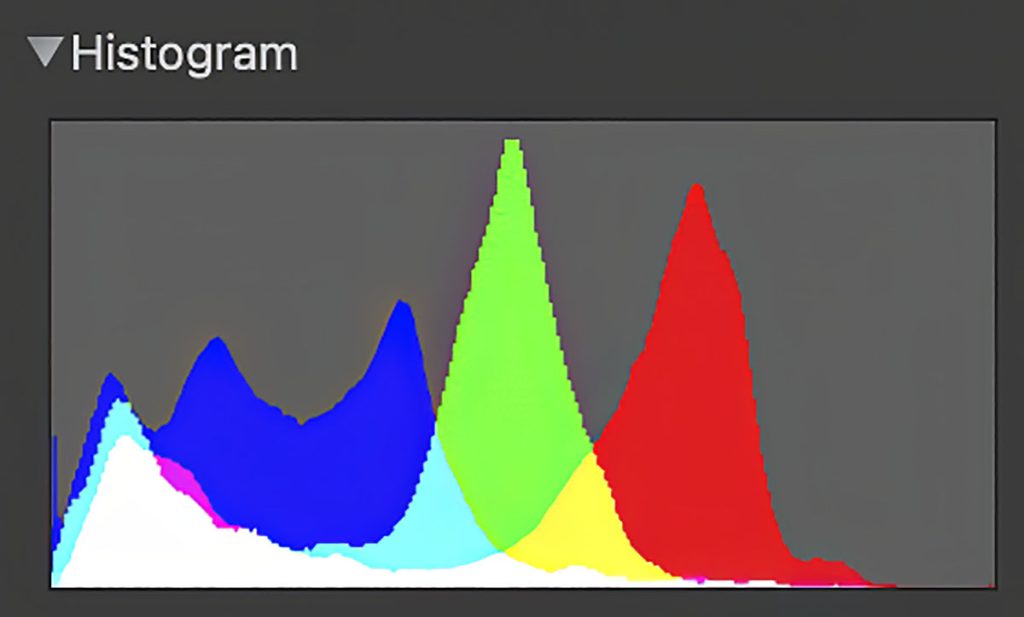
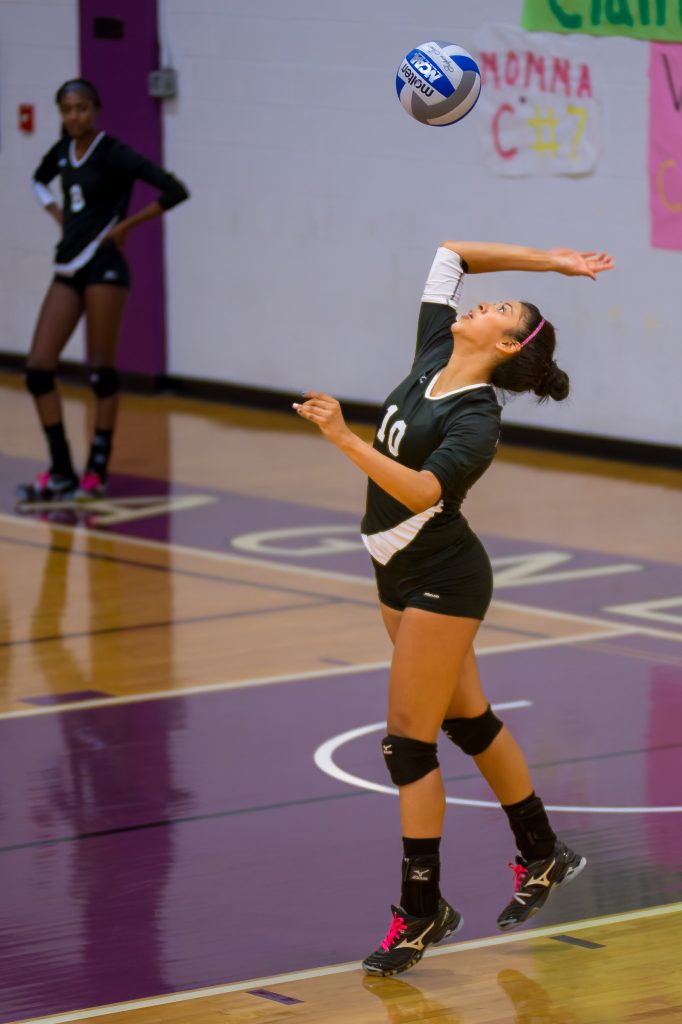
Nikon D4, 120-300mm, ISO 11,400, ƒ/2.8, 1/1000 with DXO Pure RAW 4 & Lightroom
Here is another photo without strobes. I had to change to a faster lens and use a faster shutter speed.
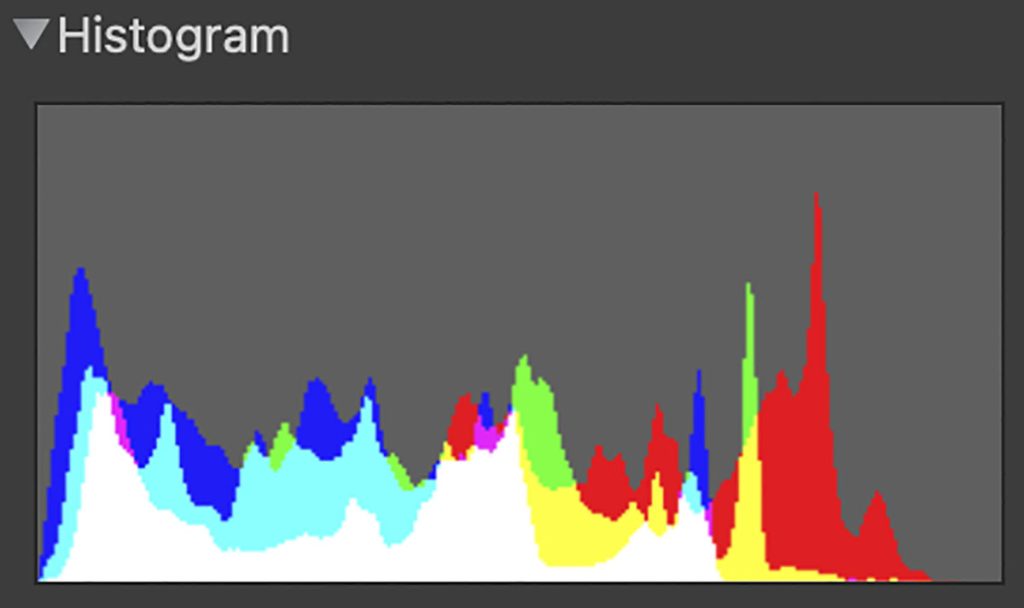
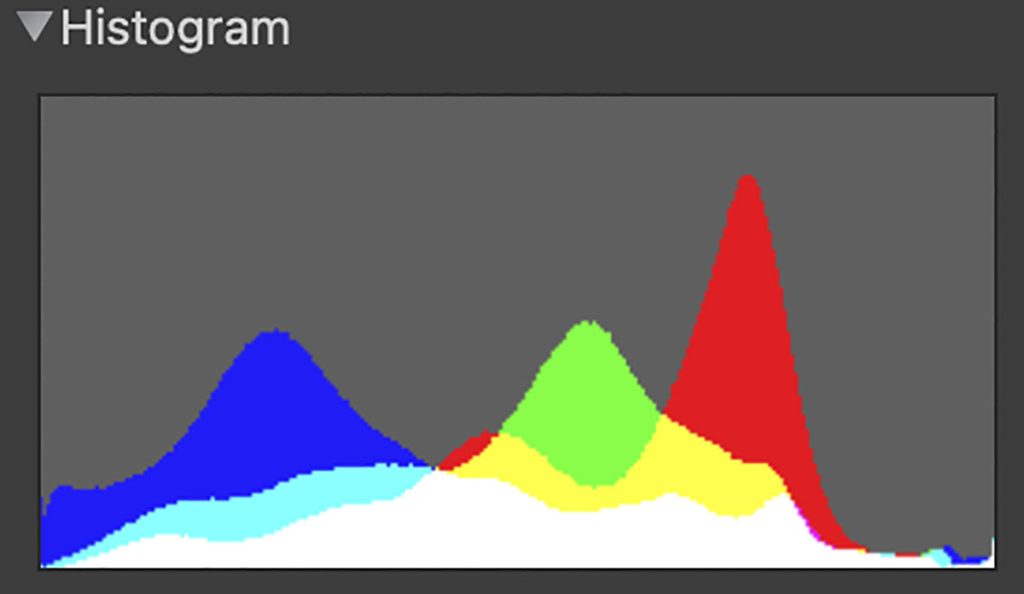
This is the histogram for the second photo. Two things stand out. First, the shadows in the picture using available light have less information than the photo using flash. Second, the entire dynamic range appears more significant with the flash, resulting in less photo noise.
ISO 25,600
I wanted to see what the Nikon D4 looked like at 25,600 without strobes. Here is the result. I am showing the same player, so there is a slight variation as possible except for ISO.
Nikon D4, 120-300mm, ISO 25,600, ƒ/4, 1/1250 processed with DXO Pure RAW 4 & Lightroom
Here is the histogram for ISO 25,600
Color Temperature
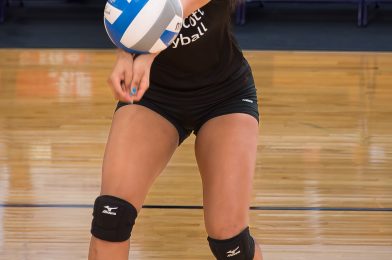
A camera’s ability to accurately reproduce color depends greatly on the color space with which the object is photographed. The dynamic range of color is the greatest with Daylight or 5500º Kelvin. As you move away from this color temperature to the sodium vapor lights in this gym, which are 3700º Kelvin, and then you must add 27+ magenta to color correct this to get a neutral grey, the color space shrinks. The dynamic range is less.
If we had used only the strobes and no ambient light for the most accurate color, the color would have been the most accurate. Also, I could not have bounced the flashes off the ceiling; I would have had to point them straight at the volleyball players. The bounced flash will shift the color of whatever it bounces off. If the ceiling were red, there would be a red tent to the light.
Setup
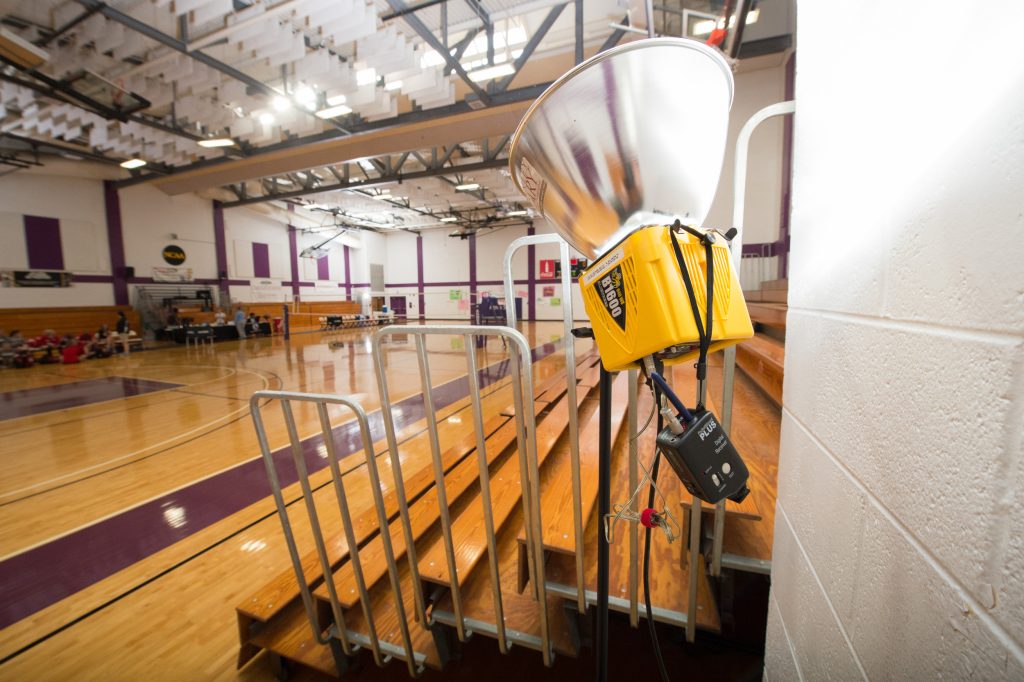
Here is a photo of one of the four Alienbees B1600 with the 11″ long throw reflectors. You can also see the PocketWizard Plus II used to trigger the flash. I dialed down the flash output to 1/8 power. Again, with today’s full-framed high ISO camera chips, the results are quite acceptable, and the flash is less disturbing to those in the room.
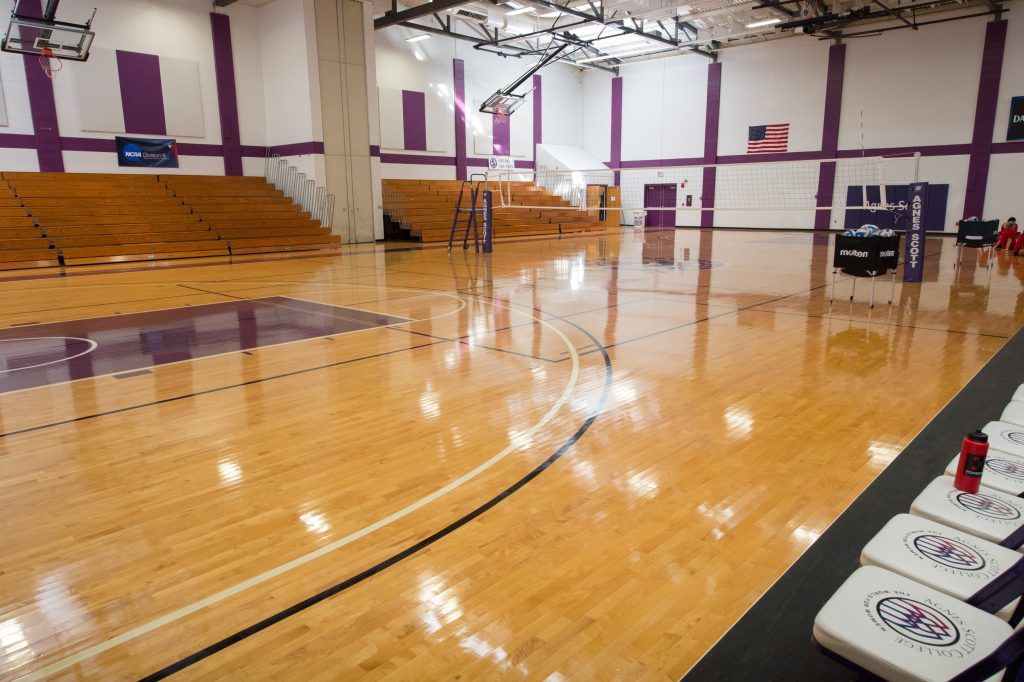
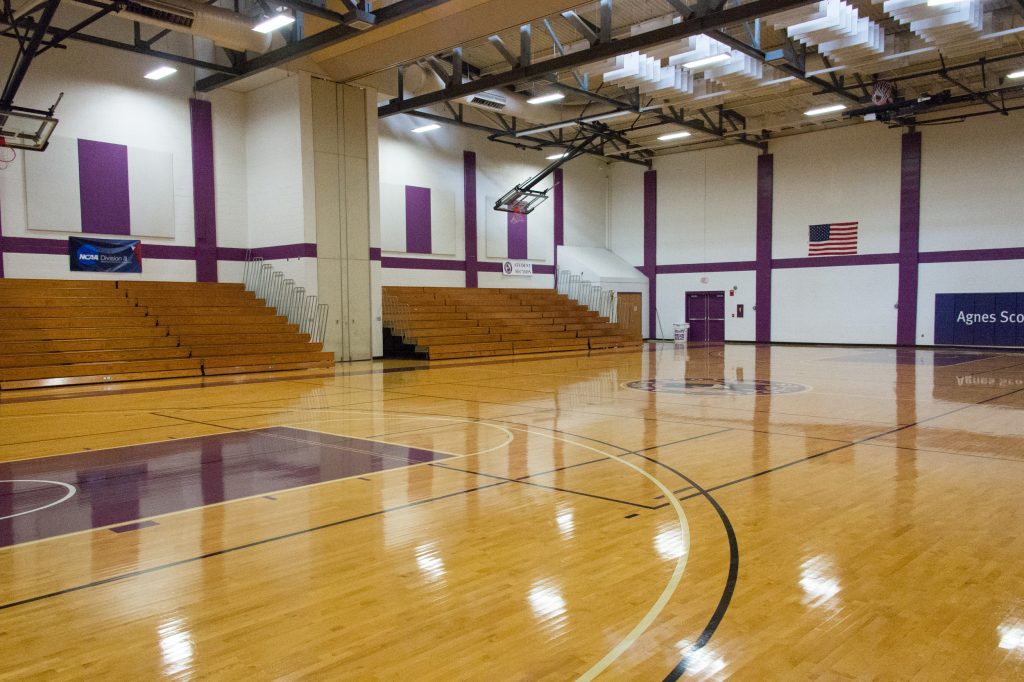
This is a wider shot of the room where you can see the results of all four strobes going off.
This is the histogram for the overall shot above.
Agnes Scott vs Huntingdon
Here is that same angle with no flashes.
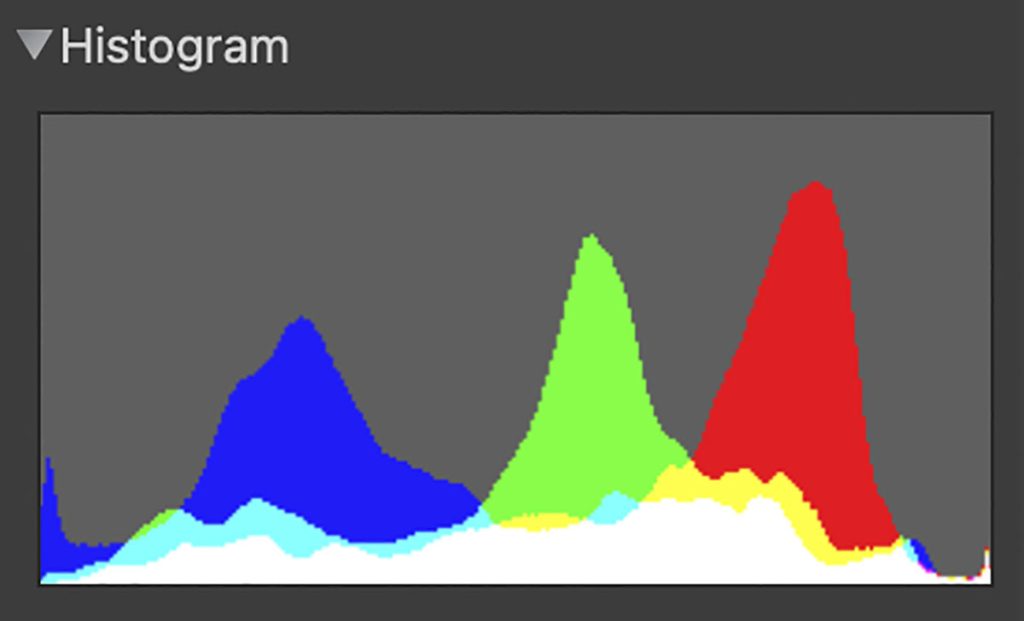
This is the histogram for the available light photo.
One last comparison
Nikon D4, 28-300mm, ISO 12,800, ƒ/5.6, 1/400 — Flashes used with DXO Pure RAW 4 & LightroomNikon D4, 28-300mm, ISO 12,800, ƒ/5.6, 1/400 — No Flash with DXO Pure RAW 4 & Lightroom
High-Speed Flash Sync
You may have noticed that the flash shots were taken with studio strobes and synced faster than the Nikon D4’s 1/250 sync speed. How did I do that?
Here is an explanation from the PocketWizard website.
PocketWizard’s HyperSync™ feature throws x-sync out the window, allowing never before possible shutter speeds with full power flash – any full power flash. With some camera and flash combinations even 1/8000th second is possible. (Alienbees with the Nikon would only sync up to 1/400)
HyperSync is simply the ControlTL® system’s unique ability to adjust the timing of the flash burst so that you can use as much of the light output as possible as the shutter opening passes over your sensor. With the systems “through-the-shoe” communication, a ControlTL transmitter with HyperSync can automatically detect the camera type connected to it as well as the shutter speed. Read more …
The key to any good photo is the old KISS rule, which is: Keep It Simple, Stupid.
For this portrait of my dad, I chose to shoot outside and use some of the sunny weather we were having down at the beach. We shot this outside on the balcony of our cottage. The location was chosen because it was the fewest steps I needed to make to get a good photo.
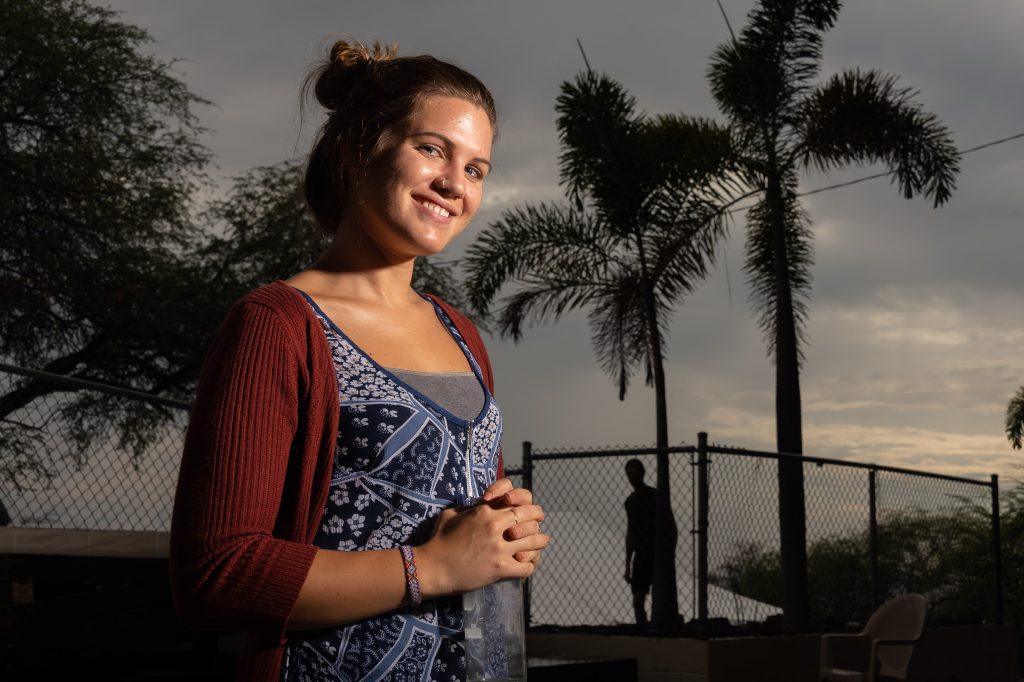
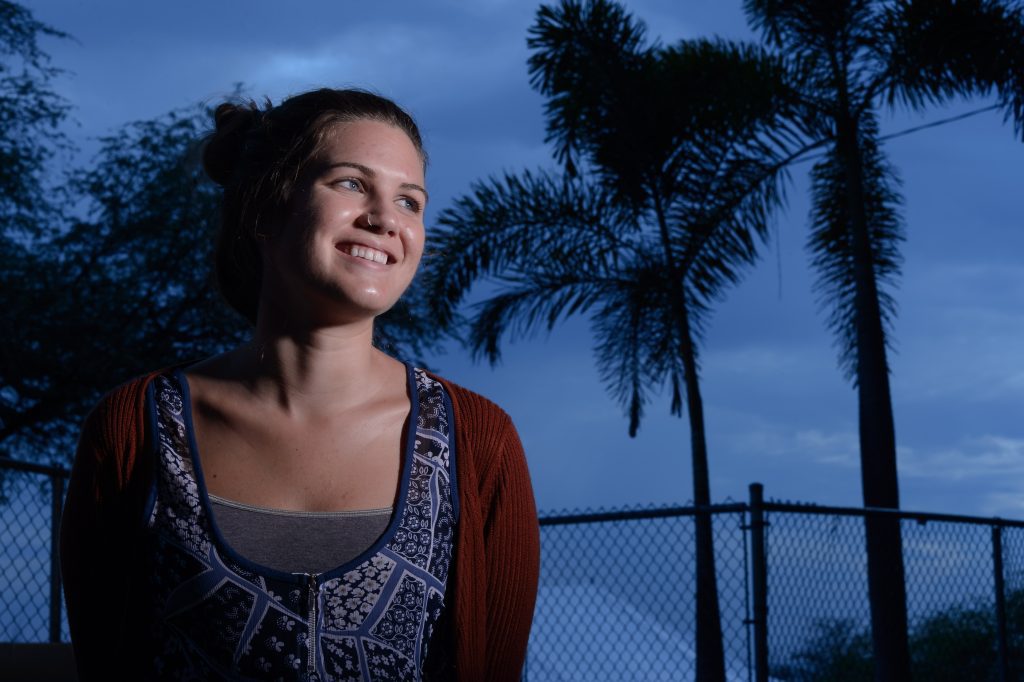
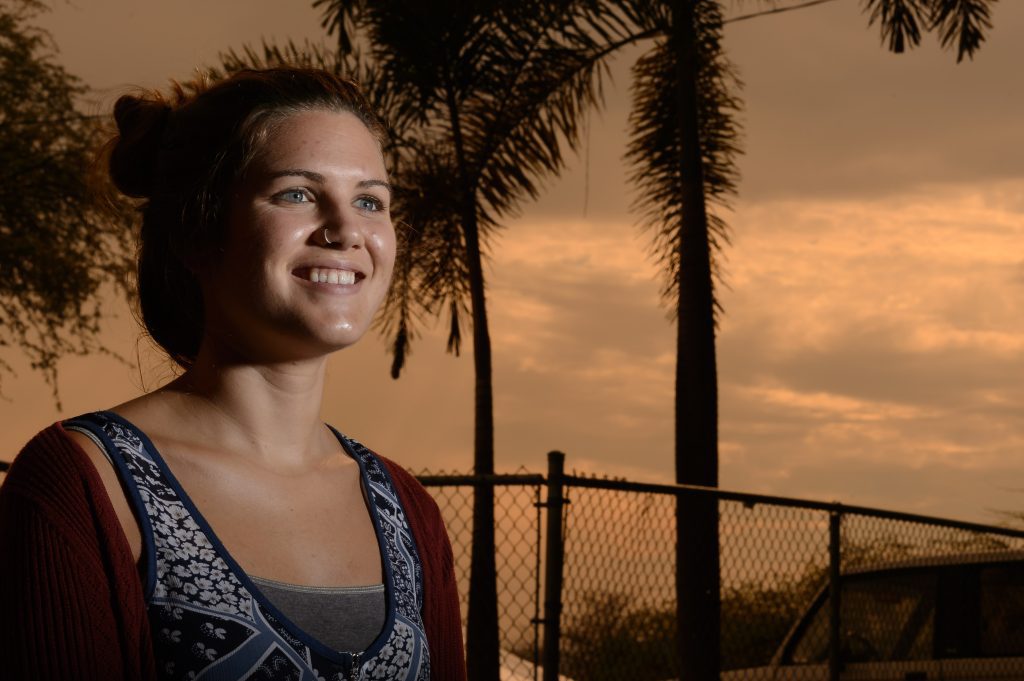
Start with the sun backlighting the subject.
One of the reasons I always start with the sun on the back of the subject and not where it is lighting their face has to do with expression. I find i almost impossible for getting a good expression when people are squinting and straining due to the sun being directly in their eyes.
The benefit of backlighting the subject is that you get a good rim light around it, which will help you separate it from the background.
Look for a darker background.
I like to find a simple background without blown-out highlights. I normally look for a much darker background than I chose here. My point is to be careful, or your blinking highlights will be in the background and distracting rather than complementary to the subject.
Choose a shallow depth-of-field
I am using my favorite portrait lens, my Nikkor 85mm ƒ/1.4, for this photo. When shooting with this lens, you need to be sure that the eyes are the sharpest point in the photo. I still recommend having the eyes be where you focus, even if you shoot this at ƒ/22.
In general, if you are doing a portrait of a person and not an environmental portrait, then the background and surroundings are not really that important. Since that is the case here for this photo, I threw that background way out of focus by shooting at an aperture of ƒ/1.4.
Fill Flash
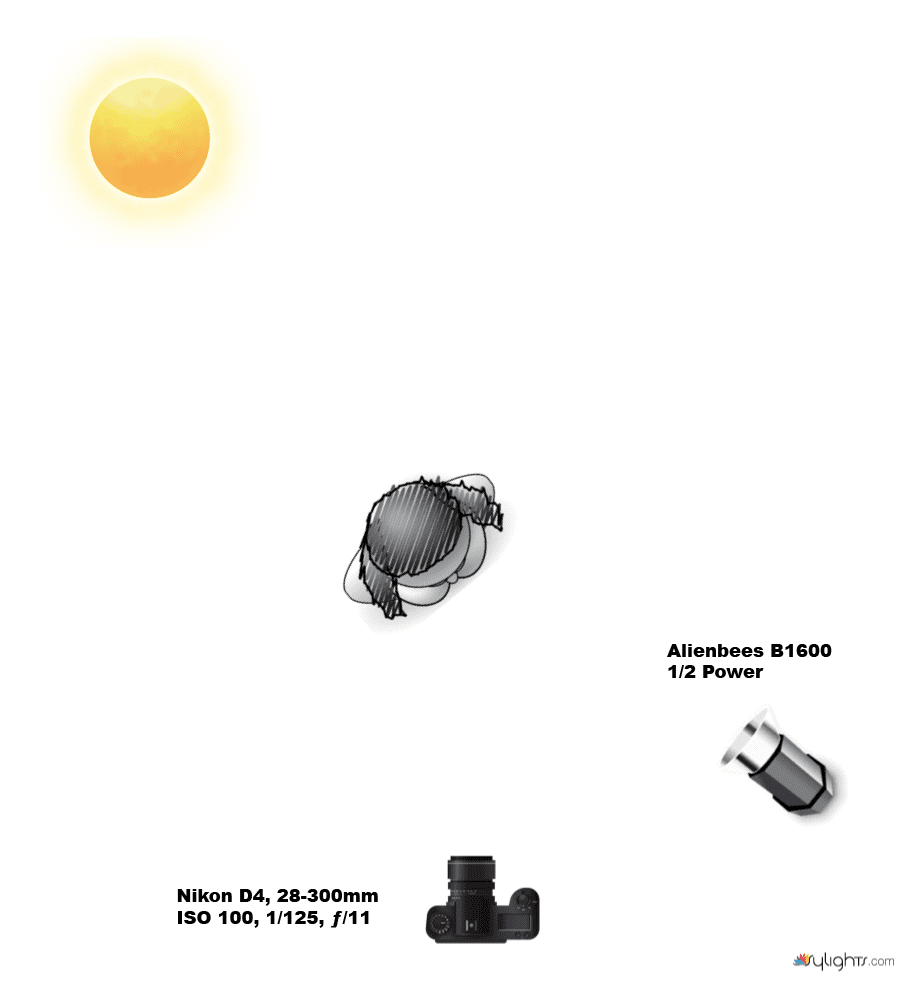
I love to use an off-camera flash as my fill/main light outside for portraits. Here is a diagram showing where the sun was and the off-camera Nikon SB-900 speedlight placement for this photograph.
You can trigger the off-camera flash in many different ways. I often use the Nikon SU-800, which uses infrared to trigger the off-camera flash. I chose to use the PocketWizard Mini TT1 on the camera with the AC3, which lets me alter the power of the flash from the camera and not the flash itself. This saves you a lot of steps back and forth for tweaking those fine adjustments.
The Nikon SB-900 has the PocketWizard FlexTT5 on it, which receives the signal and talks to the camera’s TTL system to give consistent exposures.
I placed the light 45º to the right of the camera and not quite 45º above the eyes. I am a little lower since my subject has deep-set eyes.
What is the benefit of the flash, say, over a reflector? If I use the reflector, I will be bouncing the sun into their faces and often getting the squint I was trying to avoid.
Second, I get good skin tones by using the flash, and the color temperature of the flash gives it that “pop” I like to see.
Third, I like seeing a catch light in the eyes, and the flash helps me be sure one is there. I think it helps bring the eyes to life.
Go and try this setup yourself. Adjust it to your conditions and the subject, and see what you come up with.
Cookie Consent
We use cookies to improve your experience on our site. By using our site, you consent to cookies.