How Nikon Metering Modes Changed My Photography—and What Still Matters Most

When I started in photography, getting the exposure right meant knowing your film, your light, and your camera like the back of your hand. There were no histograms or blinking highlights, just your eyes, meter, and instincts.

Back in the Kodachrome days, there was little room for error. That film had a narrow latitude—you exposed for the highlights or you paid for it with lost detail. It trained me to see light with discipline. There were no safety nets.

Then Nikon started evolving their metering systems, and everything started to change.


A Quick History of Nikon Metering Modes

Here’s a timeline of how Nikon evolved metering, each innovation promising better consistency:

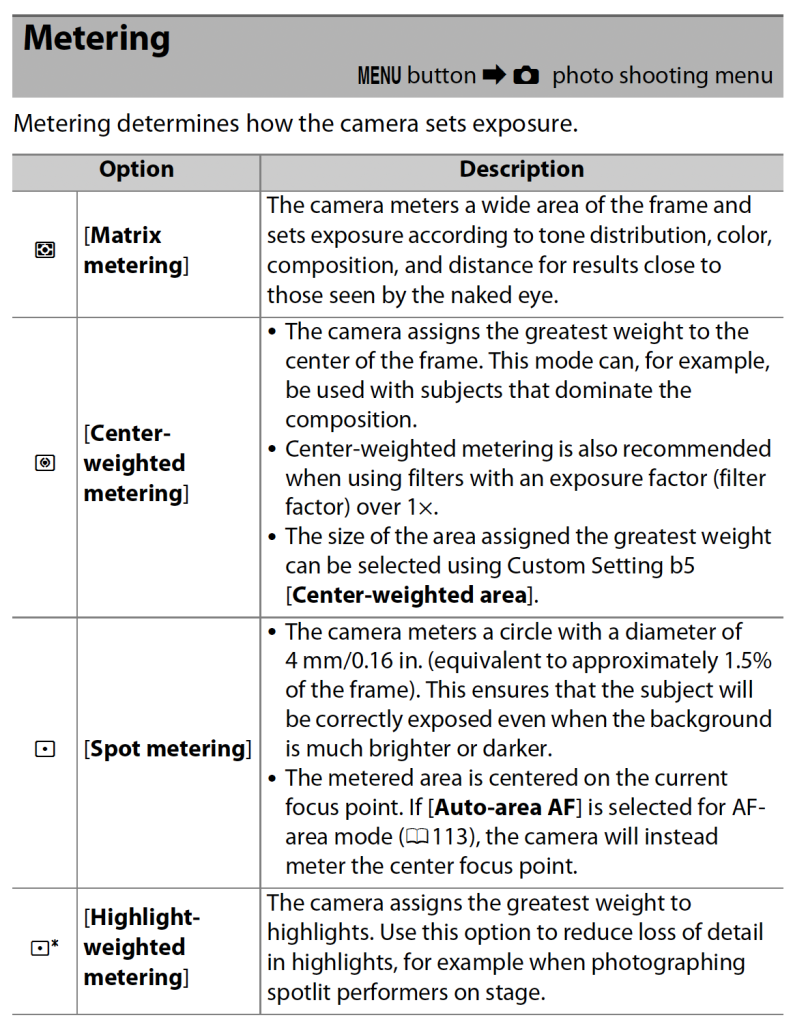
  • Center‑Weighted Metering
    📷 Nikon F (1959)
    Focused most of the meter’s reading on the center of the frame—perfect when your subject was dead center.
  • Matrix (Evaluative) Metering
    📷 Nikon F-601 / N6006 (1990)
    Game changer. The camera divided the frame into zones and used algorithms to guess the best exposure.
  • 3D Color Matrix Metering
    📷 Nikon F4/F5 (1996)
    Brought distance and color into the metering equation. The camera was getting smarter.
  • Digital 3D Color Matrix Metering
    📷 Nikon D1 (1999)
    Added a 1,005‑pixel RGB sensor. Welcome to digital wizardry.
  • Spot Metering
    📷 Nikon F-601 (1990) and D1 (1999)
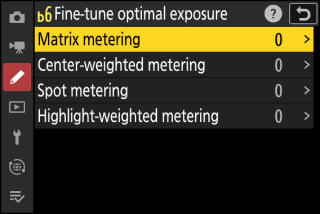
    Gave precise readings from a small portion of the frame—ideal for tricky lighting situations.
  • Highlight‑Weighted Metering
    📷 Nikon D810/D850/D5 (2014–2016)
    Specifically, it protects highlights and is a mode designed around how we see and work.

More Intelligent Cameras, But Still Not Smarter Than the Photographer

With every advancement, metering improved. It helped with consistency. But I also learned that no matter how smart the camera got, it could still be fooled, especially if I wasn’t entirely in control.

If you shoot in Aperture PriorityShutter Priority, or Program, your camera makes decisions for you. And sometimes, it makes the wrong call.

That’s why manual mode—with all these tools as guides, not governors—is still my home base when it matters most.


Enter the Histogram—A Digital Lifesaver

When digital came along, the histogram changed the game. I could finally see whether I was clipping highlights or crushing shadows. It took all those years of Kodachrome discipline and gave me a feedback loop. That made a massive difference in fast-paced situations.

I dive deep into this in my blog post, “Changing My Photography Game with the Nikon Z9 – White Balance and Metering Insights”. The Z9 gave me metering tools I never imagined years ago—but I still had to learn how and when to override them.


The Promise (and Pitfalls) of Eye-Tracking + Spot Metering

When I started using eye-tracking autofocus combined with spot metering on the Nikon Z9, I thought I had found the holy grail for portrait work.

It’s fantastic for a single person.

But on a football field? Where are there dozens of faces in the frame? The camera might suddenly lock onto a coach on the sideline instead of the wide receiver sprinting downfield.

That’s where I leaned back on my sports settings for the Nikon Z9. You’ve got to train the camera for the game, not just the face.


Metering Glitches? Sometimes It’s Not You

There have also been times when metering just seemed off. It turns out it wasn’t user error—it was a glitch.

In one post, “Troubleshooting Nikon Camera Glitches—Unveiling Solutions Beyond the Exposure Triangle,” I discuss how understanding metering modes also means knowing when the camera needs a reset or when firmware updates fix bugs that quietly wreak havoc.


Final Thoughts: Tools vs. Trust

Today’s metering systems are nothing short of incredible. But they are tools, not truth-tellers. They can inform, assist, and enhance—but only if you, the photographer, are in charge.

You still need to:

  • Know the lighting
  • Understand your subject
  • Choose the correct metering mode
  • Review your histogram
  • Be willing to go manual when things get unpredictable

Metering modes may have changed how I work, but they haven’t changed why I meter: to tell the story with clarity, consistency, and control.

Tagged :

Why I Use Manual Flash Most of the Time (Even Though TTL is Pretty Smart)

Over the years, I’ve used everything from Nikon’s speedlights to studio strobes like the Flashpoint XPLOR 600, and I’ve learned that manual flash gives me the consistency I need when the light—and the story—matter most.

Don’t get me wrong—TTL flash (through-the-lens metering) is an incredible tool, especially in a fast-moving, unpredictable environment. It’s like having an assistant constantly reading your scene and adjusting the light. TTL can be a lifesaver for event work, weddings, or situations where your subject and background continually change.

But when I have the time to set up and shape the light—whether it’s an environmental portrait, a brand shoot, or storytelling for a nonprofit—I switch to manual flash every time.

Shaping Light for Portraits — Demonstrating the shift from butterfly lighting to clamshell lighting by introducing a lower fill with a reflector or second light source during a live demo in the SOP1 class at YWAM’s School of Photography in Kona, Hawaii. Photo by Dennis Fahringer. Model: Julie Gavillet.

Manual = Control and Consistency

TTL works by firing a quick pre-flash and measuring the light bounce to determine power. The problem? If your subject moves slightly or the background changes, your exposure can shift, even if nothing about your lighting setup changes.

That’s where manual flash shines. Once you dial your settings—say 1/8 power, 1/200 shutter speed, f/4, ISO 100—you’re locked in. You can reposition, recompose, and shoot knowing your light won’t surprise you. That’s a big deal when trying to match strobes to ambient light or nail a consistent look across a series of images.

As I’ve written, “Flash is like garlic—a little goes a long way.” Manual flash gives me the finesse to use enough light to sculpt the subject without overwhelming the scene. With TTL, you sometimes get too much “garlic” when you weren’t expecting it.

Controlling the Light, Not Guessing — Demonstrating a classic 3:1 lighting ratio using manual flash setup—key, fill, and background light—to create consistent, controlled portraits without relying on TTL. This hands-on session was part of the SOP1 class at YWAM’s School of Photography in Kona, Hawaii. Photo by Dennis Fahringer. Model: Julie Gavillet.

When TTL Makes Sense

There are times when TTL flash is exactly what I need. In my post on slow-sync TTL flash, I discussed balancing flash with ambient light during low-light moments. TTL is perfect for that, especially when people are moving in and out of shade or you don’t have time to meter and tweak.

I also appreciate TTL using small flashes like the Godox V860 in rapidly changing lighting conditions. TTL gives you a strong starting point; some systems even let you dial in exposure compensation if TTL overshoots.

But again, if I have the time, I’ll almost always switch to manual after that initial TTL reading—because I want consistency from frame to frame.

Revealing, Not Replacing the Light — Teaching how to use flash to gently lift shadows and reveal detail in a backlit scene, preventing the subject from becoming a silhouette. Photo by Dennis Fahringer. Fire dancer: Aileen Kunewa.

Real-World Example: Flashpoint XPLOR 600 and the Nikon Z9

When I tested the Flashpoint XPLOR 600 with my Nikon Z6 (and now the Z9), I was impressed with how well the TTL worked for quick setups. But for my storytelling work—especially when I’m controlling background light with high-speed sync (HSS)—I rely on manual mode to avoid fluctuating exposures that TTL can sometimes introduce.

Once I’ve dialed in that look—backlight from the sun at f/2.8, a soft key from my off-camera flash—it’s smooth sailing. Manual gives me repeatability, and that’s critical when I’m shooting interviews or sequences where continuity matters.

Teaching the art of light on location — I’m demonstrating off-camera flash techniques with fire dancer Aileen Kunewa on the beach in Kona, Hawaii, during a live shoot with the School of Photography 1 class at YWAM. This hands-on session focused on using manual flash to shape light creatively in challenging environments—photo by Stanley Leary.

Final Thoughts

If you’re new to Flash, TTL is a great teacher. It helps you understand how flash balances with ambient and gets you close quickly. But if you’re ready to take control of your lighting, manual is the way forward.

So while both TTL and manual flash are in my bag, manual flash gives me the light I trust frame after frame.


Let’s connect:
Do you have a question about manual flash, or would you like help with setting up the Nikon Z9? Please message me or check out more lighting tips on my blog.

Tagged :