Depth-of-field is more than Aperture

Reading Time: 5 minutes

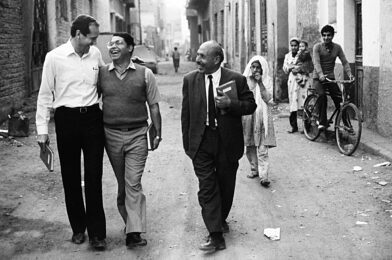
Egypt—Missionary Mike Edens (left) worked closely with Egyptian Baptist pastors to enhance their discipleship and pastoral ministries. These pastors—(left to right) Mikhail Shehata Ghaly and Anwar Dakdouk—took MasterLife discipleship training in Cyprus in 1984

Technically, Depth-of-Field—is the distance between the nearest and farthest objects in a scene that appear acceptably sharp in an image.

Don Rutledge

I have never met a photographer who understood more about packing more into a frame to tell a story than Don Rutledge.

It takes a lot more skill to take a photo of what appears to be clutter and compose it so that you capture a story than it does to isolate a subject by either getting closer or zooming in.

What Don Rutledge taught me, and yet I still haven’t begun to execute it as well as he did, was to use the environment around the subject to provide context and tell a better story.

He taught me to spend time with a person before I take a photo of them. Spend time getting to know their story; this way, once you know them, you start to see things around them and their body language that help inform the audience through visual clues as to who the subject is as a person and how they interact with people in their world.

[Photo 2] While legislators around the nation debated the need for rat-control laws–and disputing their funding–Don discovered these two youngsters who proudly displayed the results of their morning hunt. In that section of Cincinnati, Ohio, in, in 1968, rats were not particularly difficult to locate.

Don taught many photographers not to watch the edges of the photograph but to pay attention to the “Depth-of-field” when making the photograph. He wanted to use the thing in the foreground and background more than any other photographer I knew to help tell the story.

In Photo 1, you can see down the street and around the men as they walk in Egypt. While most everyone is laughing as if a joke was just told, notice the woman behind the men. Her expression tells another story.

I can picture this woman being similar to the woman in Matthew 9:20, “If I can just put a finger on his robe, I’ll get well.” Jesus turned—caught her at it.

She is not part of the men’s group, but she is interested in them.

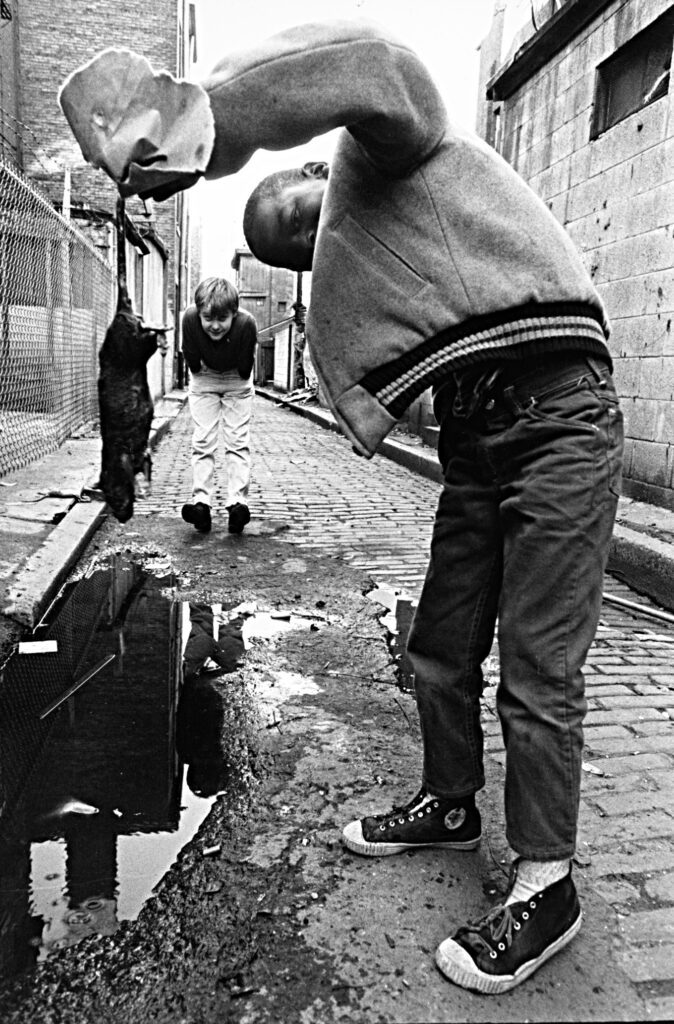
In Photo 2, you see not just the rat being held by the boy, but also his friend and the location of their discovery. His friend’s body language and the alley where they found his body add significantly to the context.

[Photo 3] This is early morning in Mississippi for Luvenia and Bailey King King sleeps as his wife puts breakfast on the table [photo by Don Rutledge]

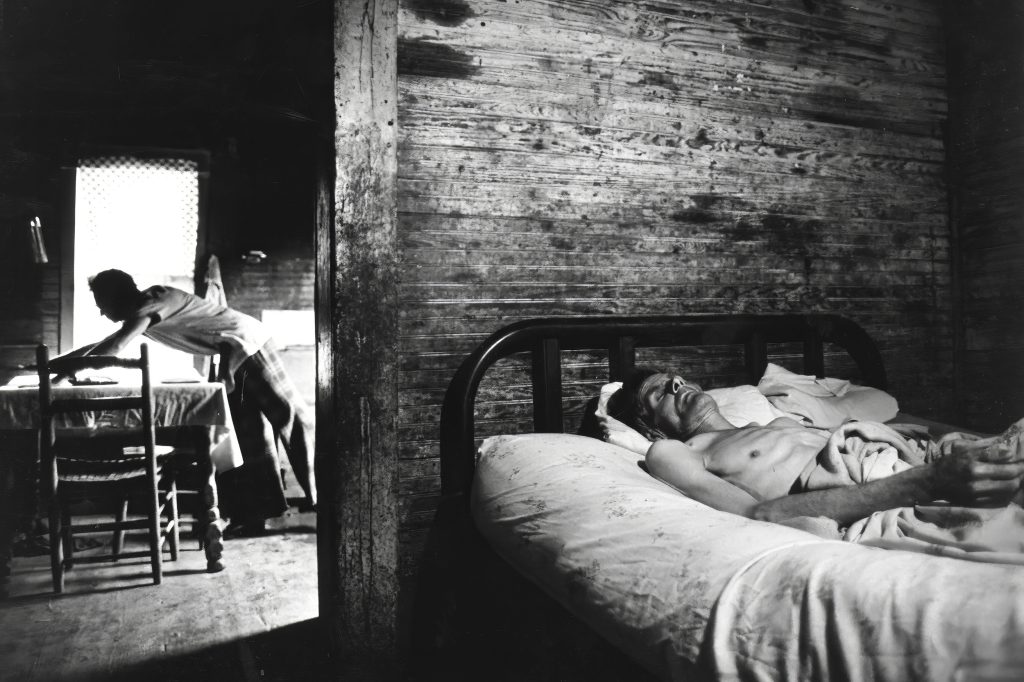
To get this type of “Depth-of-field,” Don invested time in his subjects. In 1979, Don spent a month living with the King family in Mississippi. He added just enough money to the family budget to not add any financial stress and not change their living standards so he could cover what it was like living below the poverty line in America.

This photo [Photo 3] became a favorite photo of many from the story. The image captures Bailey King and shows how thin he is and how hard his wife worked to provide for the family. It is not a photo of Bailey but of his wife, Luvenia.

[Photo 4] Appalachian migrant family in Ohio during 1968 [photo by Don Rutledge]

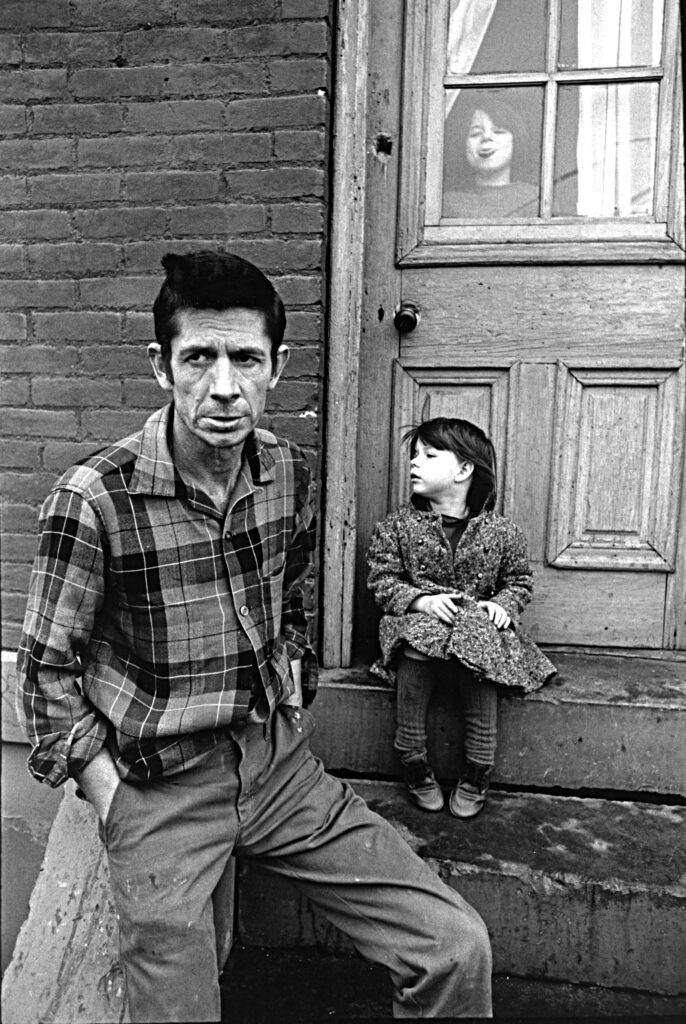
In Photo 4, you can see a father who appears concerned, and his children are visible in the background. The children are like all children, pulling the viewer into the story of a migrant worker who will travel wherever, finding work to provide for their family. Many photographers cropped just above the father’s head and left the boy in the window. The reason is that they most likely would not have seen the boy.

Don had a patience about him that let him be in the moment. He could see things that most missed. Don really and truly had more empathy for his subjects than just about any other photographer I have known.

[Photo 5] Africa—Sally Jones (white coat) felt emotions well up inside as she shared this moment with concerned mothers at the Southern Baptist Feeding and Health Care Center’s clinic in Ethiopia.

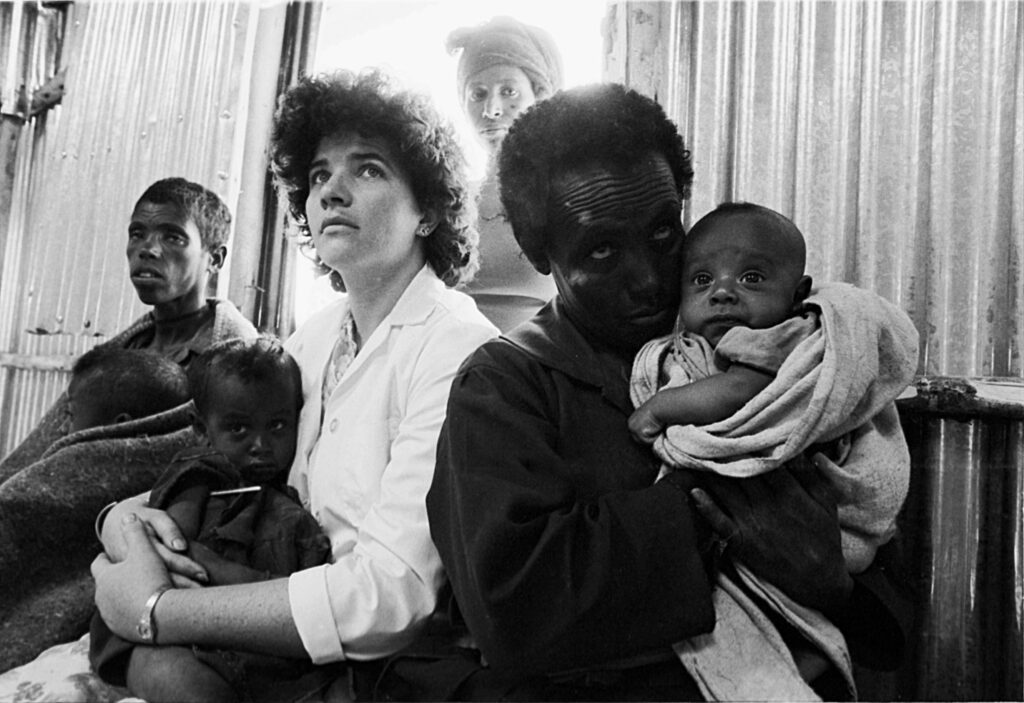
Many photographers might crop in much tighter on Sally Jones. In Photo 5, Don goes wide and gets close to ensure you see her expression. I remember often seeing the contact sheets of moments like this when Don was editing. He would show me the moment before and after, where sometimes the lady in the background was only there for one of maybe ten frames. She adds so much by helping pull you to the background after seeing Sally. There are more mothers outside, which helps convey the message.

[Photo 6] Israel—Missionary kid Sommer Hicks plays on the rocks of the Sea of Galilee with her dad, Ray Hicks, in the background [Don Rutledge]

So often, photographers become so focused on the main subject that they forget that those around the subject can sometimes offer valuable insights into them. Here we get a glimpse of how everyday life is for Ray Hicks in Photo 6 when we see how much fun his daughter is having at the sea of Galilee Don shot it in a way to bring Ray into the photo and give a context that Don did so well time and time again.

Please look at how often Don uses depth in his photos to tell stories. Here are two coverages of Russia that Don did in the 1980s. Don shot these for a magazine that would typically use only 8 to 12 photos, but look at the depth of his coverage. I recall seeing this coverage on numerous light tables and Dan Beatty commenting on how he could tell many stories whenever Don returned.

Getting the moment in a portrait with the Nikon D4

Reading Time: 3 minutes
 
Nikon D4, Sigma 70-200mm ƒ/2.8, ISO 500, ƒ/5, 1/640—Off-camera fill-flash using the Nikon SB-900 & SB800. The flash is on the Pocketwizard TT5 and triggered by the Mini TT1 on the Camera with the AC3 to control the flash’s output.

My client recently hired me to capture her granddaughter. She wanted the best expressions and said this was why I wanted to do the photo shoot. I continued to help her with her commercial needs, and she knew I concentrated on getting the “moment.”

Nikon D4Sigma 70-200mm ƒ/2.8, ISO 500, ƒ/5, 1/800—Off-camera fill-flash using the Nikon SB-900 & SB800. The flash is on the Pocketwizard TT5 and triggered by the Mini TT1 on the Camera with the AC3 to control the flash’s output.

I intentionally shot these on my Nikon D4 to use the off-camera TTL flash system I have come to love. I am using the off-camera fill-flash using the Nikon SB-900 & SB800. The flash is on the Pocketwizard TT5 and triggered by the Mini TT1 on the Camera with the AC3 to control the flash’s output.

We decided to shoot outside on their deck because the little girl was not happy when I arrived inside. However, the mother said she loved the outside, and sure enough, as soon as we went outside, she became another person.

You have to remain flexible. I wasn’t thrilled with the railing, but I liked the plants on the deck.

 
Nikon D4Sigma 70-200mm ƒ/2.8, ISO 500, ƒ/4, 1/1250—Off-camera fill-flash using the Nikon SB-900 & SB800. The flash is on the Pocketwizard TT5 and triggered by the Mini TT1 on the Camera with the AC3 to control the flash’s output.

While the little one loved the outside, she was starting to get a little fussy, so mom gave her blueberries that she just loved, but also gave me many photos with drool.

During some of the time, it was sprinkling, and the other time, it was overcast. So getting a consistent color was achieved by winking in a flash.

Nikon D4Sigma 70-200mm ƒ/2.8, ISO 500, ƒ/4.5, 1/800—Off-camera fill-flash using the Nikon SB-900 & SB800. The flash is on the Pocketwizard TT5 and triggered by the Mini TT1 on the Camera with the AC3 to control the flash’s output.

While I liked the green in the background, I found this oversized recliner I used for a three-generation photo of the Grandmother, mother, and child. I prefer the cleaner background, and had it not been raining, I would have suggested getting off the deck so I could eliminate the railing. A different location would have led to an even better background.

While I love the Fuji system, when it comes to nailing the focus and moment, I still prefer my Nikon D4.

Protecting and help retain the value of lenses

Reading Time: 3 minutes

Not long after I bought my first Sigma 120-300mm ƒ/2.8, I invested in the LensCoat Neoprene Cover for the lens.

On the most basic level, it prevents cosmetic blemishes on the surface of the lens and helps retain the value of the lens. However, your lens will still depreciate. Look at KEH’s guide, and you will see how much depreciation is cosmetic.

KEH grades:

NEW New defined as packaged by manufacturer complete with manufacturer’s USA warranty. Not previously owned or used by a consumer. *You have probably seen the words “NEW” or “LOWER PRICE” listed online or in our catalog, where prices usually appear. Due to specific manufacturers’ minimum pricing requirements, we are not permitted to publish the price if we sell it for less than the manufacturer’s Minimum Advertised Price (MAP). While these listings may seem inconvenient, it is our way of letting you know that when you call or click through on the website, you will be quoted the lowest pricing anywhere for comparable items.
DEMO The demo is defined as packaged by the manufacturer, complete with the manufacturer’s USA warranty. She was never owned by a consumer but used for demonstration.
LN “Like New” Includes the original box and instructions.
LN- “Like New Minus” Extremely slight wear only seen upon very close inspection. Box and accessories are usually not included. Glass perfect*.
EX+ “Excellent Plus” is Exceptionally nice. It May have slight wear on the finish but is visible only under close inspection. Glass is very clean*.
EX “Excellent” Shows moderate wear. It may have minor dents, dings, and slight finish wear. Glass may have little marks and blemishes that will not affect picture quality*.
BGN “Bargain” Shows more than average wear. It May have dents, dings, brassing, and finish loss. Glass may have marks and blemishes that should not affect picture quality*.
UG “Ugly” Very rough looking. Multiple impressions in metal, excessive finish loss, and brassing. Glass will have marks, fungus, and haze, affecting picture quality.
AI “As-Is” is Usually to be used for parts only. All equipment sold in the As-Is category carries no warranty nor return privileges. The equipment most likely doesn’t work and may have missing pieces. Defects include but are not limited to the problems listed in the description.

Here you can see the lens without the lens coating; that is how I hope to keep it looking for a long time.

A great feature includes a clear, flexible UV-PVC window over the AF/IS/VR controls and the distance-scale window. This window also helps you from accidentally bumping and changing those settings.

LensCoat® Lens Covers are manufactured from 100% closed-cell neoprene, offering protection from bumps, jars, and nicks, with a camouflage-pattern fabric cover. LensCoat® Lens Covers also provide a thermal barrier, protecting your hands from cold lenses in lower temperatures. In addition, they are easy to install and remove, sliding on like a sleeve and leaving no residue on the lens. And LensCoat® lens covers are waterproof, protecting in harsh conditions.

If the LensCoat performs as well on this lens as the last one I had on my older 120-300mm, I will recover the cost of the $89.

Here is a video explaining the product that LensCoat produced.

Photographers need repetition to grow

Reading Time: 3 minutes
 
Fuji X-E2, 55-200mm, ISO 6400, ƒ/7.1, 1/125, EV -1.7

My bird feeders are teaching me a great deal these days. Of course, the feeder doesn’t change daily, but the light and the birds do.

This past weekend I observed we had a lot of fledglings. Fledge is the stage in a young bird’s life when the feathers and wing muscles are sufficiently developed for flight. It also describes the act of a chick’s parents raising it to a fully grown state.

Fuji X-E2, 55-200mm, ISO 6400, ƒ/4.8, 1/420, EV -1.3

Here I watched the House Finch feeding the Fledgling. It was just fun watching this take place, and so I decided I would pull out the cameras and photograph them. Again, the combining of one interest with another enhances the experience.

When I started, the photos were overexposed. This overexposing is because I was shooting in aperture mode. I had Auto ISO chosen with a minimum shutter speed setting of 1/500. I compensated for the exposure by turning the EV to -1.7 and would fine-tune it here and there based on the histogram.

The Fujinon XF 55-200mm was pretty slow with a ƒ/3.5-4.8 aperture. I was getting pretty good results, but we had rain coming down most of the weekend, and I thought this was a great time to test the new Sigma 120-300mm ƒ/2.8.

Nikon D4, Sigma 120-300mm f/2.8 DG OS HSM Lens, ISO 4000, ƒ/6.3, 1/320 EV 0

With the Red Bellied Woodpecker, I was not having to use the exposure value compensation and got great detail in the feathers.

Nikon D4, Sigma 120-300mm f/2.8 DG OS HSM Lens + Sigma 1.4 converter, ISO 4500, ƒ/6.3, 1/500 EV -1.3

However, when the darker Downy Woodpecker visited the feeder, I had to compensate the EV -1.3.

I was having fun, and the thing is, while I was having fun, I was also learning how to check the exposure from bird to bird because that would affect the direction. I could have tried the manual exposure, but the light was changing as the sun would peek through a little and then disappear.

I also enjoyed shooting with the faster ƒ/2.8. I was able to add the Sigma 1.4 converter when I photographed the Downy Woodpecker and got just a little closer to 420mm.

I was also learning about the birds. I downloaded Peterson’s guide to my iPad and enjoyed finding out the names of the birds. For example, at first thought, I had a Hairy Woodpecker, but that is a bigger bird with a longer bill.

Taking photographs allowed me to have the time to zoom in and examine the bird in detail. But, unfortunately, too often, they come and go on the bird feeder too quickly for me to study.

Now you know why so many birders are also photographers. The photos give you a long time to examine the bird.

Do you have something you can photograph regularly, see how your camera reacts in a different light, and also help you grow? If not, I recommend you look. I found mine in my backyard.

When you travel with Super Stars you need off camera flash to make them look good

Reading Time: 3 minutes

Nikon D4, 14-24mm, ISO 100, ƒ/8, 1/250—Off camera fill-flash using the Nikon SB-900 & SB800.  The Flash is on the Pocketwizard TT5 and being triggered by the Mini TT1 on the Camera with the AC3 to control the output of the flash.

I am traveling with the famous Chick-fil-A Cow Mascots this week. They are traveling around promoting Cow Appreciation Day this Friday.

Click here to learn more

Dress head to hoof as they like to say at Chick-fil-A and get a free meal. Wear some Cow Attire and get a free entree.

Now let me tell you how I made the top photo. I had two VALS holding the two hot shoe flashes on either side of me. [VALS stands for Voice Activated Light Stand]

Without the flashes the cows would have been somewhat silhouetted and by adding the off camera flash I was able to keep the color temperature on them daylight and then also keep them bright enough to keep the rich colors in the background.

Nikon D4, 14-24mm, ISO 100, ƒ/6.3, 1/4—Off camera fill-flash using the Nikon SB-900 & SB800.  The Flash is on the Pocketwizard TT5 and being triggered by the Mini TT1 on the Camera with the AC3 to control the output of the flash.

Very similar lighting setup, just I am have a subject close to me blocking the light to the left. I dragged the shutter to 1/4 to be sure you saw the photo he was making on his phone.

Nikon D4, 14-24mm, ISO 100, ƒ/6.3, 1/4—Off camera fill-flash using the Nikon SB-900 & SB800.  The Flash is on the Pocketwizard TT5 and being triggered by the Mini TT1 on the Camera with the AC3 to control the output of the flash.

Here you can see one of my VALS holding the hot shoe flash. The other VALS is behind me pointing at the cow. If you look at the Cows eyes you can see the reflections of the two flashes. Notice the shadows on the concrete. This tells you they were all backlighted and the flashes made a huge difference.

Nikon D4, 14-24mm, ISO 100, ƒ/6.3, 1/4—Off camera fill-flash using the Nikon SB-900 & SB800.  The Flash is on the Pocketwizard TT5 and being triggered by the Mini TT1 on the Camera with the AC3 to control the output of the flash.

Here I am behind the flashes and you can see the other VALS here in the foreground. The other VALS is further to the left in the photo.

I don’t generally use these last two photos where you can see the flashes, but kept them to show to you so you can see how simple this is to do.

The best photo is often the difference is as clear as Night and Day

Reading Time: < 1 minute
 
Fuji X-E2, 55-200mm, ISO 400, ƒ/7.1, 1/600 [3 images stitched together in PhotoShop CS6] Handheld

It is a Night and Day difference between these photos. Maybe we need to remember that saying next time we travel.

I find that few photos from the middle of the day stand up to dusk and nighttime photos.

Fuji X-E2, 55-200mm, ISO 6400, ƒ/11, 1/5 seconds [I stitched three images together, and the photo was shot on a tripod with a 2-second delay to eliminate camera shake]

There is a significant difference to me between the two photos.

Here are a couple of quick tips for shooting the nighttime shot.

  • Use Tripod
  • Use a cable release or shoot on delay [I used a 2-second delay]
  • Shooting ƒ/22 will give you a star effect around the lights. I shot at ƒ/11
  • Also, this is a great way to eliminate many of those pesty power lines
 

Cosmic Bowling & Off Camera Flash

Reading Time: 4 minutes

Panasonic DMC-TZ5. ISO 1600, ƒ/3.3, 1/30

Here is a photo I took of bowling with a point-and-shoot Panasonic DMC-TZ5. I love the camera, and it has a great Zeiss lens. ISO limit up to about 1600.

It is the type of photo most people will get at the bowling alley during cosmic bowling without a flash.

Nikon D3, 14-24mm, ISO 200, ƒ/2.8, 1/4 with off-camera flash

I shot this of my daughter bowling a few years ago with the Nikon 14-24mm lens at 14mm. The Flash and I are close to my daughter’s bowling. The flash is about 45º to my left. I panned, and the shutter was dragging.

I set the camera on Aperture priority and the flash to slow sync to pick up on all the ambient light. The panning action created the streaks you see across the image.

Nikon D3, 14-24mm, ISO 1250, ƒ/4, 1/15 with off-camera flash

Because the flash is so close to the subject and exposure is set by TTL [Through The Lens] metering, it shuts off and winks a light. The camera shutter remains open, picking up the available light in the background so it doesn’t go black.

Nikon D3, 14-24mm, ISO 1250, ƒ/2.8, 1/15 with off-camera flash

The cool thing about using Slow Sync on the flash is I am capturing the room’s atmosphere, and the flash is putting light on the subject’s face. Look at that first photo here; they would be a silhouette without the flash.

My suggestion is that you try this with your friends. Go to a Cosmic Bowling Night and have some fun. I can tell you will enjoy the images for years to come.

More off-camera flash posts:

Storyteller: OffCamera Flash Solution for the Fuji X-E2
Apr 05, 2014
I prefer the off-camera flash any day to the pop-up flash on any camera. I have written many articles on it here on the blog. Just put the phrase “off-camera” in my search field on the blog, and you will see many posts …

Storyteller: TTL Nikon Off-Camera Flash Kit
Jul 05, 2013
Here is a list of what I recommend for those wanting to use the Nikon TTL system for off-camera flash and the PocketWizard radio system to fire the flashes. Of course, you can substitute another Nikon TTL or off-brand if you wish to.

Storyteller: Better bird feeder pictures with off-camera flash
Jul 14, 2014
Exposing to the subject can often blow out the background. The solution is to add a flash, but I didn’t want an on-camera flash for a few reasons. First, having it on the camera and shooting through the glass would create a glare.
 
When you travel with Super Stars, you need an off-camera flash
Jul 09, 2014
Without the flashes, the cows would have been somewhat silhouetted, and by adding the off-camera flash, I was able to keep the color temperature in the daylight and then also keep them bright enough to keep the rich colors 

Storyteller: Off-Camera Flash Examples
Apr 14, 2012
By combining off-camera flash and having people moving, I get two great results; great expressions and good color. The first thing I started with on the assignment was a group photo, but the best results as far as 

Storyteller: Off-camera flash and gels for the sky
Feb 25, 2013
Here is how to use off-camera flash and gels to change the look of the sky. When I get this kind of situation on a cloudy day in Kona, Hawaii, sometimes I fix it with flash. Using an off-camera flash, I set the flash to be 2-stops over the available light and the 

Tips for Off-Camera Flash for +/- exposure problems
Apr 10, 2012
When I first wrote about doing off-camera flash, I realized I needed to return to this and highlight some points. ISO, Shutter Speed, Aperture, and +/- Some things will affect your getting proper exposure.
 
Storyteller: Off-Camera Flash – Blog post 3 of 3
May 21, 2011
Three things make me choose my Nikon Speedlights over the manual flash: 1) I have no sync speed limitations, 2) I am quick—I don’t have to pause to take readings and then set the camera, and 3) I can shoot at very 

Storyteller: Super simple Off-Camera flash portrait
Jul 06, 2012
You can trigger the off-camera flash in many different ways. I often use the Nikon SU-800, which uses infrared to activate the off-camera flash. I used the PocketWizard Mini TT1 on the camera with the AC3, which lets me …

Storyteller: Off-camera flash for beach portraits
Jul 05, 2012
I also used my Gitzo carbon fiber tripod to keep the camera rock steady and shoot these at dusk. This way, everyone’s eyes were open and not squinting on the beach. To trigger the flashes, I had the PocketWizard Mini 

Favorite 4th of July Photos

Reading Time: 2 minutes

Nikon D100, Sigma 120-300mm ƒ/2.8, ISO 200, ƒ/8, 19 seconds [Emerald Isle, NC 2004]

I just wanted to share a few of my 4th of July photos through the years. I hope you enjoy them and also go out and make some photos for you to cherish through the years.

Settings and gear are below the images.

This image has an empty alt attribute; its file name is 2005-07-03_21-35-27-08-680x1024.jpg
Nikon D2X, Sigma 15-30mm, ISO 100, ƒ/8, 19 seconds [The Fourth of July Fireworks over Lake Mohawk on July 3, 2005 in Sparta, New Jersey.]
This image has an empty alt attribute; its file name is 2005-07-03_21-49-00-11-680x1024.jpg
Nikon D2X, Sigma 15-30mm, ISO 100, ƒ/8, 40 seconds [The Fourth of July Fireworks over Lake Mohawk on July 3, 2005 in Sparta, New Jersey.]
Nikon D3, 24-120mm VR, ISO 100, ƒ/16, 14 seconds [The Fourth of July Fireworks over Panama City, Florida, July 4, 2008]
Nikon D3, 24-120mm VR, ISO 100, ƒ/16, 11 seconds [The Fourth of July Fireworks over Panama City, Florida, July 4, 2008]


Tripod and Cable Release

I recommend using a tripod and a cable release.  This will keep the camera as still as possible during a long exposure.

This is the Nikon MC-30 that I have used for years on different Nikon Cameras.


Camera Settings

  • Manual
  • White Balance – Daylight
  • ISO 100
  • ƒ/8
  • Bulb Shutter-speed and keep open for two bursts of fireworks using cable release
My exposures were from 6 seconds to about 12 seconds on average. I typically might shoot 75 to 100 photos and only really like about 10 of those shots.

You may need a new camera before a new lens

Reading Time: 2 minutes
 
Nikon D60 was announced in January 2008

You may have an excellent camera that isn’t all that old. For example, this Nikon D60 was a great camera in January 2008.

It was a 10.2-megapixel camera with an ISO range of 100—1600; you could push it to 3200.

What prompted this blog post was a class I taught today to a group of photographers. After helping them for a couple of weeks with settings, one student went out shooting and still had problems taking photos inside without a flash. All the images had a great deal of motion blur.

The camera settings were ISO 1600, ƒ/3.5 & 1/2 sec.

Sigma 17—50mm ƒ/2.8 $519

Lens Solution

The first thought by many was to get a faster lens. The kit lens was 18-55mm ƒ/3.5—5.6. We looked at replacing it with a Sigma 17—50mm ƒ/2.8. However, this would only give her about a little less than a stop at 17mm and 50mm 2 stops.

So she could have shot only at 1/4 second verses from 1/2 second.

Nikon D3300 Introduced April 2014 $599.95

Camera Solution

I started doing the math in my head. What if we look at today’s newer cameras with higher ISOs instead?

If we buy a camera with a top ISO of 12800, we will gain 3—stops. So instead of shooting ISO 1600, ƒ/3.5 & 1/2 sec, we could now shoot ISO 12800, ƒ/3.5 & 1/15.

Ultimate Solution

Buy the camera and the lens. However, if you are on a budget, buy the camera first. It will upgrade all your lenses by 3—stops. I remember going from the Nikon D2Xs to the Nikon D3. The D2Xs ISO 100—800, but the Nikon D3 ISO 200—6400. Those 4—stops made all of the lenses in my bag increase by 4.

All my ƒ/5.6 lenses were equivalent in how much light they let in on the D3 as a ƒ/1.4 was doing on my D2Xs.

I can tell you from my personal experience the jump of 4—stops were the biggest game changer I had gone through in all of my gear upgrades in my career.

Photojournalism is a great way to develop social skills

Reading Time: 5 minutes
 

photo by Jeff Raymond

Being a visual storyteller requires you to capture a wide range of information and distill it down to the essential elements to capture an audience’s attention and inform them about a subject.

Starting this profession, you learn extensively from your mistakes those first few years. One of the first things most newspaper photographers fail to do early is to get all the information necessary to write a caption. You cannot do this job like a tourist as they travel. It would help if you interacted with the people you photograph and got some basic information necessary to the story.

Born with Asperger’s Syndrome and an Introvert

I am an introvert and also have Asperger’s.

An INTROVERT is a person who is energized by being alone and whose energy is drained by being around other people. Contrary to what most people think, an introvert is not simply a person who is shy. Being introspective, though, does not mean that an introvert never has conversations. However, those conversations are generally about ideas and concepts, not about what they consider the trivial matters of social small talk. Introverts make up about 60% of the gifted population but only about 25-40% of the general population.

Asperger’s Syndrome is characterized by significant difficulties in social interaction and nonverbal communication, alongside restricted and repetitive patterns of behavior and interests.

It is draining for Introverts to talk to people about subjects they aren’t interested in—people with Asperger’s struggle with verbalizing their thoughts.

The most challenging thing that I continue to struggle with even today is empathy. Genuine empathy is the ability to be aware of one’s feelings and thoughts. At the same time, you are aware of another person’s feelings and beliefs (or several other persons’). It means having the wherewithal to speak about this awareness. It also means mutual understanding and a sense of caring for one another.

I had to learn that I had very little empathy. It took me until my 30s to start to deal with this flaw. My wiring is not to naturally observe others’ feelings; I needed to work on this skill.

This is where photography became an asset. To improve my photos, I had to get better at analyzing situations and seeing those visual clues to pick up on people’s emotions. DING! DING! Eureka moments started to take place once I had training in body language. I first started studying body language in Social Work, but it was my time with Don Rutledge, my photo mentor, who taught me to see emotions.

It would take years before I could take what I was learning and start to capture it with my camera.

photo by Ken Touchton

I had to learn I needed to stop expecting my grasp of the facts to rule. But unfortunately, this was a trait that I share with many who have Asperger’s.

I couldn’t continue to say I was the arbiter of truth and protected by the second amendment when working for all my clients. So developing social skills is necessary for me to navigate the intricate path to gain access and cooperation to tell stories and get the assignments.

photo by Jeff Raymond

Journalist Questions

The formula for getting the complete story on a subject starts with answering the Five Ws.

  • Who is it about?
  • What happened?
  • Where did it take place?
  • When did it take place?
  • Why did it happen?
  • How did it happen?
Curiously none of the answers to these questions is a simple “yes” or “no.” My first experience was shooting for the East Carolinian, the East Carolina University student paper. I remember editors looking at my photos and loving them and then saying they couldn’t use them because I didn’t have the names of the people.
 
Quickly I learned that if I wanted to get published and paid, I had to have the Five Ws. 
 
I loved photography so much that I would do anything to keep doing it—even talk to people about subjects I wasn’t interested in at first. But, I learned through the years that everyone has a story and that by just spending some time listening and asking questions, I found out I was interested in a lot more subjects than before I started as a journalist.
 
I am critiquing students’ work with Morris Abernathy and Warren Johnson.
Photo Critique Sessions
 
I went to experts in photography to have them review my work. Each time I learned things that I could do to improve my photos. Then I would work on these recommendations and then come back to those people and ask how they did I do in implementing their suggestions.
 

I did this for a good twenty years with Don Rutledge, and never did he not have something that I could work on to improve. So I went to the Maine Photographic Workshop, studied with Steve McCurry, and worked on other aspects of my storytelling. Over time I got my work in front of industry leaders. Each time I learned something else that, if I tweaked, would make my images better at storytelling.

I remember the first time I shared my images with Tom Kennedy. At the time, he was the director of photography for National Geographic Magazine. I was terrified. He complimented me about it being solid professional work, and then he said I needed surprises. He expected to see the level of work I was doing, but to grab Tom’s attention for National Geographic Magazine, I needed to surprise him. It would take ten years to understand what he meant with that statement and where I started to shoot a unique and different photo.

I learned that I grew even more when mentoring and critiquing others’ work. To teach photography means you must understand the subject at a much higher level.
 
Teaching Photojournalism—Icing on the Cake
 
Photojournalism taught me how to listen to subjects and better understand them, and it helped me tell their story. Then, when the subjects would contact me and thank me, I felt I was finally doing a good job.
 
Teaching made me start to understand the audience more than I had done before. I could communicate something to an audience, but the story would fail unless the message was received and understood.
 
When students didn’t get a concept, I had to think of another way to communicate the message. Do this often and start understanding how to do a better job. You begin to learn how to do a better job of presenting the subject in the first place.
 
I also learned that no matter how well I do my job, sometimes those critical messages may need different stories told to reach more of your audience.
 
Everything to make your photos better with storytelling is all the things that will improve your social skills. One of the best examples is the quote from the famous photographer Robert Capa, “If your photos are not good enough, you are not close enough.”