Time for Senior pictures

 
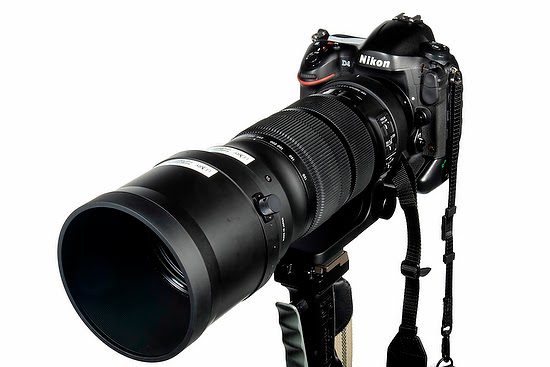
Nikon D4Sigma 120-300mm f/2.8 DG OS HSM, ISO 100, ƒ/5, 1/250—Two Alienbees B1600 mixed with daylight [diagram below]

It is that time of year that I get requests for doing Senior photos. I have not marketed myself to this market, but friends through church and work call and ask if I will photograph their Senior.

Today’s Senior pictures are much different than when I had mine made back in 1980. Today we are seeing more and more photos of Seniors in their favorite activity.

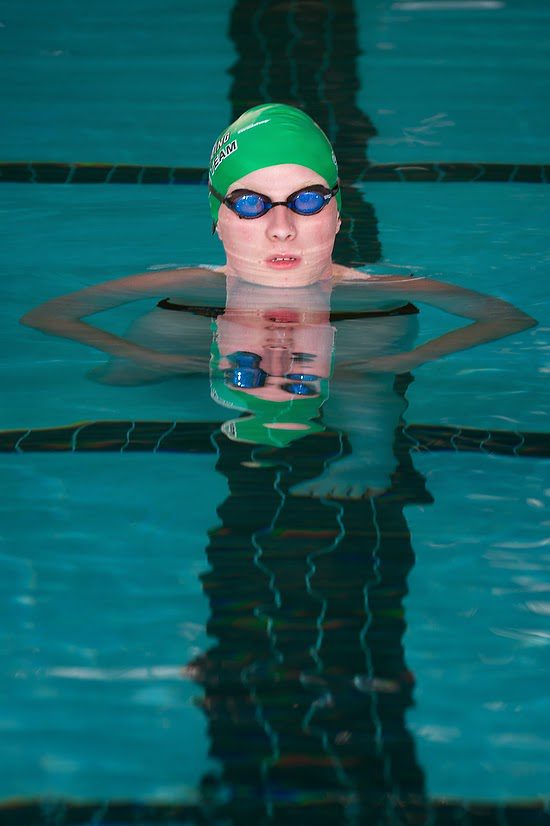
Last night I captured Grant Newsom at the pool where he is on the swim team and a lifeguard.

Nikon D4, Sigma 120-300mm f/2.8 DG OS HSM, ISO 100, ƒ/5, 1/250—Two Alienbees B1600 mixed with daylight.

When we first met to start the shoot, his mother told me that Grant’s employer scheduled him to work at the same time and didn’t tell him about the schedule change. He didn’t want to let down his employer and was concerned that this would take a long time.

We did all these photos in one hour at three locations, and one of those required us to drive a small distance. Multiple locations involve taking substantial softbox and setting up and down in three areas. It also meant that the subject had some outfit changes to do.

After the first few minutes, Grant relaxed, realizing we were getting great images and moving quickly.

Moving quickly to each new location is why you practice over and over doing these types of photos, so you are ready to go when you have to “Get Er Done.” I have done this so many times throughout my career that I could quickly move and set up and get some pretty good images of Grant. I will let you be the judge of the photos.

I used two Alienbees B1600 flashes powered by Paul Buff Vagabond battery packs. I used two at the pool because I knew that when you do the butterfly stroke, you are looking down most of the time, and the light isn’t there most of the time. So I filled the shadows with flashes.

Nikon D4, Sigma 120-300mm f/2.8 DG OS HSM, ISO 100, ƒ/5, 1/250—One Alienbees B1600 with a large softbox off to the right to be mixed with daylight

We had a lot of fun capturing these photos. The main reason I feel like you get great images in this situation is the Senior is doing what they love the most. They are in their world of comfort, and I am there to join them.
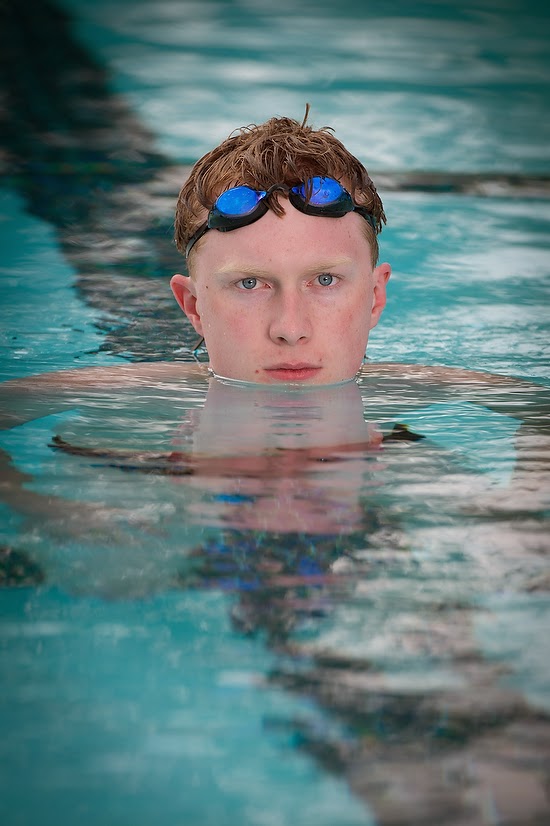
Nikon D4, Sigma 120-300mm f/2.8 DG OS HSM, ISO 100, ƒ/5, 1/250—One Alienbees B1600 with a sizeable softbox and mixed with daylight

For the most part, I wanted to capture the competitor in the pool; thus, I smiled here. We did get some, but I like the fierce look.

Nikon D4, Sigma 70-200mm f/2.8 EX DG APO OS HSM, ISO 100, ƒ/5, 1/250—Large 30″ x 60″ foldable softbox with Alienbees B1600 mixed with daylight, also one Alienbees B1600 directly behind the model

We just changed shirts and locations quickly to keep on schedule for the seniors to run to work.

Nikon D4, Sigma 70-200mm f/2.8 EX DG APO OS HSM, ISO 100, ƒ/5, 1/250—Large 30″ x 60″ foldable softbox with Alienbees B1600 on the left and then mixed with daylight [lighting diagram below]


Keeping it simple, I am using one large 30″ x 60″ Paul C Buff foldable softbox as the leading light and then letting the available sunlight light the rest of the photo. As a result, the flash is about one stop brighter than the rest of the scene. I exposed the softbox light and used an ExpoDisc to get a custom white balance before shooting the photos.

Nikon D4, Sigma 70-200mm f/2.8 EX DG APO OS HSM, ISO 100, ƒ/5, 1/250—Large 30″ x 60″ foldable softbox with Alienbees B1600 on the left and then mixed with daylight

When you look for a photographer for Senior pictures, some of the best will be former newspaper photographers. They have shot everything, so it will be rare that your child has a favorite hobby that they haven’t shot before.

I covered the 1996 Olympics and specifically covered swimming and diving. Finally, I was ready for Grant in the pool.

Remember these Senior pictures we will cherish for the rest of our lives and generations later as they look back. Next year is my 35th high school reunion. It feels like yesterday, and we are all pulling out those photos from back in 1980.

By the way, we finished in time for Grant to go to work and have a date that night.

Fuji X-E2 at ISO 25600

 
Fuji X-E2, 55-200mm, ISO 25600, ƒ/4.8, 1/340, Kelvin 10000

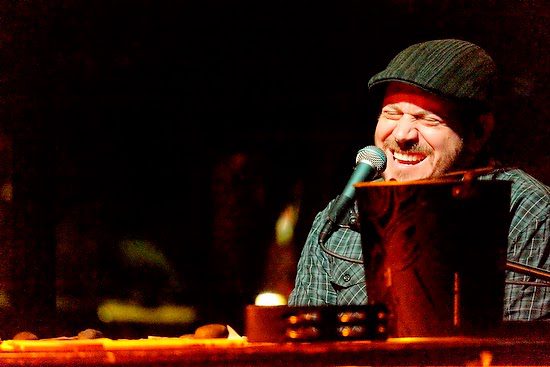
Last night we went to a concert at Red Sky Tapas & Bar to see the Dueling Pianos.

I am pretty sure this is how the light was in those caves at the beginning of time. Even with the LED spotlights, there wasn’t a lot of light in the room.

Fuji X-E2, 55-200mm, ISO 25600, ƒ/4, 1/240, Kelvin 10000

Low light is an excellent example of why Fuji designed their X-E2 to shoot at ISO 25600. Without the ability to use such a high ISO, you would not be able to shoot a handheld photo with the Fujinon XF 55-200mm, which at its most extended zoom is a ƒ/4.8.

I am shooting across the room, and right now, Fuji doesn’t have a ƒ/2.8 lens, so I have to crank the ISO up.

I cropped close to 100% of the photos above.

Even looking at the photo at close to full resolution, I am not displeased with the result. I think it is an acceptable resolution for publication in a magazine. I think it would have no problem being a two-page spread photo.

Fuji X-E2, 55-200mm, ISO 25600, ƒ/3.6, 1/400, Kelvin 10000

I could not go and get a custom white balance, so I started by dialing the white balance to Tungsten, and it wasn’t close. I noticed after a while that the lights were LED lights. I then chose to use the Kelvin setting and dial it to 10000. I thought this Kelvin setting would be a good starting point, and I decided the colors look pretty good.

Fuji X-E2, 18-55, ISO 25600, ƒ/3.6, 1/350, Kelvin 10000

The conclusion is if you ever find yourself in situations where the room is so dark that you need to shoot at a high ISO, be sure your camera can go as high as the Fuji X-E2, which at ISO 25600 made these photos possible.

Why I own Nikon and Fuji camera systems


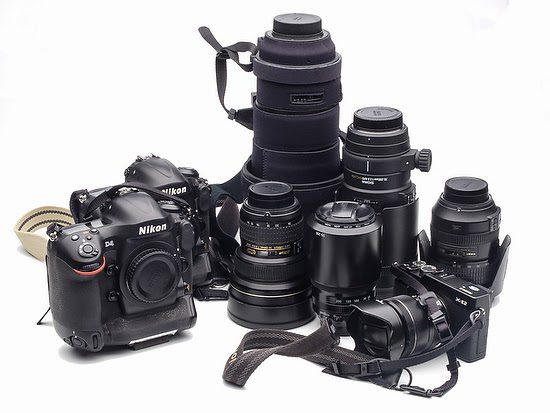
I now own two camera systems, and I am not alone.

My friend Gary S. Chapman put it perfectly yesterday when I was talking to him. He believes we have returned to how we used to be before digital, multiple formats for the right job.

I used to shoot with 4×5 Linhoff, 2 1/4 Hasselblad and 35mm Nikon film cameras. Then we all tried to get one camera to do it all when digital came along.

For a while, I think that is what I was doing and, to a certain extent, the Nikon D4 is doing. I shoot sports, do general assignment work, and, most crucial, add–VIDEO. The Fuji system isn’t cutting it for two of the three things I regularly shoot: Sports and Video.

So I find I love Fuji X-E2 for shooting what I call general assignment still photography works excellently. It does affect your workflow just a bit. The Fuji does take longer to ingest because the file sizes are almost double the Nikon D4 RAW files.

Many of the clients that I shoot for are all photographers themselves. Some of them have bought the Fuji system based on what they saw from my images caught with the Fuji system. The Fuji system is like the Leica M series when I shot that with film. So I think for a while Fuji X system for many photographers will be an addition but not a replacement system.

Like I want one camera bag to do it all, I think I want a camera system to do it all. So, just like I own multiple bags for different purposes, I will also hold other cameras for various purposes.

I find that if I need some camera gear—meaning if it will help me retain or get new clients the equipment always pays for itself. I would not own most of my system if this were a hobby. I couldn’t justify it. Lucky for me the gear keeps me quite competitive in this ever-changing market.

Protecting and help retain the value of lenses

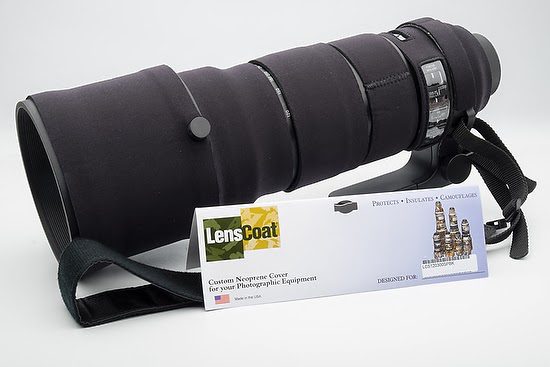
Not long after I bought my first Sigma 120-300mm ƒ/2.8, I invested in the LensCoat Neoprene Cover for the lens.

On the most basic level, it prevents cosmetic blemishes on the surface of the lens and helps retain the value of the lens. However, your lens will still depreciate. Look at KEH’s guide, and you will see how much depreciation is cosmetic.

KEH grades:

NEW New defined as packaged by manufacturer complete with manufacturer’s USA warranty. Not previously owned or used by a consumer. *You have probably seen the words “NEW” or “LOWER PRICE” listed online or in our catalog, where prices usually appear. Due to specific manufacturers’ minimum pricing requirements, we are not permitted to publish the price if we sell it for less than the manufacturer’s Minimum Advertised Price (MAP). While these listings may seem inconvenient, it is our way of letting you know that when you call or click through on the website, you will be quoted the lowest pricing anywhere for comparable items.
DEMO The demo is defined as packaged by the manufacturer, complete with the manufacturer’s USA warranty. She was never owned by a consumer but used for demonstration.
LN “Like New” Includes the original box and instructions.
LN- “Like New Minus” Extremely slight wear only seen upon very close inspection. Box and accessories are usually not included. Glass perfect*.
EX+ “Excellent Plus” is Exceptionally nice. It May have slight wear on the finish but is visible only under close inspection. Glass is very clean*.
EX “Excellent” Shows moderate wear. It may have minor dents, dings, and slight finish wear. Glass may have little marks and blemishes that will not affect picture quality*.
BGN “Bargain” Shows more than average wear. It May have dents, dings, brassing, and finish loss. Glass may have marks and blemishes that should not affect picture quality*.
UG “Ugly” Very rough looking. Multiple impressions in metal, excessive finish loss, and brassing. Glass will have marks, fungus, and haze, affecting picture quality.
AI “As-Is” is Usually to be used for parts only. All equipment sold in the As-Is category carries no warranty nor return privileges. The equipment most likely doesn’t work and may have missing pieces. Defects include but are not limited to the problems listed in the description.

Here you can see the lens without the lens coating; that is how I hope to keep it looking for a long time.

A great feature includes a clear, flexible UV-PVC window over the AF/IS/VR controls and the distance-scale window. This window also helps you from accidentally bumping and changing those settings.

LensCoat® Lens Covers are manufactured from 100% closed-cell neoprene, offering protection from bumps, jars, and nicks, with a camouflage-pattern fabric cover. LensCoat® Lens Covers also provide a thermal barrier, protecting your hands from cold lenses in lower temperatures. In addition, they are easy to install and remove, sliding on like a sleeve and leaving no residue on the lens. And LensCoat® lens covers are waterproof, protecting in harsh conditions.

If the LensCoat performs as well on this lens as the last one I had on my older 120-300mm, I will recover the cost of the $89.

Here is a video explaining the product that LensCoat produced.

Process for buying a lens


While I reviewed this lens a year ago, I am now buying the Sigma 120-300mm f/2.8 DG OS HSM Lens for the Nikon mount. So here it is on my Nikon D4.

The Sigma was more of an upgrade. Buying the newer version would be like selling your older car after getting 12 years of use of it and then buying a new one.

Until last night, I owned the original Sigma 120-300mm.

Here is a screen grab of the eBay listing I did to sell the lens. I sold it in less than 24 hours. But unfortunately, I didn’t list it until I had the other lens.

I listed the lens for sale using 11 photos, with this one being the main photo. Most people want to see everything.

I did differently this time by including photos taken with the lens.

These are all the photos I put up to sell the lens. In addition, two of the four images I posted taken with the lens were ones published in Sports Illustrated. I think this helped to sell the lens.

Too many people think that if it isn’t a Nikon or Canon lens, Sports Illustrated will not use it. I even had one photographer say this to me while standing next to me at a football game, trying to put down my lens. I laughed out loud at him and said that is funny because look at this week’s SI, and you can see the photo. Then he started back peddling and asked how big it ran.


Here is that photo.

All this is to say the lens I bought twelve years ago was great and did an excellent job through the years. However, I was replacing it because the newer technology that has come along makes it possible to get even sharper photos.

Sigma introduced a USB docking station that only works with their “Global Lenses,” and the 120-300mm is one of those lenses. Micro-adjust settings change the focus position bias and provide many exciting options for photographers who like to tinker with their equipment to get the best results. I am one of those photographers.

I do not have the funds to buy all the lenses now available in this focal length and test them. When I purchased the first lens, there were no other options except fixed lenses.

I highly recommend always going to the DXOMark website and looking at their test results on the lenses you are interested in buying. For example, I reviewed the DXOMark website when I wanted to see if I should buy the Nikon 200-400mm or get the newer Sigma 120-300.

The chart below is the side-by-side comparison of a Nikon D4. Another cool thing is you can check the results on your camera if they tested it.

I was also just a little curious about the Canon 200-400mm and how it measured up to it. So I compared it.

You can click on this comparison to see it larger. The bottom line is for sharpness; it was pretty equal.

Price Comparison:

  • Sigma    $3,599
  • Nikon    $6,749
  • Canon    $11,749
It was a no-brainer even after tossing in the USB Dock [$59] to calibrate the lens based on price alone.
Proverb

you get what you pay for

In commercial transactions, the quality of goods and services increases as the prices increase, i.e., the more one pays, the better the merchandise.

Well, the test results on these lenses and my experience with the Sigma lenses proved the old English proverb wasn’t always correct.

If you buy the lens, then be sure and buy the USB Dock and calibrate the lens. Here is a blog post I did about this process.

After I did all this research, I just looked for who had the lens and could get it to me at the best price. The best price nowadays was more about who offered free shipping because the price was pretty much the same no matter where you looked.

Stay tuned in the future, and I will be sure to post many photos from this lens.

Your photography gets better when you synthesize

 
Teaching in Lisbon, Portugal. [photo by Jeff Raymond]

Synthesizing is the combining of two things for something completely new. For example, I have discovered through the years that combining items in teaching improves my photography.

Storyline

I have discovered that as I came to understand Joseph Campbell’s The Hero’s Journey as a framework for telling stories, I could not only analyze a project and make it better, but I can also apply this storyline to my own life and make changes.

Studying the concept of the storyline helped me do a better job throughout the storytelling process. I did a better job of pre-planning and, amid the shooting of the story, adjusted more quickly and improved the storytelling due to understanding the power of the myth of The Hero’s Journey.

Steve Johnson did a great job a few years ago talking about how synthesis takes place in ideas.

I have enjoyed teaching a lot more than I thought I ever would. I was terrified at first, but over time learned to thrive.

Teaching students in the Storytelling workshop in Lisbon, Portugal. [photo by Jeff Raymond]

I have shared in many of my past blog posts about how teaching is the highest form of the learning process.

Combining photography, video, audio, and writing, I have been able to tell stories more effectively than when I was doing photography.

When I started to teach, I was perfecting my storytelling skills. First, I had to connect the subject with the audience. Often that audience is just one person. Second, I would have to understand enough about the audience to know how to choose the right metaphors to engage them and teach different complex concepts.

[photo by Jeff Raymond]

I noticed that when I showed the audience something, their understanding increased over just talking about it. So I was synthesizing [combining] the visual and the spoken word to create a more meaningful and understandable presentation.

I have had many “Aha moments” where what many might consider a failure was a calibrating moment. You try a metaphor and realize this did not work with that audience. You may use it later, but then you must come up with another way to connect with the subject you are trying to teach the audience.

When pros take photos, the first pictures they take in a studio, for example, are to check the exposure, white balance, and often containing a composition. They then look at the photo and analyze it. Does it need to be lighter or darker? Is it too green or magenta? Do I need to do a custom white balance to fix it?

Teaching storytelling has me teaching a variety of subjects. Here are some of the topics I am training, for example:

  • Software like Adobe Lightroom, PhotoShop, Adobe Premier, or Final Cut
  • Lighting— Hot shoe flashes, studio strobes, radio remotes, flash metering, custom white balance, high-speed sync, slow-speed sync
  • Camera — ƒ-stops, aperture, shutter speed, ISO, EV, White Balance, composition, lens choices
  • Subjects — Sports, Fashion, Portraiture, Science, Features, Photo Stories, Environmental Portraits, 360º Panoramics, Landscape
  • Audio — microphones, setting levels, natural sound, voice over
  • Video/motion — formats, audio, storyboarding, scripts

There are more topics, but when I started to teach multimedia storytelling, I synthesized all of them in the class. You cannot teach a subject effectively if you do not know it inside and out. Once the student starts to ask questions about things you haven’t thought about, you must be able to process the inquiry and pull upon all this information to help formulate a response.

When you can answer the student’s questions and help everyone learn, you get invited to teach more and more. You then get exposed to more and more questions which often may have you saying let me get back to you on that question. I might find myself with a camera and working on a solution to the student’s question.

You see, when you teach, you will synthesize the material, and by combining the content, you create new content. As a result, you will start to CREATE new IDEAS. These unique creations will strengthen your portfolio and help you get more work.

Since I don’t always have a class to teach, I use the blog as a way to help me continue to synthesize content and improve my skills. Combining ideas is how you build a better portfolio.

How are you getting better?

You may need a new camera before a new lens

 
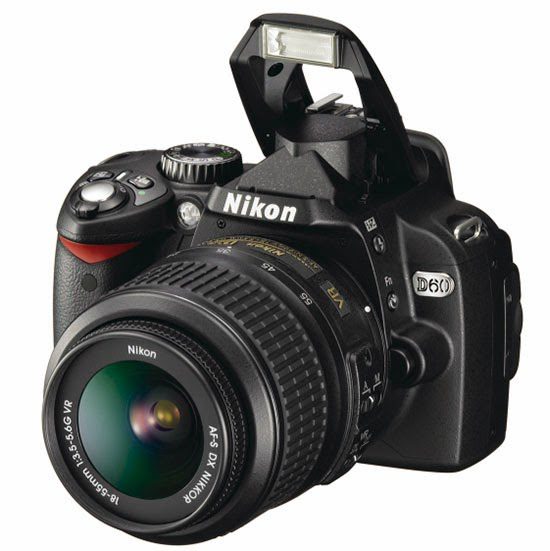
Nikon D60 was announced in January 2008

You may have an excellent camera that isn’t all that old. For example, this Nikon D60 was a great camera in January 2008.

It was a 10.2-megapixel camera with an ISO range of 100—1600; you could push it to 3200.

What prompted this blog post was a class I taught today to a group of photographers. After helping them for a couple of weeks with settings, one student went out shooting and still had problems taking photos inside without a flash. All the images had a great deal of motion blur.

The camera settings were ISO 1600, ƒ/3.5 & 1/2 sec.

Sigma 17—50mm ƒ/2.8 $519

Lens Solution

The first thought by many was to get a faster lens. The kit lens was 18-55mm ƒ/3.5—5.6. We looked at replacing it with a Sigma 17—50mm ƒ/2.8. However, this would only give her about a little less than a stop at 17mm and 50mm 2 stops.

So she could have shot only at 1/4 second verses from 1/2 second.

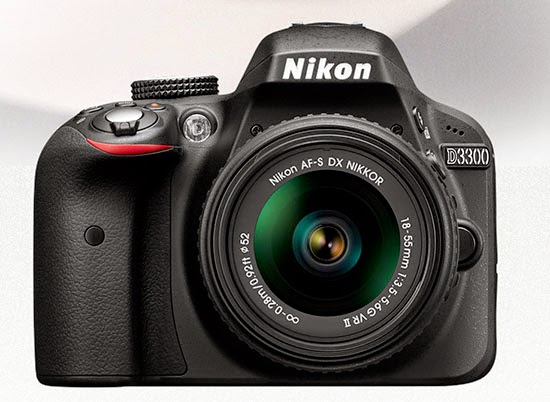
Nikon D3300 Introduced April 2014 $599.95

Camera Solution

I started doing the math in my head. What if we look at today’s newer cameras with higher ISOs instead?

If we buy a camera with a top ISO of 12800, we will gain 3—stops. So instead of shooting ISO 1600, ƒ/3.5 & 1/2 sec, we could now shoot ISO 12800, ƒ/3.5 & 1/15.

Ultimate Solution

Buy the camera and the lens. However, if you are on a budget, buy the camera first. It will upgrade all your lenses by 3—stops. I remember going from the Nikon D2Xs to the Nikon D3. The D2Xs ISO 100—800, but the Nikon D3 ISO 200—6400. Those 4—stops made all of the lenses in my bag increase by 4.

All my ƒ/5.6 lenses were equivalent in how much light they let in on the D3 as a ƒ/1.4 was doing on my D2Xs.

I can tell you from my personal experience the jump of 4—stops were the biggest game changer I had gone through in all of my gear upgrades in my career.

Photojournalism is a great way to develop social skills


photo by Jeff Raymond

Being a visual storyteller requires you to capture a wide range of information and distill it down to the essential elements to capture an audience’s attention and inform them about a subject.

Starting this profession, you learn extensively from your mistakes those first few years. One of the first things most newspaper photographers fail to do early is to get all the information necessary to write a caption. You cannot do this job like a tourist as they travel. It would help if you interacted with the people you photograph and got some basic information necessary to the story.

Born with Asperger’s Syndrome and an Introvert

I am an introvert and also have Asperger’s.

An INTROVERT is a person who is energized by being alone and whose energy is drained by being around other people. Contrary to what most people think, an introvert is not simply a person who is shy. Being introspective, though, does not mean that an introvert never has conversations. However, those conversations are generally about ideas and concepts, not about what they consider the trivial matters of social small talk. Introverts make up about 60% of the gifted population but only about 25-40% of the general population.

Asperger’s Syndrome is characterized by significant difficulties in social interaction and nonverbal communication, alongside restricted and repetitive patterns of behavior and interests.

It is draining for Introverts to talk to people about subjects they aren’t interested in—people with Asperger’s struggle with verbalizing their thoughts.

The most challenging thing that I continue to struggle with even today is empathy. Genuine empathy is the ability to be aware of one’s feelings and thoughts. At the same time, you are aware of another person’s feelings and beliefs (or several other persons’). It means having the wherewithal to speak about this awareness. It also means mutual understanding and a sense of caring for one another.

I had to learn that I had very little empathy. It took me until my 30s to start to deal with this flaw. My wiring is not to naturally observe others’ feelings; I needed to work on this skill.

This is where photography became an asset. To improve my photos, I had to get better at analyzing situations and seeing those visual clues to pick up on people’s emotions. DING! DING! Eureka moments started to take place once I had training in body language. I first started studying body language in Social Work, but it was my time with Don Rutledge, my photo mentor, who taught me to see emotions.

It would take years before I could take what I was learning and start to capture it with my camera.

photo by Ken Touchton

I had to learn I needed to stop expecting my grasp of the facts to rule. But unfortunately, this was a trait that I share with many who have Asperger’s.

I couldn’t continue to say I was the arbiter of truth and protected by the second amendment when working for all my clients. So developing social skills is necessary for me to navigate the intricate path to gain access and cooperation to tell stories and get the assignments.

photo by Jeff Raymond

Journalist Questions

The formula for getting the complete story on a subject starts with answering the Five Ws.

  • Who is it about?
  • What happened?
  • Where did it take place?
  • When did it take place?
  • Why did it happen?
  • How did it happen?
Curiously none of the answers to these questions is a simple “yes” or “no.” My first experience was shooting for the East Carolinian, the East Carolina University student paper. I remember editors looking at my photos and loving them and then saying they couldn’t use them because I didn’t have the names of the people.
 
Quickly I learned that if I wanted to get published and paid, I had to have the Five Ws. 
 
I loved photography so much that I would do anything to keep doing it—even talk to people about subjects I wasn’t interested in at first. But, I learned through the years that everyone has a story and that by just spending some time listening and asking questions, I found out I was interested in a lot more subjects than before I started as a journalist.
 
I am critiquing students’ work with Morris Abernathy and Warren Johnson.
Photo Critique Sessions
 
I went to experts in photography to have them review my work. Each time I learned things that I could do to improve my photos. Then I would work on these recommendations and then come back to those people and ask how they did I do in implementing their suggestions.
 

I did this for a good twenty years with Don Rutledge, and never did he not have something that I could work on to improve. So I went to the Maine Photographic Workshop, studied with Steve McCurry, and worked on other aspects of my storytelling. Over time I got my work in front of industry leaders. Each time I learned something else that, if I tweaked, would make my images better at storytelling.

I remember the first time I shared my images with Tom Kennedy. At the time, he was the director of photography for National Geographic Magazine. I was terrified. He complimented me about it being solid professional work, and then he said I needed surprises. He expected to see the level of work I was doing, but to grab Tom’s attention for National Geographic Magazine, I needed to surprise him. It would take ten years to understand what he meant with that statement and where I started to shoot a unique and different photo.

I learned that I grew even more when mentoring and critiquing others’ work. To teach photography means you must understand the subject at a much higher level.
 
Teaching Photojournalism—Icing on the Cake
 
Photojournalism taught me how to listen to subjects and better understand them, and it helped me tell their story. Then, when the subjects would contact me and thank me, I felt I was finally doing a good job.
 
Teaching made me start to understand the audience more than I had done before. I could communicate something to an audience, but the story would fail unless the message was received and understood.
 
When students didn’t get a concept, I had to think of another way to communicate the message. Do this often and start understanding how to do a better job. You begin to learn how to do a better job of presenting the subject in the first place.
 
I also learned that no matter how well I do my job, sometimes those critical messages may need different stories told to reach more of your audience.
 
Everything to make your photos better with storytelling is all the things that will improve your social skills. One of the best examples is the quote from the famous photographer Robert Capa, “If your photos are not good enough, you are not close enough.”
 

The Two Most Made Travel Photography Mistakes


Batteries

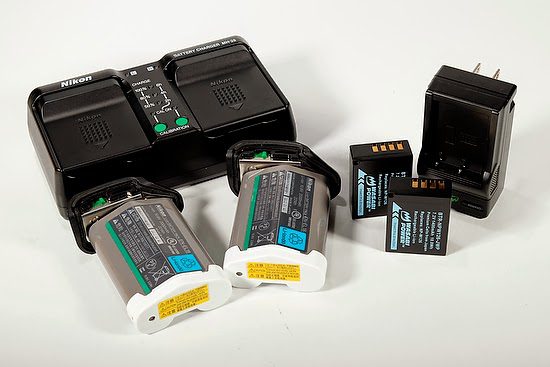
The number one mistake I see most often made by people traveling with cameras is not having enough fresh batteries.

Depending on your camera and flash, you may need more than just one extra battery. For example, my Nikon D4 camera can go most of a day shooting still images with one battery; however, if I start to shoot video or spend a lot of time reviewing images on my LCD, I can drain the battery and need a second.

My Fuji X-E2 goes through batteries, and I used all three batteries the day before.

I recommend having at least one extra battery, and before you leave for the day of shooting, be sure to charge both batteries fully.

Every evening before you turn in for bed, be sure to recharge all your batteries. That way, they will all be ready for another full day of shooting your travel in the morning.

Memory Cards

Carrying a few extra memory cards on a trip is much easier than a laptop computer.

For a once in a lifetime trip, it is wise to keep all the images on cards until you have them all on your computer and backed up in another location before formatting your cards.

Memory Card Tip

Always format your cards in your camera and not on your computer. The camera will do a better job of clearing the cards and creating the proper directories needed for the card to work correctly with the camera.

Common portrait mistake made by photographers


Fuji X-E2, 55-200mm, ISO 1000, ƒ/4.8, 1/500

When making a person’s portrait, people often end up with a photo like the one above. Instead, they are looking for an image like the one below.


Fuji X-E2, 55-200mm, ISO 1000, ƒ/4.8, 1/500

As you can easily see, the background in the first photo is quite distracting and competes with the face of the person. In the second photo, some people might even say the subject just “pops” out of the picture.

Notice the camera settings are identical.

The difference is the distance the subject is to the background. For example, in the first photo, the person is right next to the background, and in the next one, the subject is 30 feet away from the background.

If you have a very distracting background like the brick wall, move the subject very far away to be able to throw the background out of focus.

Even if the background is a plain solid color wall, pull the person away from it, so you do not see the wall’s texture.

Don’t be a Naysayer


This photo is of the Mexico/US border in Douglas, Arizona. Many children are now crossing the Mexican border without their parents. You can read more about this here. Why? They are desperate to solve a problem they have, and even risking their lives in the middle of the desert is better for them than remaining in their situation.

I mention this to remind us that when people come to you with a problem, you are either part of the solution or not.

Naysayers

nay•say•er: a person who says something will not work or is not possible : a person who denies, refuses, or opposes something

For many years while I was a staff photographer, people classified me as a “naysayer” due to how often people came to me to ask me to do something, and I explained why it wasn’t possible.

I remember when it finally hit me how negative I was when my co-worker jokingly said that I always was saying no. While the comment hurt me, I realized he was right.
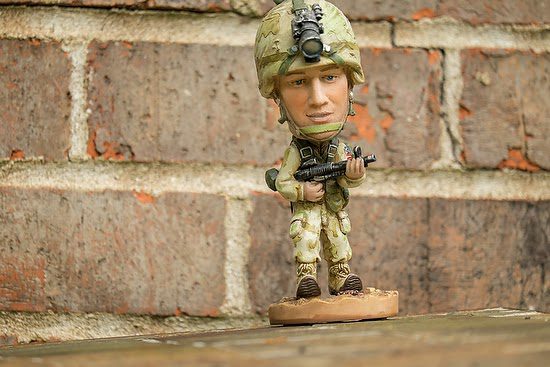
Are you a Naysayer?

My experience has been there are more naysayers on staff than freelance. You cannot grow your business by saying no. It would help if you learned how to say yes. Those freelancers who say no too often are soon looking for another career. However, being on staff is a little more protection than being negative. However, this has a time limit as well.

A good clue that you might be a naysayer is other people are starting to do what you perceive as your job.

“Why are they bringing in an outsider to do what I am supposed to do?” is a question you might be asking if you are a naysayer. While working as a staff photographer for a college, I couldn’t understand why the admissions office was hiring freelance photographers to shoot their recruiting catalogs.

Hiring an outsider is not always due to being a naysayer. Many colleges around the country have staff photographers who do most all the work for a school. However, when it comes to the school’s advertising, they are looking for a particular style. You should be fine if you offer to help them and the photographer is coming in to shoot.

If you feel threatened by this outside photographer, take a deep breath. Ask yourself if anyone has come to me and I answered them with reasons their request isn’t possible. If you did, then you should feel threatened.
Too often, people take the attitude that it is their job and the rules say I have this responsibility. But, unfortunately, you do have this until you become an obstacle to people in the company trying to get their projects done.

Be an Optimist

The opposite of the Naysayer is the Optimist. When people come to you with requests, learn how to turn their proposal into a reality. While someone’s request has some vast problems look first for something positive. A big clue is that if nothing seems good about their request at the bare minimum, you can start by being excited that they came to you with their idea.

“I am honored that you thought of me to help you with your project” is a great way to start on a positive note.

When addressing an obstacle, talk about a solution. For example, let’s say you don’t have a particular piece of equipment to make that happen. Tell the client if we can rent or buy a part you don’t have that would make it possible. Maybe you need an extra hand to make it happen. For example, for me to move the couch from this room to another, I need some help carrying it, would you or can you find someone to help? I am more than willing, but I am busy now and could use some service to find another person.

The trick is to let them know from your experience that we need to address something for success. I am more than willing to help you, but my boss has me working on these projects. So while I can ask them to let me help you, it would be better for you to request my time.

Remember Storyline

Looking at the storyline elements will help remind you why you need to be the Optimist and not the Naysayer.

The person coming to you has a Conflict/Task and is looking to you to help them as a Guide/Resource. If you say no, their issue doesn’t go away. Like Dorothy in the Wizard of Oz, she will move down the yellow brick road to find the solution to her problem.

The difference between the Optimist and the Naysayer is the Assignment they give to the person. Please give them the solutions [Actions] to help their story turn into a comedy, not a Tragedy. You saying no is just not an option for someone who needs to solve a problem.

When someone proposes a new program that will compete with your schedule, tell them how you want to help and need to understand their goals. Also, ask for their critique on how the current program you are doing isn’t meeting those needs. Don’t be quick to defend your program.

If you listen, you may learn that your program isn’t serving all the needs, or maybe you need to tweak the communication about your program to show how it addresses those needs. Either way, there is a perception that it is not meeting the audience’s needs.

Your role may change going forward, but learning how to listen and adjust makes you more valuable to them and the organization.

As long as you are helping the organization address the new issues facing it, you are part of the solution and will have a job in the future. If you try and protect and keep things as they are, you are not growing and slowly helping the organization die.

The most under utilized setting on a camera


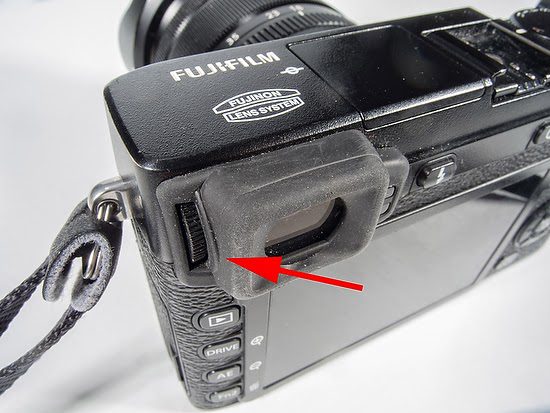
Your photos might look much better if they look sharp in the viewfinder. This dial is how you make sure they are in focus.

Most cameras today have a diopter adjustment dial near the viewfinder. For example, this arrow points to the diopter adjustment on the Fuji X-E2.

The camera comes with diopter adjustment in the rangeof  –4 to +2 m–1 to accommodate individual differences in vision. Rotate the diopter adjustment control until the viewfinder display is in sharp focus.

Fuji covers this in the basic setup of the camera, right after you set the date and time for the camera. It is more important than all the other settings like ISO, Aperture, Shutter Speed, and Focus settings. Why? You need to see the subject and know if it is in focus and read all the information they provide you in the viewfinder.

First Steps 

  1. Attaching the Strap
  2. Attaching a Lens
  3. Charging the Battery
  4. Inserting the Battery and a Memory Card
  5. Compatible Memory Cards
  6. Turning the Camera on and Of
  7. Basic Setup
  8. Choosing a Display
  9. Focusing the Viewfinder 
  10. Adjusting Display Brightness

The great advantage of the mirrorless Fuji X-E2 over a conventional DSLR is when looking through the viewfinder, you can do everything through it. So once you adjust the diopter, you don’t need your glasses to review images or change settings in the menu; use the EVF instead of the LCD screen.