How to see a photo 4 different ways

 
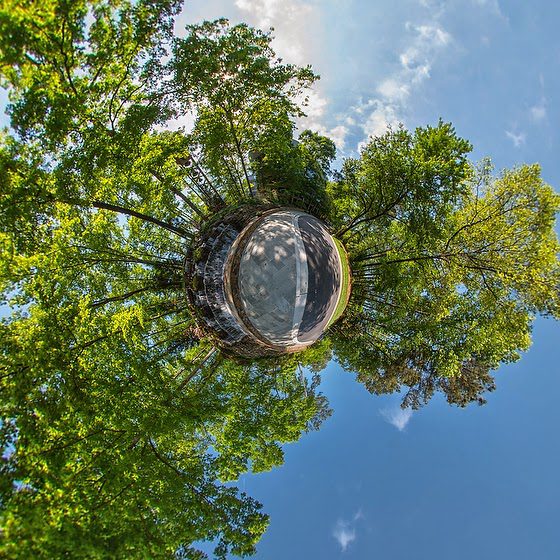
Little Planet Version

Here is the same photo, but I am showing it to you in 4 different ways. The top image is what we call the Little Planet view.

It would help if you had special software to do all these photos. Some Apps exist to help you create pictures similar to these with your phone–just not as consistent and precise as the way I did it with a tripod, fisheye lens, and particular nodal head on the tripod.

iPhone Apps
Android Apps

Photo #2 360º Panoramic gut stretched horizontally

Photo #2 is the same but extended to a large horizontal photo. Often this is cropped with less sky and ground to give a more strip print. This photo would then be like the inside of a cylinder.

Photo #3 Cubed 360º Panoramic

Photo #3 is the same photo, but instead of how it would appear inside a ball, this is how it would appear inside a box. Again, the first four panels are the sides, then the top and bottom are the last two.

This last one is an interactive 360º panoramic. You can watch it; it will rotate and let you see the 360º cylinder, or you can click on the menu arrows to go up and down or change direction. You can also just put your mouse and, while clicking and holding, drag the image up, down, and sideways to control it yourself.

What would you say if Eugene Smith was on the front row listening?

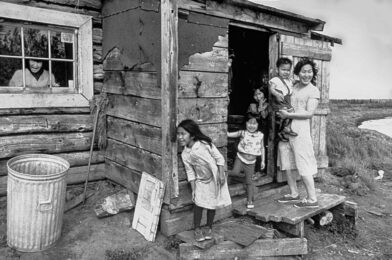
Don Rutledge was the speaker on the second day of the Atlanta Photojournalism Conference in 1975. The night before, William Albert Allard had blown away the group with his work on the American Cowboy. The first time anyone had spoken to the group and gotten a standing ovation.
 
Following Don Rutledge would be Eugene Smith. Don admired Smith’s work more than any other photographer at the time. Eugene Smith is sitting right in front of Don during this talk.
 

Don Rutledge
photo by: Ken Touchton

Listen to Don’t talk here:

There are three types of photographers

Snap Shooter
Gimmick Shooter
The fullness of Photography Shooter

The Snap Shooter enjoys taking pictures. The Gimmick Shooter uses tricks to keep your interest. Finally, the Fullness of Photography shooter uses his eyes, brain, and heart to shoot.
Don got those three elements from Ernest Haas.

The Fullness of Photography Shooter I will call the concerned photographer. They identify where people are in this world.

Now all of us can drift away from being concerned. Photographers use excuses. Many photographers use reasons like lack of time to dominate situations.

The concerned photographer listens and looks. They put it all together and stand flat-footed in this world. We are tuned into the moments in the zone and can anticipate those peak moments.

1) We need to learn to turn handicaps into advantages.

SIDE NOTE

I used to travel with Don doing stories for the Black Star photo agency. These would be features that he could take at his own pace. Later I understood how this was Don’s way of training himself to have muscle memory when he had to rush.

Don pointed out that all photos are taken at a fraction of a second, so it isn’t a lack of time–it is a lack of discipline we lack in these times of having to work quickly.

2) We complain about photo editors who don’t understand. To update this a bit, it is anyone you are shooting for today.

Our problem is often our ego. We think we are a great photographer. So we often say or want to speak to our clients if you only gave me a chance. “This is where a picture is worth a thousand words,” says Don, with the audience laughter following.

Don’s advice is to shoot the photo the way you want to and show it to them when they crop it poorly. Then, talk to them about what you were trying to say.

IMPORTANT!!!!!! Don said you would probably not be heard the first or second time. But you are educating people over time.

I watched and wrote about how long it took Don to turn around organizations in my thesis. Here are links to it.

Storyteller: Master’s Thesis on Don Rutledge: Chapter OneJan 16, 2013
For this reason, this writer is doing his thesis on Don Rutledge for publication. Don has worked for the Black Star photo agency in New York for over thirty years. During this time, he has also worked for the Home Mission and 
https://t86.1e3.myftpupload.com/Storyteller: Master’s Thesis on Don Rutledge: Chapter TwoJan 12, 2013
Don was born in Smithfield, Tennessee. The family moved to Murfreesboro, Tennessee, south of Nashville, shortly after being born. “Good ole’ home folk,” is what you would say about the Rutledges. They lived on a farm 
https://t86.1e3.myftpupload.com/
Storyteller: Master’s Thesis on Don Rutledge: Chapter ThreeJan 13, 2013
Master’s Thesis on Don Rutledge: Chapter Three. HOME MISSION BOARD, 1966 TO 1980. When Walker Knight went to the Home Mission Board of the Southern Baptist Convention in 1959, he was handed a photo story
https://t86.1e3.myftpupload.com/
Storyteller: Master’s Thesis on Don Rutledge: Chapter FourJan 15, 2013
When Dr. Keith Parks went to the Foreign Mission Board in 1975, his responsibility was to head up the mission support division. Establishing one of the finest communications departments possible was one of the goals that 
https://t86.1e3.myftpupload.com/Storyteller: Master’s Thesis on Don Rutledge: ConclusionJan 16, 2013
To a non-Christian, Don would have been considered crazy for taking the positions with Southern Baptist. Going to the Home Mission Board was a step down in pay and prestige for Don Rutledge. Why would
https://t86.1e3.myftpupload.com/

Bottom line Don is telling us we need to prepare for some “Show and Tell.”

Next, Don warns us to have our Egos and Abilities in check with each other. We need to know our abilities and not have our egos way out and in front.

Now Don also mentions that being a part of an institution like LOOK Magazine helps a photographer. It will open doors for you and give you a budget to work with. However, there is a downside to an institution for a creative. You will find that they want to stop you and make you fit their system.

Just know that being a creative photographer and wanting to change the world sometimes will take time, time for you to educate those around you about the work you are producing. You must be able to articulate your vision to help them see it.

Face Recognition with Lightroom 6

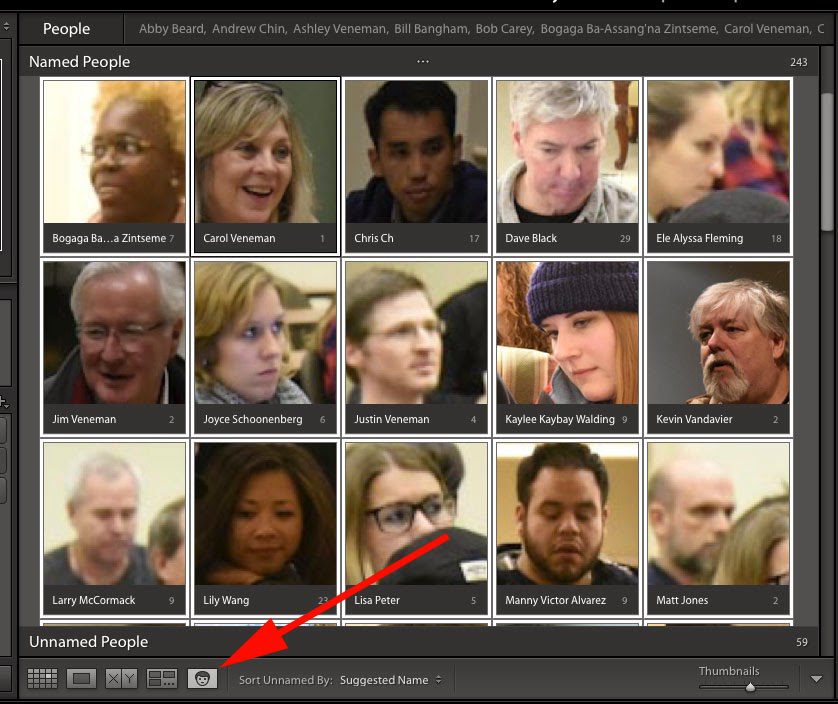
It takes time to explore new or upgraded software, so all I am writing about is just what I discovered and loved immediately with the latest Lightroom upgrade. As I discover all the new bells and whistles in Lightroom 6, I will write about them if I see something worth my time. For example, I downloaded Adobe Lightroom 6 and fell in love with the Face Recognition feature. Open a collection and then click on the little face [red arrow pointing to it], and it will bring up all the faces, just like what happens on Facebook when you upload images, asking you if you want to tag people.

Click on the image to see larger.

Throughout my career, I have shot large projects and had to go through and identify everyone in the photo. Now I can at least scan a complete shoot and put the names that Lightroom sees into every image’s metadata.

Now when you go to each photo, you can check to see the names of people. If the face isn’t recognized, you can still click on the box at the bottom, as I have done here, create a box, and type in the person’s name.

Click on the image to see larger.

Here it missed Philip Lin, and I went back and then typed his name into the photo.

Click on the image to see larger.

It puts all the names in alphabetical order based on the first letter in the name. Now, while the photo isn’t captioned left to right as you would have in the caption, having all the names from a large 3,000 + images in each photo is a huge time saver.

It put the names in two IPTC fields: 1) Keywords & 2) People Shown.

When you export, you can remove all the names or add them with a click. The names are all saved in your RAW files.

I can see almost all my friends who are photojournalists and need to have names with all their photos being thrilled with this feature. The other group of photographers that will benefit is anyone who keeps a database of pictures and needs to search for them to find people.

I know of one client I have that this feature could improve their image archive system almost overnight.

Photographers be like farmers in the Springtime–Prepare the fields


Fuji X-E2, Fuji XF 18-55mm, ISO 1000, ƒ/4.5, 1/500

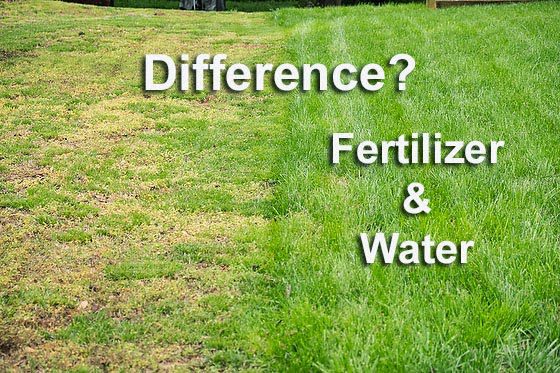
This time of year is when you can drive around your neighborhood and see a significant difference in lawn care. This photo shows just the difference spreading Weed & Feed with the watering can make in the appearance of your lawn.

Only the farmer who faithfully plants seeds in the Spring, who reaps a harvest in the Autumn.
 
B. C. Forbes
Fuji X-E2, Fuji XF 18-55mm, ISO 2500, ƒ/4.5, 1/500

A few weeks ago, I tackled the problem of bare spots in my yard. Well, they are more significant than spots. There is a lot of shade, so this will always be an area that needs more work than the sunny sections of the yard.

I went to HomeDepot and bought Powermate 10. 43 cc 2-Cycle Gas Cultivator to help turn the soil with the Rebel tall fescue, pelletized limestone, & Vigoro 15m weed & feed.

Just two weeks later, you can see the results of a much greener yard in these photos.

Fuji X-E2, Fuji XF 18-55mm, ISO 3200, ƒ/4.5, 1/500

Here you can see the areas I didn’t cultivate did not produce as much grass. Some grass seed and fertilizer fell in those areas, but the difference was in the turning the soil about 2″ – 3″ that buried the seeds and helped them grow.

Just celebrating Easter at our church reminded me of the Parable of the Sower that Jesus told.

Matthew 13: 3-9
“A farmer went out to sow his seed. As he was scattering the seed, some fell along the path, and the birds came and ate it up. Some fell on rocky places, where it did not have much soil. It sprang up quickly, because the soil was shallow. But when the sun came up, the plants were scorched, and they withered because they had no root. Other seed fell among thorns, which grew up and choked the plants. Still other seed fell on good soil, where it produced a crop—a hundred, sixty or thirty times what was sown. Whoever has ears, let them hear.”

Photographer Tips:

You reap what you sow. We have all heard this before, but what can a photographer learn from this? First, you must return to your present clients and reconnect with them. Next, you need to give them more information about you and what new things you are doing. Reconnecting with clients is like fertilizing your yard.

Now some ground is hard as a rock. So first, a farmer uses a tiller to break up dirt that has not been farmed or has become extremely hard. Next, a farmer uses a cultivator to loosen the soil in an existing planting area, weeding the area during the growing season, and mixing compost into the ground.

You may have to do a lot of leg work and go and beat the pavement finding those new clients. You may need some good examples to leave with them through your website, e-newsletter, or printed material. You may need to get friends working with those potential clients to help introduce you and break the ice for you.

Competition:

Even Jesus knew that your competition would try and sabotage all your good work. So he told a parable about it as well. It follows the Parable of the Sower:

Matthew 13:24-30
Jesus told them another parable: “The kingdom of heaven is like a man who sowed good seed in his field. But while everyone was sleeping, his enemy came and sowed weeds among the wheat, and went away. When the wheat sprouted and formed heads, then the weeds also appeared.

“The owner’s servants came to him and said, ‘Sir, didn’t you sow good seed in your field? Where then did the weeds come from?’

“‘An enemy did this,’ he replied.

“The servants asked him, ‘Do you want us to go and pull them up?’

“‘No,’ he answered, ‘because while you are pulling the weeds, you may uproot the wheat with them. Let both grow together until the harvest. At that time I will tell the harvesters: First collect the weeds and tie them in bundles to be burned; then gather the wheat and bring it into my barn.’”

They didn’t have weed & feed in those days. We as photographers may not have the weed control to put out either, but the lesson is clear others will try and attack you at times. Be careful at trying to fix this–you could damage the excellent seed you planted.

The message is straightforward having a big harvest requires you to work the field. First, you must get that tiller and break up the harsh ground. Next, using the cultivator to mix the seed and fertilizer would be best. Finally, you will need to water the field if you expect to see a crop worthy of harvesting.

You can’t reap what you do not sow.

Telephoto or Wide-angle Lens?

 
Nikon D4, AF-S NIKKOR 28-300mm f/3.5-5.6G ED VR, ISO 6400, ƒ/6.3, 1/100

Should you use a Telephoto lens or a Wide-Angle lens? Well, that all depends.

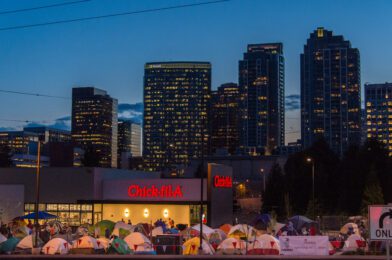
Here I walked across the street and up a small hill and shot back at all the First 100 Campers sleeping over the night in the parking lot for the Grand Opening of Chick-fil-A at Northeast 8th Street in Bellevue, Washington. The First 100 get free Chick-fil-A for a year.

I did a great job showing the campers in front of the store.

 
Nikon D4, AF-S NIKKOR 14-24mm f/2.8G ED, ISO 9000, ƒ/8, 1/100

Here I walked a lot closer and shot it with the 14-24mm at 14mm to emphasize all the tents in the parking lot.

Which photo is better?

Well, that all depends on what you are trying to say. I am covering this story because Chick-fil-A is just now with this Grand Opening getting into the Seattle, Washington market.

I think the first photo shows the city of Bellevue and even the corporate offices of Microsoft just next door to Chick-fil-A. The lower photo could almost be shot anywhere because the emphasis is more about what is the same at the grand openings–tents in parking lots.

Now, if I only needed one photo, I would shoot the top photo, but I am a seasoned journalist and know to cover it completely, so I shoot them all and even more angles. Getting a variety of angles is critical when you are telling the story. The array of photos is especially true in multimedia, where you may show both with other images in a series. For example, you may talk about the campers and how this is in the city of Bellevue.

The question is not just which is best, but why not shoot both and then decide later as you figure out what you want to say? Maybe you will need both.

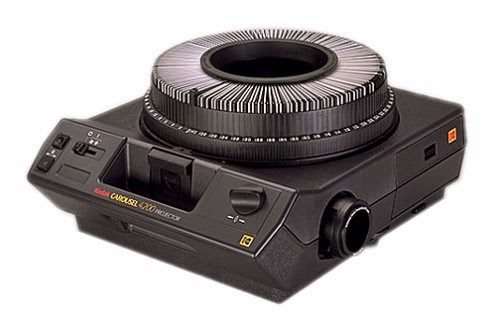
The Kodak Carousel

I own a Kodak Carousel projector. For me, it was a magic lantern to the past. I loved how simple it was to operate.

I regularly created slideshows for my work, synchronizing two or more projectors to a soundtrack. The audio tape had two tracks: left and right for stereo. One track was for mono sound, and the other was for code to control the projectors.

The other day, I got hooked on the TV show Mad Men. According to the show’s pilot, “Mad men” was a slang term coined in the 1950s by advertisers working on Madison Avenue to refer to themselves.

I watched the show yesterday about the agency working with Kodak on their new slide projector, which they wanted to promote the wheel aspect of the tray.

This scene is not only a masterfully written explanation of what advertising executives do but also gets to the heart of the power of photography.

Here is that scene for you to watch.

While the power of images is used all the time by Madison Avenue to hook us on products and services, I think Don Draper’s image selection in the pitch gets to the real power of photography for the individual.

I love this speech by Don Draper:

Fujifilm X-E2, FUJINON XF 18-55mm, ISO 6400, ƒ/3.2, 1/220

Yesterday at our church, I took a few photos to preserve such a fun service. I shared this photo on my Facebook page, and many shared it. People loved it not just because their kids were in the picture but because of their own “nostalgia.”

I loved it because this year’s church created a unique family service. So often, parents of little toddlers feel pressured to keep their kids quiet in a “big church” here; they want the families to feel welcomed.

I have never seen this many kids at our church during a Children’s Sermon.

Fujifilm X-E2, FUJINON XF 18-55mm, ISO 3200, ƒ/3.8, 1/500

I also captured my daughter singing as part of a quartet. I was incredibly proud.

Today’s photos help me remember and appreciate my wonderful family. This photo is from Easter 2001, fourteen years ago, when my daughter was just two years old.

We might not be showing our photos on a Kodak Carousel projector anymore, but the image lets us travel the way a child travels. Around and around and back home again to a place where we know we are loved.

Ever wonder what happened to your camera???

The other day I was trying to take photos with my Nikon D4, and it would just not focus. There was a delay when I pushed the shutter until the camera fired. 

I looked to see if I had set the timer. I didn’t select it. So now I am telling myself, what the &#%!@?!? 

I had put the Pocketwizard TT1 on the camera and was attempting to fire off the camera flash.  

I can report that this took a couple of days to figure out. Not proud of how long this took. 

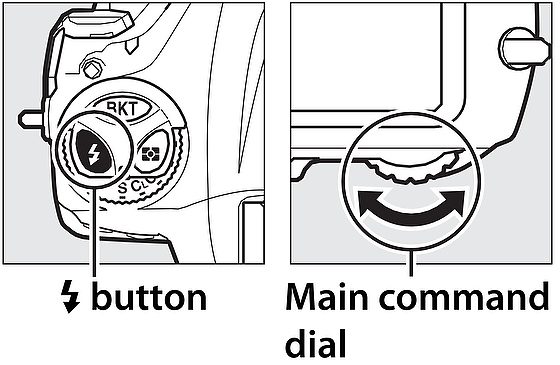
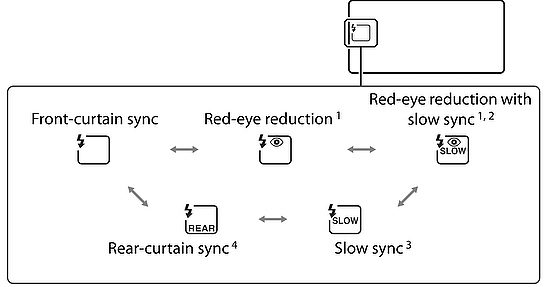
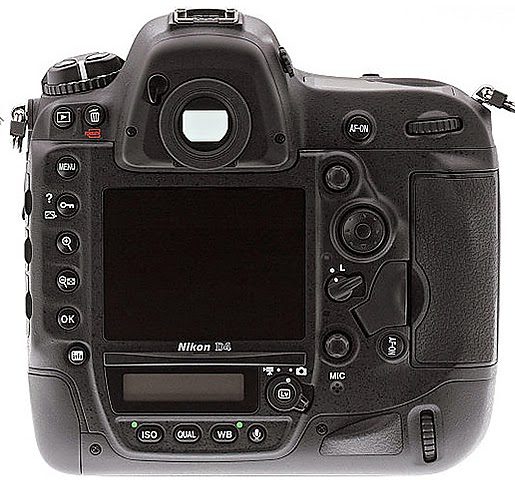
The problem was the flash control on the Nikon D4 was set to Red-eye reduction. To change those settings, you push the flash button on the top of the camera and turn the main command dial. See the illustration here. 

  Here are the choices on the camera for you.

I do not remember ever changing this, so this is why I had a tough time isolating this problem.

Quick solution 

Most all cameras have a way to reset the camera to factory settings. However, the time it takes to figure out what setting the camera changed may take longer than just a quick reset. On the Nikon D4, you find the two buttons with the green ●. You can find them by the ISO and WB buttons on the back of the camera. 

Just push these two buttons, which will likely solve most of your problems.

One more way on the Nikon D4 camera [most cameras have this function] is to find all your current settings and change that one item.

I am writing this blog as much for myself as anyone else.  

Here is an interesting factoid: When you take good notes, you will remember things well enough that you rarely have to look at their notes again.

It seems that writing anything down makes us remember it better. But, on the other hand, not writing things down is just asking to forget. So it’s a kind of mental Catch-22: the only way not to have to write things down is to write them down so you remember them well enough not to have written them down.

Now you may know another reason I do a blog. It helps me to go through the process of writing something down, and in the process, I have discovered I remember more things. Another thing is I now have an online database of topics I can find later when I am having trouble remembering or I want to share with someone who asks me a question.

Nikon D750 Settings


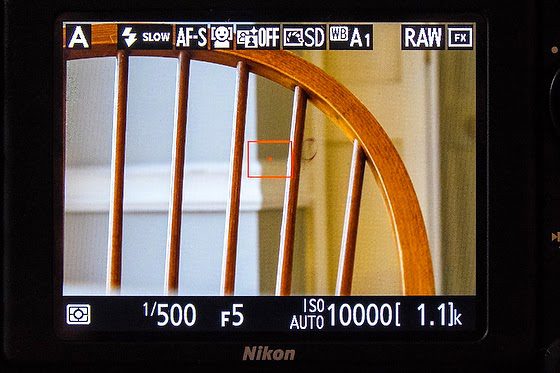
I was asked what my settings were for the Nikon D750. Here are most of those settings, but I want to be sure you know that these are not what I use every time. I do modify these based on situations.

However, this is how I generally leave the camera set.

  • Aperture Priority
  • Slow Flash Sync
  • Auto Focus – Single
  • Auto Focus – Auto set to find faces
  • White Balance A1
  • RAW
  • Matrix Metering
  • Auto ISO
    • Lowest ISO 100
    • Highest ISO 12800
    • Shutter Speed 1/500
 

I am post-processing all images through Adobe Lightroom 5.7.


The first thing I am changing on these settings is White Balance. I will Custom White balance most of the time using the ExpoDisc.

The second thing I am changing is the Auto Focus. Again, I will choose a single point using the 51 pts to move the tiny box around the viewfinder where I put it most of the time on the subject’s eyes.

Little bit of red better than a lot

 
Fuji X-E2, FUJINON XF 55-200mm, ISO 6400, ƒ/8, 1/320

Just a dash of red in this otherwise very monochromatic photo gives it the pop necessary to grab your attention.

Notice how the same black & white photo doesn’t have the same POP as the color photo.

Fuji X-E2, FUJINON XF 18-55mm, ISO 6400, ƒ/8, 1/320

Red is one of the colors that draw the most attention in a scene. Stop signs are red for this reason, like on this school bus–your eye will see it in a location. Also, this is why the lights are red on the bus. Same as the tail lights of a car. You want them to be red when you hit the brakes so that those following will be alerted.

The lesson is simple when there is just a splash of red in the photo, you will draw your eye to that area of the photograph. If you don’t want that to happen, don’t include it in the image.

Lovin’ Nikon D750 @ High ISO

 
Nikon D750, AF-S NIKKOR 28-300mm f/3.5-5.6G ED VR, ISO 5000, ƒ/5, 1/250

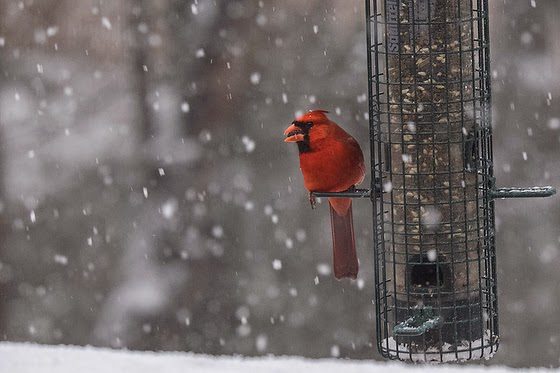
I have been looking through my photos from the Southwestern Photojournalism Conference shot on my Nikon D750. I was shocked at the quality of the images.

The EXPEED 4 Image-Processing Engine and 24.3 MP FX-format CMOS sensor are a significant jump over my Nikon D4.

Years ago, when ADOBE improved the main processing software engine for PhotoShop, you could go back to older files and get better results due to the software improvements.

Nikon D750, AF-S NIKKOR 28-300mm f/3.5-5.6G ED VR, ISO 12800, ƒ/8, 1/40

I think this happened with the new Nikon processor and sensor. While at first, I thought the images were sharper and cleaner due to the 24 MP versus the 16 MP, I think it has more to do with the chip quality for dynamic range and the new processor combination.

The pixel distance from each other is at a pitch of 7.3 microns on the Nikon D4 and 5.97 microns on the Nikon D750. This spacing improves clarity and definition. Rich and smooth tonal gradations. Dramatic character and texture.

Nikon D750, AF-S NIKKOR 28-300mm f/3.5-5.6G ED VR, ISO 8000, ƒ/5.6, 1/30

Size Matters

It is essential to look at the photos in size you would be using–not zoomed in to 1:1.

So when I compare the images as I will most likely use them, there is an important notice of quality with the Nikon D750. When you go to 1:1, there is still an advantage.

I recommend looking at images of the sizes you usually use for comparison. For example, zooming into a 1:1 will have you cropped tight, comparing a 24 MP to a 16 MP.

If you are comparing Nikon cameras, unless you need 11 fps or 36 MP, buy the Nikon D750.

The Culling of Photographers

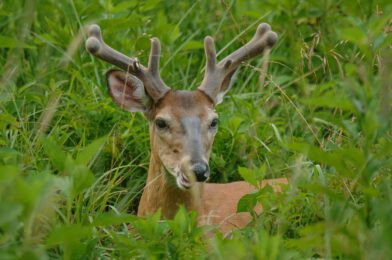
When populations of deer get too great, they can start to destroy the land due to the lack of resources. There are Wildlife Management Programs around the country to control the population of deer.

Without management, you can overharvest, and it will take a long time for the population to recover; if you harvest, crop damage and deer-vehicle accidents may increase.

This process is the herd’s culling, or herd thinning.

There have been natural disasters that have helped nature to correct itself without any culling.

Humans used to have a more natural culling of our population. If you did something stupid on your bike when I grew up, then you didn’t survive. Today helmets are keeping more of us around. Some could argue that the lack of helmets helped us thin the herd.

Weld Founder Austin Mann says, “Many people call photography a profession and moving away from a 9-to-5 job.” Yet, the other day on Facebook, an advertising headline read, “Understand your camera in 10 minutes.”

Today the market is flooded with photographers, and since we do not cull the population [some may wish they could], nature has its way of natural selection or the survival of the fittest in today’s marketplace.

There is a limit to the jobs for photographers. Many will have to move on to pay their bills from a lack of work.

It is said in sailing the pessimist complains about the wind. The optimist expects it to change. The leader adjusts the sails. – John Maxwell

I played trumpet for many years and even through college. I was pretty good and enjoyed playing. However, I did not have what it took to become a professional musician. I did not enjoy practicing for hours each day.

When I discovered photography, things changed. I was spending an unusual amount of time shooting or in a darkroom. I would lose track of time. I never remember losing track of time playing my trumpet.

If you lose your sense of time with photography, you might survive. But, first, you must love the work. Losing yourself to photography lets, you know this is not just fun but your passion.

Jay Maisel, Bernie Boston, Hugh Morton, and George Tames. Our famous photographers in my book. I took this photo at the Southern Short Course in the 1980s.

Jay Maisel tells his students to “always carry your camera.” He goes on to tell them he can tell who will not make it—those not carrying their cameras all the time.

“In this world, you’re growing or dying, so get in motion and grow,” said Lou Holtz.

Time to assess

Where are you now, and where do you want to go? How are you going to get from here to there?

I know many photographers who wanted to go from no video skills to adding these to their skill set. Hey, I took the NPPA Multimedia Immersion Workshop. I invite you to join me in Romania this summer for a Multimedia Immersion Workshop. Here is the link to the Storytellers Abroad Workshop.

I will be glad to help you see the way from here to there if this is the path you want to choose.

I believe that a passion for photography is better than having a passion for the story. For example, Eugene Richards went from a social worker to a social activist and finally realized that photojournalism was the most powerful way to help people.

Discover your passion, and it will help give you the answers to the big questions. Why go there? A D Why not stay here?

You may also discover that you don’t have a passion for this, which is a good discovery. J st move on to your love, and you will be successful–if you nurture it.

Student’s 1:3 Lighting Ratio results

 
© 2015 Stephanie Leilani

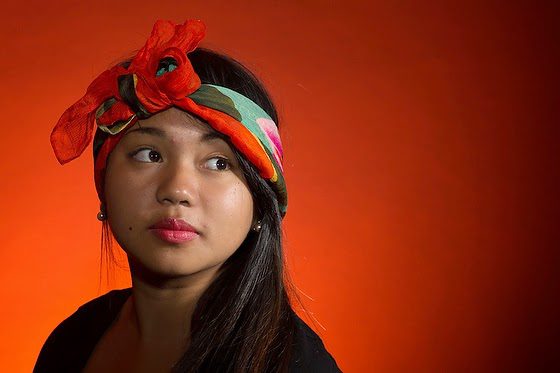
These are the students’ assignment results, where they were to create a 1:3 lighting ratio on the subjects. They could add a background color or just white. They could also have fun, but they had to demonstrate the 1:3 lighting setup.


Assignment Description:
1:3 lighting ratio. This photo uses classic lighting.

Items:

Softbox
This light is your leading light. Get a light reading with just this first. The light should be 45 degrees off the axis of the camera and 45 degrees above the subject’s eyes.

Subject
Your subject should have the main light lighting only part of the face, and the shadows should be just a little to show the 1:3 ratio.

White backdrop
Keep the subject a few feet from the background, and do not use more lights to light it.

(D)SLR
Choose the lowest ISO. Use a portrait lens of 50mm if you don’t have a full-frame camera can work. No more than 100mm.

Octobox
The Octobox is your fill light; get just a reading of this 2nd. Be sure it is 1/2 the power (1 f/stop less) than the leading light. After this is done, get a 3rd light reading of both lights, which will be the setting for the camera. It can be level with the eyes, but you may have to move up with glasses to avoid glare.

© 2015 Benjamin Marsden