Nikon D4 and D750 shooting Hawaiian Fire Dancer

 
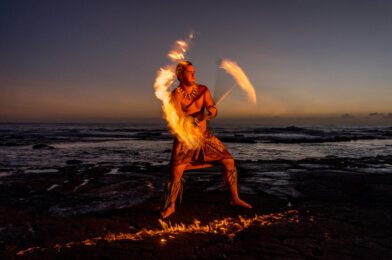
Nikon D750, NIKKOR 28-300mm f/3.5-5.6G ED VR, ISO 5000, ƒ/25, 1/40

I went out to shoot with strobes last night to show the students how to use a fill flash.

We set up a strobe to take some photos. This top one was without the strobe, which was a pleasant surprise to me.

Nikon D750, NIKKOR 28-300mm f/3.5-5.6G ED VR, ISO 100, ƒ/7.1, 1/60

Here you can see us setting up. Only one of those strobes is going off at a time. So we had two strobes set up the same way, giving more people the opportunity to shoot.

Click on the diagram to see it larger

Here is one of the photos using this setup here.

Nikon D4, AF-S NIKKOR 14-24mm f/2.8G ED, ISO 100, ƒ/7.1, 1/60

If I had been shooting this for myself, I would have had even more options and maybe an even better photo. Instead, I shot a few and gave the students time to shoot the same setup on their cameras.

We used Pocketwizards to trigger the strobe.

Student’s 1:3 Lighting Ratio results

 
© 2015 Stephanie Leilani

These are the students’ assignment results, where they were to create a 1:3 lighting ratio on the subjects. They could add a background color or just white. They could also have fun, but they had to demonstrate the 1:3 lighting setup.


Assignment Description:
1:3 lighting ratio. This photo uses classic lighting.

Items:

Softbox
This light is your leading light. Get a light reading with just this first. The light should be 45 degrees off the axis of the camera and 45 degrees above the subject’s eyes.

Subject
Your subject should have the main light lighting only part of the face, and the shadows should be just a little to show the 1:3 ratio.

White backdrop
Keep the subject a few feet from the background, and do not use more lights to light it.

(D)SLR
Choose the lowest ISO. Use a portrait lens of 50mm if you don’t have a full-frame camera can work. No more than 100mm.

Octobox
The Octobox is your fill light; get just a reading of this 2nd. Be sure it is 1/2 the power (1 f/stop less) than the leading light. After this is done, get a 3rd light reading of both lights, which will be the setting for the camera. It can be level with the eyes, but you may have to move up with glasses to avoid glare.

© 2015 Benjamin Marsden