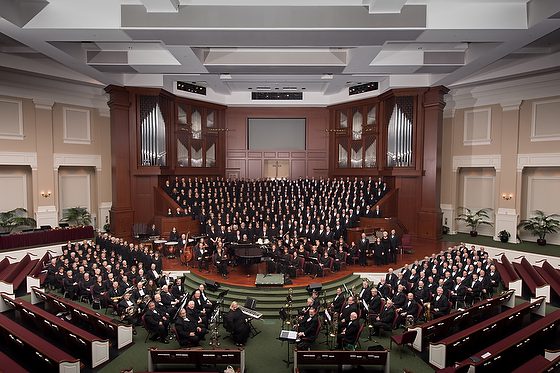
Why ƒ/1.4 isn’t always best or one angle the best

 
Fujifilm X-E2, FUJINON XF 18-55mm, ISO 320, ƒ/4, 1/250

How often do you photograph the same subject but try and mix it up?

I find many young photographers with lenses apertures glued to the wide open to give a shallow depth of field photos.

Maybe just closing down the aperture to ƒ/14 versus ƒ/4 can give your photos a little more relevant to what is going on in the photograph.

Fujifilm X-E2, FUJINON XF 18-55mm, ISO 4000, ƒ/14, 1/250

Notice how the greater depth of field helps you know this is outside a church. Well trying to say this is a photo about Easter Sunday that needed, in my opinion, a little more depth of field.

Fujifilm X-E2, FUJINON XF 55-200mm, ISO 6400, ƒ/4.8, 1/140

I was photographing Tenebrae: Service of Darkness on Good Friday at my church. Now because I sat down near the front, I ended up with the microphone on the minister’s nose. Not all that flattering.

Fujifilm X-E2, FUJINON XF 55-200mm, ISO 5000, ƒ/6.4, 1/250

On Easter Sunday, I sat on the balcony and got a much better photo of the minister at the podium.

Remember to move around and find those perspectives that help keep the photo on message with little few distractions as possible.

Fujifilm X-E2, FUJINON XF 55-200mm, ISO 4000, ƒ/4.8, 1/250

Now no matter where you choose to shoot from and at what aperture, you still need to pay attention to the best moment.

Here I think the photo with the minister’s arms open wide is much better than the one below.

Fujifilm X-E2, FUJINON XF 55-200mm, ISO 3200, ƒ/4.4, 1/250

Seeing her hands here takes a little while, and the message isn’t as straightforward.

Tips to remember:

  • Shoot a variety of apertures–not just wide open or closed down
  • Look for different camera angles
  • Work the aperture/angle that you picked for the best moment

Fuji X-E2 4.00 Firmware Upgrade

 
Fujifilm X-E2, FUJINON XF 55-200mm, ISO 5000, ƒ/4.7, 1/200–Electronic Shutter

As promised, I shot the same theater show as last night and my previous blog post after I updated the firmware.

Electronic Shutter

Well, one of the first things I fell in love with was the electronic shutter. So I turned the camera to this and shot a few images out my window of the backyard. Overall looked OK. Then I even turned the sound off on the shutter, and I mean, it is silent.

You can see in the top photo that the right wall should be straight. However, looking at the actor’s lips, you can see a softness that shouldn’t be there. My friend Gary Chapman warned me about this banding effect.

Fujifilm X-E2, FUJINON XF 55-200mm, ISO 6400, ƒ/4.6, 1/500–Electronic Shutter

Here you can see the banding effect. To compare this to one without the electronic shutter, I reset the camera quickly when I noticed this, and here is the one I shot after changing the setting.

Fujifilm X-E2, FUJINON XF 55-200mm, ISO 5000, ƒ/4.5, 1/300–Regular Shutter

Now I went back and read the upgrades in the PDF by Fujifilm:

High-speed electronic shutter with a maximum speed of 1/32000sec. (*) 

The FUJINON XF Lens series lineup includes a number of fast fixed focal length lenses which boast very high sharpness with the aperture wide open, producing excellent out of focus “bokeh”. However, fast apertures are difficult to use if the light is too bright, so to ensure users can create shallow depth-of-field effects, the camera is now equipped with a fully electronic shutter offering a maximum shutter speed of 1/32000sec. The mechanical shutter will not operate at all when any speed for the electronic shutter is selected, which also delivers a completely silent shooting experience; perfect for shots of sleeping children, pets, weddings, and more. In addition, it is possible to set the electronic shutter in 1/3 steps from a range of 1sec to 1/32000sec. 

Notes: Shutter Sound 

The shutter sound can be muted if desired. Use the new “SHUTTER SOUND” and “SHUTTER VOLUME” options in the setup menu to choose the type and volume of the sound made when the shutter is released. 

I believe from my tests that you can get the banding effect if you are inside and shooting at a pretty fast shutter speed. However, I think the electronic shutter is better for shooting outside in bright light where you may want to shoot at ƒ/1.2 and need the super fast shutter speeds.

Fujifilm X-E2, FUJINON XF 55-200mm, ISO 6400, ƒ/4.8, 1/180–Firmware 3.10

This photo is from the first night’s performance with the older firmware 3.10

 
Fujifilm X-E2, FUJINON XF 55-200mm, ISO 6400, ƒ/4.8, 1/250
The main difference in the shooting was the AF locked on faces better than before. So since the autofocus and face recognition was better, the exposures were better because once the camera recognized the face, the exposure was based on them.
 
Here are the notes about the improved AF

New AF System

(1) New AF system with Zone and Wide/Tracking modes for effortless capture of moving subjects. 

The AF System complements the fast and accurate 49-single-point autofocus system with new Zone and Wide/Tracking modes, which use 77 autofocus points across a wider area to substantially improve the camera’s ability to capture moving subjects.

(2) Improvement of AF accuracy. 

Single-point AF divides the focus area into smaller sections to more accurately determine the distance to the subject for even greater focusing accuracy. The built-in phase detection pixels have the detection range of 0.5EV, an improvement from the previous 2.5EV, delivering phase detection AF performance that enables fast focusing in low-light conditions and on low-contrast subjects.

(3) Eye Detection AF. (*) 

The firmware update provides Fujifilm’s Eye Detection AF, which automatically detects and focuses on human eyes. 

The function allows you to easily focus on the eyes even in difficult conditions, e.g. when shooting a portrait wide open to obtain a beautiful bokeh background.

My hopes of using the Electronic Shutter were dashed; the firmware upgrade significantly improved the performance of the Fuji X-E2, and I like buying a newer model camera. So thanks, Fuji!

Fujifilm X-E2, FUJINON XF 55-200mm, ISO 6400, ƒ/4.6, 1/400

I had to post one photo of my daughter’s performance tonight.

Love how the Fuji X-E2 is for Theater

 
Fujifilm X-E2, FUJINON XF 55-200mm, ISO 6400, ƒ/5, 1/125

NEWS UPDATE!!!

This morning I went to Fujifilm.com and discovered there was a firmware update on the Fuji X-E2. Go here if you need to upgrade to the latest Firmware, 4.00.

Due to the upgrade and having the opportunity tonight to reshoot the same play, I will write a new follow-up post on Monday about the firmware upgrade and how it helped improve my experience. Well, that is what I anticipate.

One huge update is an electronic shutter release that you can make silent. The camera, on default, actually plays a recorded sound that you can change to different noises, just like ring tones, or turn it off completely. So, in essence, a silent camera. So this I can tell you already will be better than last night.

Observations from last night’s photoshoot

When shooting a theater performance, you can quickly hear how quiet the auditorium will get so everyone can appreciate the dialogue. However, in a high school play like the one, I shot last night, the actors’ ability to all project like professionals is not the same.

Some of the actors required the audience to work hard to hear them, which is when you quickly realize how loud a camera can be in this environment.

Fujifilm X-E2, FUJINON XF 55-200mm, ISO 6400, ƒ/4.5, 1/280

The Fuji X-E2 is a pretty quiet camera. One of the main reasons it is silent compared to other DSLR cameras is the lack of a mirror.

Do you get the same quality if you get rid of the mirror? Well, in this case, it does help. However, because you have no mirror, you are also eliminating one of the things that often affects the sharpness of DSLR cameras–the mirror. In a DSLR, a mirror lets you see through the lens, and when you press the shutter release, the mirror goes up, the shutter opens, and then the mirror goes back down. In addition, moving mechanical parts introduces some vibration in the camera, which often can add just enough vibration to make your images not quite as sharp.

Fujifilm X-E2, FUJINON XF 55-200mm, ISO 6400, ƒ/4.4, 1/110

The second thing that helped with the photo quality was the Fujinon XF 55-200mm ƒ/3.5–4.8 lens. It has built into the lens optical image stabilization for effective 4.5 stops improvement. So if you breathe a little in the photo, the camera will, in essence, take care of the vibration you introduce into the camera.

The 55-200mm lens is quite sharp for zooms. Fuji makes some of the world’s best lenses.

Fujifilm X-E2, FUJINON XF 55-200mm, ISO 6400, ƒ/4.4, 1/150

One of the best attributes of shooting mirrorless is seeing what you are shooting before you shoot. Before you shoot, you are visiting the processed image in terms of exposure and white balance in the viewfinder or on the LCD. Therefore, you can see if the color or exposure is off and correct it before shooting.

With the DSLR, you can REVIEW, but you cannot PREVIEW. This ability to PREVIEW an image helps you know if you will be getting the image correct before you push the shutter.

Fujifilm X-E2, FUJINON XF 55-200mm, ISO 6400, ƒ/8, 1/80

While shooting this scene where the one actress on the floor is quite far from the other actors, I knew I wanted both of them in focus. So I cranked the aperture to ƒ/8. So now I could see everyone was in focus.

Fujifilm X-E2, FUJINON XF 55-200mm, ISO 6400, ƒ/4.8, 1/45

The 55-200mm at 200mm is the same as a full-frame camera with a 300mm lens. The rule would be to have the shutter speed at 1/300 to avoid motion blur, but the camera and lens did a great job at almost 3-stops lower than the recommended shutter speed for this lens.

Side Note

Since downloading the new Firmware this morning, I am again falling in love with the Fuji X-E2. You see, Fuji is doing what Nikon nor Canon is doing with their cameras. When the ability to write better software comes along, other manufacturers save this for the new cameras. Therefore manufacturers are forcing you to buy a new camera.

Tune in Monday for my new CAMERA review due to Fuji upgrading the Fuji X-E2 with new Firmware.

Great BOKEH with Sigma 35mm ƒ/1.4 DG Art on Fuji X-E2

Fujifilm X-E2, Sigma 35mm ƒ/1.4 DG Art, Nikon G AFS lens to Fujifilm X, ISO 6400, ƒ/1.4, 1/300

I wanted to test the Sigma 35mm ƒ/1.4 DG Art with Nikon mount on my Fuji X-E2. With the help of the Nikon G AFS lens to Fujifilm X converter I shot some of our Christmas ornaments we just put up.

This is shooting as close as the lens will focus.

Fuji also added magnification options for fine tuning focus, which is great. You simply press the rotary dial on the back of the X-E2 and the camera switches to zoom mode. In magnified mode, autofocus still works and you can see it much better.

Fujifilm X-E2, Sigma 35mm ƒ/1.4 DG Art, Nikon G AFS lens to Fujifilm X, ISO 2500, ƒ/1.4, 1/500

Now the Nikon G AFS lens to Fujifilm X makes the depth-of-field is even more shallow because the lens isn now further from the sensor.

Fujifilm X-E2, Sigma 35mm ƒ/1.4 DG Art, Nikon G AFS lens to Fujifilm X, ISO 4000, ƒ/1.4, 1/500

As you can see this combination of the Sigma 35mm ƒ/1.4 with the Fuji X-E2 will give you some great BOKEH!!

Fujifilm X-E2, Sigma 35mm ƒ/1.4 DG Art, Nikon G AFS lens to Fujifilm X, ISO 2500, ƒ/1.4, 1/500


Fixing a Macbook Pro that crashes

My computer crashed many times the past month and I was attributing this to the new El Capitan Mac Operating system.

After reading the crash log report I kept noticing similar crashes no matter what programs I had open. One thing in common was the programs that were crashing were using a lot of memory like Lightroom and Final Cut Pro X.

After reading around on different forums I discovered this cool APP to test your MacBook Pro’s memory. Rember is free and is a great way to just test your RAM to see if this is the culprit. Rember says on their website:

Defective memory can cause computers to malfunction, crash, and behave in a variety of ways which can sometimes baffle end users and computer technicians alike. Apple provides hardware test CDs with most of their products, and there are some third-party utilties for Mac OS X which perform memory testing. In my experience, these tools have not always been able to quickly and efficiently diagnose memory problems. Rember has been designed to simplify the testing, and diagnosis of these problems.

I downloaded the APP and ran it and it alerted me to the fact that this was indeed what was crashing my computer.

Ran to my Fry’s store and bought replacement memory and put it in myself in about 5 minutes.

How to replace the memory is super simple. Here are the directions for my Macbook Pro 15″ Midyear 2012 laptop.

Now not only is my computer not crashing like it was doing the computer is a lot faster. Bad memory can do more than just crash your computer.

Software can get corrupted as did my Microsoft Outlook yesterday. I had to rebuild the database. Microsoft Outlook message popped up and I followed the directions and it was fixed. This is just one of many other things that bad RAM can do to your computer.

CONCLUSION: Too many times people will blame software when sometimes you computer is just wearing out. It is similar to an automobile. Some of the parts just break down over time. You don’t need to go and buy a new computer every time the computer starts to have problems. If you don’t want to self diagnose the computer then just take your computer to the store. If it is a Mac they will diagnose it in the store and if under warranty fix it for free.

Those who like to shoot film might also like classic cars for similar reasons.

 
DROID TURBO by Motorola 64GB in Black Ballistic Nylon, ISO 50, ƒ/2, 1/307

Whenever I see a classic car like this Duesenberg 1935 SJ LaGrande Dual-Cowl Phaeton, I, too, would love to have one.

Very few classic cars can compare to most modern vehicles for performance. However, there are cult followings for these classic cars.

I love the Fuji X-E2 because it has a lot of the feel and design qualities of the Leica M6 that I used to shoot with years ago.

I am finding those who are all about shooting film today are very similar to those who buy classic cars and love driving them. It is about nostalgia more than if it is genuinely better than digital.

All the research today shows that digital’s dynamic range, sharpness, and resolution are superior to film.

You can even shoot digital and then, in post-processing, make it look like you shot it on film. You can even buy those presets for Adobe Lightroom if you don’t want to learn how to create the effect.

Why you might want to shoot film

Creativity requires you to get into a zone and think beyond the boundaries. If you need to shoot film to be your best creatively, then you need to shoot film.

You may even need to shoot film every once in a while to get those creative juices flowing. Whatever the reason, it is OK to shoot film.

Why I shoot with Nikon D4

As soon as the new Nikon D5 comes out, I will most likely upgrade for the same reason I upgraded from the earlier pro-Nikons The new camera will give me some new capabilities to do things I could not do before.

The Nikon D3 was the game changer for low-light photography. First, I could quickly shoot at ISO 6400, and then the Nikon D4 gave me one stop more to ISO 12800. The Nikon D5 will have a native high ISO of 102,400 and 4k video  This would be a 3–stop increase in ƒ-stops.

The last time I had a jump in IOS like this was when I went from the Nikon D2x to the Nikon D3. The D2Xs ISO 100—800, but the Nikon D3 ISO 200—6400. Those 4—stops were making all of the lenses in my bag increase by 4—stops.

Getting the same ƒ–stop gains would require you to spend an incredible amount of money just to increase those lenses would 3 to 4 times what the present lens I own, and most of those lenses don’t exist.

My creativity comes when I don’t have to shoot because there isn’t enough light. So if film gave me the advantage to do this over digital, I might be interested in shooting film.

How I solved the problem of providing prints on location

Crisis Situation

“Can you provide prints onsite?” was a client’s question to me. I hated making prints with inkjet printers through the years, and some of the other solutions were just too expensive to justify.

Suppose you owned one and did any amount of printing; you most likely have had to clean the heads due to getting banding across prints. Making prints just was so time-consuming for me.

When I had this request, the very first thing was feeling the emotions of stress.

Solution

I first went to my friend for the past 20+ years Pete Casabonne. Pete manages PPRPix. In the past, I did my printing with in-house labs that I managed. When this got in the way of me shooting more assignments, we outsourced that at Georgia Tech to PPRPix.

Talking with Pete and then doing some research on my own, I found the Epson PM225 PictureMate Charm Compact Photo Inkjet Printer for $199.

To set up the Charm the first time, you slide the four-color ink cartridge into the slot in the back of the Printer. Next, you rotate the handle back and out of the way, open the top cover to turn it into an input tray and open the front cover to turn it into an output tray. Then load paper in the paper tray, plug in the power cord, and you’re ready to print from a memory card, using the control panel and tiltable LCD on the top of the Printer or from a PictBridge camera.

If you want to print from a computer instead (or also), run the automated installation from the supplied disc and plug in a USB cable. When you open the box, you should be ready to print your first photo within 10 minutes—or less if you don’t need to install the driver on a computer.

For glossy photos, the cost works out to just 25.3 cents each, based on the $37.99 (direct) price for a print pack with enough ink and paper for 150 photos. The cost is 32.3 cents per photo for matte images, based on a $32.29 (direct) price for enough ink and paper for 100 photos.

The combination of fast speed, low cost per page, and high-quality prints earned it a spot as PC Magazine Editors’ Choice for 4- by 6-inch dedicated photo printers.

I will be writing my review of its performance after using it in a Photo Booth in a couple of weeks.

PRODUCT HIGHLIGHTS

  • 5760 x 1440 dpi
  • Print 4.0 x 6.0″ Photo in 37 Seconds
  • Print from Memory Cards
  • Borderless Prints
  • 2.5″ Color LCD Preview Display
  • Portable, Weighs only 7.9 lb
  • Dry, Scratch, & Water-Resistant Prints
  • Grab the handle and take PictureMate Charm to parties, events, the office, and even your vacation getaway.
  • Smudge, water, and fade-resistant photos
  • With on-board photo editing, you can crop, enhance, remove red-eye, and more.
  • Choose from various layouts and print in black-and-white, color, or sepia
  • Print stacks of photos at an everyday, low print price
  • Compatible with any digital camera
  • The Charm operates for hours on a single battery charge (with an optional rechargeable battery)
  • Print wirelessly with the optional Bluetooth adapter


This screenshot of the Epson Easy Photo Print software will let you print from your computer. 


Once you select your images, you can crop and make minor adjustments and choose if you want index print [contact sheet], borderless or bordered prints, and more adjustments. I prefer shooting RAW and editing all my images using Adobe Lightroom. Once you install the printer driver, you are just picking the Epson PictureMate as your Printer. 


In Adobe Lightroom Print Module, go to the Print Job tab and select Printer. 


On the lower left, pick the “Print Settings,” and then this will pop up where you choose the EPSON PictureMate PM 225. 

Tethered Shooting

I will use my Nikon D4 to shoot photos of people at a Photo Booth wireless. I will use my CamRanger to sync to my Macbook Pro. Here is an earlier blog post on how that works.

Here is how you set up Lightroom to automatically have those images appear so you can immediately edit/print the photos.

Simple Photo Frame Effect – Add a Custom Border with Text or Image

Here is a great video to help you create text. To add logos and text, I make those in PhotoShop and select graphics instead of text. Little practice, and you will be doing this with ease. Watch this video for a walk-through of the steps.

Fujifilm X-E2: Capturing the stories of our lives

 
Fujifilm X-E2, FUJINON XF 18-55mm, ISO 400, ƒ/7.1, 1/600

One of the best things the camera phone has helped us do is capture ourselves in our pictures. Capturing a moment with a horse that Keziah met on her trip around The Big Island of Hawaii is something she wants to keep for herself and share with her friends.

The quality of a photograph is what drives people to buy those cameras. The other thing in many camera purchases today is the camera size.

Fujifilm X-E2, FUJINON XF 18-55mm, ISO 500, ƒ/6.4, 1/500

Some of the students I was teaching in Hawaii went on trips around The Big Island, and everyone had their DSLR cameras. They give excellent results when used correctly, and the lens choices are far superior to their smartphone cameras.

Fujifilm X-E2, FUJINON XF 18-55mm, ISO 2500, ƒ/7.1, 1/500

Tomorrow I will be lugging around my Nikons as I shoot the Chick-fil-A Kickoff Game between Auburn and Louisville. The Nikon D4 is just the perfect sports camera and lets me continuously shoot more than 90 frames at 10 FPS in the RAW setting before the buffer slows the camera down. The XQD memory card is so fast and the buffer so good that I can get those big plays without missing moments because the camera isn’t capable of keeping up with the action.

However, the downside to the gear is its size and weight. By the end of the day, I will collapse more from carrying all this gear for more than 12 hours. I will be covering the pre-game Fan Zone till the Trophy presentation.

I cannot think of a better system for travel photography than the Fujifilm X-E2. It is small and compact. I have great lenses to use with it, and at the end of a long day, as I traveled around The Big Island of Hawaii, I wasn’t tired and worn out. On the contrary, It was an energizing experience for me.

Fujifilm X-E2, FUJINON XF 18-55mm, ISO 400, ƒ/6.4, 1/1700

I only carried the Fujinon XF 18-55mm and the 55-200mm with one body. So I stuck the 55-200mm in my vest pocket and just continued to relax and enjoy my time.

Fujifilm X-E2, FUJINON XF 55-200mm, ISO 6400, ƒ/5, 1/110

I captured the Island Breeze Luau from the back with the 55-200mm due to the image stabilizer to keep the photos sharp.

Fujifilm X-E2, FUJINON XF 18-55mm, ISO 1250, ƒ/4, 1/500

Unless you are shooting sports for a living, I think the Fujifilm X-E2 is a great camera. The lenses they make for the system and the images are incredibly sharp.

Fujifilm X-E2, FUJINON XF 18-55mm, ISO 200, ƒ/8, 1/680

A video was helping two funerals I was attending to tell the story of the people who had passed away. The use of photos all through the pieces to help tell their stories was quite moving.

It reminded me there were some things I hadn’t known about them, and I loved them even more for learning them.

Fujifilm X-E2, FUJINON XF 18-55mm, ISO 6400, ƒ/5, 1/480

This photo is a moment I also cherish of Karen Walker having parakeets on her hand at a store we stopped by on our trip.

Fujifilm X-E2, FUJINON XF 18-55mm, ISO 200, ƒ/3.6, 1/180

Tips for Capturing the stories of your life

  • Carry your camera with you–Since you cannot take photos if you don’t have your camera be sure to buy a camera you would want to lug around with you. Fuji X system cameras are my vote for just such a camera.
  • Spend a lot of time just soaking in and listening to people. Of course, you don’t need to be shooting every minute, but be sure you have some photos that you can then add the text to later that you can preserve these stories for you to have for years to come.
  • Archive your photos. I put captions with every shot I take. Some are just a few words to help me remember.
  • Display the stories. Find a format where you can display those stories.
    • Maybe you use something like Instagram, where you post your photo and then put a caption that tells the short story.
    • Blogging about your journeys might be another way to preserve those stories. My friend Bill Bangham is doing that on his blog here.
    • Maybe create a book as I have done many times for trips, special events, and family stories. Here is a link to some of my books.
    • Create videos with your voice-over and pictures. Here are some of my packages.
Most important is to take the time to listen to people and honor them by helping to remember their stories through pictures and their words.

How to add HSS Sync to the latest cameras using PocketWizard Flex system

 
Nikon D4, Sigma 120-300mm ƒ/2.8 DG OS HSM | S, Sigma TC-2001 2x, Nikon SB-900, Nikon SB-800, PocketWizard Transceiver TT5, PocketWizard Mini TT1, AC-3, ISO 6400, ƒ/10, 1/2000

Getting this type of photo of the hummingbird, I used the PocketWizard Flex system to help trigger my Nikon SB-900 and SB-800 flashes using TTL HSS.

I started to shoot this with my Nikon D750, but it wasn’t working. I quickly realized the PocketWizard system wasn’t working with the Nikon D750. That was easy to fix.

I fired up the Macbook Pro, plugged my PocketWizard TT5 and later the mini TT1, and updated the firmware to the latest version.

If you wonder what is up with the green tape, I use it to help me know which channel on the PocketWizard.

I have the small Mini TT1 on the camera with the AC-3. I have A Channel marked Orange, and C Channel marked Green.

The first thing I had to do was update the PocketWizard Utility to the latest 1.58 version.

The website for updating the utility lists all the hardware and the latest firmware. In addition, you can click on the release notes to see what they improved.

Once I downloaded the software, I then had to install it.

Then the PocketWizard Utility alerted me to download the latest firmware. I had the PocketWizard TT5 plugged in, so it knew which firmware I needed.

After the update, the utility shows you a picture of the device you have plugged in with the serial number and gives you all the specs, including the firmware version.

Now I can easily use the system with my Nikon D750, which was newer than the PocketWizards, thus the reason for the need for a firmware upgrade.

PocketWizard’s newest firmware platform taps into the camera’s digital communications to enable a new remote flash capability through our proven radio system. ControlTL allows remote i-TTL for Nikon CLS / i-TTL systems and Manual Power Control. In addition, ControlTL firmware is configurable and upgradeable for “future-proof” continuous improvement.

TIP

Go to all the websites of your camera gear and be sure all your equipment has the latest firmware. If you are unsure how to do this, use Google to search for your camera gear and add the word firmware.

Capturing Hummingbirds with Fuji X-E2 with 55-200mm

Fujifilm X-E2, FUJINON XF 55-200mm, ISO 5000, ƒ/6.4, 1/2000

I may have accidentally gotten a photo of a hummingbird in the past, but now with a feeder on our back porch, I think I will make a better attempt for the first time.

I realize the feeder placement may need to change, and I may need strobes to make these fast birds pop.

Fujifilm X-E2, FUJINON XF 55-200mm, ISO 3200, ƒ/6.4, 1/2500

So to take these photos, I had my Fujifilm X-E2 camera on a tripod, and I used the Android Fuji app to fire the camera.

Fujifilm X-E2, FUJINON XF 55-200mm, ISO 3200, ƒ/6.4, 1/2500

I did this because as I stood there with the camera, the birds would come flying in and quickly see me behind the glass and take off. So either I build a blind, which I might do to hide from the birds, or I can use the remote and go and sit down and wait till I see the pop into view on my phone screen.


The only thing is there is a delay with the shutter.


Here are the screen grabs from the app:


REVIEW OF APP
 
The APP will disconnect you from your present Wi-Fi connection and look for the Fuji X-E2.
 
Once connected, you can touch the screen where you want the camera to focus as long as you are in AF mode. You can control all the functions of the camera that I could test.
 
Now that I have captured a few photos of the hummingbird, I will now try to get a better picture in the future and, hopefully, a few different breeds.

Why Photography/Photojournalism is an Awesome Career


Nikon D4, 14-24mm, ISO 160, ƒ/8, 1/100

This simple photo of Claudio Cesar Aguirre, who is helping run a Chicken Coop in San Esteban, Olancho, Honduras, helped to get funds for micro-loans to help the community change. As a result, people are now living longer, healthier lives and gaining access to better education.

Yes, there are countless examples of where photos have changed the course of history from the civil rights movement, helped to change public opinion on the Vietnam War, helped to end the apartheid in South Africa, and recently has the public upset about ISIS.

Do you want to make the world a better place to live? If you are a person that sees injustice happening to people and feel people need to do something, then this might be the best job you could ever have.

People become doctors, lawyers, social workers, nurses, and many other professions to make a difference in people’s lives.

What if instead of being a doctor taking care of patients, you were the pharmacist researcher and came up with a cure for a disease? Think about how your discovery would help more people than you could have ever seen in your lifetime.

What if, instead of being a defense attorney, you became an elected official and changed policy? You could impact far more than one person at a time.

Being a photographer has that kind of compounded interest impact. You can’t go worldwide and share the story one-on-one, but your photos can. So many of my photos have impacted millions of people. Not all the images have the impact I wish, but many have and will.

John Howard Griffin having lunch with shoe shine man in New Orleans for his research for the book Black Like Me. photo by Don Rutledge 1959

Over fifty years ago, John Howard Griffin published a slim volume about his travels as a “black man.” He expected it to be “an obscure work of interest primarily to sociologists,” but Black Like Me, which told white Americans what they had long refused to believe, sold ten million copies and became a modern classic. Read more … 

The book Black Like Me had a great deal of impact due to Don Rutledge’s photos of Griffin traveling the South. The images helped to make his claims accurate. That work had a profound effect on the Civil Rights Movement.

photo by Dorothea Lang February 1936

Another photo still impacts how we see poverty and depression.

The photograph that has become known as “Migrant Mother” is one of a series that Dorothea Lange made of Florence Owens Thompson and her children in February or March of 1936 in Nipomo, California. Lange was concluding a month’s trip photographing migratory farm labor around the state for what was then the Resettlement Administration. In 1960, Lange gave this account of the experience:

I saw and approached the hungry and desperate mother, as if drawn by a magnet. I do not remember how I explained my presence or my camera to her, but I do remember she asked me no questions. I made five exposures, working closer and closer from the same direction. I did not ask her name or her history. She told me her age, that she was thirty-two. She said that they had been living on frozen vegetables from the surrounding fields, and birds that the children killed. She had just sold the tires from her car to buy food. There she sat in that lean-to tent with her children huddled around her, and seemed to know that my pictures might help her, and so she helped me. There was a sort of equality about it. (From: Popular Photography, Feb. 1960).

Spinner in Vivian Cotton Mills, Cherryville, NC photo by Lewis Hine

Lewis Hine’s photographs of children working as slave labor in plants were instrumental in changing the child labor laws in the United States.


“Eugene Richards’s wrenching photographic study of the culture of cocaine in three inner-city neighborhoods gives faces to some of the victims of addiction. It provides a shocking and heartrending picture of the damage inflicted by the drug.”
–Charles Hagen, The New York Times  

“Eugene Richards’s seventh book, Cocaine True, Cocaine Blue, reaffirms his position as the premier chronicler of the dark side of American life he is the true heir to the mantle of the legendary W. Eugene Smith.”
–American Photo

Early in his career, Eugene Richards was a social activist who realized the camera’s power to influence change more than he could do alone.
 
Check out his website to see more compelling stories about our culture. 
 
 
Sebastião Salgado is another photographer using photos to make the public pay attention to the crisis. One of his books, Workers, uses compelling imagery that makes you wonder about the progress we have made with technology. Salgado is a UNICEF Goodwill Ambassador. 
 
He began work as an economist for the International Coffee Organization, often traveling to Africa on missions for the World Bank, when he started taking photographs seriously. He chose to abandon a career as an economist and switched to photography in 1973, working initially on news assignments before veering more towards documentary-type work. Salgado initially worked with the photo agency Sygma and the Paris-based Gamma, but in 1979, he joined the international cooperative of photographers, Magnum Photos. He left Magnum in 1994 and, with his wife Lélia Wanick Salgado, formed his agency, Amazonas Images, in Paris to represent his work. He is known for his social documentary photography of workers in less developed nations.
 
Cornell Capa, founding director of the International Center of Photography, introduced the idea of the “concerned photographer” in the mid-20th century and maintained that cameras could catalyze necessary change rather than just preserving an image of the situation that needed it. 
 
I believe most photojournalists are social advocates in their hearts. They care for those they photograph and share those stories with the world, hoping that change takes place.
 
Gear needed
 
One could do a great deal with a smartphone today. For example, you could take photos and then write text to go along with the pictures and post them to a blog on the internet and reach the world. But, of course, many will choose a better camera and a computer to do this even more effectively to tell stories.
 
Training Needed
 
It isn’t enough to have the equipment. You need to know how to use the gear and get the most out of your bag.
 
Besides technical knowledge of how to use your gear to capture and write your stories, you need more profound knowledge. You need to know the subject like an expert in that field so that you understand the story enough to see the essence of the story.
 
You need to understand the techniques of storytelling. The storytelling skills take a great deal of time to master from a mentor and coach.
 
It would help if you had a good understanding of your audience. You need to know how to pique a person’s interest and move the audience beyond the emotions of laughter and tears to action. 
 
“Revolution” by the Beetles
 
You say you want a revolution.
Well, you know
We all want to change the world
You tell me that it’s evolution
Well, you know
We all want to change the world
 
Do you want to change the world? Then it takes commitment and genuine passion. So your first step should be to find a workshop or, even better, a college where you can learn photography skills and take courses on the subjects you want to impact the most.
 
Don Rutledge had an undergraduate degree in psychology and started work on his master’s as well. Dorothea Lang studied art at Columbia University. Hine studied sociology at the University of Chicago, Columbia University, and New York University. He became a teacher in New York City at the Ethical Culture School, where he encouraged his students to use photography as an educational medium. 
 
Eugene Richards received a BA in English from Northeastern University, plus photographer Minor White supervised graduate studies at the Massachusetts Institute of Technology.
 

Salgado initially trained as an economist, earning a master’s degree in economics from the University of São Paulo in Brazil.

Summary

Picking up a camera, shooting away, and posting to social media will not get the results. You need strong images with a storyline to engage your audience. This blog post’s moral is to enroll in workshops or a college program and plan on your first attempts as part of the learning. To become a master, you must put in the time.

 
All the examples went on for college degrees which helped them prepare to change the world. Go and do likewise.

Is your photography website scalable from Desktop to Mobile?

60 Percent Of Internet Access Is Mostly Mobile

This is how the rest of the world is consuming the web, excluding the UK and the USA.
Here is a link to that story.

 
I pulled the report on my website.
 

These are some of the numbers of visitors to my website. The main discovery is that 56% use a laptop or a desktop to look at my website.

My website worked great for anyone using a desktop/laptop to connect with the website. However, 44% were visiting using mobile or a tablet. On the mobile, the website wasn’t amicable.

Now, viewing this blog on your mobile device, you have already seen the above photo. I realized I needed to make my main website mobile-friendly but also still a great experience if using a larger device.

Now my website looks like this on a mobile device.

Now in the corner, I have a typical pull-down menu on the web.

People often go to your website with their mobile device and then return later on a larger screen laptop or desktop. I still need to engage them because sometimes they are looking for someone like me, and I don’t want them to pass over me because my website isn’t mobile-friendly.

IMPORTANT FACT


In February 2015, Google announced that the mobile-friendly update would boost the rankings of mobile-friendly pages — legible and usable on mobile devices — in mobile search results worldwide. (Conversely, pages designed for only large screens may significantly decrease rankings in mobile search results.)

The rollout of this change was April 21st this year.

Are you mobile-friendly with your website?

I am using the website builders from Godaddy and PhotoShelter to build my websites that make them scalable from desktop to iPad to the mobile device. Of course, you can do this using a more traditional approach like Dreamweaver, but I have found these online designers are more straightforward.

Here is the link to see PhotoShelter website templates and designs. $10 a month for a mobile-friendly website.

Here is the link to see Godaddy website templates and designs. $6 a month for a mobile-friendly website.