On Friday, I ran into a frustrating issue that every digital creative dreads—my Mac ran out of space. As someone who regularly works with large files, I understand the importance of keeping my storage in check, but this time, something unusual happened.
The Mystery of Missing Space
I had been helping a friend recover files from an 8TB damaged hard drive. Using data recovery software, I recovered about 3.9TB of data. However, I could only find 2.5TB of recovered files when I checked my storage. At the time, I assumed the missing data was due to the drive’s damage and didn’t think much of it.
I didn’t realize that my Mac’s System Data had swallowed 1.5TB of space. I had always assumed that System Data was just a temporary cache used while working on files and that macOS would eventually distribute those files to their appropriate locations. However, this time, it didn’t work as expected, and my computer was stuck with a bloated System Data folder, leaving me almost no free space.
Troubleshooting the Issue
I tried everything—clearing cache files, rebooting in safe mode, manually deleting unnecessary files—but nothing freed up that mysterious 1.5TB of System Data. After a call with Apple Support, I realized the only real solution was to wipe my Mac and restore it from a Time Machine backup.
The Restore Process
Thankfully, I followed a 3-2-1 backup strategy and had a full Time Machine backup on my NAS (Network Attached Storage). The restoration process took about four hours because I was restoring over the network. While this worked, I quickly realized there was a much faster way to get back up and running.
The Faster Restore Solution
If I had copied my backup from the NAS to an external SSD and then restored it from that drive, the entire process could have been completed in under 30 minutes instead of four hours.
For reference:
Restoring from a NAS over a network: ~4 hours
Restoring from an external SSD via USB-C or Thunderbolt: ~25–30 minutes
Lessons Learned
Additionally, I learned that if I travel, as I did this week, I should carry an SSD with my latest Time Machine backup. This way, I could have completed the restore in just a few hours rather than waiting until I got home.
System Data Can Get Stuck: While macOS is supposed to clear out temporary files, sometimes it doesn’t. Be mindful when working with massive data recovery projects.
Keep a Fast Local Backup Option: NAS is great for redundancy, but an external SSD is the way to go for speed.
Plan for Large Restores: If you ever need to restore your Mac, copying the backup to an external SSD first can save hours.
This experience was a wake-up call about the importance of not just backing up, but backing up efficiently. Next time, I’ll be better prepared—and hopefully, this post helps someone else avoid the same hassle!
As an independent photographer, it’s easy to fall into the trap of thinking your work is just about delivering images. A client hires you; you take photos, and they pay you—it’s a transaction. But if you want to build a lasting career, focusing solely on transactions will limit your growth.
The magic happens when you go beyond the transaction and build client relationships. Relationships lead to repeat business, referrals, and a more fulfilling career. The formula is simple:
Values + Trust = Relationship
Without trust, you’re just another photographer sending an invoice. But when clients trust you and connect with your values, they see you as a partner—not just a vendor.
How Transactions Differ from Relationships
A Transaction-Only Mindset
A transaction looks like this:
A client emails you for a quote.
You respond with a price and contract.
They approve it, you show up, take photos, and send the gallery.
The client pays, says thanks, and moves on.
There’s nothing inherently wrong with this process, but there’s no connection beyond the business exchange. The next time they need a photographer, they might shop around for the cheapest option because there’s no relationship keeping them loyal to you.
A Relationship-Driven Approach
Now, contrast that with a photographer who focuses on values and trust:
Before sending a quote, you take time to understand the client’s needs, goals, and vision.
You align your work with their values—whether it’s their brand story, personal milestones, or the emotions they want to capture.
You communicate consistently, helping them feel confident and heard.
After the project, you follow up—not just with a delivery link, but with personal engagement.
In this approach, the client sees you as more than a service provider. They feel connected and are likelier to return to you, recommend you, and even advocate for your work.
How to Implement Values + Trust in Your Business
1. Define and Share Your Values
What do you stand for as a photographer? Is it authenticity? Storytelling? Capturing emotions? Helping nonprofits?
Your values should be reflected in:
Your website and portfolio
Your social media posts
The way you communicate with clients
Clients who see your values align with theirs are more likely to trust and invest in your work.
2. Be More Than a Price Tag
If the first thing a potential client asks is, “What are your rates?” don’t just send numbers. Instead, respond with:
“I’d love to understand what you’re looking for and how I can best serve you. Let’s hop on a quick call so I can hear more about your vision.”
This shifts the conversation from cost to connection and allows you to create a service that meets their needs.
3. Over-communicate (In a Good Way)
Trust is built through clear and consistent communication. Keep clients informed at every stage:
Confirm bookings and send reminders.
Share what they can expect before, during, and after the shoot.
Offer guidance on how to prepare.
Be responsive and proactive in answering questions.
Clients feel valued when they’re not left guessing.
4. Give More Than Just Photos
A transaction ends when files are delivered. A relationship continues because of thoughtful follow-up:
Send a handwritten thank-you note or a small gift.
Share behind-the-scenes moments on social media and tag them.
Offer a referral discount or loyalty incentive.
Check-in months later with a personal message.
Small touches make clients feel part of something bigger than a one-time shoot.
5. Think Long-Term, Not One-Time
Approach each client as someone you want to serve for years, not just for one project. Consider:
How can you provide value beyond this shoot?
What future needs might they have (family portraits, branding updates, milestone events)?
How can you stay top-of-mind without being salesy?
For example, a wedding photographer who follows up with anniversary reminders or a corporate photographer who sends insights on visual branding will naturally build deeper client loyalty.
The Long-Term Benefits of Relationships Over Transactions
When you invest in relationships rather than just jobs, you gain: ✅ Repeat business ✅ Word-of-mouth referrals ✅ Clients who trust your expertise (fewer pricing objections!) ✅ More fulfilling work with people who truly appreciate your talent
The best photography businesses aren’t built on one-time gigs. They thrive on connection, trust, and shared values.
So, as you approach your next client, ask yourself: Am I just delivering a service, or am I building a relationship?
Your business will thank you for choosing the latter.
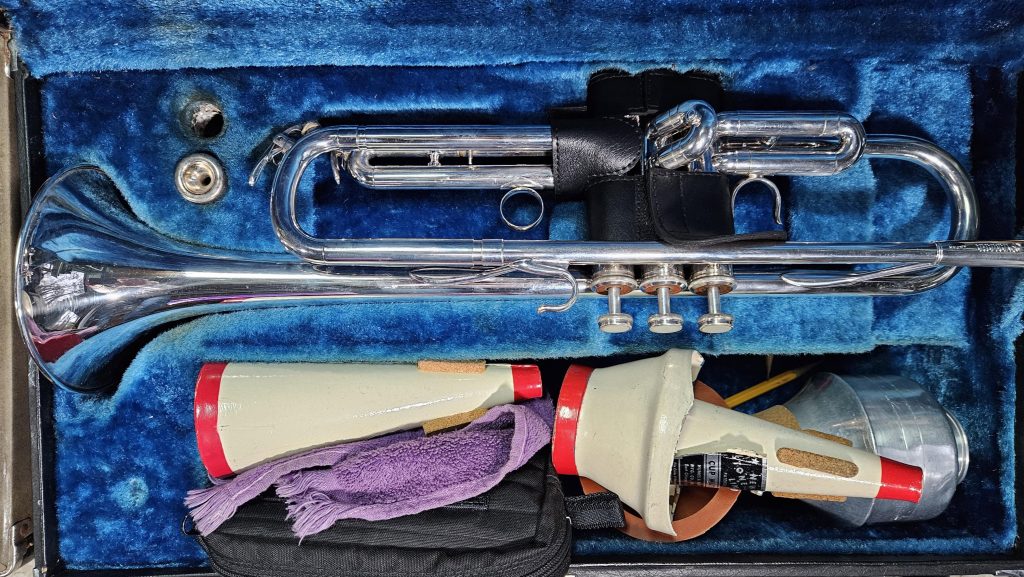
I recently inherited my uncle’s English Besson 10-10 trumpet, a beautifully crafted instrument with a rich, resonant tone. As I started playing it, I naturally compared it to my Yamaha YTR-734, my trusted trumpet for years. While both instruments are excellent, they feel different in my hands and require their nuances to play well. This journey of comparing the two led me to dive deeper into my music and even inspired me to play some of Herb Alpert’s iconic tunes.
Watching the Herb Alpert documentary shortly after was a revelation. It wasn’t just his music that resonated with me but his philosophy about the trumpet. Alpert famously said the trumpet is “just a piece of plumbing.” This perspective stuck with me, not only as a musician but as a visual storyteller and photographer. It got me thinking about how cameras, like trumpets, are tools that amplify our creativity rather than creating art by themselves. That realization is what inspired this blog post.
The Camera and the Trumpet: Tools of Expression
Herb Alpert’s description of the trumpet as “just a piece of plumbing” applies perfectly to cameras. At their core, trumpets are pipes that vibrate with the musician’s breath, and cameras are boxes that capture light. They’re tools that depend entirely on the skill, creativity, and emotion of the person using them.
For a photographer, the camera doesn’t make the art any more than a trumpet makes the music. Both require a human touch. Mastery of technique, while essential, is only the starting point. The real artistry lies in how we see, feel, and interpret the world, just as it does with a musician interpreting a song.
Mastery is in the Details
One thing I’ve learned while playing the Besson is that the trumpet isn’t just about pressing valves. Staying in tune requires constant adjustments. When I practice scales with my tuner app, I see how much I need to adjust my embouchure and even fine-tune the first and third valve slides to keep the sound in harmony. It’s a continual refinement process, not just playing the notes but controlling them.
Photography is no different. You can’t simply set your camera to “auto” and expect every shot to align perfectly with your vision. Like a trumpet player adjusting tuning slides, photographers constantly fine-tune their settings:
Exposure adjustments ensure the light matches the mood.
White balance tweaks make sure the colors feel authentic to the story.
Composition and framing require moving around, crouching, or standing high to find the perspective that brings the subject to life.
This active control, this dance between the photographer and the camera, elevates a photo from ordinary to extraordinary.
Seeing and Feeling Beyond Technique
In the documentary, Alpert shares how he learned a profound lesson from Sam Cooke. Cooke had written a song he thought was mediocre, but when Cooke performed it, he transformed it into something magical. That’s when Alpert realized that the musician’s interpretation makes the music come alive.
Photography follows the same principle. A technically perfect image—perfectly exposed, sharply focused, and composed by the rule of thirds—can still feel lifeless if the photographer isn’t emotionally connected to the scene. Great photographs don’t just show what something looks like; they reveal how the photographer thinks about what they’re seeing.
When I photograph a moment, whether a portrait, a landscape, or a street scene, I aim to infuse it with how I feel in that moment. That emotional connection is what gives an image its soul. It’s not just about composing and exposing—it’s about seeing and feeling.
Conclusion: Beyond the Tool
The tool is only as good as the person using it in music and photography. The trumpet and the camera are amplifiers for creativity, not the source of it. My uncle’s Besson trumpet taught me to respect the subtleties of the tool in my hand, but it’s my breath, my feeling, and my interpretation that makes the music.
As photographers, we must approach our cameras with the same mindset. Master the tool, but never forget that the magic happens when we see the world uniquely and connect deeply with our subject. As Herb Alpert said about his music, artistry doesn’t come from the tool but from you.
Knolan Benfield
A Personal Note: Honoring Uncle Knolan
This trumpet is particularly special to me because it belonged to my uncle, Knolan Benfield, who passed away this past summer. Uncle Knolan didn’t just teach me music; he also introduced me to photography. His passion for storytelling through images shaped much of who I am today as a photographer. I wrote about him earlier, reflecting on his remarkable life and the legacy he left behind. Receiving his trumpet feels like inheriting a piece of his creative spirit, and it reminds me of the profound impact he had on both my craft and my life.
As a photographer and small business owner, mastering marketing can feel overwhelming, especially with limited funds. However, you can grow your brand without breaking the bank by focusing on the right resources, strategies, and opportunities. Here are some key insights to get you started.
Best Books for Marketing as a Photographer
Books are a fantastic way to learn timeless principles and practical strategies. Here are some of the best-rated books for marketing that cater to photographers and small business owners:
“Building a StoryBrand” by Donald Miller
Learn how to clarify your message to connect deeply with clients by positioning your services as a solution to their problems.
“This Is Marketing” by Seth Godin
An excellent resource for understanding how to find your audience, tell your story, and build trust.
“Lead with a Story: A Guide to Crafting Business Narratives That Captivate, Convince, & Inspire” by Paul Smith
This book offers practical techniques for using storytelling to engage clients, build credibility, and drive business results. It is perfect for photographers looking to connect emotionally with their audience.
Budget-Friendly Marketing Strategies
When funds are tight, creativity and focus become your best allies. Here are some high-impact actions to prioritize:
1. Master Social Media
Use platforms like Instagram to showcase your work, engage with potential clients, and build your brand.
Create reels or stories highlighting behind-the-scenes shots, client testimonials, and quick tips.
2. Leverage Networking Opportunities
Join local networking groups or professional organizations like the Chamber of Commerce.
Connect with other small business owners in your area who may need photography services.
3. Develop Your Website
A professional, portfolio-driven website is essential. For affordable yet polished designs, use platforms like Squarespace or Wix.
Focus on SEO by adding relevant keywords, blog posts, and image metadata to attract organic traffic.
4. Embrace Direct Mail
While digital dominates, direct mail still works. Create targeted postcards showcasing your photography and send them to local businesses or individuals who may need your services.
Highlight any promotions or packages.
5. Collaborate with Nonprofits
Many nonprofits appreciate professional visuals but have tight budgets. To build goodwill and gain exposure, offer discounted or pro bono services.
Always include your name and contact information in the credits.
Maximizing Internet Marketing
The internet is your most powerful marketing tool. Here are the top strategies to prioritize:
Google My Business: Optimize your profile to appear in local searches.
Email Marketing: Build a list of clients and prospects. Tools like Mailchimp offer free plans to get started.
Content Creation: Start a blog or vlog to share stories, tips, or tutorials, establishing yourself as an authority in photography.
Online Ads: Consider running targeted ads on Facebook or Google. When ads are optimized for your audience, even a tiny budget can yield results.
Networking and Community Engagement
Joining organizations can open doors for collaboration, learning, and client acquisition:
Chamber of Commerce: Ideal for meeting local business owners needing your services.
Photography Groups: Both online and in-person groups can provide mentorship and referrals.
Nonprofit Events: Volunteering at events can showcase your skills while benefiting a good cause.
Special Interest Clubs: Join groups aligned with your niche, such as wedding expos, sports leagues, or art communities.
Tips & To-Do List for Marketing Success
Tips:
Focus on consistency over perfection; show up regularly on social media and your website.
Leverage storytelling in all your marketing materials to connect emotionally with your audience.
Always measure your efforts. Use analytics tools to see what’s working and adjust accordingly.
To-Do List:
Read one of the recommended marketing books.
Create or update your Google My Business profile.
Post consistently on your top-performing social media platform for one month.
Research local networking groups or nonprofit events to attend.
Design a direct mail postcard and identify 20 potential recipients.
Write one blog post or create one video showcasing a recent project.
Reach out to another local business to discuss collaboration opportunities.
By investing time and energy into these steps, you can market yourself effectively without needing a huge budget. Remember, marketing is about building relationships and showing your audience the unique value you bring as a photographer and storyteller.
Today’s snowstorm brought more than just a blanket of white to Roswell, Georgia; it brought a sense of wonder and excitement that kept me glued to my windows. Snow is a rare occurrence here, and its arrival turns even the most familiar scenes into magical landscapes. Watching the soft flakes fall, I couldn’t help but marvel at the transformation. It wasn’t long before I noticed some unexpected visitors—cardinals and deer—each adding their charm to the wintry scene.
Amid Metro Atlanta’s snowfall, a cardinal adds color to our serene backyard scene—birds in our backyard at the bird feeders during our first snow of 2025.
The vibrant red of the cardinals against the stark white snow was stunning. These backyard birds, often overlooked, became the stars of the day. Their presence reminded me of the beauty and life that surround us daily but are so easily missed in the rush of life. And then, as if on cue, a few deer wandered gracefully through the snow-covered yard, their quiet elegance enhancing the moment’s serenity.
A cardinal’s crimson feathers contrast beautifully against the snowy backdrop of today’s winter storm in Roswell. Birds in our backyard at the bird feeders during our first snow of 2025
The combination of snow, wildlife, and quiet reflection made me realize something profound. How often do I look out my windows with the same anticipation and curiosity I have today? How many moments like this might I have missed simply because I didn’t take the time to notice? Today’s snowfall wasn’t just a weather event but an invitation to slow down and truly see the world outside my door.
White Tailed Deer in our backyard during the snow.A magical winter moment in Roswell, Georgia—deer gracefully wandering through the snowy backdrop of my backyard. The soft snowfall and serene setting make this a rare and peaceful sight in the South.
Backyards are often seen as extensions of our homes—places for grilling, gardening, or relaxing. But they are also habitats, sanctuaries, and stages for countless moments of natural wonder. You don’t need to travel far to experience beauty and adventure; sometimes, you must pause and pay attention. Whether it’s the bright flash of a cardinal’s feathers, the quiet movement of deer, or the way snow transforms the landscape, there’s so much to explore and appreciate.
Today’s snow reminded me of the value of looking closer, stepping away from the screens and distractions, and embracing beauty outside my window. I encourage you to do the same. Whether it’s snowing or sunny, take a moment to explore your backyard. You might be surprised by what you discover. As I learned today, sometimes the most extraordinary adventures await outside our windows.
A winter storm brought a mix of snow and ice to Roswell, Georgia, today, transforming the landscape into a serene, frosty panorama. From above, the aerial view captured by my drone reveals the rare beauty of a Southern neighborhood blanketed in white during this January snowfall—snow in Roswell, Georgia.
Tips for Capturing Backyard Moments:
Keep Your Smartphone Handy: You don’t need fancy equipment to capture nature’s beauty. With the right light and perspective, your smartphone can take stunning photos.
Use Natural Light: Early morning or late afternoon often provides the best lighting for capturing vivid colors and soft shadows.
Look for Contrast: The bright red of a cardinal against snow or the earthy tones of a deer against a white backdrop can create striking photos.
Get Creative with Angles: Experiment with different perspectives—shoot low to the ground or find a higher vantage point to add variety to your shots.
Be Patient. Wildlife often requires some waiting, but the results are worth it. Observe and enjoy the moment, even if the perfect shot doesn’t come immediately.
Remember, the moments you capture today become the memories you cherish tomorrow. So, step outside or look out your window and start exploring—camera in hand!
Sports photography is often as much about what you discard as what you keep. I shot 6,589 images over a full day at the Chick-fil-A Peach Bowl. From the excitement of pregame activities like the FanZone and marching bands to the intensity of the coin toss, the national anthem, and the game itself, the challenge was capturing the action and refining those moments into a cohesive collection for my client. Here’s how I culled down thousands of images to a polished final selection.
Step 1: Initial Numbers
From the total 6,589 images, 1,451 were pregame shots. These included:
Fans enjoying the FanZone.
Marching bands are playing their hearts out.
Key ceremonial moments like the coin toss and the national anthem.
Fans were able to get their photo taken with the Chick-fil-A Peach Bowl trophy as well as the Cows in the Fanzone.
The rest of the day’s images captured the fast-paced action on the field, reactions from players and coaches, and the celebratory (or solemn) moments that make sports storytelling so compelling.
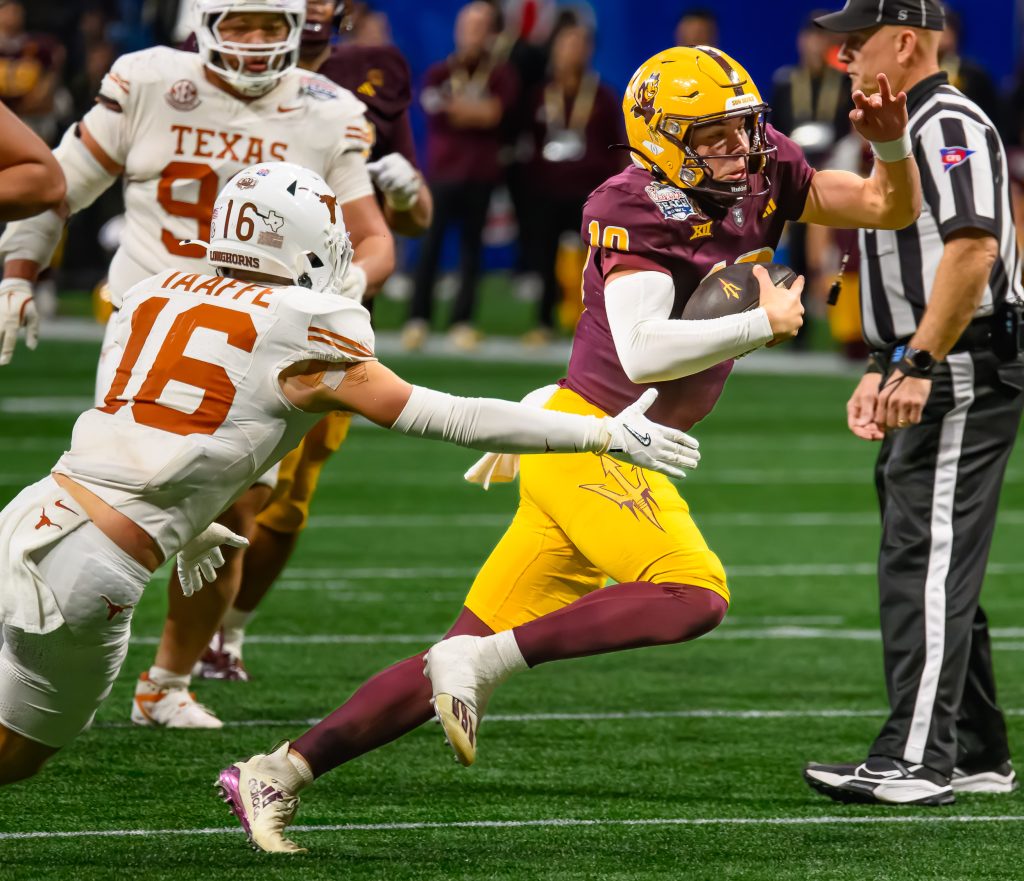
Arizona State Sun Devils quarterback Sam Leavitt (10) is pursued by Texas Longhorns linebacker Michael Taaffe (16 )during the CFP Quarterfinal at the Chick-fil-A Peach Bowl, Wednesday, Jan. 1, 2025, in Atlanta.
Step 2: The Culling Process
Culling thousands of images can seem daunting, but breaking it into stages makes it manageable:
Initial Cull: Removing Technical Flaws
With my Nikon Z9 set up for general and sports shooting, I’m proud to say I discarded fewer than five photos for not being sharp. The Z9’s impressive autofocus system was a game-changer, especially for fast-moving action.
A few accidental photos occurred when my camera, hanging from my Holdfast Camera Straps, was bumped. These straps—made of high-quality leather and designed to carry multiple cameras comfortably—are fantastic for quick transitions, but occasional shutter bumps do happen.
Subject Cull: Focusing on the Story
Next, I eliminated repetitive or irrelevant shots. For example, images of players mid-stride without context or fans’ backs turned to the camera didn’t add to the narrative.
Creative Cull: Capturing Peak Moments
This stage focused on the peak of the action: dramatic tackles, emotional reactions, and moments that defined the game’s story.
Final Cull: Delivering to the Client
From the original 6,589 images, I delivered 235 carefully selected photos to my client. Each was chosen to tell a specific part of the day’s story, ensuring a balanced mix of pregame, game action, and postgame celebrations.
Lessons from the Day
Efficiency with Gear: The Nikon Z9’s autofocus allowed me less time to remove technically flawed images. When paired with its robust customization options, it proved indispensable for switching between pregame coverage and high-speed sports shooting.
Holdfast Camera Straps: These straps are a lifesaver for multi-camera setups, offering durability and ease of use. While accidental shutter presses can happen, the benefits outweigh this minor inconvenience. Their stylish design and functionality made navigating a long day of shooting much more manageable.
Why the Cull Matters
Culling accounts for more than 50% of the post-production process. When done well, it saves a tremendous amount of time during editing because I only work on the keepers—the very best storytelling photos. Delivering 235 images from a pool of nearly 6,600 isn’t about discarding the “bad” pictures but refining the story. Every shot I delivered had a purpose, whether it captured the fans’ energy, the game’s drama, or the players’ emotions. That’s the art of storytelling through sports photography: finding and curating the moments that matter most.
By the end of the day, the client received a gallery that showcased the excitement of the Chick-fil-A Peach Bowl and highlighted the precision, care, and intentionality that goes into every step of the process—from shooting to selecting the best.
When shooting photos for clients, my goal isn’t just to fulfill the immediate assignment and create a resource that serves them far beyond the event or project. I want to provide my clients with a photo library they can draw from repeatedly, saving them time and adding value to their branding efforts.
That mindset has led me to refine my approach over the years. Here’s how I’ve evolved my workflow and what you can learn if you create or curate visual assets for an organization.
Culling Down to the Best Images
I used to give clients all the acceptable images in the past, but that often resulted in an overwhelming number of similar shots. For example, if I captured 30-50 photos of a keynote speaker, that sheer volume wasn’t helpful—it was overkill.
Now, I focus on curating the most potent images, selecting a handful that best captures the moment. Typically, 5-10 images per speaker is an ideal range. These might include:
A clear, engaging portrait of the speaker.
Dynamic shots show gestures or expressions that emphasize their points.
A contextual image with the audience to show interaction or scale.
Close-ups of details like hands, props, or visuals on stage.
This curated approach gives clients variety without overwhelming them, ensuring they get the most impactful and polished images.
Shooting and Cropping for Impact
Another change I’ve made is shooting and cropping tighter. In the past, I left extra room in my shots to allow flexibility for editing or layouts, but I realized this sometimes resulted in images that didn’t feel finished or compelling.
Now, I aim to compose shots nearly ready for final use, with minimal cropping needed. This means:
Focusing closely on expressions or actions that tell the story.
Eliminating distractions in the background or frame.
Considering verticals or horizontals based on likely usage (e.g., social media, presentations).
Tighter cropping immediately elevates the image’s visual appeal and saves clients extra editing time.
Tagging Key People for Better Usability
Metadata is another area where I add value. While I don’t tag every single person in group photos, I make sure to tag the key players, especially:
Speakers and performers on stage.
Members of an organization’s C-Suite or leadership team.
VIPs like sponsors, special guests, or honorees.
This makes it easy for my clients to search their archives later and find exactly who or what they need. Efficient tagging transforms a simple collection of photos into a strategic asset.
Creating a Visual Story Beyond the Stage
Yesterday, I photographed the Chick-fil-A Peach Bowl, including the Fanfest before the game. My goal wasn’t just to document the event and create a dynamic photo library to serve Chick-fil-A’s storytelling needs.
From fans enjoying pregame activities to action-packed moments on the field, I aimed to provide a mix of images that capture the event’s spirit and connect with its brand values.
Takeaways for Clients and Creators
Whether you’re commissioning photography or creating visuals for your organization, think beyond the immediate needs of your project. Ask yourself:
How can these images serve long-term marketing and branding goals?
Am I curating a selection that tells the story clearly and efficiently?
Are the images ready for immediate use, or will they need extensive edits?
Can I improve searchability with thoughtful metadata?
These small but intentional steps can make a big difference in how your visuals support your organization’s mission over time.
Here are a few highlights from yesterday’s Chick-fil-A Peach Bowl to show this approach in action:
By thinking beyond the assignment, we turn every shoot into an opportunity to craft stories that endure.
Want to build a photo library that works as hard as you do? Let’s talk about how I can help.
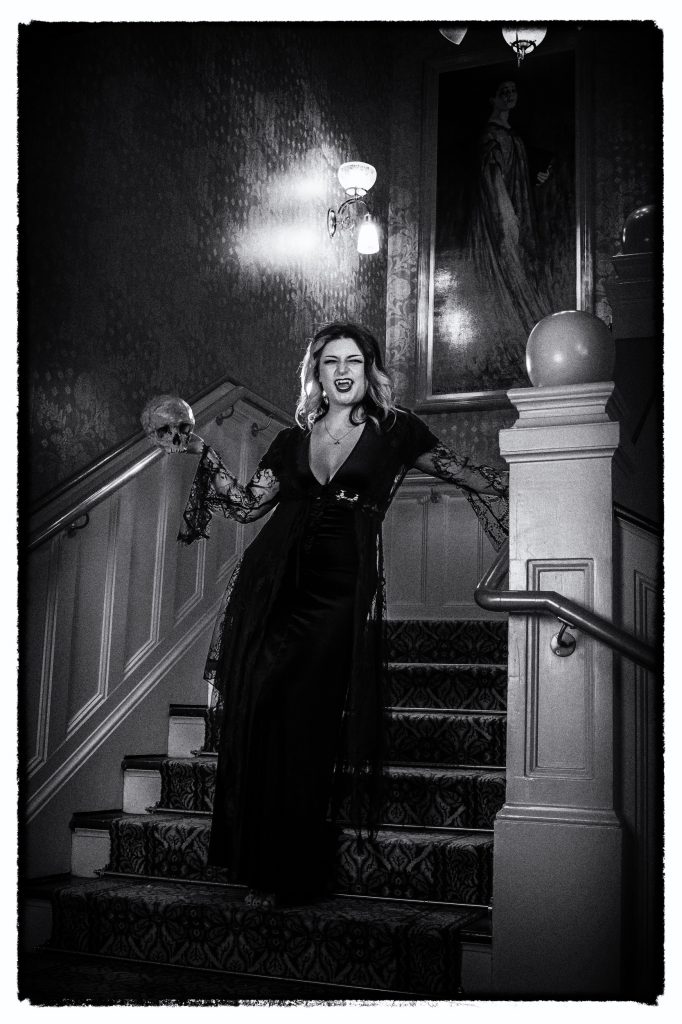
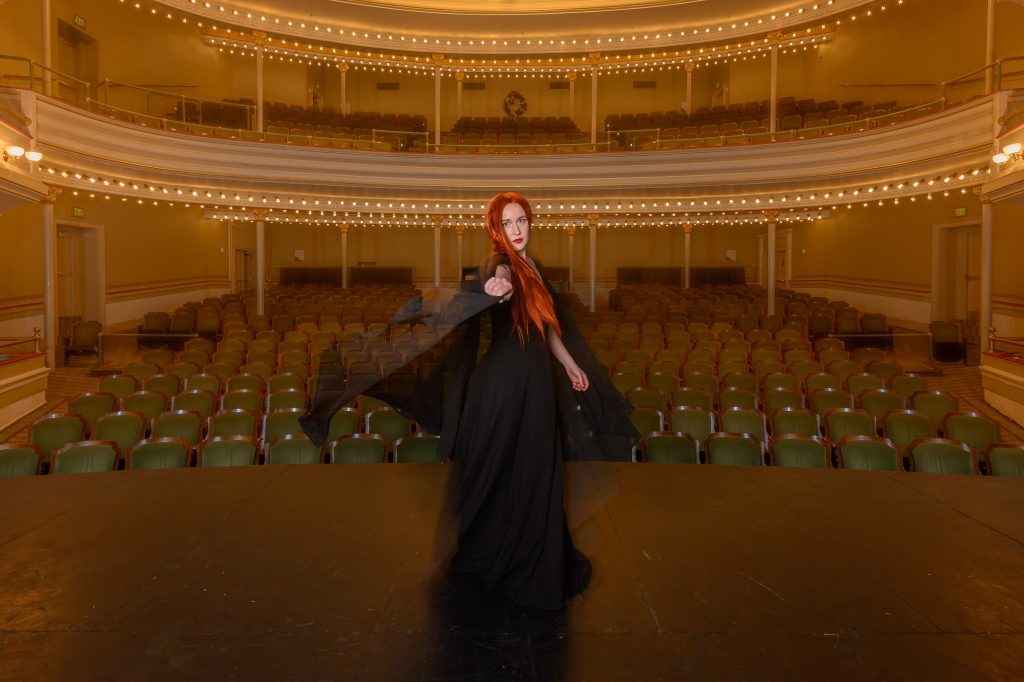
Collaborating with fellow creatives is essential for artists seeking to expand their horizons and produce compelling work. Recently, I had the pleasure of photographing my daughter, a professional actress, makeup coach, and dance instructor, alongside her friend, Nova Lux—known in the cosplay community as FlickerSpark—at the historic Springer Opera House in Columbus, Georgia.
The Springer Opera House
Nova Lux, who goes by @flickerspark_ on Instagram, is a prominent figure in the cosplay scene, captivating over 164,000 followers with her transformative portrayals and engaging content.
The Springer Opera House, established in 1871, has long been a beacon for the arts in Georgia. Its rich history and architectural grandeur provided a dramatic backdrop that enhanced the visual storytelling of our Gothic-themed photoshoot. The theater’s opulent interiors and storied past infused each image with depth and character, demonstrating how a thoughtfully chosen setting can elevate artistic expression.
This collaboration underscored the importance of artists coming together to share their unique skills and perspectives. My daughter’s expertise in performance and aesthetics, combined with Nova’s cosplay artistry, created a dynamic synergy that brought our creative vision to life. Working in an inspiring environment like the Springer Opera House further amplified our collective creativity, resulting in impactful images resonating with emotion and artistry.
In the realm of creative endeavors, partnerships like these enhance the quality of the work produced and contribute to personal and professional growth. Engaging with other creatives opens avenues for learning, inspiration, and innovation, reminding us that art is often a collaborative journey enriched by the talents and passions of others.
Chelle Leary at The Springer Opera House
Tips for Collaborating on Personal Projects:
For Photographers:
Scout the Location Choose a venue with a story or a unique ambiance, like a historic theater, to add depth and character to your images.
Plan a Visual Theme Collaborate with your creative team to decide on a cohesive style (e.g., Gothic, vintage, modern) that complements the talents of each contributor.
Communicate the Vision Ensure all collaborators understand the project’s concept, purpose, and potential audience to align their contributions.
Utilize Lighting Creatively Experiment with theatrical lighting setups to enhance the drama of the setting and bring your concept to life.
Capture Behind-the-Scenes Content Document the collaboration process to share the creative journey with clients and fans, showcasing the effort behind the results.
Sabrina at The Springer Opera House
For Actors and Makeup Artists:
Bring Character to Life Dive deeply into the theme to visually express emotions and movements that connect with the audience.
Match Makeup to Mood Use makeup techniques that enhance the atmosphere, whether dark and dramatic, for Gothic or natural, for a minimalist vibe.
Collaborate on Wardrobe Coordinate outfits with the photographer and other creatives to ensure a harmonious aesthetic.
Be Flexible with Poses and Angles Take feedback from the photographer to adjust positions or expressions for the best shot.
Share Your Expertise Suggest creative ideas from your craft (e.g., makeup artistry or acting techniques) to contribute uniquely to the project.
For All Creatives:
Focus on Storytelling Ensure every element (lighting, poses, costumes) contributes to a cohesive narrative.
Use the Work as a Portfolio Builder Showcase the final product as an example of what’s possible for clients looking to create something unique.
Tag and Credit Collaborators Highlight everyone involved on social media and portfolio sites to expand your reach and build mutual opportunities.
Reflect the Project’s Market Potential Frame the results to inspire clients to envision how they could apply similar creativity to their projects.
Follow Up with Insights After the project, discuss what worked well and areas for improvement to strengthen future collaborations.
These tips can help creatives see personal projects as a testing ground for their skills and a marketing opportunity for their professional offerings. Collaborations like this inspire clients to dream bigger and believe in the possibilities your team can bring to life.
The holiday season is the perfect time to take memorable photos of friends and family in front of beautiful Christmas trees, dazzling light displays, or festive events. However, many images fail to capture the people and the setting effectively, leaving faces in shadow or the background overexposed. To help you avoid these pitfalls and create stunning holiday photos, here’s a handy list of tips and common mistakes to avoid.
Tips for Amazing Holiday Photos
1. Get Close and Use a Wide-Angle Lens
Position yourself closer to your subject rather than zooming in. A wide-angle lens captures more of the setting (such as a Christmas tree or festive decor) and adds depth and connection.
Wide-angle perspectives are especially great for showing the scale of large decorations or vibrant street scenes.
I spent time with my Uncle Knolan Benfield, who taught me a great deal about photography, in Kona, Hawaii, where we taught lighting to the School of Photography for Youth With A Mission.
2. Use External Light Sources
Cell Phone Flash: Turn on your phone’s flash for better lighting on your subject.
Buddy System: Ask a friend to shine their phone flashlight toward your subject. Position the light at an angle to reduce harsh shadows.
Portable Light: Bring a small, portable light for even lighting if you feel extra prepared.
3. Find the Right Background Balance
Compose your shot to showcase the people and the background. For example, crouch slightly or shoot from a lower angle to include both faces and the Christmas tree topper.
4. Adjust for Low Light
Use your phone or camera’s Night Mode to capture more detail in dim settings.
Use a tripod or steady the camera against a solid surface for sharper images in low light.
5. Experiment with Angles
Don’t always center your subject; try placing them off-center to add creative flair.
Play with reflections, like ornaments or puddles, to create unique compositions.
Common Mistakes to Avoid
1. Skipping the Light
Faces in darkness are the most common issue. Don’t rely solely on ambient light, especially when the background is brightly lit. Use a flash or external light source to illuminate your subject.
2. Staying Too Far Away
If you’re too far back, your subjects might look like silhouettes against the bright background. Move closer to ensure they’re the stars of the photo.
3. Overexposing the Background
Many cameras struggle to balance light between the foreground and background. If your background looks blown out (too bright), reduce the exposure or try HDR mode to preserve details.
4. Ignoring Composition
Avoid placing your subjects in front of cluttered or distracting backgrounds. Instead, position them against precise, symmetrical, or aesthetically pleasing settings.
5. Relying Only on Automatic Settings
While automatic settings can be helpful, take a moment to explore manual options or use apps with adjustable focus and exposure for better control.
A Real-Life Example
Last night at the Fox Theatre in Atlanta, I noticed many people trying to capture the grandeur of the organist or the stunning stage behind them. Unfortunately, their faces were often in shadow, making it hard to appreciate the moment fully. They could have transformed their photos into beautifully lit memories by simply using their phone’s flashlight or asking someone to light them up with a flashlight.
Don’t let poor lighting or Composition keep you from capturing the magic this holiday season. With these tips and a little creativity, your photos can bring smiles for years. Happy holidays and happy shooting!
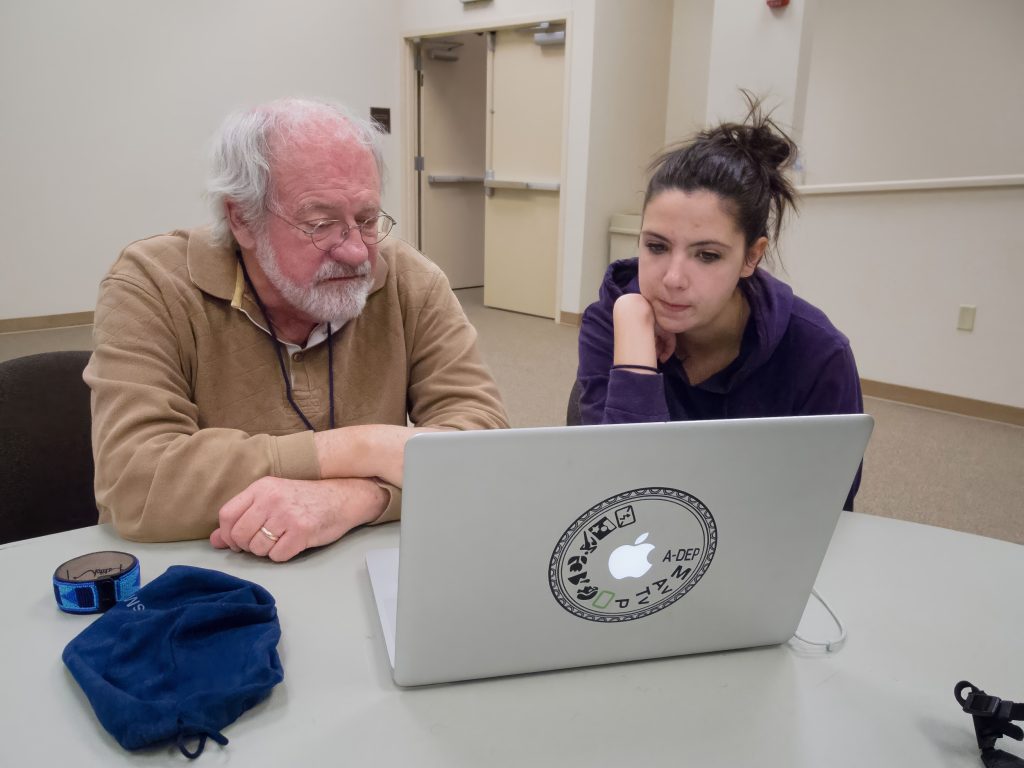
I recently had the pleasure of meeting my NPPA mentee for the first time. She’s just starting in the photography business, and as we talked, it became clear that she had some basic questions about the business side of things. It reminded me how critical it is to get those foundational elements right. Here are a few key tips I shared with her to set her on the right track:
1. Keep Every Receipt in Your First Year
When starting, it’s better to over-document than miss something important. Save every receipt. Whether it’s for a lens you bought, software you downloaded, or even parking fees for a shoot, keep those records. At the end of the year, you can determine what’s deductible, but you can’t claim what you didn’t document.
2. Use Software to Track Your Transactions
I recommended a tool like Quicken to help her track every financial transaction—credit card purchases, debit card payments, checks, and deposits. By staying on top of this from the beginning, you’ll clearly understand your cash flow and be prepared for tax season. It’s also a good way to identify trends in your spending and adjust accordingly.
3. Log Your Mileage
If you use your car for business, those miles can add up to significant tax savings. I’ve been using the TripLog app, which makes tracking mileage effortless. Just remember to categorize your trips as personal or business so you can provide accurate records if the IRS asks.
Additional Tips for Starting Out
4. Separate Personal and Business Finances
One of the first steps is to open a dedicated business bank account and credit card. Mixing personal and business expenses can lead to confusion and missed deductions. Keeping them separate makes your bookkeeping cleaner and your accountant happier.
5. Invest in Insurance
Make sure you’re insured—both for your gear and your liability. Accidents happen, and having coverage can save you from financial disaster. Many organizations, like the NPPA, offer insurance options tailored for photographers.
6. Build a System for Organizing Files
Whether it’s client contracts, invoices, or your portfolio, create a system for storing and organizing your files. Use cloud storage solutions like Dropbox or Google Drive, and back everything up regularly. I recommend a 3-2-1 photo backup system—three copies of your files stored on two different media types, with one copy offsite.
7. Start Networking Early
Relationships are the backbone of any business, especially in photography. Join local photography groups, attend workshops, and don’t hesitate to reach out to potential mentors. You never know where your next client or collaboration will come from.
8. Learn the Basics of Contracts
Always use a contract for your jobs. It doesn’t have to be complex, but it should outline the scope of work, payment terms, and what happens if things don’t go as planned. A good contract protects both you and your client.
Final Thoughts
There’s a lot to learn when you’re just starting, and it can feel overwhelming. But you’ll set yourself up for success if you focus on building good habits early—tracking receipts, logging mileage, separating finances, and networking.
As I shared with my mentee, the key is to stay organized and proactive. Mistakes will happen, but the more prepared you are, the fewer surprises you’ll face. Remember, asking questions and seeking guidance, as my mentee did, is a significant first step in growing as a photographer and a business owner.
In this photo, women learn to sew as part of Sifa’s mission to empower women to become successful small business owners who, in turn, invest in their communities. Sifa is faith-based, gospel-centered, and committed to equipping Dar es Salaam and East African women, churches, and businesses. Learn more at https://sifacollective.com/
In today’s crowded communication landscape, standing out requires more than just sharing facts and figures. Whether you’re a business or a nonprofit, storytelling is the secret weapon that connects you emotionally with your audience while inspiring action. But how much of your messaging should lean into storytelling, and how much should deliver the critical information your audience needs to make decisions? Let’s explore this balance and outline how to craft a strategy that resonates and drives results.
The Power of Storytelling in Messaging
Stories create emotional connections. They’re how humans have communicated values, lessons, and experiences since the dawn of time. For businesses and nonprofits, storytelling has the potential to:
Engage your audience: A compelling narrative captures attention and invites people to invest emotionally in your mission or product.
Make your message memorable: People may forget a statistic, but they’ll remember how a story made them feel.
Humanize your brand: Sharing real stories about the people you serve or the impact you’ve made makes your organization relatable.
The Role of Information in Messaging
While storytelling connects emotionally, information builds trust. Your audience needs to understand the “what,” “why,” and “how” of your offering:
What are you offering?
Why does it matter?
How can they take action?
The details matter here: statistics, features, benefits, and clear calls to action turn interest into support or sales.
Coffee baristas Solomon David Ndunguru and Greyson Tizo Majiyakunde are part of the Harakati Coffee program, launched in 2017 to equip individuals in Dar es Salaam and across Tanzania with essential skills for a career in coffee. Initially focused on monthly week-long training sessions covering barista skills, job readiness, customer service, and hospitality soft skills, Harakati has since evolved into a social enterprise. Today, it offers top-notch training while creating sustainable, value-added products. Learn more at harakaticoffee.com.
The Ideal Balance: 70% Storytelling, 30% Information
For most businesses and nonprofits, a 70/30 split is an effective way to structure messaging:
70% Storytelling: Lead with stories that evoke emotion and connect your audience to your mission or product. Showcase the human impact, the transformation, or the vision you’re working to achieve.
30% Information: Follow up with the essential facts and figures your audience needs to take action. Be concise and straightforward—this is where you provide the rational foundation that supports the emotional appeal.
Putting It into Practice
Here’s how this could look in action:
Opening Hook (Storytelling): Start with a relatable story or a powerful anecdote. For example, a nonprofit might share the journey of a single individual whose work changed their life. A business might highlight a customer’s success story.
Supporting Information: Once you’ve captured attention, transition into the specifics. What problem are you solving? How does your product or service work? What’s the evidence of your impact?
Call to Action: End with a clear, compelling call to action that ties back to the story. Ask your audience to donate, sign up, purchase, or engage.
Example: Nonprofit
Storytelling: “When Maria fled home with her two children, she left everything behind. Thanks to your support, Maria now has a safe place to live and a job that helps her provide for her family.”
Information: “Last year, we helped over 1,000 families like Maria’s rebuild their lives through our shelter and employment programs.”
Call to Action: “Your gift today can help more families like Maria’s find hope. Donate now and make a difference.”
Ursala Phoenix trains with her coach, Wlaa (pronounced Will-eh) Weeks, at the Wellbridge Athletic Club. Since joining, her stamina has soared, helping her thrive at the CDC and in everyday life!
Example: Business
Storytelling: “John struggled with back pain for years until he discovered our ergonomic office chair. Now, he works pain-free and with better focus.”
Information: “Our chairs are designed by experts and backed by a 10-year warranty, offering the perfect combination of comfort and durability.”
Call to Action: “Transform your workspace today. Shop now and experience the difference.”
Your Next Steps
Think about the stories you have at your disposal. Who have you helped? What transformation have you enabled? Lead with those narratives, then back them up with solid, concise information. By striking the right balance, you’ll capture your audience’s hearts and equip them with the knowledge they need to act.
Would you be ready to tell your story? Reach out to me by clicking on the “Let’s Talk” button above, and let’s craft messaging that connects and converts.
ChatGPT is an excellent tool for photographers, helping streamline tasks like writing captions, generating keywords, and refining storytelling. When used wisely, it can significantly speed up your workflow—but remember, AI isn’t perfect. You must provide it with clear, detailed information to get valuable results and, most importantly, double-check everything it generates. I often find that ChatGPT rephrases or changes my intended message, requiring me to tweak the output to align with my vision. Relying solely on AI to do all the work is a mistake; think of it as an assistant, not a replacement. You’re still the storyteller, and your voice matters most.
Think of it as an assistant, not a replacement.
Photographers know that capturing a stunning image is only half the job. Whether you’re showcasing your work online, submitting it to clients, or building your portfolio, strong captions and effective keywords are essential. Yet, many photographers need help finding the right words to match their visuals.
This is where tools like ChatGPT can be a game-changer. If you’re a photographer looking for feedback, caption help, and keyword ideas, let me show you how AI can help you take your storytelling to the next level.
“I recently learned you can ask it to write alt-text for your photos. So helpful!”
Jaime Rose
Why Captions and Keywords Matter
Captions Tell the Story: A great photo might grab attention, but the story behind the image keeps your audience engaged. Captions provide essential details that a photo alone can’t convey—the who, what, where, when, and why.
Keywords Boost Discoverability: For photographers who upload their work to websites, photo libraries, or social media, keywords are critical for being found. Effective keywords improve searchability, ensuring your photos reach the right audience.
Feedback Improves the Image: When sharing your work for feedback, it’s essential to understand how viewers interpret your image. ChatGPT can provide critique to help you improve your technical and storytelling skills.
How ChatGPT Can Help Photographers
With tools like ChatGPT, photographers can refine their storytelling and marketing by:
Writing Better Captions: ChatGPT can craft detailed, engaging captions if you provide some key details.
Generating Keywords: AI tools can analyze images and suggest relevant, searchable keywords.
Providing Constructive Feedback: By describing your image to ChatGPT, you can get feedback on composition, lighting, focus, and storytelling impact.
What to Provide ChatGPT for Better Captions and Keywords
You must give it the right information to get the most out of ChatGPT. Remember, the AI can only analyze what you tell it—it doesn’t know your photo’s context unless you provide it.
Here are some essential details to include when asking ChatGPT for help:
Who: If people are in your photo, provide their names or roles if possible (e.g., “Sarah, a college student, bowling with friends”).
Where: Share the location. Be specific if relevant, like “Atlanta Bowling Alley” or “Rocky Mountain National Park.”
What: Describe the activity or subject. For example, “a joyful woman mid-bowling throw with friends cheering in the background.”
When: Mention the time of day, season, or event (e.g., “an evening game during a Friday night outing”).
Why: Why did you take this photo? Was it a personal project, a client commission, or part of an event?
Mood or Story: What feelings or story does the image convey? Is it a celebration, a moment of peace, or something more emotional?
By including these elements, ChatGPT can write a caption that complements your photo’s story, making it far more compelling for viewers.
Example Workflow: Using ChatGPT for Feedback
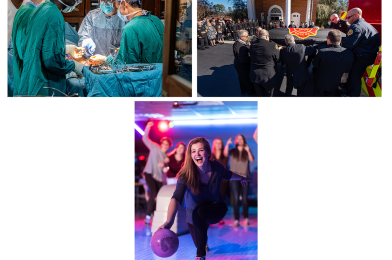
Let’s break it down with a quick example. You upload a photo of someone bowling and provide this:
Photo Description: A young woman bowling with a big smile. She’s wearing a navy shirt and colorful bowling shoes. Her friends are cheering in the background under bright lights. The photo was taken at a local bowling alley during a night out with friends.
What ChatGPT Generates:
Caption: “A joyful moment at the local bowling alley as Sarah celebrates her throw while friends cheer her on during a Friday night outing.”
Keywords: Bowling, celebration, friends night out, group activity, colorful lighting, bowling shoes, happy young woman, fun sports.
Feedback: “The subject’s smile and body language create an engaging focal point. Consider softening the bright background lights for a cleaner look and ensuring the bowling ball isn’t cropped to strengthen the composition.”
Tips for Getting the Best Results
Be Descriptive: The more details you provide, the better the caption and keywords.
Share Intentions: If you want ChatGPT to write for a specific audience (e.g., Instagram, clients, or stock libraries), include that in your prompt.
Request Feedback: Don’t hesitate to ask for constructive feedback on lighting, composition, or storytelling impact.
Iterate: Refine your prompts if the output isn’t quite right. Ask ChatGPT to tweak the tone or add more keywords.
Final Thoughts
Photography is about visual storytelling, but words can elevate your images and expand their reach. ChatGPT is a tool that can help photographers save time, improve captions, and get valuable feedback—but it works best when you provide context.
Next time you’re stuck trying to caption a photo or find the right keywords, turn to ChatGPT, by sharing the who, what, where, and why behind your image, you’ll unlock better captions, more assertive keywords, and more straightforward storytelling.
So, photographers, start using AI as part of your workflow—because great stories deserve to be told visually and verbally!
My Test & Results
Here are three photos I uploaded to ChatGPT using my simple prompt. You can see the response and how valuable this could be for someone wanting help and feedback.
Give me a caption for the photo, Keywords for the photo, and lastly, critique
ChatGPT said:
ChatGPT
Caption
Firefighters and loved ones honor a fallen hero during a solemn memorial service, showcasing respect, unity, and tradition as the casket is carried toward its final destination.
Keywords
Firefighter Funeral
Honor Guard
Memorial Service
Fallen Hero
Uniformed Ceremony
Fire Rescue Tribute
First Responders
Line of Duty Death
Brotherhood and Tradition
Casket Ceremony
Critique
Strengths:
Composition: The leading lines of the casket and crowd naturally guide the viewer’s eye toward the central focus — the pallbearers and the casket adorned with the “Rescue” emblem.
Emotion: The photo captures a deeply respectful and solemn moment, with participants’ body language and expressions conveying a sense of loss and honor.
Depth of Field: The focus on the pallbearers and casket keeps the scene crisp, while the slightly blurred background provides context without distraction.
Lighting: The natural light illuminates the subjects well, casting soft shadows and adding depth to the photo.
Areas for Improvement:
Cropping/Framing: The red fire truck to the far right dominates part of the image, pulling attention away from the central scene. Cropping slightly or repositioning could better emphasize the emotional focus.
Perspective: A slightly lower camera angle might enhance the sense of grandeur and respect, emphasizing the significance of the procession.
Highlights Control: Bright reflections off uniforms and faces, particularly where sunlight directly hits, could benefit from post-processing adjustments to balance exposure.
Overall Assessment: The photograph beautifully captures the honor and reverence of a firefighter’s memorial, evoking emotion and telling a powerful story of respect and sacrifice. Minor adjustments in composition and post-processing could elevate the image even further.
You said:
Give me a caption for the photo, Keywords for the photo, and lastly, critique
ChatGPT said:
ChatGPT
Caption
A dedicated surgical team collaborates in the operating room, demonstrating precision, focus, and teamwork during a life-saving procedure.
Keywords
Operating Room
Surgical Team
Medical Procedure
Surgeons at Work
Healthcare Professionals
Teamwork in Surgery
Life-Saving Operation
Focused Collaboration
Medical Mission
Surgical Instruments
Critique
Strengths:
Composition: The image has strong framing with the surgeons and patient as the focal points, naturally drawing the viewer’s eye to the surgical scene. The surgical instruments in the foreground add depth.
Lighting: The light source illuminates the surgical area effectively, creating contrast between the bright focus on the procedure and the darker surrounding areas.
Emotion and Storytelling: The teamwork and focus of the surgical team tell a compelling story about dedication and precision in healthcare. The facial expressions and body language of the surgeons convey professionalism and concentration.
Sharpness and Detail: The textures of scrubs, gloves, and instruments are crisp, and the image maintains clarity even in a high-detail environment.
Areas for Improvement:
Foreground Clutter: The table with instruments is prominent, slightly competing for attention with the main surgical team. A slight adjustment to the angle might reduce its dominance.
Lighting Balance: While the surgical area is well-lit, there are parts of the image where shadows could be softened to maintain overall clarity and consistency.
Distractions: The reflections on the right and background cabinet details slightly distract from the central action. A cleaner background or less reflection would strengthen the visual focus.
Overall Assessment: This is a powerful image that effectively captures the intensity and collaboration of a surgical team at work. With slight refinements in framing and lighting balance, the photograph can achieve even greater impact while retaining its storytelling strength.
You said:
Give me a caption for the photo, Keywords for the photo, and lastly, critique
ChatGPT said:
ChatGPT
Caption
A joyful moment at the bowling alley as a young woman celebrates her throw, surrounded by friends cheering in the background.
Keywords
Bowling Alley
Fun with Friends
Bowling Celebration
Sports and Recreation
Group Activity
Happy Young Woman
Bowling Ball and Lane
Celebratory Moment
Night Out Fun
Laughter and Excitement
Critique
Strengths:
Emotion: The subject’s joyful expression and body language convey excitement and fun, making the image relatable and dynamic.
Composition: The central subject is well-placed with a clear focus, while the blurred background adds context without competing for attention.
Lighting: The colorful and dynamic lighting creates a lively atmosphere, enhancing the vibrancy of the scene.
Depth of Field: The shallow depth of field effectively separates the main subject from the background, drawing the viewer’s eye to the action.
Areas for Improvement:
Highlights and Lighting Control: The bright light behind the group in the background creates slight distractions. A softer, more diffused light could reduce its overpowering effect.
Cropping: The lower part of the image, including the bowling ball and shoes, feels slightly cropped. Adjusting the framing to include the full hand and ball could strengthen the overall composition.
Background Distractions: While the blurred background is effective, the lighting and gestures of the friends might slightly detract from the subject. A slight repositioning or angle adjustment could improve focus on the bowler.
Overall Assessment: The image successfully captures an energetic, celebratory moment, showcasing the fun of bowling and shared experiences. The subject’s genuine expression draws viewers in, making it a strong and engaging visual. With minor refinements to lighting and framing, this photo could be even more impactful.