Success is most often in the nuance of the details

 
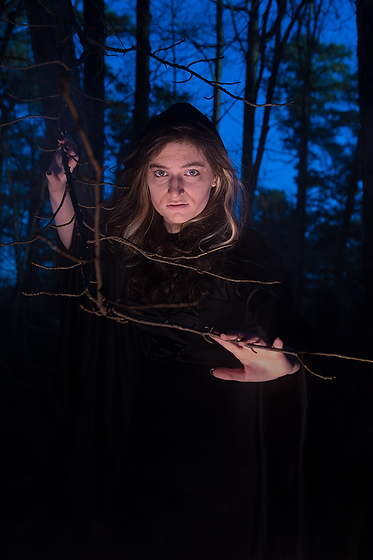
Nikon D4, Sigma 24-105mm f/4 DG OS HSM Art Lens, ISO 2500, ƒ/6.3, 1/18000

The success of a photo is often in the nuance of the details. For this photo shoot, it was essential that I not only have the subjects in their costumes and makeup but that I was lighting the subjects during the daylight to look like nighttime.

I wanted to create a mood that said “spooky.” So, to help take it to that level, we got a fog machine to help make this look above.

Now, look at the photo without the fog to see how important details are in a photo shoot.

Nikon D4, Sigma 24-105mm f/4 DG OS HSM Art Lens, ISO 2500, ƒ/7.1, 1/15000

For me, the difference isn’t minor but rather quite prominent in the impact of creating the “spooky” mood I was going for in the photo.

We often talk about moving the camera, so slighting to the left or right can make a difference.

If you are creating something like I did here versus capturing your subject, you can plan and think of all the tiny nuances you can control to make your photo successful.

Why I chose my Nikon D4 over my D750

While in Florida at a family reunion, we were suddenly in the backyard watching our kids enjoying Go Karting. I started shooting this with my Nikon D750 with a Sigma 24-105mm f/4 DG OS HSM Art Lens. I quickly realized the performance differed from what I was used to with my Nikon D4.

Nikon D4, Sigma 70-200mm f/2.8 EX DG APO OS HSM, ISO 1250, ƒ/2.8, 1/2000

I returned to the car and got my Nikon D4 and Sigma 70-200mm f/2.8 EX DG APO OS HSM. I immediately went to the “Shooting menu bank” and picked what I saved as my sports settings.

Next, I went to my “Custom menu settings” and picked the setting I saved as my sports settings.

Lastly, I put the shutter release on continuous high.

To see what each of these settings are on my Nikon D4, you can read this earlier blog post on my Sports Settings for the Nikon D4.

The Nikon D750 could have performed much better, but the point of this blog post is how important it is to concentrate on the action when you need to capture a moment, not your camera.

The one significant advantage of the Nikon D4 over the D750 was 11 fps. The focus tracking and 11 fps gave me more moments to choose my best shot. In addition, the buffer is more significant, so you can shoot more frames before the buffer fills.

The best thing to know is that if you need to get the shot, you must know that you have maximized your camera settings. You don’t do this when you need a photo; you do this when you take your camera and go and practice. For example, maybe you go by a busy road and practice shooting moving traffic so you can tweak your focus settings. After you get that set, then you move to another location to set.

Once you get all the settings just right, then save them. My Nikon D4 gives me four different memory banks to save my settings.

Nikon D4, Sigma 70-200mm f/2.8 EX DG APO OS HSM, ISO 1250, ƒ/2.8, 1/2000

The payoff for maximizing my camera’s settings is having a moment like this to remember my daughter and her cousin having fun.

You will pick the camera you are most comfortable with to get the photo you need, so take the time and calibrate the camera for the situations you will shoot.

Creating the promotional poster for a theater production

 
Nikon D4, Sigma 24-105mm f/4 DG OS HSM Art Lens, ISO 1250, ƒ/8, 1/50

Just the other week, I teased you with some test shots. These are some of the final images from our shoot.

Editorial Note: Due to the contract signed to put on the play we cannot promote the name of the play until February 23rd. Another theater company is putting it on right now and has rights to PR and Advertising in our market.

Now to give you a feel for the before and after, here is a shot my wife took on her phone.


Yes, we are shooting during daylight. So you cannot get this photo with your smartphone or, for that matter, any camera.

Photography like this is about lighting and controlling it.

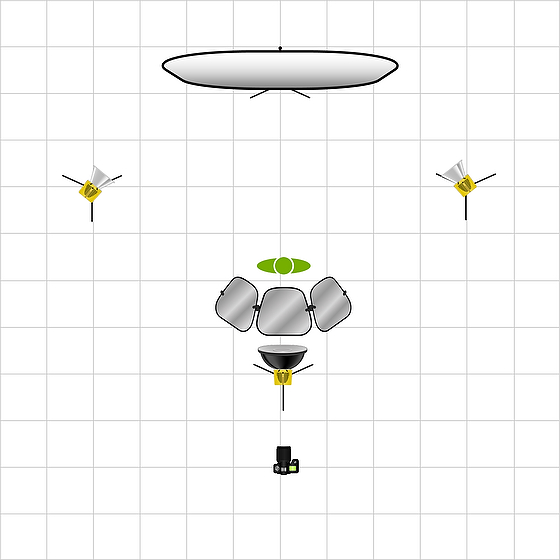
I set up 3 Alienbees B1600 flashes with CTO gels on the lights earlier. The camera is white balanced for tungsten. This white balance adjustment means wherever the flashes of orange light hit will be neutral and give good skin tones. However, all the available daylight will now be blue.

Nikon D4, Sigma 24-105mm f/4 DG OS HSM Art Lens, ISO 2500, ƒ/6.3, 1/8000

For the individual cast member shots, I just used one flash off to the side about 45º right of the camera and about 45º above the cast member’s head.

You should notice that the shutter speed is 1/8000. To make this work, I am using the PocketWizard TT5 on the flash with an AC-9 adapter plugging into the phone cord connection on the Alienbee B1600. This gear will let me shoot at any shutter speed. We call this high-speed sync.

I have the PocketWizard TT1 transmitter with the AC-3, which lets me remotely control the flashes’ power from the camera. For example, I turn up or down the power from -3 to +3 in 1/3 increments.

There are three groups, A, B, and C, and two Channels, 1 & 2. Each flash was on a different group setting, and all were simultaneously on the same channel to fire.

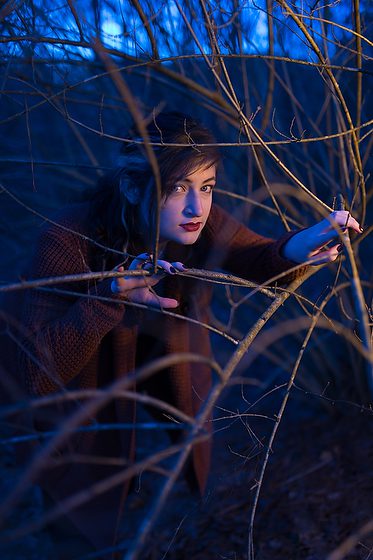
Nikon D4, Sigma 24-105mm f/4 DG OS HSM Art Lens, ISO 2500, ƒ/5.6, 1/5000
Nikon D4, Sigma 24-105mm f/4 DG OS HSM Art Lens, ISO 2500, ƒ/7.1, 1/5000
Nikon D4, Sigma 24-105mm f/4 DG OS HSM Art Lens, ISO 2500, ƒ/6.3, 1/8000

We moved the group around in our backyard, trying different locations and lighting.

Nikon D4, Sigma 24-105mm f/4 DG OS HSM Art Lens, ISO 1600, ƒ/5, 1/8000

The most significant changes from my test shots, which you can see in the earlier blog post, were 1) Costumes, 2) Makeup & 3) smoke machine.

As you can see, we had to work to get the right shot with the smoke. So often, it overpowers the photo.

Here is a view of the photo without the strobes going off.

Now you know how sometimes they film those nighttime scenes in so many movies.

Shooting wireless tethered for headshots

 
Nikon D4, Nikon 85mm ƒ/1.8G, ISO 50, ƒ/4.5, 1/160

Yesterday I did headshots for my daughter’s theater. I used a straightforward setup that I have shown here before.

As I was shooting, you can also see the setup with my wife helping with putting the names into the metadata fields.

Now I was shooting wireless tethered by using the CamRanger system.

You can look at my earlier blog post on the system to see how to use this system. I shot all these as RAW this time and didn’t shoot JPEGs.

There is a delay from the time shot is taken to the time it pops up on the computer.

Here is the workflow outlined for you:

You can see the screenshot of adding the subject’s names to the caption field using PhotoMechanic.

The client can download with a password I provided or order prints online.

Here you can see the screen when they add it to their cart:

Make your family photos more valuable for future generations

 
Nikon D750, Sigma 24-105mm f/4 DG OS HSM Art Lens, ISO 200, ƒ/6.3, 1/160–Neewer T850, Neewer 433MHz Wireless 16 Channel Radio system

This past weekend our family flew down to Jupiter, Florida, to surprise my wife’s oldest sister for her 80th birthday.

We met some of the family for the first time and others my wife hadn’t seen in 39 years.

After taking this photo, I didn’t wait till I got home to work on it on the computer. I wanted to be sure to make this photo the most valuable asset it can be to our family from now on.

Here is a video to help you know how to do this in Adobe Lightroom:

[youtube https://www.youtube.com/watch?v=45_zCZnqmqU]
After I had the photo in Adobe Lightroom editing software, I used Face Recognition technology to help identify every person in all the photos I took this weekend. Now the software, while not perfect, did a great job. However, I did have to force it to tag some of the faces.

The good thing is now inside the metadata of the image is everyone’s name in this photograph.

Metadata is “data that provides information about other data”. Two types of metadata exist: structural metadata and descriptive metadata. Structural metadata is data about the containers of data. Descriptive metadata uses individual instances of application data or the data content.

Metadata was traditionally in the card catalogs of libraries. As information has become increasingly digital, metadata is also used to describe digital data using metadata standards specific to a particular discipline. Describing the contents and context of data or data files increases their usefulness. For example, a web page may include metadata specifying what language the page is written in, what tools were used to create it, and where to find more information about the subject; this metadata can automatically improve the reader’s experience.

The main purpose of metadata is to facilitate in the discovery of relevant information, more often classified as resource discovery. Metadata also helps organize electronic resources, provide digital identification, and helps support archiving and preservation of the resource. Metadata assists in resource discovery by “allowing resources to be found by relevant criteria, identifying resources, bringing similar resources together, distinguishing dissimilar resources, and giving location information.”

This photo is from my dad’s side of the family. I know the man on the far left (even though this is sketchy) is my great grandfather, who owned the blacksmith. He is H. P. Sewell.

Who are the rest of the people? We don’t know.

Make your photos from your family more valuable. Take the time to identify who is in the picture.

Nikon D750, Sigma 24-105mm f/4 DG OS HSM Art Lens, ISO 100, ƒ/4, 1/200

This photo is of the three sisters from the weekend and my wife’s great niece. Just imagine a few generations later where they tell their children stories about who their ancestors were.

In the past, people put the names of people on the back of the print. Today embedding that information using metadata is even better.

In PhotoShop, go to the menu item File>File Info.

Under the primary table in the description box, put the people’s names in the photo. You can even put them from left to right and row 1, 2, and so on to help people in the future who will not know who anyone is in the photograph.

This screenshot is the Spotlight search on a Mac, but you can do a text search on a PC and get the same results. Because the names are embedded in a photo, you can now search and find those people. Here I put the last name in for Teubner. I didn’t even have to finish spelling it before the photos started listing for me in the search box.

I set up two umbrellas with hot-shoe flashes to make the group photos this past weekend. Once I had them set up, we had one of our family members take a picture of our family, which rarely happens. Like the cobbler, we have a few photos of us as a family.

Nikon D750, Sigma 24-105mm f/4 DG OS HSM Art Lens, ISO 180, ƒ/4, 1/250–fill flash.

While we set up and took some posed photos, we enjoyed those moments, capturing the family having fun.

Nikon D4, Sigma 70-200mm f/2.8 EX DG APO OS HSM, ISO 1250, ƒ/2.8, 1/2000
Nikon D750, Sigma 24-105mm f/4 DG OS HSM Art Lens, ISO 12800, ƒ/5.6, 1/60

I feel great about this past weekend. I not only got to meet family members I didn’t know we had, but I can now look back at the photos, tell my family who is who, and help them know what a wonderful family heritage we have.

Expression is often the key element to great photos

 
Nikon D4, Sigma 120-300mm ƒ/2.8 DG OS HSM | S, Sigma TC-2001 2x, ISO 12800, ƒ/5.6, 1/1250
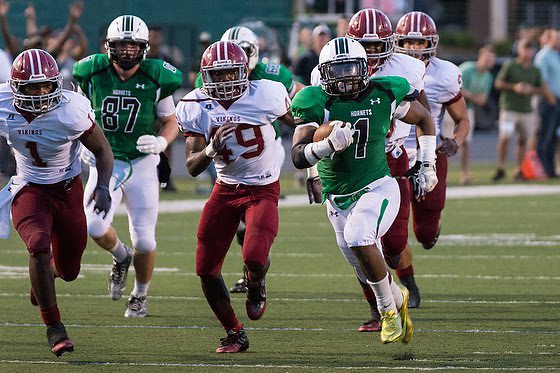
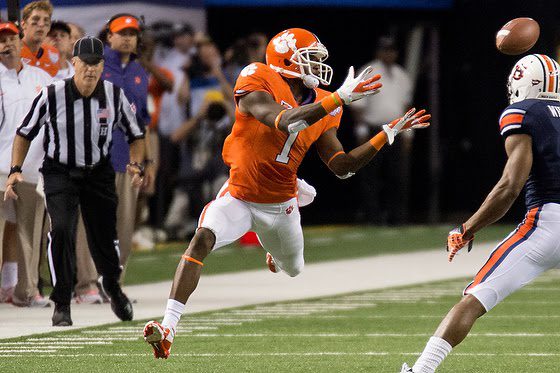
Key elements of the sports photo often include the ball and the competition. Here you can see the player’s expression and the valiant effort of the receiver to catch the ball. He is fully extended, running full speed, and keeping his eyes on the ball. Also, the defensive player can see the catch and his concentration on the ball.
 
Nikon D4, Sigma 120-300mm ƒ/2.8 DG OS HSM | S, Sigma TC-2001 2x, ISO 12800, ƒ/5.6, 1/2000
Here you can see the runner extending for all he can and also see a defensive player’s look of concern that he is still moving ahead.
Nikon D4, Sigma 120-300mm ƒ/2.8 DG OS HSM | S, Sigma TC-2001 2x, ISO 5000, ƒ/5.6, 1/2000

The key to almost all good to great photos of people is EXPRESSION. In sports, it can be the one thing that helps tell you more about the game.

The closer crop of the top photo shows how intense the defensive player is playing.

Nikon D4, Sigma 120-300mm ƒ/2.8 DG OS HSM | S, Sigma TC-2001 2x, ISO 12800, ƒ/5.6, 1/2000

In this photo, you can see the defensive players reacting to the quarterback starting to pass the ball on the left and right.

Sometimes sports photographers tend to crop tight to ensure that you need to see. However, sometimes pulling back and including more of the action helps to communicate more about the play. For example, you miss that two players’ faces are reacting, and you forget how close the sack of the quarterback is on the play by being a little looser on the space.

Sports enthusiasts like to see the game elements, whereas those who are just a photographer will tend to crop tight for impact.

As one who played sports, I can tell you that we like to see more play. Seeing the player’s feet during basketball is how players decide which way to drive, for example. It is why the crossover is such a big deal.

While this cropped version helps you see the player’s faces, the looser shot gives you the perspective of the play development.

Nikon D4, Sigma 120-300mm ƒ/2.8 DG OS HSM | S, Sigma TC-2001 2x, ISO 12800, ƒ/5.6, 1/400

When you have very little space to use a photo, it is better to go tight, but this is why so many sports enthusiasts love getting Sports Illustrated. Those photos that filled two pages didn’t need to be tight as the photo in the newspaper’s sports section. Instead, they had the space, which helped those who play sports better understand the play.

Nikon D4, Sigma 120-300mm ƒ/2.8 DG OS HSM | S, Sigma TC-2001 2x, ISO 4000, ƒ/5.6, 1/2000

In a high school game, the quarterback concentrates more on the execution, which shows in the face. However, they are moving so much quicker in the pros that it must be an instinct that kicks in for the quarterback to make the handoff.

Nikon D4, Sigma 120-300mm ƒ/2.8 DG OS HSM | S, Sigma TC-2001 2x, ISO 7200, ƒ/5.6, 1/2000

Expression is more than just in the face. Here you see the bodies all twisting to adjust to the play that just went by them. You also see the ball carrier looking more downfield and missing the defensive player to his left.

Nikon D4, Sigma 120-300mm ƒ/2.8 DG OS HSM | S, Sigma TC-2001 2x, ISO 6400, ƒ/5.6, 1/2000

This photo is a split second later when his forward advance is stopped.

Which photo here is the best picture? You will see photo editors studying an image for the nuances of the expression of the bodies in motion.

Nikon D4, Sigma 120-300mm ƒ/2.8 DG OS HSM | S, Sigma TC-2001 2x, ISO 6400, ƒ/5.6, 1/2000

 This first one looks like the defensive player is about to give up.

Nikon D4, Sigma 120-300mm ƒ/2.8 DG OS HSM | S, Sigma TC-2001 2x, ISO 6400, ƒ/5.6, 1/2000

 In the second photo, the defensive player looks like he is matching his stride, and you wonder if he will catch him.

Nikon D4, Sigma 120-300mm ƒ/2.8 DG OS HSM | S, Sigma TC-2001 2x, ISO 6400, ƒ/5.6, 1/2000

In the last photo, you can see the offensive player pulling away, and the defensive player is giving his previous diving effort to stop the touchdown.

Which photo is best? Well, which one not only tells the outcome of the play, but it often needs to be the moment that communicates the game. Unfortunately, most media outlets do not have unlimited space and must choose the moments they use to communicate.

Nikon D4, Sigma 120-300mm ƒ/2.8 DG OS HSM | S, Sigma TC-2001 2x, ISO 5000, ƒ/5.6, 1/2000

You have to pick the right moment to capture the intensity of the play.

Returning to the photo above, compare it to the previous split second.

Nikon D4, Sigma 120-300mm ƒ/2.8 DG OS HSM | S, Sigma TC-2001 2x, ISO 12800, ƒ/5.6, 1/400

See how the defensive player’s head is down, and you don’t see the eyes?

Now, look at the photo from the split second later of the same play.

Nikon D4, Sigma 120-300mm ƒ/2.8 DG OS HSM | S, Sigma TC-2001 2x, ISO 12800, ƒ/5.6, 1/400

The most significant difference between the two photos is being able to see the expression.

Order of importance:

  1. Expression
  2. Composition
  3. Exposure
The difference between the genuinely great photos and the rest is that all three are well executed. But the sign of the technician photographer is often those who concentrate more on the last two elements of composition and exposure and not enough on expression.
 
Nikon D3, AF-S NIKKOR 28-300mm f/3.5-5.6G ED VR, ISO 280, ƒ/7.1, 1/200
The expression can also be in the form of light, which helps to create a mood.
 
Nikon D3, AF-S NIKKOR 14-24mm f/2.8G ED, ISO 200, ƒ/7.1, 1/100
 

Creating Nighttime during the Daytime


Nikon D4, Sigma 35mm ƒ/1.4 DG Art, ISO 200, ƒ/1.4, 1/640–Alienbee B1600 with CTO +1 triggered with Pocketwizard TT1 and TT5 system.

If you need to create a nighttime scene, the easiest way is to turn your color temperature to 3200º Kelvin or even lower. Then the daylight will appear blue.

Next, warm up your subject with a Color Temperature Orange filter over your flash. Correcting for custom white balance will make their skin appear more neutral in color.

Nikon D4, Sigma 35mm ƒ/1.4 DG Art, ISO 200, ƒ/1.4, 1/400–Alienbee B1600 with CTO +1 triggered with Pocketwizard TT1 and TT5 system.

How bright it is outside is controlled by your shutter speed. The proper exposure for the subject is more about ISO and Aperture.

Nikon D4, Sigma 35mm ƒ/1.4 DG Art, ISO 200, ƒ/1.4, 1/1000–Alienbee B1600 with CTO +1 triggered with Pocketwizard TT1 and TT5 system.

As you can see, the 1/1000th of a second darkens the available light compared to the 1/400th exposure.

Just experiment and see what you like the best. By the way, you need to be able to shoot with High Shutter Speed Sync to make this work with a wide aperture of ƒ/1.4 like I did here.

To do this, I am shooting with the Pocketwizard Flex TT5 system and using the AC9 plugged into the Pocketwizard and then plugged into the telephone cord slot of my Alienbees B1600 flash. So I can shoot HSS and also control the flash from the camera. Very cool!

These are all test shots. I will later add a smoke machine and have the people in costume–so stay tuned for more photos outside during the daytime that look like nighttime.

Where are your photos displayed?

 
Nikon D4, Sigma 35mm ƒ/1.4 DG Art, ISO 12800, ƒ/4, 1/125

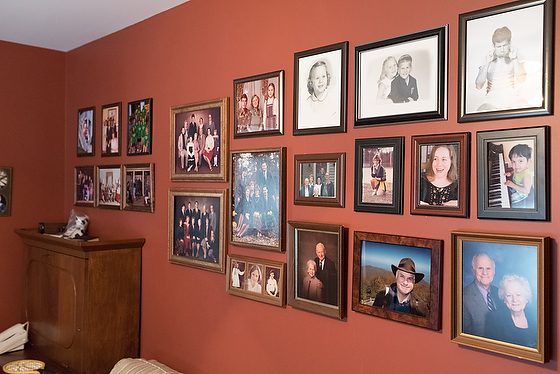
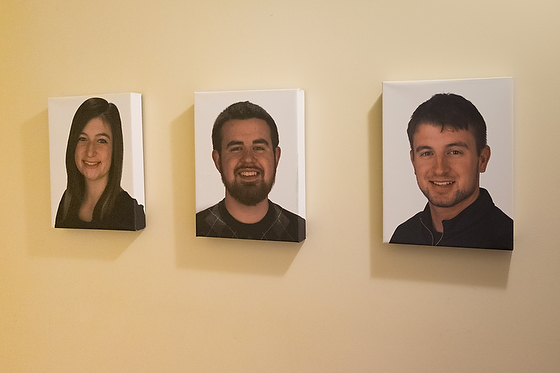
Celebrate your family and your photography by displaying it on your walls at home. My mother had prints made last year and put those up around her house.

When people visit, they will not go onto their smartphones to look at your family photos. Most people are not waiting for you to post your family photos so they can appreciate all your family.

Take the time to celebrate those you love by honoring them with a place in your home.

Fujifilm X-E2, FUJINON XF 18-55mm, ISO 6400, ƒ/2.8, 1/200–fill flash -1 EV

We have put up portraits of each of our children. We also have photos throughout the house of places we have visited.

If your photos are just on digital devices, get them printed and celebrate your photography on the walls of your home. Your friends and family that visit will then see what you value.

Same lens, but a different perspective can engage your audience.

 
Nikon D4, AF-S NIKKOR 14-24mm f/2.8G ED, ISO 5600, ƒ/5.6, 1/100

The same lens and a different perspective can change a photo’s impact on an audience.

Nikon D4, AF-S NIKKOR 14-24mm f/2.8G ED, ISO 5000, ƒ/5.6, 1/100

Here is a clue to your photos having more impact. Find a perspective that the audience rarely will see or has access to.

Nikon D750, Sigma 24-105mm f/4 DG OS HSM Art Lens, ISO 400, ƒ/4, 1/100

How often does the audience ever get to see the coin used in the coin toss to start the football game? It is even rare for them to see the Chick-fil-A Peach Bowl coin.

Nikon D750, Sigma 24-105mm f/4 DG OS HSM Art Lens, ISO 450, ƒ/4, 1/100

You are probably curious about what is on the other side once you see the coin.

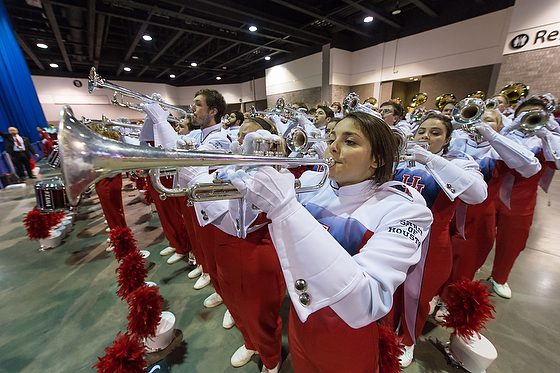
Nikon D4, Sigma 120-300mm ƒ/2.8 DG OS HSM S, Sigma TC-2001 2x, ISO 9000, ƒ/5.6, 1/2000

Using long glass like this 600mm ƒ/5.6 allows you to help isolate the flute player in the pregame show. Even if you were at the game, you most likely never will see this except if the television captures it and puts it on the jumbotron.

Nikon D4, Sigma 120-300mm ƒ/2.8 DG OS HSM S, ISO 12800, ƒ/5.6, 1/1000

I had to share this photo because that is a former player for East Carolina University Pirates, Jeff Blake, and the famous coach Lou Holtz who were both honored as inductees into the College Football Hall of Fame. My alma mater is ECU.

Now many of the other photos I shot from a kneeling position in the end zone. Here are some for you to see.

Nikon D4, Sigma 120-300mm ƒ/2.8 DG OS HSM S, Sigma TC-2001 2x, ISO 12800, ƒ/5.6, 1/1000
Nikon D4, Sigma 120-300mm ƒ/2.8 DG OS HSM S, ISO 12800, ƒ/5.6, 1/1600
Nikon D4, Sigma 120-300mm ƒ/2.8 DG OS HSM S, Sigma TC-2001 2x, ISO 12800, ƒ/5.6, 1/1250
Nikon D4, Sigma 120-300mm ƒ/2.8 DG OS HSM S, Sigma TC-2001 2x, ISO 12800, ƒ/5.6, 1/1000
Nikon D4, Sigma 120-300mm ƒ/2.8 DG OS HSM S, Sigma TC-2001 2x, ISO 12800, ƒ/5.6, 1/2000
Nikon D4, Sigma 120-300mm ƒ/2.8 DG OS HSM S, Sigma TC-2001 2x, ISO 12800, ƒ/5.6, 1/1250
Nikon D4, Sigma 120-300mm ƒ/2.8 DG OS HSM S, ISO 12800, ƒ/5.6, 1/2000

These are all from a perspective that, even in the stands, you cannot get to see. So even those in the stands would want to see these later, giving these photos more value.

Now, remember those first two photos in this post. What if I shot the same lens from a different perspective?

Nikon D4, Sigma 120-300mm ƒ/2.8 DG OS HSM S, Sigma TC-2001 2x, ISO 12800, ƒ/5.6, 1/1250
Nikon D4, Sigma 120-300mm ƒ/2.8 DG OS HSM S, Sigma TC-2001 2x, ISO 12800, ƒ/5.6, 1/2000
Nikon D4, Sigma 120-300mm ƒ/2.8 DG OS HSM S, Sigma TC-2001 2x, ISO 12800, ƒ/5.6, 1/1600
Nikon D4, Sigma 120-300mm ƒ/2.8 DG OS HSM S, Sigma TC-2001 2x, ISO 12800, ƒ/5.6, 1/1000

You might have seen this perspective if you were at the game and had binoculars. You might have seen this perspective if you were at home watching the game on TV. But many online galleries forget to show this perspective.

Tip

Look for a different perspective and then look for another one, and so on until you have a more well-rounded coverage of the event.

How to embed IPTC Metadata on NIKON D4 into each photo as you shoot

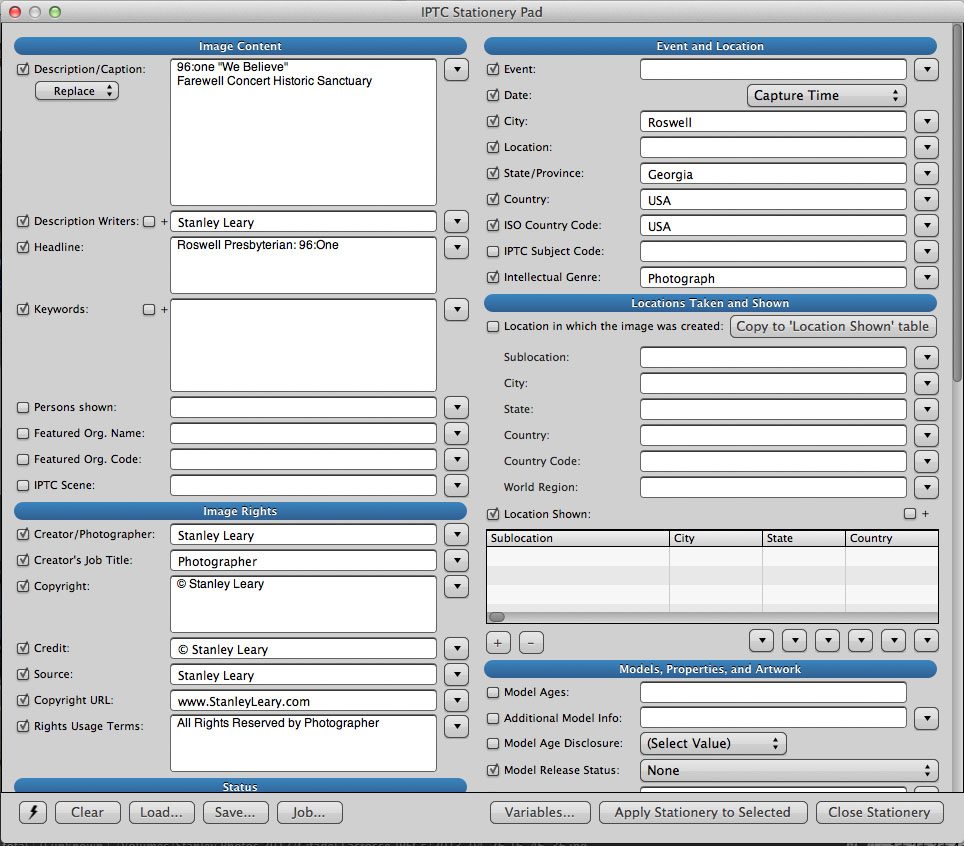
This screenshot is Nikon’s IPTC Preset Manager application that you put onto your computer, fill out, and then embed into every photo you shoot on your Nikon D4 Camera. Now compared to the PhotoMechanic fields, there are not as many, but you can embed these into each image as you shoot.

PhotoMecahnic’s IPTC fields

IPTC Preset Manager is used to enter IPTC presets for cameras that embed IPTC information. “IPTC” stands for “International Press Telecommunications Council.”

The cool thing I discovered with my Nikon D4 was that it has built-in support for 14 more critical IPTC fields.

The D4 and the IPTC Preset Manager software support the following IPTC fields:

Caption
Event ID
Headline
Object Name
City
State
Country
Category
Supporting Category
Byline
Byline Title
Write/Editor
Credit
Source

You can save 10 Presets of these.

Besides doing this in the camera, you can also type all these on your computer PC or Mac, then put them on your memory card and import them into the camera. That software is available from Nikon here http://tooldl.nikonimglib.com/iptc/index.html.en.

It requires an up-to-date version of Microsoft Silverlight to download. Here is that link http://www.microsoft.com/getsilverlight/Get-Started/Install/Default.aspx


For those assignments, when you need to be sure all the photos are identified with some basic information, this is a great way to do this as you shoot. So now all the images have your data in each picture as you shoot.

Copyright

I also recommend setting your copyright information on your camera as well. This way, every photo has your name specified as the copyright holder.

Importance of Practicing Before the Assignment

Nikon D4, Sigma 120-300mm ƒ/2.8 DG OS HSM | S, Sigma TC-2001 2x, ISO 400, ƒ/5.6, 1/2000
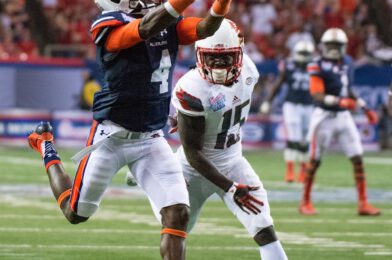
This past weekend I watched a lot of football getting ready for the Chick-fil-A Peach Bowl that I will be shooting on December 31st.
The game continues to evolve and each team has it’s own unique characteristics. This year I will be photographing Houston vs FSU.

Nikon D4, Sigma 120-300mm ƒ/2.8 DG OS HSM | S, Sigma TC-2001 2x, ISO 12800, ƒ/5.6, 1/1000
I started this season of football at the Georgia Dome shooting the Chick-fil-A Kickoff between Auburn and Louisville. 
While once you master a skill you don’t ever really lose it you do become rusty if you do not keep those skills up.
Nikon D4, Sigma 120-300mm ƒ/2.8 DG OS HSM | S, Sigma TC-2001 2x, ISO 12800, ƒ/5.6, 1/400
Two weeks before the Kickoff game I was out practicing at my daughter’s high school shooting the Roswell HS Hornets. By the way Roswell plays this Saturday in the the state championship game Class AAAAAA at the Georgia Dome facing defending champion Colquitt County.  
Nikon D4, Sigma 120-300mm ƒ/2.8 DG OS HSM | S, Sigma TC-2001 2x, ISO 4000, ƒ/5.6, 1/2000
The week after the Roswell game and week before the Kickoff I went to another local High School game at Blessed Trinity. Again I was just trying to put oil on those skills and getting myself lubricated for the game.

Nikon D4, Sigma 120-300mm ƒ/2.8 DG OS HSM | S, Sigma TC-2001 2x, ISO 1000, ƒ/5.6, 1/2000
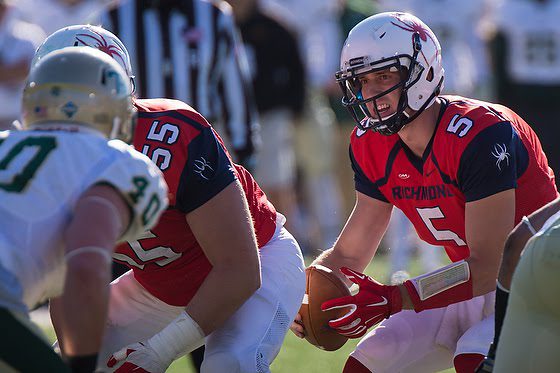
Then just a couple weeks ago the weekend before Thanksgiving I flew to Richmond, Virginia and covered the Richmond Spiders. My wife went there and they had their 125th meeting between William Mary and them that weekend. Many of the past coaches and players came to the game. My wife worked in the sports information office through college and also after graduating, so many of these were her friends.
Nikon D4, Sigma 120-300mm ƒ/2.8 DG OS HSM | S, Sigma TC-2001 2x, ISO 400, ƒ/5.6, 1/2000
I was able to practice not only getting peak action, but to incorporate signage into the photos. I must do this when shooting for corporations that sponsor these games. They want to see that their sponsorship was clear to those who saw the game.
Why Practice?
  • One reason practice our craft is so that we are not subject to living the day out of haste but rather out of calm. 
  • Camera Setting for Auto Focus – My camera has three categories for auto focus: 1) AF-C Priority Selection, 2) AF-Area Mode, & Focus Tracking with lock-on. You need to test out those settings and get the camera set for the best setup for the sport you are shooting.
  • Lens choices – Just renting or buying a lens without understanding how it factors into the coverage can be a huge mistake. 
  • Rules – You cannot just go wherever you want on a field during a game. These restrictions can impact your lens choices and impact where you shoot from during a game.
  • 1/10 of a second isn’t all that fast when it comes to stopping action. Even 1/500 isn’t as great as 1/2000 or 1/4000 for freezing that action. Freezing the action also improves your sharpness in photos.
  • Choosing the right aperture – while you may want to blur the background to get really smooth BOKEH if you are shooting for a corporate sponsor this may not be a good idea. Sometimes you need more depth-of-field to bring in the background. What apertures work best and how will you need to adjust to make this work?
Over time I realized that I needed to create settings profiles on my camera because it was taking a long time to set the camera up for sports. I ended up creating custom profile settings on the camera for: 1) Normal Shooting, 2) Video, 3) Studio Strobes & 4) Sports. 
Nikon D4, Sigma 120-300mm ƒ/2.8 DG OS HSM | S, Sigma TC-2001 2x, ISO 560, ƒ/5.6, 1/2000
No matter what type of photography you are doing take the time and practice before the assignment. If you do portraits then have someone model for you while you check out a location or check your lighting. 

Do your photos have Gibberish in them?

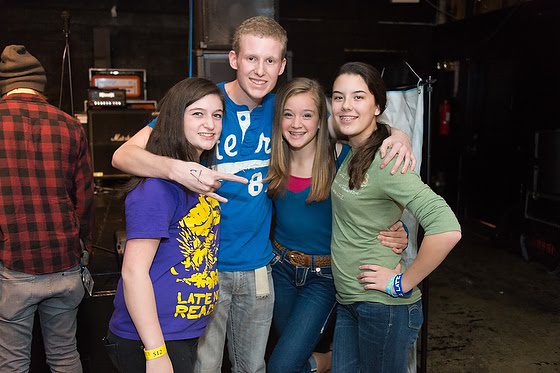
Nikon D4, AF-S NIKKOR 28-300mm f/3.5-5.6G ED VR, ISO 8000, ƒ/4, 1/100
How would this photo look as a sentence?

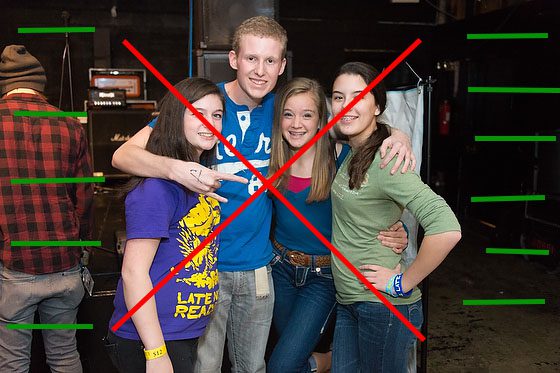
asdfaggsgggTEENAGE GIRLS, YOUNG MANadsfgalgalcln

What is all that gibberish around the subjects in the photo? 
All the area marked with green is that really needed? Did I compose the photo in such a way that it is a sentence rather than just a noun with gibberish around it?
Posed photos of people looking straight into the camera for the most part are not anything but a noun without a verb. Sure there are some exceptions, but many people use this same composition no matter what they are shooting. Just put the subject in the center and click.
Nikon D4, AF-S NIKKOR 28-300mm f/3.5-5.6G ED VR, ISO 12800, ƒ/5.6, 1/50
While here the people on the sides kind of balance the photo they really are more of a distraction than helping.
Nikon D4, Sigma 1.4X, Sigma 120-300 mm f/2.8 DG EX APO IF HSM, ISO 8000, ƒ/4.5, 1/2000
Here the edges cannot come in and crop much more without eliminating some of the sentence.
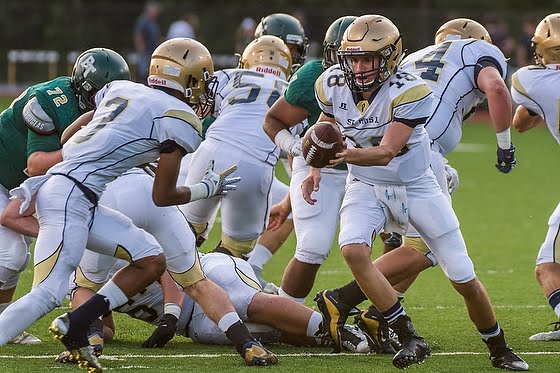
The ball is on the far right/top and the referees’ hand on the left  and not to crop out the foot and show how the athlete is flying I kept it in at the bottom. Notice the wide receiver also has room to go once he catches the ball. 
Nikon D4, AF-S NIKKOR 28-300mm f/3.5-5.6G ED VR, ISO 6400, ƒ/4, 1/60
While I could have moved the frame slightly to the right you can see here that I am using the bands name on banners to help compose the photo.
This helps to create leading lines as well and create depth into the photograph.
Here is a great rule to use for your compositions. 
First and foremost eliminate anything you can from the frame that doesn’t help compliment the subject. Think of it like a sentence. Do you have a noun, verb and maybe some descriptors?
Second decide on where to place the subject into the frame.
Third is there a way to create depth into the photograph. This helps pull the audience into the photo.
These three things are just what you can do by moving your camera around in the subject and framing in a way to create impact and help the photo move from a noun with gibberish to a sentence.
Another thing that can greatly improve all photos is the lighting. Sometimes adding light to a situation can help guide the audience as well if not better than using leading lines and S-curves.
But before taking on lighting, always first learn to just compose using the frame of the camera.
How do you know if you are doing a good job of framing your subjects. While looking at your photos on your computer or even on the LCD look around the edges. Do you see things other than the subject that you don’t need? A good way to think of this while shooting is identify your subject and then look at everything but the subject in the frame–can it be eliminated or do I keep it?
Nikon D3S, AF-S NIKKOR 28-300mm f/3.5-5.6G ED VR, ISO 8000, ƒ/5 1/100
Remember to make the edges of the photo count as much as the subject you are focused on to make your photos stronger.
Nikon D2XS, Sigma 18-50mm ƒ/2.8, ISO 100, ƒ/5, 1/125
Take your time to compose. Once you have your composition then let the moment happen just like you do after you sit down to watch a play on broadway. The frame is the whole stage. Wait for the actors to move and hit those peak moments.
Fujifilm X-E2, FUJINON XF 55-200mm, ISO 6400, ƒ/4, 1/420