How I covered Hurricane Sandy Disaster Relief

Reading Time: 6 minutes
This is just some of the damage to homes by Hurricane Sandy in Union Beach, New Jersey that I saw last week while covering a companies work there.
Ken is one of my mentors helping me with business practices.

My good friend and fellow photographer Ken Touchton, pointed out to me how we are called on day to day to cover the ordinary and make it look extraordinary.

Photographer’s on tour

The camera manufacturers and even our professional organizations often have photographers who create some cool photos doing their “dog and pony show” at seminars and workshops. Many of these photographers create these incredible images which help them to be professional speakers and lead workshops.

My hats off to these guys. They do an incredible job and create some outstanding images. The reality is that in my lifetime I will most likely have very few if any of these types of photo assignments.

Lately those photographers on tour are no longer using dogs and ponies. Now they have elephants, dancers and just find the most exotic people and places to capture. It does make sense that to have a great photograph start with great material.

It would be fun to have the budget to hire a few exotic animals, a few models and fly them all to an exotic location. I also think it would be cool to have all that equipment to light the subjects and make a truly memorable photo.

However, Ken and I are often called on by companies to tell the stories of normal every day folks doing what may visually appear to be mundane, but are truly extraordinary.

This is some of my coverage of Chick-fil-A cooking sandwiches that they do everyday and giving them to people in need.

Chick-fil-A has a food truck that they use to distribute sandwiches at large events. Here it is in Howell, NJ where they were distributing sandwiches to Hurricane Sandy victims, first responders and volunteers.

In total over four days, Chick-fil-A’s food truck produced and distributed 13,650 Chick-fil-A Sandwiches to folks in northern New Jersey and Staten Island.

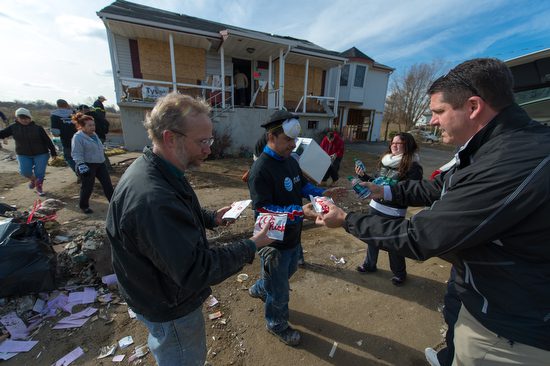
Eddy Taylor from Chick-fil-A gives sandwiches to workers helping to clean up Union Beach, New Jersey. (Nikon D4, 14-24mm, Nikon SB-900 shot on TTL on camera on slow sync. Camera settings ISO 100, ƒ/8 and 1/250)

My objective was to capture Chick-fil-A personnel giving away sandwiches to those affected by Hurricane Sandy. When in a disaster I don’t get to scout the area and then plan which models to bring in for the photo shoot. I don’t get to come in and light the scene to make this pop as I might do in an advertising photo shoot. This is finding moments as they happen to tell a story. These moments were in short one to two minute intervals of the volunteers giving out sandwiches. It doesn’t take long to give them a sandwich and give a quick word of encouragement.

The hardest part of the coverage was showing people receiving sandwiches that you could tell by the visuals alone they were part of a disaster.  I needed the food distribution and I needed to show this was about Hurricane Sandy. The photo above comes very close to communicating the two in the same photo.

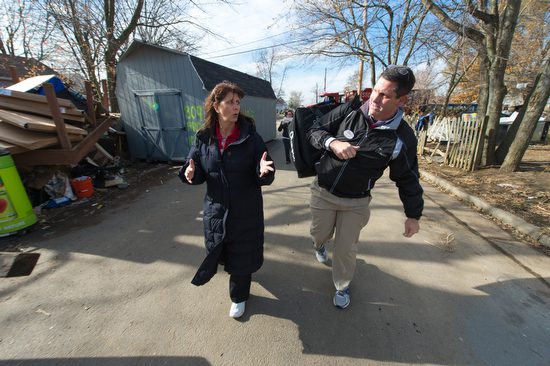
(Nikon D4, 14-24mm,  ISO 100, ƒ/8 and 1/160)

One of my favorite photos from my coverage isn’t necessarily the best storytelling shot, but I love the motion of the Chick-fil-A personnel walking down the street of Union Beach, NJ where there is major damage. You can see all the debris stacked behind them that had to be cleared off the roads for vehicles to get into this neighborhood.

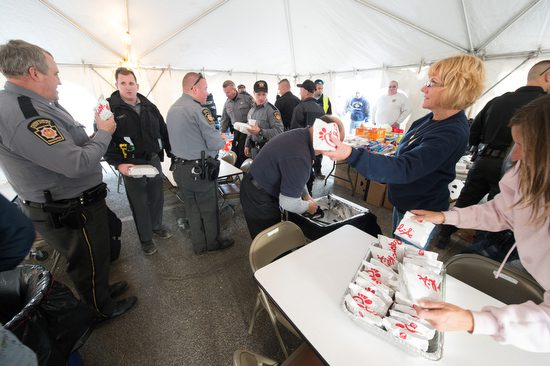
Chick-fil-A delivered free sandwiches to the Union Beach command post where they had setup a dining room in a tent to feed all the emergency responders. Here the State Troopers from all over the country are taking a lunch break. (Nikon D4, 14-24mm. Camera settings ISO 8000, ƒ/8 and 1/100 and AUTO White Balance)

Most of the time in disasters people are in the centers where people can come to get clothing, counseling or information about their homes. While the photo above of food being distributed to the first responders communicates the food distribution it lacks the context of Hurricane Sandy without some text.

While you can put a series of photos together on a page to help tie the communication package into a more cohesive package, the photojournalist is trying to do this with one photo, because often that is all the space they have.

Running and Gunning

In all of these photos I was what I call running and gunning. As a photojournalist I don’t stop people and ask them to do it again. You keep the camera up to your eye a lot of the time and quickly fire shots as they come up.

Now when I shoot for a company where we need certain things to look a certain way it is OK to make changes–it isn’t photojournalism it is advertising or corporate communications. However, my photojournalism background helped me stay focused during my coverage. Chick-fil-A was on a timetable of delivering these sandwiches to people in less than 20 minutes.

They know that food safety is important and also gives the customer the best experience.  If you look closely you will notice they are on the move in giving these sandwiches out to people.

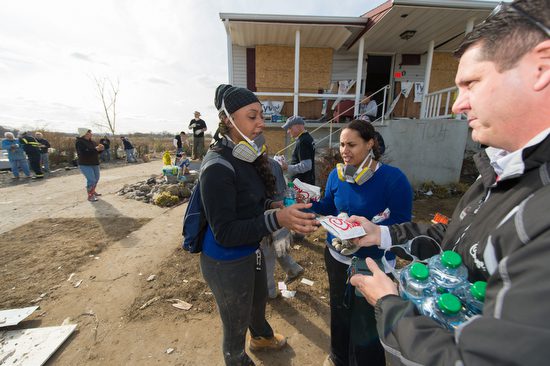
(Nikon D4, 14-24mm,  ISO 100, ƒ/5 and 1/500 No Flash)

I wanted to show how at times the photojournalist will use on camera flash in a fast moving situation to help hold some of the shadow details. In the photo above I was believing this would work OK since the skin tones of the people getting sandwiches was light. When the darker skinned volunteers came up and they were all backlit I didn’t want to risk not seeing their faces so I put on the Nikon SB 900 and using the high speed sync mode and slow-sync was able to pop a little fill flash ensure I was capturing people’s faces.

Another side note you can see how I altered the frame in the two photos. I don’t need multiple shots with just the people changing, I wanted to tell more about the location, but had no time to move around. I just composed to show how the devastation to the left of the house was there in the second photo.

By the way we were in this location for less than five minutes. We had hot sandwiches that needed to be delivered to more places.

(Nikon D4, 14-24mm,  ISO 100, ƒ/5 and 1/500 with Nikon SB-900 on camera fill flash on slow-sync)

The Results

You might wonder how all this went for Chick-fil-A. Here is one person’s response to the call center for Chick-fil-A:

Customer Comments: The customer stated that he and his family are
survivors of Hurricane Sandy. He stated that the Howell Restaurant
delivered Chicken Sandwiches to people in his area.  He informed me that
the Red Cross has not even made it into his area yet but Chick-fil-A has
come two times.  He and his family really appreciate the gesture.

It is due to all my training as a photojournalist that companies need me. They cannot turn the hurricane disaster coverage into an advertising location photo shoot. They need a photographer that can in any situation come away with photos that communicate.

Ken Touchton and I are going to the Atlanta Photojournalism Seminar next week the first weekend in December. It is their 40th anniversary and Ken was there 40 years ago.  I am also one of the organizers for the Southwestern Photojournalism Seminar that is March 1 – 3, 2012. Both of these are great places to learn from storytellers and ask them how they handle situations.

Many of the speakers are photojournalists who also shoot commercially. Maybe the reason some of them make great advertising photographers is they know what looks authentic and have a knack for helping creating those impactful moments.

I still advise anyone starting in this industry to try and get a job with a small town newspaper. The experience gained from shooting day to day assignments will help you know how to get the best possible photo in any situation. It will also help you appreciate the ability to plan and do preproduction to get those advertising shots where you are in control.

300 PPI and Output sizes

Reading Time: 3 minutes

The magazine publishing my pictures requires images to be at least 300 ppi. How do I change the resolution to 300 ppi?

Editorial Note: DPI (or dots per inch) is commonly accepted but not technically correct. It refers to the resolution of output devices such as laser or inkjet printers, plate setters, or film imagesetters. For accuracy, we will use the term PPI (or Pixels Per Inch).

I’m often asked this question based on misunderstandings, and I hope we can clarify them in this newsletter.

First of all, you rarely need to do anything. They request an image with a resolution of 300 PPI when printed to a specific size. A request for 300 PPI or any ppi without any associated width and height dimensions of the print is nonsense—the dimensions of the print need to be known.

The Formula:  

Width x 300 = a
Height x 300 = b

Multiply a times b to determine the minimum size of a megapixel camera needed to make the photo.

Here’s an example for an 8 x 10-inch print.  Width 8 x 300 ppi = 2400.  Height 10 x 300 ppi = 3000. 

 You need an image that is at least 2400 x 3000 pixels. Multiply 2400 x 3000 to get 7,200,000 pixels or 7.2 megapixels. Now we know the minimum size of the megapixel camera needed, but how do we change the resolution?  Photoshop to the rescue…. again.

The dialogue to change the PPI-number in Photoshop is Image->Image Size.  When you choose it, you get a dialogue box like the one in Example 1.  Be sure the Resample Image checkbox is left unchecked.  This prevents accidentally throwing away pixels that will diminish the quality of the image.

The Image Size box is a resolution calculator. Your camera manufacturer has a default setting, such as 72 ppi. In this example, the default setting is 240. Remember that you can change this to 300 ppi, which tells you the maximum size print you can make with this image. As long as the Resample Image checkbox is unchecked, you will not accidentally damage your image.

Take a look at Example 2.  You can see that the Resample Image box is unchecked, and the Resolution was changed to 300 ppi.  Note: The width and height remain the same for the Pixel Dimensions.  The actual image didn’t change.  You now have a calculator that tells you the print size you can make at any ppi.

There are many different output devices.  Let’s look at printers. Canon and HP desktop inkjets are usually optimized at 600 ppi, while Epson’s are 720 ppi. The Fuji Frontier, used in many minilabs, is generally optimized for 300 ppi; some laser jet printers offer a choice between 200 ppi and 400 ppi.  You should refer to the manufacturer’s specifications or ask the lab to determine the optimum resolution for a specific printer.

Please know the best PPI for your printer to determine the most significant print size you can make.  Just be sure the size image is not larger than your printer’s quality capabilities.  You want it large enough, but there is a slight chance it can be too big. An often forgotten aspect of quality prints is the distance from which the prints will generally be viewed. The viewing distance changes everything.  You do not need a 300 ppi image to produce a billboard.  You only need about 6000 total pixels for a Billboard. 

The chart below can help you make display prints for trade shows or places where you need large images.

Determining PPI by Viewing Distance

To determine an optimal PPI (resolution in Photoshop) for a photo, the calculation is as follows:

7000 / viewing distance in inches = PPI

This is for optimal results.  Using half that number will still provide good-quality results. If you do anything lower, you will begin to sacrifice image quality.

A Quick Chart for Determining PPI by Viewing Distance

Under 24 inches = 300 PPI

24″ to 36″ = 200 PPI

36″ to 60″ = 120 PPI

5′ to 10′ = 60 PPI

10′ to 20′ = 30 PPI

Billboard = 10 to 20 PPI

 I hope this information about PPI, image size, viewing distance, and printer capabilities has been helpful to you. Nothing is EVER simple.

Pricing depends: Full-time or Part-time

Reading Time: 4 minutes

I get this question all the time:
“How much should I charge for my photography?”

I teach classes that help students understand pricing each year. I’ve noticed that many students simply copy each other’s numbers instead of doing the math for themselves, which is a big mistake.

There are a few dangerous myths about pricing your work. Let’s break them down.


Myth #1: Everyone’s Situation Is the Same

People say they know everyone’s situation is different, but then they go online, see what others charge, and copy those prices.

Here’s a typical example:
A new wedding photographer sees that most people in the area charge $2,500 per wedding. They look at what’s included—prints, a photo book, maybe an online gallery—and figure, “I can do all that and still make money,” so they charge the same amount.

They often don’t realize that photographers may be losing money or barely breaking even. Learning whether your pricing works takes time (and frequently a few financial hits).

Hawaii Tropical Botanical Garden

Myth #2: Better Work = Higher Prices

Many photographers think that the better your work, the more you can charge. Unfortunately, it doesn’t work like that in the real world.

Let me explain it with a business concept: Return on Investment (ROI)

Here’s the formula:

ROI = (Net Profit / Investment Cost) × 100

Example:
If you spend $1,000 on marketing and make $1,500, your ROI is 50%.
You earned 50 cents for every dollar you spent.

In photography, better quality doesn’t always lead to better ROI. A real-world example: Sports teams often need basic photos for websites or media guides. A high school doesn’t need a Sports Illustrated-level photo—they need one that works. The incredible image might be admired, but it won’t necessarily generate more revenue for the school.

Even at the professional level, the value of a photo often depends more on who’s in it than how technically perfect it is. A great action shot of an MVP might sell. The same quality image of a benchwarmer? Probably not.

So yes, quality matters—but it’s not the only thing that matters.

Honu’apo Bay, The Big Island of Hawaii


Myth #3: New Photographers Should Charge Less

I hear this mostly from students:
“I’m still in school, so I should charge less.”

But here’s the truth: Clients look at your work first, not your resume. They’ll hire you if they like what they see and your price fits their budget.

The only time being a student matters is when the client is seeking a bargain and believes hiring a student is a way to save money.

Experience does help in some cases. But sometimes clients prefer a fresh perspective over someone with decades of experience. There’s room for both.

Clients really care about whether your photos look like what you say you can deliver.


So… What’s Your Situation?

Before you can price your work correctly, you need to know where you stand and what you want.

Here are the three main types of photographers:

1. Hobbyist

You love photography but don’t plan to make it a career.

  • Some hobbyists fund their equipment and share photos for fun or access.
  • Others try to offset the equipment cost by charging a little for their work.

2. Part-Time Photographer

You have a primary job but shoot gigs on the side.

  • Teachers who shoot weddings in the summer.
  • Professionals who do editorial work in their field, like scientists contributing to National Geographic.

3. Full-Time Photographer

You make your living entirely from photography.

If you want to move from hobbyist or part-time to full-time, you must price accordingly.

Balloon Ride in North Georgia

Want to Go Full-Time? Here’s How to Start

If you’re serious about going full-time, you need to do three things:

  1. Know Your Budget.
    Use tools like Excel’s “Household Budget” or free resources like Kiplinger’s online budget worksheet:
    http://www.kiplinger.com/tools/budget/
  2. Know Your Business Expenses.
    It all adds to gear, insurance, marketing, software, and subscriptions.
  3. Estimate Your Workload.
    How many shoots do you think you’ll realistically book in a year? Start small and base your estimates on real jobs you’ve already done, even on the side.

Once you have those three numbers—your budget, business costs, and potential jobs—you can figure out what you need to charge to go full-time.

Myth #4: “I’ll Figure It Out Later”

Many photographers tell themselves they’ll figure out pricing once they’re “ready.” But that kind of thinking can delay or even sabotage your success.

Here’s a little secret: Many full-time photographers don’t create mind-blowing work.
How do they remain in business?

They know their numbers.
They understand the costs of operating their business and the revenue they need to earn. They stick to their pricing and don’t discount out of fear. They don’t work for free or less than cost.

When you’ve done the math, you’ll have the confidence to say,
“This is my price.”
And you’ll know you’re running a sustainable business, not just chasing your passion.


Which kind of photographer are you today?
And more importantly, where do you want to go?

Pricing isn’t just about numbers. It’s about clarity, confidence, and building the kind of career—or hobby—you want.

Rock Band Promo Shot

Reading Time: 3 minutes

Nikon D4, 28-300mm (44mm), ISO 100, 1/160, ƒ/5

“Hey can you take some photos of our band for a promo shot?” Was the request from Late Night Reading’s drummer Drew Cottrell.

Earlier I took some pictures of the band when they were in town a couple of months ago.  Here is the blog post I did then.  What I wrote about back then was that even the D4 was struggling to take photos in a dark hole like the Swayze’s Venue in Marietta, GA.

I had in my van my monobloc lighting kit this time in addition to the Nikon Speedlights.

I went into the parking lot a little later after they had played and set up my lights.  I also asked them if they had something they were looking for.  They didn’t have any ideas, so I took the lead and told them about this concept you see above.

Here is the setup for the photo.

Now lets play

Once I have the lights set and get a few of the shots that I was initially looking for, I asked the band to have some fun.

I then took the same setup and moved it to where you could see the Tatoo Shop and the Pawn Store lights in the background.  Here are some of those shots.

For these I used a tripod and dragged the shutter to 1/13th of second.  Everything else stayed the same since there was almost no light on the band.

I would prefer to shoot the promo photos all the time over the concert photos.  Just compare these above to the same band performing below.

Live Performance 

Nikon D4, 14-24mm ƒ/2.8, ISO 6400, 1/60, ƒ/4

The strobes are on the PocketWizard Transceiver TT5 and They are on Manfrotto 5001B Nano Black Light Stands and the Manfrotto 175F Justin Spring Clamp with Flash Shoe to hold the flashes. I am triggering the TT5 using the PocketWizard Mini TT1 and PocketWizard AC3.

I turned the ISO up to about ISO 6,400 because I didn’t want the background to go totally dark.

Nikon D4, 14-24mm ƒ/2.8, ISO 6400, 1/60, ƒ/4
Nikon D4, 28-300mm ƒ/3.5-5.6, ISO 10,000, 1/60, ƒ/5.6

While these are pretty good for shooting in a dark hole, I still prefer having the control I had with the studio strobes and moving the band members around.

My friend Zach Arias launched his successful freelancing business just shooting bands like Late Night Reading’s promo shots. He started by just using a Vivitar 285 on a light stand. He was so successful he started a workshop teaching photographers his “One Light” technique.

You can see my whole take here from the evening.

Shooting Volleyball with the Nikon D4 using available light

Reading Time: 3 minutes

Nikon D4, 70-200 ƒ/2.8, ISO 12,800, 1/1250, ƒ/4

Today I shot a volleyball game with just available light. I was pleasantly surprised at how nice the quality of the images were for shooting under sodium vapor lights.

The Nikon D4 is something I wish I had back in the 1980s.  During those years I was shooting sports every week for the daily newspaper that I worked back then. Now I only occasionally shoot sports.

While the Nikon D4 has the high ISO capabilities the new technology of vibration reduction also contributes to the photos being sharper than I can remember.

Nikon D4, 70-200 ƒ/2.8, ISO 12,800, 1/800, ƒ/4

White Balance Setting

To insure I got the best skin tones possible, I used the ExpoDisc.  I put the ExpoDisc over the lens and pointed it towards the lights in the gym.  I also slowed the shutter speed to 1/100 to be sure I was not catching the lights during a cycle.  After doing this for both of the Nikon D4 cameras, I cranked the shutter speed preference in the Auto ISO settings to 1/2000.

Nikon D4 Exposure Settings

  • Aperture Priority
  • Auto ISO
    • Lowest ISO 100
    • Highest ISO 12,800
    • Shutter Preference 1/2000

I also was using the Vibration Reduction on the lens to help improve sharpness due to handholding the lens.

Nikon D4, 70-200 ƒ/2.8, ISO 12,800, 1/1250, ƒ/4

With the Nikon D4 you also have auto focus setting as well to choose from. 

Auto Focus Setting for the Nikon D4

  • Continuous Auto Focus
  • 21 Grouping
  • Kept it centered and locked it
  • Focus Tracking on Long
  • Shutter on C-H 10fps

Nikon D4, 120-300 ƒ/2.8, ISO 12,800, 1/1000, ƒ/5.6

My Favorite Angle

This is my favorite angle for shooting volleyball. However, the one thing I would have loved even more was to shoot from a slightly higher angle. The reason for this would help me keep the net from trying to refocus my lens.

Why I like this angle is I can show the team I am covering. You can see their face expressions and while I cannot see the other teams faces, I can see the competition in the body language.

The good thing in shooting up a the players is it gives them this Greek gods feel.  I like athlete looking like they are bigger than life.  Shooting up at them helps to create this feel.

There you have it, my settings and secret weapon, the Nikon D4.