Stanley’s DSLR Buying Guide

I get asked all the time which cameras I suggest people buy.  While I will mention specific models, those can change at anytime, so I will address features to look for when buying a DSLR camera.

I will first cover the different features and then my recommendations for the first time buyer of DSLR suggestions.

List of features:

Effective pixels
Sensor Size
Card Slot/Storage Media
Shooting speed
ISO Sensitivity
Movie
File format still/video
Lens Compatibility
Maximum Auto Focus Points
Built in flash
Live View Shooting
Microphone/Headphone for Video

There are many other features and even in these it maybe more than the nuts and bolts I think are most important.

Effective Pixels

How many pixels per inch does your camera capture?  First of all we need to know that for the most part today’s camera are capable of producing larger size prints than most people will ever need.  However with that said you could read this blog post if you need to figure out how big of a print the camera will produce.


There are basically two different physical sized sensors on the market.  Full framed sensors and cropped size of 1.5 or 1.6 sensors.

While the number of pixels may be the same the larger sensor has less noise as a rule and therefore cleaner images when taking photos at a higher ISO.

The larger full-framed sensor means you need lenses that support this.  The smaller sensor can usually use the full-framed size lenses, but not the other way around.  Lens made for the smaller sensors cannot be used on the larger sensor.

Besides noise differences the physical size of the camera gear weighs more and is heavier with the full-framed cameras.

Card Slot/Media Storage

DSLR cameras take 4 different types of cards. SD, CF, QXD & CFast.  The SD and CF are the two most dominant. The QXD is a new format used in the Nikon D4 and the CFast will be used in some newer Canon cameras.

SD cards are used in most point and shoot cameras and are the card readers are build into most laptop computers. If you choose any of the other cards then you will need a card reader most likely to transfer from the card to the computer.

You also want to read the small print details to see which cards in a format they support.

Shooting Speed

This refers to how many frames per second you can make.  Very important for things like sports photography.

ISO Sensitivity

In the days of film, the film you bought determined the ISO settings on the camera.  Today the digital camera works like having a shelf of film ready and you can change the sensitivity of the camera from frame to frame if you like. You can even let the camera figure all this out for you if you choose Auto ISO.

Basically the higher the second number the less light you need to make a picture. Today’s cameras are usually looking at ISO settings of 1600, 3200, 6400, 12,800, 25,600 or even higher.

The cameras have what they call their sweet range for the camera. It may look like this ISO 100 – 3200 and then state can be boosted to ISO 12,800 for example.  What this means is the ISO 3200 will make acceptable prints and the ISO numbers above this will give you an image, but it may be pixelated.

Movie

Many of the cameras will also take video.  In general there are two formats 720 and 1080.  This refers to the pixel height.  Both of these are really high resolution and if you are showing this video on a TV bigger than 46” you will notice a difference.

What type of movie file the camera makes is useful to know what you need on your computer to open it and or edit it.  Most all will play on any computer, but when it comes to editing this is when you need to really pay attention to the format.  You may have to purchase special editing software.

File formats

For stills the major thing to look for is if your camera shoots RAW in addition to JPEGs and possibly Tiff.  You have more control of a RAW image, but you need a RAW editing program like Adobe Lightroom or PhotoShop to edit these images.

Lens compatibility

If you buy a Nikon or Canon that doesn’t mean all the Nikon lenses will work on all the Nikon Cameras and the same for Canon.  Read the fine print. In general the entry-level cameras have less lens choices.

Higher end cameras have motors to operate lenses whereas some of the entry-level cameras save money and the lens has to have the motor.

Maximum focus points

Each camera manufacturer addresses this a little differently, but the general rule is the more expensive cameras in the manufacturers line have more focus points and more settings you can choose to help you focus a camera.  This is important to those who want the camera to help them focus more accurately and quickly.

Built in flash

While the top end cameras do not have built in flash there are many reasons you may like to have it. First of all they are not all that powerful, but they are always there if you need it. Second, both Nikon and Canon for example have very advanced flash systems where the built in flash can help trigger an off camera flash wirelessly. For the top end camera you will need to buy an additional piece of equipment to fire the off camera flash.

Live View Shooting

Since most cameras now have video capabilities, this helps photographers use the LCD screens on the back for more than just movie mode. You can often use this to view the subject rather than the viewfinder only.  Can help you when you want to shoot from the floor or above your head for example.

Microphone/headphone Jack

If you want to do some serious video with your DSLR then I suggest being sure it has a microphone jack. To control the recording level with just the camera you will need a headphone jack. If you have no headphone jack you can run your microphone through something like the Juicebox to monitor your recording levels.

What I suggest are key features

First thing that needs to be decided is this for professional use or as a hobby?  I will first address the hobbyist.

Hobbyist suggestions

In general the least expensive camera will do for general all purpose shooting. However, if your hobby is photographing your children playing sports or wildlife for example you need to spend just a little more to be satisfied.

For the most part the number one feature to consider is the ISO. The highest ISO cameras will let you take photos in low light situations and/or situations where you need to stop the action.  ISO 6400 or higher is necessary to really shoot indoor sports and in the woods of wildlife.

If you are shooting sports inside the high ISO will let you make photos without a flash and this is very important for many sports where flash isn’t allowed.  Spend the extra $500 to $1,000 to get the high ISO.

You may also need to invest in faster lenses. Think of the ƒ-number for a lens as a fraction.  The smaller the fraction the cheaper the lens and requires more light to take a photo. In general a ƒ/2.8, ƒ/2 or ƒ/1.4 lens is what you want to photograph sports and wildlife.  This combined with a high ISO will let you get the photo.

The kit lens and low end camera is not going to be the camera for the parent with a kid in sports.  It is a great camera for people who travel and take photos of friends.

You may want to consider the full-framed camera to reduce noise as well if you are needing the high ISO.

In the Nikon lineup I recommend the Nikon 3200 for the person just wanting to take snapshots. If you want to do video as well I think the Nikon 5200 is the model I would look at due to the swiveling LCD.

For the sports shooter I would start with the Nikon D600.  If you have the funds then look into the Nikon D4.  It is the perfect camera for the sports shooter.

Considering going pro

The minute you decide you want to go pro plan on backup for everything. You need an extra body a few lenses and a couple flashes to do jobs. You cannot be caught shooting a wedding for example and the camera dies on you.

Now that you know you need two cameras and multiple lenses, be sure everything is compatible. For example While you can have one full-framed camera and the other a smaller chip, the lenses should most likely all be good for the full-frame or you will be caught if the smaller chip camera dies having to shoot everything with the full-framed camera.

Some of the major differences between the very top of the line cameras and the next level is about how well they are built.

The high end cameras have better seals to help keep out moisture. They are not water proof, but water resistent. Very important for the photojournalist who is called to shoot in all types of conditions. Even if you have the high end camera still buy some rain gear for the camera and lenses.

If you are primarily shooting portraits in a studio, then even the entry level cameras will work fine.  Put more of your money into lights and other gear, than all of it in a camera which is overkill for your use.

In general it is harder to make the mistake of buying too good of a camera if you can afford it.  The problem is under estimating and then having to sell the camera and buy a better camera later.  Cameras loose a lot of value quickly as compared to lenses, flashes and other camera gear.  As soon as the next model comes out your camera will drop in value and for every new model introduced since your camera, it will continue to drop.

There are three cameras I recommend for the pro shooter today in the Nikon lineup. Nikon D4, D800 or D600.

The Nikon D800 is the studio camera and for those who remember photographers shooting medium format, unless you are ready to shell out $25,000 for those cameras this is a great medium format quality camera in a DSLR 35mm size.  The D800 is also one of the favorite video cameras of those shooting video with DSLRs today.

If you need a work horse camera to shoot everything from sports, portraits, weddings, to video the Nikon D4 is the camera to get. It does a great job with video. It has microphone and headphone jacks making it possible to monitor sound.

I believe the Nikon D600 is the lower end pro camera only due to the weather seals and body build, but as far as functions, this camera rocks.

300 PPI and Output sizes

“The magazine that is going to publish my pictures says the images must be at least 300 ppi.  How do I change the resolution to 300 ppi?”


Editorial Note: While DPI is commonly accepted, it is not technically correct. DPI (or dots per inch) refers to the resolution of output devices such as laser or ink jet printers and platesetters or film imagesetters. For the sake of accuracy we will use the term PPI (or Pixels Per Inch).


I’m asked this question a lot and it is based on a misunderstanding that I hope we can clear up in this newsletter.

First of all, it is rare that you need to do anything.  They are requesting an image with a resolution of 300 ppi when printed to a specific size.  A request for a 300 ppi or any ppi without any associated width and height dimensions of the print it is nonsense.  The dimensions of the print need to be know.

The Formula:  

Width x 300 = a
Height x 300 = b

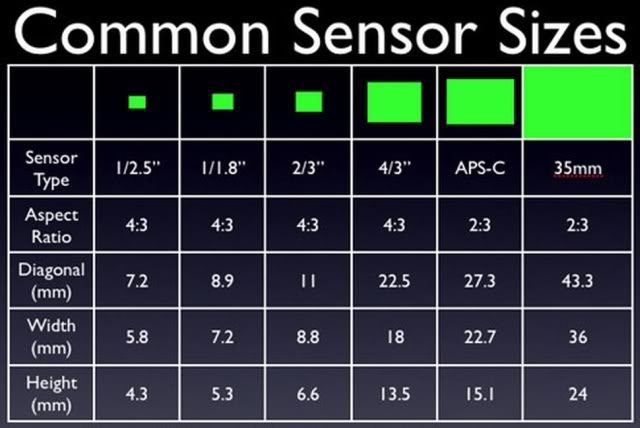
Multiply a times b to determine the minimum size mega pixel camera needed to make the photo.

Here’s an example for an 8 x 10 inch print.  Width 8 x 300 ppi = 2400.  Height 10 x 300 ppi = 3000. 

You need an image of at least 2400 x 3000 pixels.  Multiply 2400 x 3000 = 7,200,000 or 7.2 mega pixels.
Now we know the minimum size mega pixel camera that’s needed, but how do we change resolution?  Photoshop to the rescue…. again.
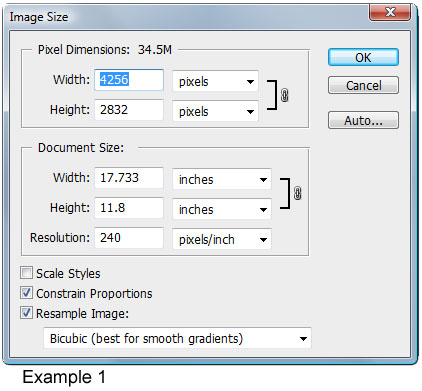
The dialogue to change the ppi-number in Photoshop is Image->Image Size.  When you choose it, you get a dialogue box like the one shown Example 1.  Be sure the Resample Image checkbox is left unchecked.  This prevents accidentally throwing away pixels that will diminish the quality of the image.

The Image Size box is a resolution calculator.  Your camera manufacturer has a default setting.  It may be set at 72 ppi or something else.  In this example the default setting is 240.  Remember you can change this to 300 ppi and it will then tell you the maximum size print you can make with this image.  As long as the Resample Image checkbox is unchecked you will not accidentally damage your image.
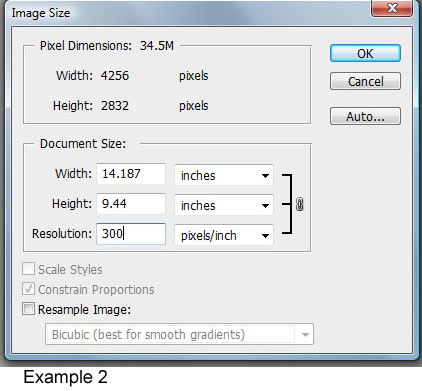
Take a look at Example 2.  Here you can see that the Resample Image box is unchecked and the Resolution was changed to 300 ppi.  Note: the Width and Height remain the same in Pixel Dimensions.  The actual image didn’t change.  You now have a calculator that tells you the size print you can make at any ppi.

There are many different output devices.  Let’s look at printers. Canon and HP desktop inkjets are usually optimized at 600 ppi, for Epson it is 720 ppi. The Fuji Frontier, used in many minilabs, is usually optimized for 300 ppi, some laser jet printers offer a choice between 200 ppi and 400 ppi.  You should refer to the manufacturer’s specifications or ask the lab to determine the optimum resolution for a specific printer.

You need to know the optimum ppi for your printer to determine the largest size print you can make.  Just be sure the size image is not larger than your printer’s quality capabilities.  You want it large enough, but there is a slight chance it can be too big.
An often forgotten aspect of quality prints is the distance from which the prints will normally be viewed.
The viewing distance changes everything.  You do not need a 300 ppi image to produce a billboard.  Actually you only need about 6000 total pixels for a Billboard. 
Use the chart below to help you in making display prints for trade shows or other places you need extremely large images.

Determining PPI by Viewing Distance

To determine an optimal PPI (resolution in Photoshop) for a photo the calculation is as follows:

7000 / viewing distance in inches = PPI

This is for optimal results.  Using half that number will still provide good quality results. Any lower and you will begin to sacrifice image quality.

A Quick Chart for Determining PPI by Viewing Distance

Under 24 inches = 300 PPI

24″ to 36″ = 200 PPI

36″ to 60″ = 120 PPI

5′ to 10′ = 60 PPI

10′ to 20′ = 30 PPI

Billboard = 10 to 20 PPI

I hope this bit of information about ppi, image size, viewing distance and printer capabilities has been of use to you.
Nothing is EVER simple, right?