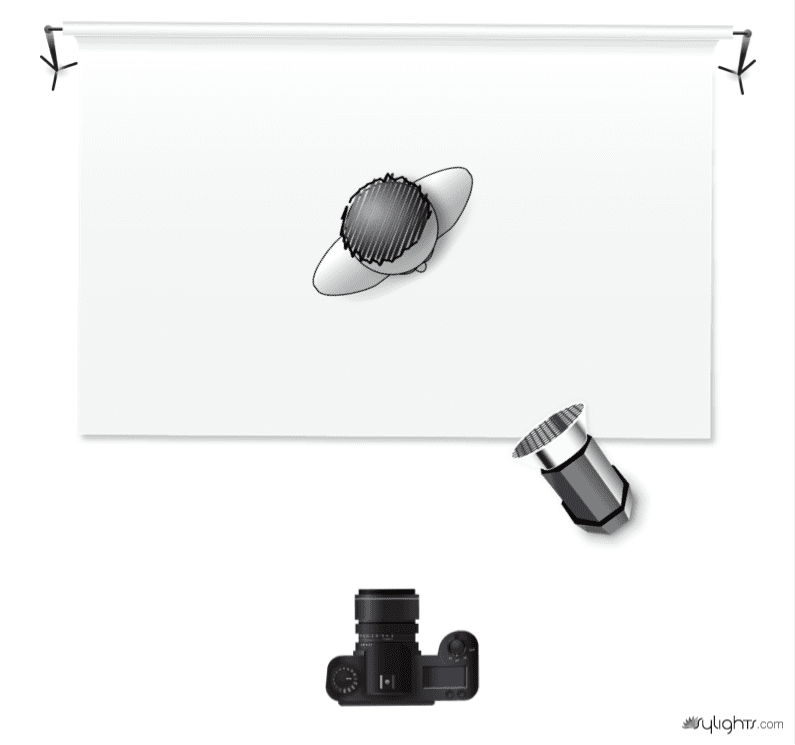
I gave the class an assignment on making a Rembrandt light portrait using just one light with a 10º or 20º spot grid.
Most of the class has never even turned on a studio strobe.
Here is the assignment:
Description: Rembrandt portrait using one grid light
Items:
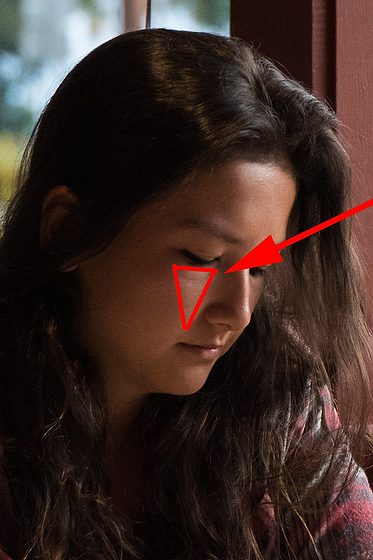
Subject Please get the best possible expression. It would be best if you saw a triangle on their cheek. Be sure the triangle includes lighting their eye.
Monobloc with ten or 20-degree grid You may use any power setting you choose. Be sure your skin tone is exposed correctly and correct white balance.
Camera Choose the lowest ISO setting for your camera. Use a portrait lens 85mm – 100mm; if you don’t have a full frame, 50mm will be OK.
Backdrop You may also use a black background—no other lights are to be used in this assignment.
When did you start here? [Figure 2] Nikon D3, 85mm, f/1.4, ISO 200, 1/500 on Matrix metering.
Maybe you want the light on even less of the face like this. [Figure 3]
I started this photo shoot with Figure 2. I started with a backlighted subject. Most of the light is in the background, and the subject is in the shade.
This is the setup. I used a fill flash on my Nikon P7000 to take this photo. If you look behind the model, you can see the shadow from the house and see how all the sunlight hits the background. Nikon SB900 is on a light stand with Radio Poppers PX, which helps ensure the signal from the Nikon SU800 is not lost outside in all the sunlight.
I suggest doing this assignment and taking notes to ensure you remember all your settings. While Nikon will capture the camera settings, the embedded information doesn’t show the SB900 settings; it only shows the used settings.
Shoot all these combinations; you will have 16 photos to compare the results. Add + series, and you will have 28 different ones to look through and compare.
As you can see in these shots, the background is consistent throughout each series, and the skin tone gets brighter and darker as the flash changes while the camera setting stays the same. You then adjust the camera setting and re-shoot the series.
Here, you can see me changing only the camera settings on the Nikon D3. The ISO stays the same. The aperture is the same, and dialing this under the shutter speed will adjust automatically because I am using the exposure compensation to change it. Had I chosen to shoot this in Shutter Priority and not Aperture Priority, the Aperture aperture changed from each setting instead of the Shutter Speed.
Flash: The flash is off-camera, and I am using the Nikon SU-800 to control it. I a changing the SU-800 and not the SB-900. Wha will those changes look like?
You can continue to go through the -1, -2, -3 respectfully to get more combinations. I am only changing A and not B or C because the Nikon SB-900 is set to Channel 1, Letter A.
The Camera is set at 0 Flash, which is set to flash. The flash also zoomed to 200, so I am just lighting her face, not the outfit. [Nikon D3, 85mm, f/1.4, ISO 200, 1/1000]
Camera -1, Flash 0 [Nikon D3, 85mm, f/1.4, ISO 200, 1/2000]
Camera -3, Flash +3 [Nikon D3, 85mm, f/1.4, ISO 200, 1/8000]
Now, let’s back up and talk about the Zoom on the Nikon SB-900 flash. The following three images are all shot with the Camera flashing the flash at 0, but I am zooming in on the flash as wide as it will go, from 17mm to 35mm and finally to 85mm.
Zoom at 17mm [Nikon D3, 85mm, f/1.4, ISO 200, 1/1000]
Zoom 35mm [Nikon D3, 85mm, f/1.4, ISO 200, 1/800]
Zoom 85mm [Nikon D3, 85mm, f/1.4, ISO 200, 1/800]
You can never see it happen when you push the shutter, but the Nikon Speed light system fires a pre-flash to set the exposure and then Flash the flash. w, remember the Camera is set to Aperture priority and is in matrix metering mode; I’m trying to figure all this out for you. The flash was 17mm, and the light flash fell on the model’s black robe. The camera wanted to make it darker, thus shortening the shutter speed to 1/1000. Flash hits he face with the 35mm and 85mm zoom settings, and it is at 1/800 shutter speed.
I mention this to say that when you are in TTL mode shooting in some form of auto, there are variances due to each scene. This is why you want to shoot this type of test before you shoot a real job. Change the odel’s shirt to white, and everything will change again.
Let’s mix it up more by adding a snoot to the SB900.
I use the LumiQuest snoot on the Nikon SB-900, which narrows the light to an even smaller spotlight.
I didn’t flash the flash or Camera, but the model moved slightly in these two examples. You can use the Depth-of-Field preview button to have the flash fire a continuous light to see where it is hitting the subject. I can tell ou from experience that you don’t want to do this a lot without letting the flash cool down between doing it. I burned ut the tube and had to have Nikon repair it. Do this sparingly. [Nikon D3, 85mm, f/1.4, ISO 200, 1/5000]
I pushed the depth-of-field preview button and had the model stay still to get the light where I wanted it. [Nikon D3, 85mm, f/1.4, ISO 200, 1/5000]
As you can see, everything is the same without the snoot in the setup. When using he snoot, the exposure changed a great deal even tho I only have the Camera at -3 Flash and the Flash at +3
Turn your photos upside down; this will help you see where your eye goes first. After seeing where your eye goes first, is this where your audience wants to look? Nikon D2Xs, ISO 400, f/7.1, Nikkor 24-120mm
Fair values are one of the most significant factors influencing where someone looks. Nikon D2Xs, ISO 400, f/7.1, Nikkor 24-120mm
Start upside down One of the ways I was first taught to look at a photo is to turn it upside down. This way, you see how the photo’s composition and light values will direct someone to what is essential or away.
The light values alone have a tremendous effect on the viewer. If you put a black dot on a white paper with nothing else or a white dot on a black piece of paper, your eye is drawn to the dot.
With more stuff on the paper, the principle is still the same. The contrast of the light value to the rest of the scene will draw you to a spot.
Now that you know this, you should be able to help create a photo that directs the viewer based on fair values to the subject.
The ceiling helps to add some graphic qualities to the photo. Nikon D3, ISO 400, f/7.1, Nikkor 24-120mm
Graphics
Sign manufacturers have used big arrows to direct you to a store location. You could use a large hand to show people where to look, or you can use this same principle more subtly to direct the viewer.
Leading lines and perspective can help pull you into a photo and give the image some depth.
While straight lines hit you over the head, directing your eye, the S-curve is a classic way to draw a viewer’s eye. One of the most common uses in the scenic photo is the river winding through a scene.
Framing
Here I am using the tree and the people in the shadows as framing at The Citadel. Nikon D3S, ISO 200, 1/1250, Nikkor 24-120mm
While a photo might look good in different frames, you can buy it at a frame shop. You can also use elements in an image to help frame the shot. This framing often helps create a sense of depth to a photo and not just a border like a physical frame. Looking through a doorway to the subject in a room helps create some context.
Using the flowers to fill in what could be an empty space. Nikon D3, ISO 1600, f/5.6, 1/5000 Nikkor 14-24mm
Flowers in the foreground and the subject like a house in the background help fill what would often be dead space in the photo.
Hey there’s more
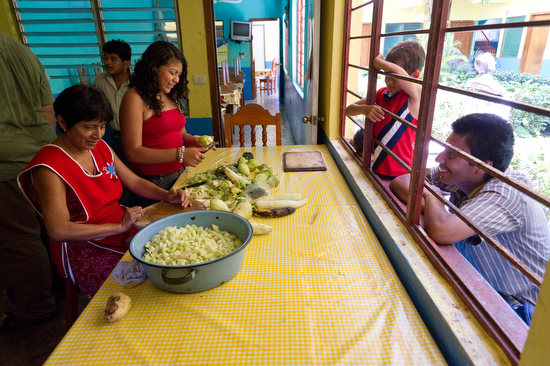
While your eye may go to the young man setting the table and it is telling a story, your look will likely drift to the woman at the stove cooking and then to the people in the back room. If I did it right, your eye would drift around looking at the more minor details because I got your eye moving, and once it is, it will explore. Nikon D3S ISO 12,800, f/5.6, 1/40, Nikkor 14-24mm
You can make a nice composed photo of a subject and do a great job creating a good image of the issue. You can also make a more storytelling photo and not just a pretty picture. These are photos that you may be drawn immediately to the main subject, but your eye continues to be moved around the scene, and you are learning more about the story.
Some photographers have you looking only at the subject and not much more. The seasoned storyteller will have you looking all around and absorbed into the content.
Multi-layered compositions take time and help tell the story in its context more. It also is more entertaining but requires time for the audience to absorb. Photos like this need a longer pause in the slide show or video. Sometimes in magazine story spread, you let them run over two pages to let the audience see all the action. Nikon D3S ISO 5600, f/5.6, 1/250 Nikkor 14-24mm
When hiring a photographer, I recommend looking for a few things in the work they show you. If you pay attention to these little things, your storytelling will improve.
Exposure
When you look from photo to photo, is there consistency in the exposure? Amateur photographers often have inconsistent exposure values.
Skin Tones
When you look at the subject, does the skin tone look correct, and is the exposure correct? How often do you see photos shot under fluorescent lights with a green tint to the skin tone? If the main subject has good skin tone but the background is green, it might be because they used their on-camera flash.
Another color shift in skin tones is an orange cast when shooting under tungsten lights. If they used their on-camera flash, the skin tone might look OK, and the background would be orange.
If the photos are outside and the subjects are under trees, is the skin tone natural or green-cast? The leaves on the trees filter the light and give it a green tinge.
Where does your eye go first?
When you look at the photo quickly, where do you look first? Is it the subject, or is there something distracting in the background, or off to the side? My photographers cannot understand how the photograph is about front-to-back, not just the subject. Good composition will have your eye go first to the subject, and, if they do a great job, it will then want to wander to the subtle complementary areas that give more context to the photograph.
Light value on faces
Can you easily see the people’s faces in the photos? It’s much easier to point a camera and shoot in existing light, so photographers even talk about how it makes things feel real. Great photographers can often shoot using only available light, but the light on the face must be right.
The style of helmet used here makes it much easier to see the Fencer’s face.While seeing a fencer’s face is usually challenging, I made it stand out by lighting them specifically. Can you see how the face helps bring more life to the photo?
When selling, ensure your face is at its best and looks as natural as possible. Skilled photographers know how to light faces so they look natural, but most importantly, the person’s face is not in shadow and is easy to see.
Catchlights in the eyes
Often, the difference between a good and great portrait is just a catchlight. A torchlight is a photographic term used to describe light reflected in the subject’s eyes. The absence of a catchlight, even in an animal photo, can make the subject appear comatose.
Catchlight in action photos is just as appealing as in portraits.
Catchlight in action photos is just as appealing as in portraits.
Without a catch light, you can look a little more sinister.
For the most part, a catchlight will add more life to a person than it would without one. Not having a catchlight can also help communicate. The point isn’t that they need to appear in every photo, but you should be aware that you may never see them in the photographer’s work.
Series
When the photographer shows you a photo, do you see a series? For visual storytelling, you need overall, medium, and sometimes close-up shots. Your designers want to include background graphics or complementary graphics to complement the layout of the webpage, printed piece, or web-based multimedia package.
Citadel Cadet prepares the Sparkling Cider for the seniors who are now getting their rings.
I chose to add a little variety shot here to show it waiting for the seniors.
The seniors run under the sword arch after getting their rings into the quad.All the seniors grab a glass and toast to their success of making it this far at The Citadel.After toasting, they all toss their glasses at their company’s letter. They are all in Bravo and smash the glasses on the B.I like how I caught the glass just before it was smashed.This doesn’t make sense without the other photos, but in the series, they help tell the story.
Variety
Do all the photos look like they were taken from the same perspective? It’s common for photographers to shoot at their standing height or at a similar distance from the subject. They may use their zoom lens to get closer, but they never get close to the subject.
Giving out door prizes at a college alumni event.It’s the same alum event, but now the audience is listening to the development office discuss the institution’s future. The variety is not just in the close-up but also in the moment’s tone.
You should feel that your photographer offers visual surprises and delivers both safe and edge-of-your-seat compositions.
Focus and sharpness
I hate to mention this, but many photographers don’t have razor-sharp photos. This does not mean everything is in focus; rather, whatever is supposed to be in focus is extremely sharp. Many photographers experience camera shake, and their photos aren’t tack-sharp.
Moments
The family enjoys working out at the gym together.This is where many elements come together to help create the moment, but you have to catch all the subjects in the “moment,” which is often their facial expression and their being in step together.
You will find many technically proficient photographers who meet most of what I have mentioned so far, yet, after looking at the photo, you are not moved emotionally. Great storytellers will have moments that bring joy to your heart or maybe even sadness.
It will be apparent that you felt something when viewing the photos.
The photo makes you ask questions.
If your photographer does a great job, you will want to know more about the photos. The photographer should wait for you to ask questions rather than jumping in to tell you everything. The photos should, for the most part, communicate.
I can see the cool angle and what they are doing, but I want to know why and for whom. The photo makes me want to read the caption, “By the way,” which states it is a middle school group helping widows with repairs to their homes during the summer.
I can see the cool angle and what they are doing, but I want to know why and for whom. The photo makes me want to read the caption, “By the way,” which says it is a middle school group helping widows with repairs on their houses during the summer.
Getting people to do something gives you better expressions. I have two techniques for keeping people engaged when I have to set up a situation and then help it become a real moment.
Pass the Pen
Many schools love to show the seminar setting for a class. When you photograph in a room with everyone around the table, Murphy’s Law states the action will be when their back are to you if you are photographing.
I will have a few moments with everyone and explain my dilemma. If I shot this naturally, it would take ten times longer because I am on the wrong side of the table when someone starts to talk. By the time I shift, the conversation has shifted.
I ask everyone to listen with their eyes, not just their ears. This really speeds up the number of usable images.
Typical conference table for a seminar class.
I then ask to borrow a pen, give it to someone, and tell everyone this person will talk. I ask them to tell us what they did the other day or what they are planning to do that is exciting. No one can interrupt them; they need to continue talking until I say Pass the pen.
Even if you do not see the pen, the person holds the group’s attention and lets me take photos of their various expressions. We all get some laughs and good stories in the process.
Even in small groups, I use the pen to help the subjects relax.
This teacher used a similar technique for classroom discussions. He had a ball of tape that he would toss to a student who raised his hand to answer a question. He tossed it to the student, and when they were done, they tossed it back to him. He was quite impressive with his tosses and catches.
As this student tosses the ball back, you can see he is engaged in the class.
Walk and Talk
When you get people walking and talking, they forget about you and engage quickly. If it is just two people, I have them walk close enough to feel each other bump occasionally. I’ve one person who talks, and the other listens. I stress the importance of looking at each other and not at the ground. It’s incredible that people in everyday conversations might look at the ground or off somewhere rather than at someone. However, for a photo to communicate their interest in each other, they must have eye contact.
Again, in the group situation, I designate who is talking and ask everyone to give them their full attention, not just their ears. To the left, my assistant is walking along with them out of camera range, pointing a flash at them. I really use the Nikon SB900 with the Radio Poppers PX system to be sure the signal from the Nikon SU800 triggers the flash consistently. The flash is zoomed out to about 28 settings to light the entire group.
Here, you can see the tour guide helping the students with the campus. For this photo, I am using a Pocket Wizard Plus II to trigger the Alien Bees B1600 being fired off to the right of the group. They are walking towards me as my VALS (Voice Activated Light Stand: AKA assistant) is carrying the light on a light stand and staying with the group out of the frame.
The couple is walking and talking to each other, a good 50 yards from me. I like using the zoom lens so that as they walk closer, I zoom out. My ALS carries the Nikon SB900 with the Radio Poppers PX system triggered by the Nikon SU800 on the camera. I’m shooting with the flash at standard setting and zoomed to 200.
The flash off camera really helps clean up the photo. Of n, you will have a shadow on one or more of the people. The other advantage of the flash is that it helps draw the audience’s attention to the subjects.
Helping keep the dark skin tones with detail is improved outside with the off-camera flash. I need to power the flash up or down on the Nikon SU800. So, I make it +1 or -1 compared to the camera’s exposure. One takes a second to look at the histogram and the LCD and see what might need adjusting. By shooting RAW, I still have lots of control in post processing, but being sure shadows have detail is essential when the dark areas can be the subject’s face in a photo like this one.
Take notice of the details in the white shirt and the dark skin of the subjects in the photo. This will work easily in a printed piece. Remember, I have one person talking and the others listening with their eyes.
TTL hot shoe Flash vs Manual Studio Strobe
As your VALS walks along with the Nikon SB900, varying their distance from the subject, the camera still compensates, making sure the power stays the same. Of course, the assistant has to remain pretty close with a hotshoe flash like the Nikon SB900 because it is not powerful enough to be much more than 10 to 15 feet away.
Now, when you VALS is carrying a studio flash, the exposure will change as they change the distance to the subject. As they get closer, the flash will get brighter, and when they move away, it will get darker. However, they can stay further away with a studio strobe, since the strobes are much more potent than a hot shoe flash. I am shooting with my Alienbees B1600, which is much more than 1/4 power. I usually run at 1/8 power. I like to use a grid spot so I am not lighting up the ground leading up to the subjects. I want to hit the faces and let it drop off a little.
Finding a Photograph is More Important Than Making One
Why? Being able to locate your photos when you need them saves time, impresses clients, and ultimately helps you make money.
“Now, Where Did I Put That?”
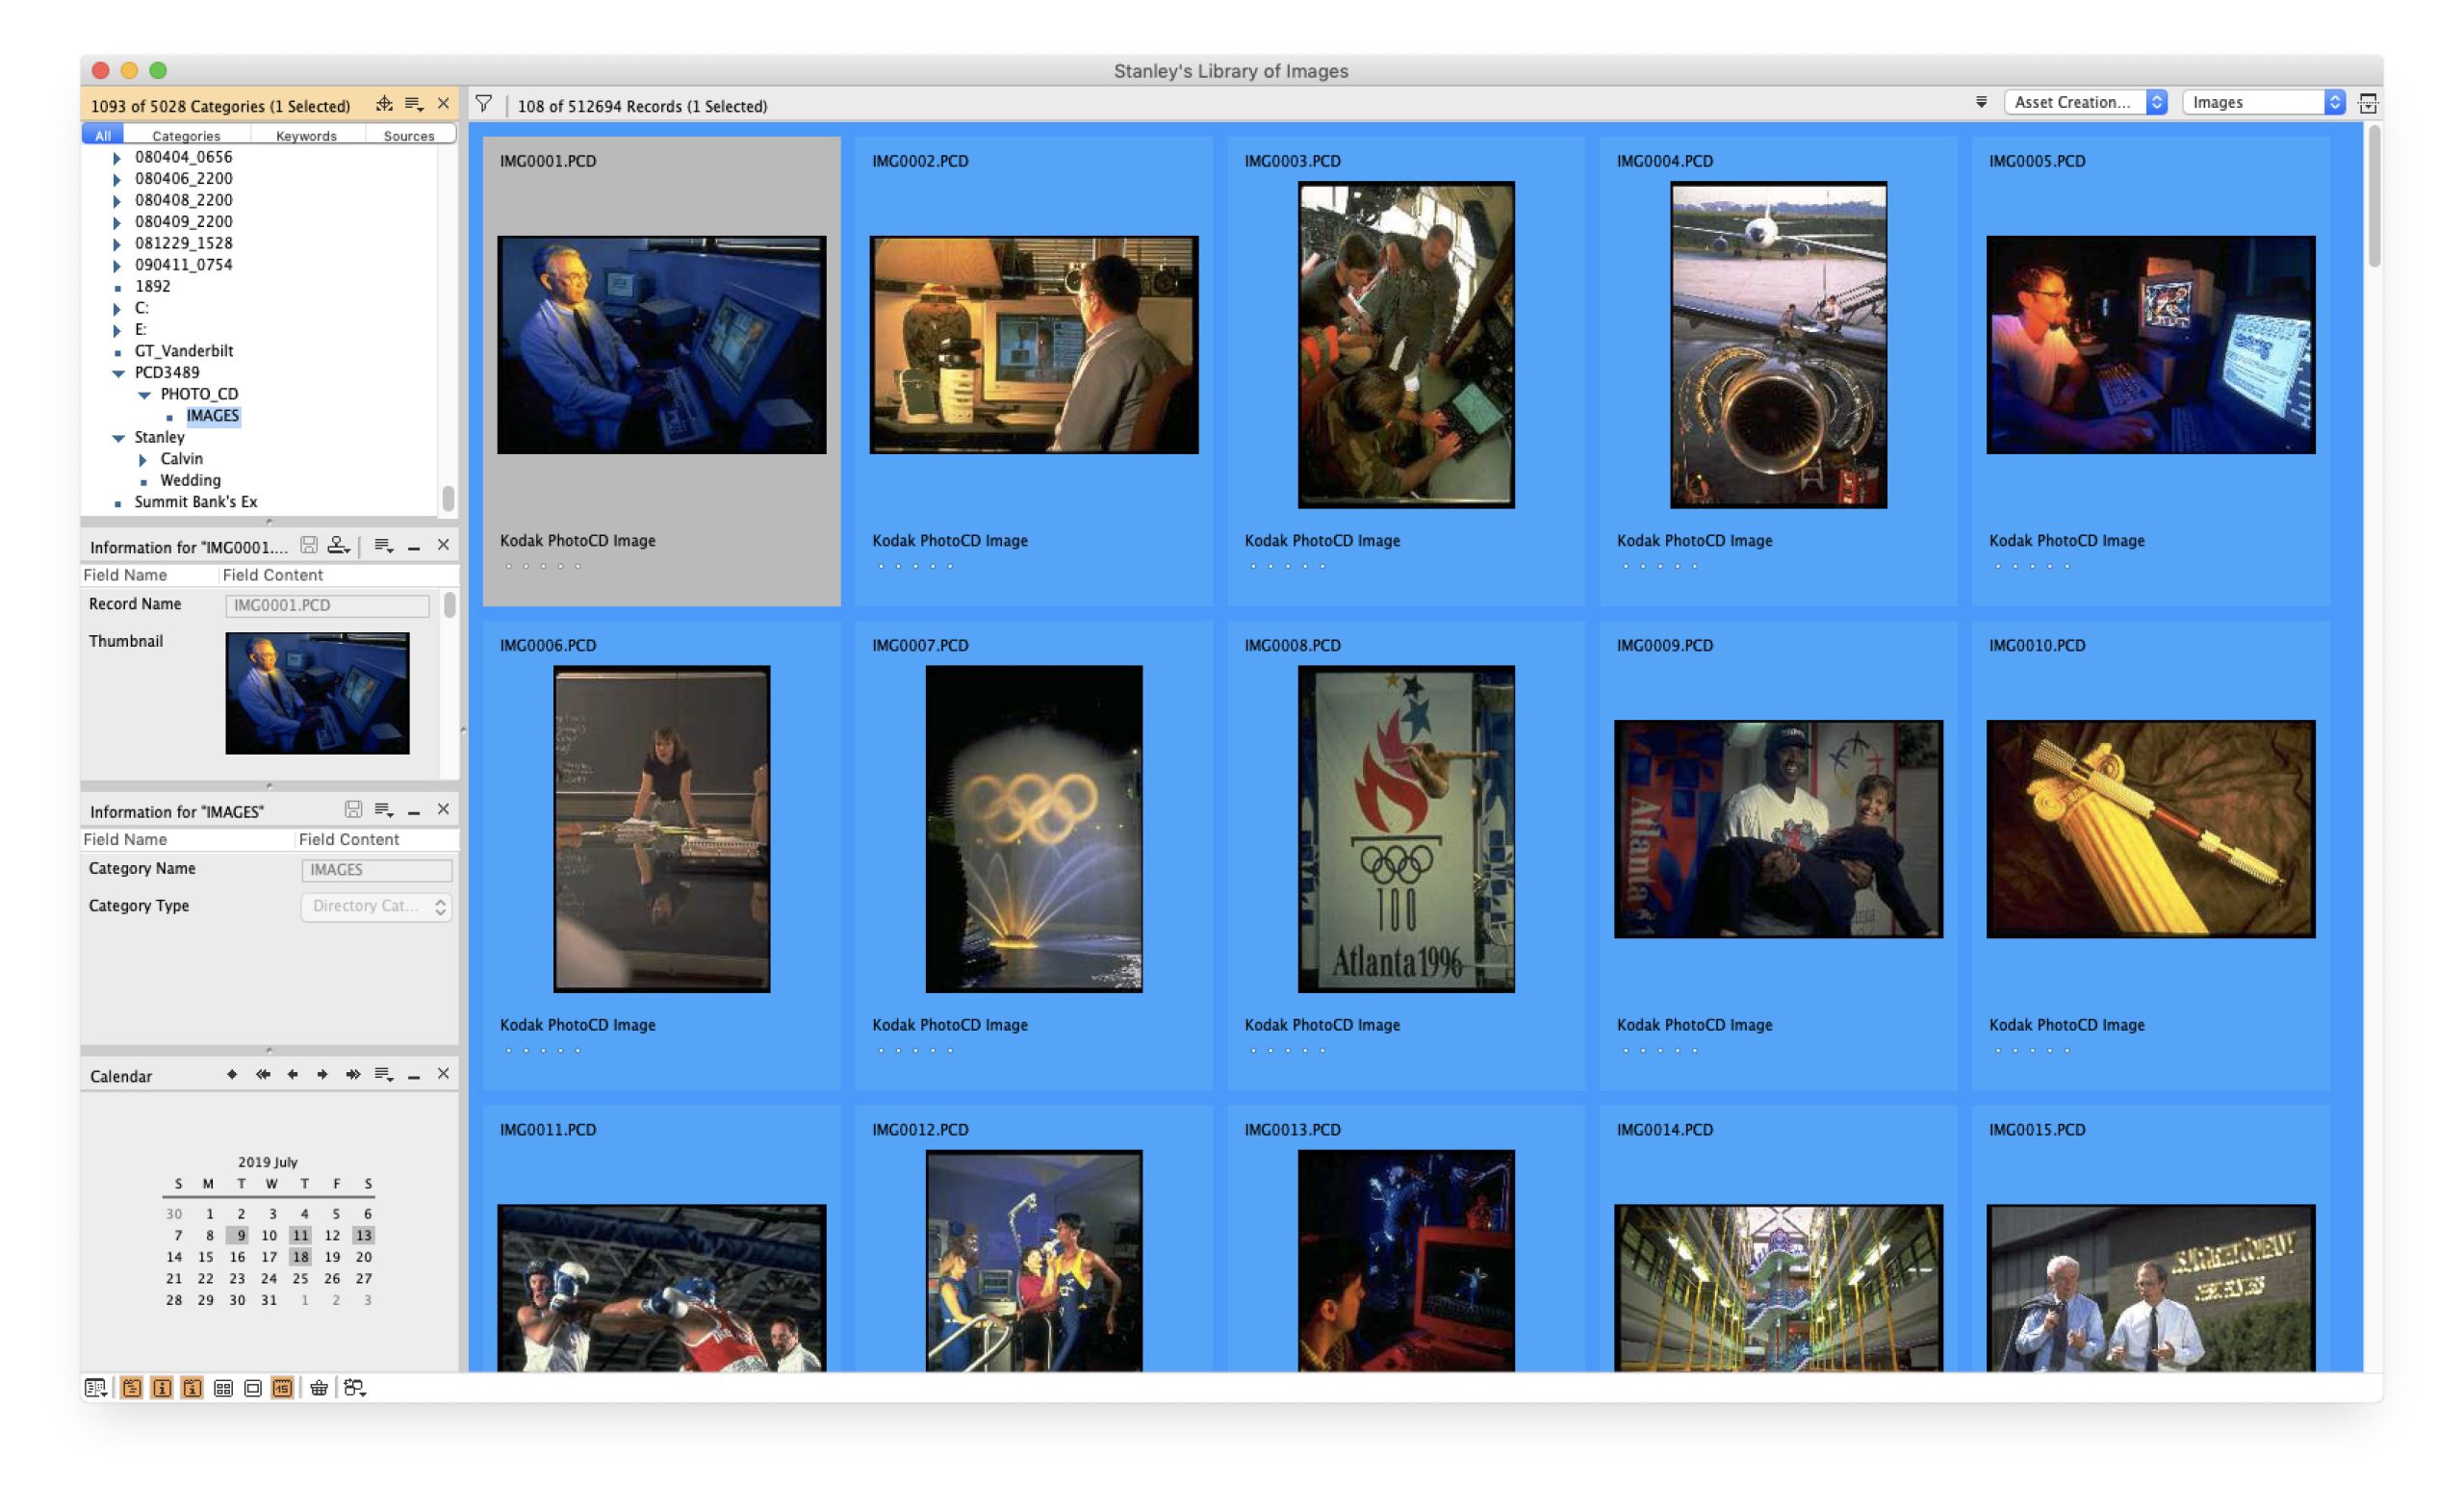
In 1993, I was introduced to Nikon’s Image Access scanner software. Over time, this evolved into what is now known as Cumulus by Canto, an image database software. Today, I use Cumulus Single User 8.5, which costs $399 and works on PCs and Macs.
This software is highly powerful and scalable, comparable to Adobe Photoshop or Premiere. While most users may use only a fraction of its capabilities, it’s a long-term investment that can grow with your needs, whether you need multi-user or web-based versions.
Organizing with Metadata
A key part of my workflow is embedding metadata—text information—into each photo. This metadata makes images searchable and manageable.
What is Metadata?
Adobe’s Extensible Metadata Platform (XMP) is a labeling technology that embeds data within files. It allows for:
Efficient job processing
Workflow automation
Rights Management
XMP integrates with IPTC fields to capture details such as camera settings (f-stop, shutter speed, etc.) and custom information you add. Why Metadata Matters
Metadata makes your photos searchable on your computer. This valuable data remains hidden without tools like Photoshop or database software (e.g., Cumulus). You can quickly locate images even years later by embedding keywords, captions, and other information into your files.
My Workflow: Organizing Photos
Burn Images to a Disc After a shoot, I copy all the images onto a labeled DVD (or a hard drive for modern workflows).
Ingest Images into Cumulus I import the DVD into Cumulus and catalog the images and their metadata. While I keep physical copies (DVDs or hard drives) offline, Cumulus helps me locate each image by disc name and folder.
Thumbnail Views for Easy Browsing Cumulus generates high-quality thumbnails. These previews let me quickly identify the correct image before accessing the high-resolution file.
Store and Label Discs After ingesting, I organize discs in binders, shelved chronologically. I rely on backups to retrieve the images if a disc is damaged.
Real-World Scenarios
Handling Client Requests
When I get a call like:
“Do you have the disc you made for us?”
“Do you have a photo of President George Bush?”
I searched in Cumulus. For example, if I search for “George Bush,” I’ll find the relevant disc and folder—labeled by date (e.g., 031003 for October 3, 2003). I retrieve the disc, locate the high-res image, and send it to the client.
Quick Turnaround for Big Clients
Sports Illustrated once requested images of a specific Georgia Tech player. Thanks to Cumulus, I quickly found both headshots and action shots. Within 30 minutes, I delivered 10 high-quality options for their consideration.
Tools to Consider
While I use Cumulus, other solutions, such as FileMaker Pro or Extensis Portfolio, can also help you manage your image library. The key is to choose a system that fits your workflow and ensures you can find your images when needed.
Bottom Line: Find It, Make Money
The ability to quickly locate your photos is critical to professional success. Without an organized system, your images—and opportunities—are lost. Embrace tools and workflows that prioritize searchability, because the faster you find them, the sooner you can profit.
Cookie Consent
We use cookies to improve your experience on our site. By using our site, you consent to cookies.