Photojournalists covering disaster need to know their role

Reading Time: 3 minutes

Moore Oklahoma Disaster Relief Coverage

I find many people who have trouble covering disasters or helping with them due to being overwhelmed emotionally. While seeing horrific tragedy can affect you if it consumes you it isn’t healthy. It is healthy to have a heart and be moved by the situation, but when it imobilizes you is when it is a problem.

When you are unsure of your role is when you are more prone to being an emotional wreck and not very useful.

The people of Moore Oklahoma are some of the most resilient people I have ever met. One of the reasons for this is their understanding of their roles in disasters.

You can ask any resident their plan in case of a tornado and they can tell you their A, B or even a C plan they have in place. Most of them will first tell you if they have a place to go for shelter below ground or in a safe room above ground.

The next plan beside seeking shelter is to get out of the way. Most of them with this plan will just get in cars and drive away from the area.

Once the tornado has hit everyone jumps into recovery mode. What is interesting here is many people realize they are better off doing what they do best rather than doing just anything.

After digging out of their own homes, many will go back to work, because what they do as a job is helpful. Many who worked in the restaurants would go back helping feed those who are the first responders and the victims of the tornado.

You see most of these residents understand how they are most helpful for recovery efforts.


The Photojournalist’s role

While I could have gone to Moore, Oklahoma with a team to help clean up, I am much more useful telling the story. You see when I do my job well as a photojournalist I am helping get the word out.

There are three basic things I see as my role as a visual storyteller.

First, I need to help people know what happened. Now besides taking pictures showing the damage, I need to help tell the personal stories of the victims of the tornado. This first piece of the puzzle will help engage my audience.

When I capture the emotional impact the tornado is having on the community, it is time to move onto step two.

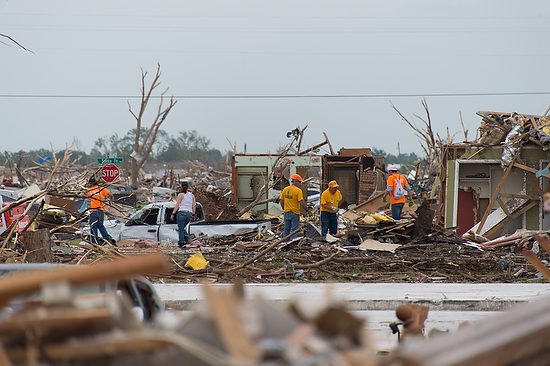
Second, I want to show what is happening right now. This is where I am showing the immediate first responders helping the community. This could be in the moments right after the damage while they are digging through the rubble to find survivors or it can be even days to weeks later where I am showing teams helping clean up.

I enjoyed showing all the teams helping clean up. I was there to show Chick-fil-A going around helping those home owners and clean up teams by giving them a hot sandwich.

Many of the local Chick-fil-A franchise guys all realized they served their community best by doing what they do best–making chicken sandwiches.

As a photojournalist I have to remember what I do best. Visual storytelling by me is helping the subjects connect with the audience who can potentially help. This is where I move on to the last part.

Third, I need to help my audience know how they can get involved. You can here the lady sharing how it is helpful for teams to come and help them put their community back together and for those who cannot come even prayer can make a difference.

Without giving people a way to respond can often cause problems. Most news media outlets coverage will tell their audience they can give to the Red Cross for example. I encourage you to consider going with a team as well and for everyone to pray for the people.

3.5 Easy Slide Show solutions for Mac and PC

Reading Time: 4 minutes

The last time I wrote about creating slide shows, Adobe Flash worked everywhere on the web after Apple decided not to support Flash on their iPads, iPhones, or iTouch.

All the slide shows I produced early on will not work on the Apple mobile devices. So the shows needed updating.

I primarily use Final Cut and Pro X when editing videos and mixing still images. However, I have also used Adobe Premier before Final Cut doing the same thing.

While I could use Final Cut Pro X and create slide shows, these solutions are much simpler and faster, in my opinion. In addition, I can produce most of what I want and export them into Final Cut Pro X if I like.

1. Soundslides Solution for both Mac and PC

The latest Soundslides (1.9.5) version has JQuery HTML5 built into it. The beauty of the Soundslides solution is that the project will play back using Flash when available and use the HTML5 version as a fallback. The update ensures the user experience is the best it can be.

The best part of the Soundslides solution is that it is cross-platform.

You may find out as I did that some servers do not like how Soundslides is talking to the device to determine what it is before giving it a flash or html5 version. The way licenses work, they cannot create an html5 version only since it will not work on all browsers.

One more option is to use Soundslides Video converting service. The downside is you have to upload your file and then wait for them to send you a link to download it. Also, your project goes into a Que, and if you are on a deadline, this might not work.

As far as simple to use and if your office has a mix of PCs and Macs, this is a great software that is relatively easy to use. Also, having everyone using a similar software means you can quickly train everyone.


2. For the Mac

My favorite Slide Show software for the Mac that creates movie files is FotoMagico. The cost of the software is $99. One thing they offer that I don’t know any other software offering is One-to-One Coaching. Get up to speed with FotoMagico! Get tips and tricks from our tech support pros. Be more productive, and get your work done faster. Arrange a one-to-one online session with desktop sharing for $99 per session. When you are ready to output the show, FotoMagico has easy choices like YouTube, Apple Devices, and just about any other output, including 4K Cinema Projection.


3. For the PC

For a long time, before I switched to using Mac exclusively, I was using ProShow Gold. However, I found going from ProShow Gold to FotoMagico seamless and believe they work very similarly.

As you can see from the screen grabs, they look very similar. The outputs are identical to FotoMagico. You can create DVDs, Blu-ray, Facebook, Youtube, and more creations.


My suggestion is to output to H.264 format since this is a standard for video compression and is currently one of the most commonly used formats for recording, compressing, and distributing high-definition video.

These solutions make it very easy to combine your still images with audio. You can create a voiceover, use music and even blend it with video. In addition, the learning curve on these software packages is much easier than using Adobe Premier or Final Cut Pro X.


3.5 DigiCraft Plugin Solution

If you are looking for a plugin with Adobe Lightroom to create a slide show gallery, try DigiCrafts software. It was designed primarily for photographers to develop portfolio packages to play on Apple devices. However, I have used it when I need a click-through package.

I used this software to create small galleries of my work for my blog and website. You can click on the categories above.

How much should I charge?

Reading Time: 5 minutes

It is quite common for a professional photographer to get a call asking to use a photo and the photographer doesn’t know how to give a quote for the usage.

Understanding Copyright

First let me start with understanding of copyright. It is safe to say that unless you have permission from a photographer to use a photo you cannot use it without opening yourself up to copyright infringement.

If a photo qualifies in Public Domain then you can use it.  Accurate photographs of two-dimensional visual artworks lack expressive content and are automatically in the public domain once the painting’s copyright has expired (which it has in the US if it was published before 1923).

There is also the category of Creative Commons License. Here the photographer has given permission for use of their images for non-commercial use. What is considered “non-commercial” is debated. To be sure you are OK clarifying before using would be a good idea.

If you are searching Flickr just look on the side navigation with all the tag and group information, it’s listed in that area with a link to what kind of license it is.

The other category is called Fair Use which can allow for use of images without compensation. My interpretation and I am not a lawyer, but if you are a student and working on a project for a class you can use images. However, if that student publishes those say on the internet could be a violation of copyright. When teachers start using the material it becomes a problem once they publish and distribute the material. Showing a news clip for a class to discuss would most likely fall under Fair Use.

When in doubt get the photographer’s permission.

The Phone Call

I have gotten numerous phone calls from colleagues on quoting on some of the strangest uses. My first place to look for starting is the software FotoQuote. It sells for $149.99 and most everyone I know that buys it usually recovers their money in the first few times they use it.

FotoQuote has over 300 stock photo pricing categories and a wealth of coach information.

Often clients are asking for a variety of uses and FotoQuote lets you even create “Quote Packs.” This is where you might include all advertising uses and exclude editorial. Just remember there are over 300 categories alone in this software package of categories.

Besides what category you are also giving permission for how big the image will be used. For example is it the main part of an ad or just a spec? Will they use your photo for the cover or just a thumbnail head shot with an article?

How often they use the image makes a difference as well. If they are publishing only 300 brochures for a meeting verses a print run of 5 million should be priced differently.

How long they get to use the image is also another variable. Will they use the photo one time, one month, one year, multiple years or unlimited should impact your price.

The first few times I was quoting on large projects I could feel the sweat on my forehead and my heart racing. I was having a panic attack.

Guidelines for quoting

Here are my tips for quoting on a usage. We need to first start with your base. If this is an assignment the basic price should be about the same for similar assignment, the differences in price are for the use. So, an executive portrait for a print on the wall in the companies headquarters verses it being use on billboards and running on the cover of Forbes Magazine will change the price, due to usage.

  1. Always ask what their budget is for the project up front. Sometimes they will give you a better deal than you would have asked.
  2. Be prepared to negotiate. Your first quote will often be countered. Therefore it is better to quote a little higher and have room to drop your price.
  3. Whenever you change your price you should change the usage terms.
  4. To speed the process along, I recommend going to a client with three prices. Your rock bottom price, middle range price and the high end price. This makes them see you as already trying to work with their budget. 

 Creative Fee and Usage Fee

When quoting on an assignment separating the creative fee and usage fee is a good idea. In addition to the creative fee you might have expenses as well listed.

I would suggest trying your best to encourage the client pay for as much usage up front. To help encourage them it would be great to list usage fees for future purchases.  I would probably state the time these prices will still be good as well.

For example you might allow them for an unlimited usage right now for $10,000. If they come back to you later that price should be much higher.  By putting this in writing and up front with the client you are showing them you are being transparent and trying to work with them.

Magazines

One category in the FotoQuote database I find helpful is the going rates that are known for different publications. Many of the magazines listed will even let you know the rights and there going rates.  Basically they set the price and you decide to except their terms or not. Sometimes you might be able to get a better rate if you have a specialty or the only one with access to the subject.

I think of using FotoQuote like a pilot does when they are flying in the clouds, they are using the instrument panel to help guide them.

Remember FotoQuote is a guide and not prices fixed by the industry. These give you some starting points to help you negotiate.

Just as important as FotoQuote are other photographers. This is why I joined American Society of Media Photographers [ASMP]. I can pick up the phone and ask other members their advice. Often some of them have more experience than I. I am not calling for prices as much as also how to communicate with clients. Often how you word something can make a huge difference.

Photographers–Do you have a healthy ego, or are you just narcissistic?

Reading Time: 3 minutes
Mark Wood, Emmy recording artist and inventor of the Viper electric guitar, plays with Chelle, my daughter, and her friend Maggie. They were able to perform with Mark Wood after attending a workshop with him during the week at Elkins Pointe Middle School in Roswell, GA.

Every artist has enough self-esteem to want to show their work, so a healthy amount of ego is good.

When you look at others’ work and think your work is at least that good, this is OK. This is good if you think you are even better than most. You need that drive to pursue this as a career.

Wanting to be on stage is a good thing.

There is a line you need not cross, and when you do, you have become narcissistic.

One of the places I see a lot of narcissistic behavior is in “missions” and “humanitarian photography.” Their pictures are more memory joggers for themselves; if they didn’t talk while showing you photos, you would have no idea what they did or why they were taking the photos. Often, even with them talking, you may still be clueless.

Some clues that you have crossed the line into narcissism:

  • When asked why you are doing the photography, your motivation is about having a good experience.
  • When your conversation is all about the gear you are using, Gear-centric is an indication of self-indulgence.
  • When evaluating a trip, you have that country stamped in your passport.
  • When you cannot tell the stories of the people you have just met on the trip.
  • When you cannot explain how your photos are helping further the work of the people in the pictures, you are about yourself.
  • You might be self-centered when taking people’s pictures and rarely ask for or care to ask for permission.
  • When you ask people to look at your pictures and look for kudos rather than wanting them to support the cause you photographed.
  • When you evaluate the photos based on how artistic they are versus on, do they communicate the message?
  • When you constantly push to go with teams on trips rather than finding causes, you can help.
  • Have a mentor and ask how well you are doing.
Seth Gamba, the orchestra teacher at Elkins Pointe Middle School, is on the far left in the back helping his youngest students. On the front row are his oldest students and his guest teacher/performer, Mark Wood. Do you have enough belief in who you are working for that you would bring in someone else to ensure they attained their goals?

How to keep a healthy ego

  • You know your purpose for photographing on a trip.
  • You know the subject well.
  • You have taken the time to get to know the people you photograph.
  • You are asking permission to photograph people.
  • You always have your audience in mind when taking photos.
  • You have people calling you to be involved in their projects.
  • You are concerned that the photos you made are making a difference.
  • You are concerned about exploiting people and their situation for your gain.
  • Have a mentor and ask what you can do to improve.
  • You know when someone else would do a better job, and you step aside for now.
  • You know you need to improve and feel the burden to improve for your client’s sake.

Check out this multimedia package I did on the students learning from Mark Wood. I am proud of my daughter for singing and playing the viola with the orchestra.

Photographing school plays

Reading Time: 5 minutes

Nikon D4, 70-200mm, ISO 11,400, ƒ/5, 1/500

Be Prepared

Here are a few tips before you start shooting the performance.

  • Arrive Early—You need some time before the curtain goes up.
  • Fast lens and/or high ISO—You need gear to take low-light photos.
  • Find a good seat—You might think the front row is the best, but sometimes the back row is the best. If it is assigned seating, you might want to go before you buy a ticket to the venue. In general, I find the seats in the center to give you more opportunities than from the side.
  • Test Shots—Often, you can make some test shots to set your exposure correctly.
  • White Balance—Shooting on Auto White Balance for a theater production is the worst possible time to use this setting. Often, the productions use colored lights, which can have your camera correcting, giving your actors funny skin tones. Custom white balance is ideal, and second, you can try some presets like tungsten to get you close.

White Balance

Pleasing skin tones are the number one thing that separates hobbyist photos from pros.

My secret weapon is the ExpoDisc.

 ExpoDisc EXPOD2-77 2.0 Professional White Balance Filter 77 mm, 82mm (Black)

ExposDisc goes in front of the lens and then you use it to get an incident reading rather than a reflective reading of the light.
Notice the direction of the light hitting the subject.  You move to the same position to get the light reading below.
Point the camera toward the direction of the light that is falling on the subject.

If the subject is facing me and the light is from the side, I face the camera with the ExpoDisc on it so it is pointing toward the camera position.  The chart above is to help you understand the concept, but you can modify it.

One way you can modify it is if the light is the same where you are standing, you could cheat and take a reading from where you are.  The problem that can arise is if they are lit by Window light and the camera position is in the shade; your color balance will be off if you do not take it from the subject’s perspective.

Nikon D4, 28-300mm, ISO 3,600, ƒ/5.6, 1/400

If it is supposed to be a silhouette and you get a photo like mine, that’s great. However, if you are supposed to see their faces, you must make some adjustments.

Nikon D4, 28-300mm, ISO 4,500, ƒ/5.6, 1/320

There are a few ways to adjust to get a good exposure to skin tones. First, use spot metering if your camera has it. On the Nikon D4, I can choose selective focus and spot metering. I then have 51 different points to move the focus/spot metering to take the photo.

Using spot metering and selective focus with the Nikon D4, I have red brackets to move where I want the focus and exposure to be set.
Nikon D4, 28-300mm, ISO 12,800, ƒ/5.6, 1/320

Waiting for the light

While waiting for the peak moments in the scene, you also have to wait for the best light. For example, this witch’s hat had her face in the shadows most of the time she was on stage., but when she was singing those dramatic high notes, she put her head up and said, you have your shot.

Post-production is critical.

Nikon D4, 70-200mm, ISO 1,2500, ƒ/2.8, 1/500

No Flash—That is the rule for stage performances; therefore, you are at the mercy of what stage lighting you see. Unless your small town has some incredible endowment for the arts, your lighting on the stage will not look like Broadway or TV shows.  Throughout this production, the light value on one person would look great, and the other person was blown out or silhouetted.

This is where taking the photo into either Adobe Lightroom or PhotoShop can help salvage a photo. This is one of the rare moments I have to fix photos in post-production. It isn’t because I screwed up, it is because the lighting just isn’t even or at least acceptable for photos.

This is the photo before I cropped it or made changes in post-production. Notice that the kneeling actress is well-exposed and not blown out. Generally, you can open up the shadows but do very little with something blown out without detail.

Nikon D4, Sigma 120-300mm ƒ/2.8, ISO 2,500, ƒ/2.8, 1/500

Get Close

Don’t shoot the entire stage all the time. Vary your images using long glass, like a 300mm lens or longer, to isolate an actor. The lighting guys do this with a spotlight to make you look at just one place, but you can do it with lens choice.

Nikon D4, Sigma 120-300mm ƒ/2.8, ISO 2,800, ƒ/2.8, 1/500

Think Marching 

Nikon D4, 28-300mm, ISO 7,200, ƒ/5.6, 1/250

The photos look fantastic when you see the military marching in formation or marching bands, and everyone is in sync.  It looks better when everyone is in full stride because it creates motion. Closer the legs are together, they look like they are standing still, even tho they are moving.

Nikon D4, 28-300mm, ISO 4,000, ƒ/5.6, 1/250

Summarizing

Please arrive early, shoot many photos, and plan on doing some post-production to get the quality I am getting here. Your camera phone will not get this quality. Nor will having excellent gear. What gets this quality is experience. So please arrive early to take test shots so you do not need to shoot your first images of the play when it is live.