Most organizations need a stock photography library

Reading Time: 5 minutes
 
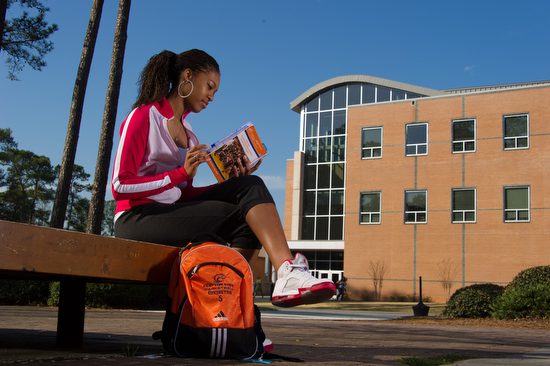
Photos like this one above have many uses for this college. They are showing some of the facilities, the idea of a small campus (not many people in the photos), and other ways how this photo can communicate for the school.

One of the best things any organization can do is to create a stock photo library. These are photos people can use for a variety of uses.

If your organization has specific main themes or initiatives, you need images to help illustrate the concept. “Seeing is believing” is the old saying we all know to be true.

Your company may be in the service industry where you want to emphasize good eye contact with the customers. You would benefit from having not just a few but a variety of photos to use for your website, PowerPoint presentations, and training manuals, and even use these to drop into videos.

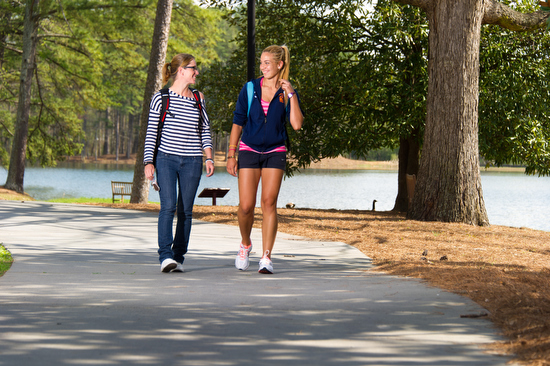
This college wants to emphasize they have trees and lakes on their campus. Even tho they are only minutes from downtown Atlanta, this campus offers a piece of nature and relaxation to its students.

Plan your photo stock shoots

Take some time to plan those photo stock shoots, and you will be amazed at how much of a resource this will become for the organization.

Start by making a list of your major initiatives. Maybe your company talks about a particular value-added concept you do that distinguishes you from your competition.

Create a list of things your clients are looking for that you address. For example, high school students looking for colleges look for a few things. See which of these might apply to your organization.

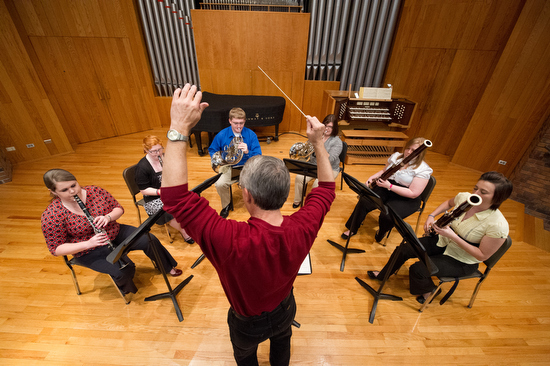
The small ensemble helps to communicate faculty to teacher ratio. It also shows they have the arts at this school, and it shows off the facility.

Things schools typically show.

  • Teacher-student ratio. Most schools will try to have many photos of their faculty teaching one-on-one or in small seminars.
  • Diversity. Most schools not only want to show what they are, but many will also shoot stock photos to recruit for what they want to become.
  • Technology. Schools want to show their state of art labs and classrooms, which communicates to High School students they have an opportunity to work with different techniques.
  • Living Spaces. Students want to know where they will live and play—showing dorm rooms, coffee shops, fitness centers, and more to help entice students to your campus.
  • Community. While many schools do not show the community they are a part of, most schools that want to show all available to a student would like to show things from skyline shots, professional sports teams nearby, the arts, and anything that helps recruit their ideal student.
  • Extracurricular activities. Students want to know about flying clubs, sporting clubs, or anything else that can complement their time in the classroom.
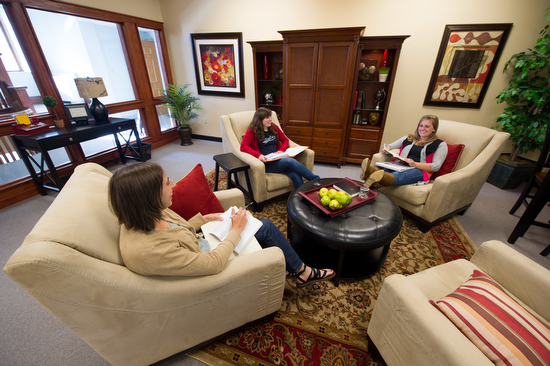
This living space in a women’s dorm is surprising to some folks and looks like a home atmosphere.

Getting ready for the shoot

  • Recruit more models than you think you will need. The best reason to have more models than you need is many will have last-minute reasons they cannot make it. Another good reason is some models you picked may not look all that good in photos. Rather than taking many pictures of students, you will not use them. You not only get images you can use, but more photos you can use.
  • Ask models to bring a change of clothes. Two or more outfits can help you when someone is wearing something inappropriate or so busy or loud that it draws too much attention to the photo. You may also want some solid-colored polo shirts to offer.
  • Ask models to wear solids. Also, avoid red and solid white. The red draws your eye too much, and the white can sometimes be complex for printing later.
  • When planning locations, remember to give time to transition from one place to another. It would be easier to use the same classroom and switch out teachers and students than to move from building to building. Unless there are some particular features in a school, you are showing off, showing a class is about showing the diversity of your students, the engaging faculty, and them enjoying themselves. Plan enough time for a photographer to pack up, move and then reset things like lights, tripods, and light stand.
  • Give time for the situation to work. Give enough time once the photographer starts to shoot for people to get into it. Giving time means the photographer can shoot a while, look at the images and suggest changes (like switching out people) to get you usable photos.
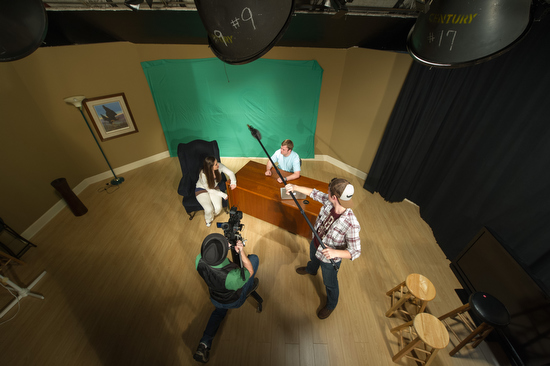
School showing their TV studio facilities.

Your Stock Images are Old

Be very careful to plan stock shoots annually or every other year. Hairstyles and clothing styles will quickly date your photos. If your audience is the same, you will need to update more often. Years ago, colleges updated their materials every other year. They were mainly shooting for recruiting materials.

With today’s internet, you need to have even a larger stock file replenished more often. One organization I work with puts a new photo on its home web page daily. By rotating this daily, the number of people going to the website has increased. They are creating excitement by having people wanting to see what is new.

One photographer has about 175,000 hits daily on his blog, and the draw is a daily photo. Check out Trey Ratcliff’s site, Stuck in Customs. Having lots of images is an excellent reason to have more stock images to help drive people to you.

Product shots 

Don’t forget to have fresh images of your products as well. You will help create a mood and ambiance for your product line with photos.

Use as graphic elements.

When it comes to photos, they can be used as much for their graphics as for their content.

Some of your products can look cool. So be sure and get detailed shots into your library.

Close-up images can add impact to a presentation. But, of course, you can also use them as a background.

Keep it Current

A sound photo library you are constantly updating is one of the best resources for your organization.

These photo shoots will become your way of having visual images to compliment the initiatives and messaging you need to be doing daily for your organization. Call me if you need help. I can not only help in the shooting but help you create an online database for storage and searching.

Shooting under fluorescent requires you to slow down

Reading Time: 4 minutes

Shooting under fluorescent lights can give unpredictable results if you do not slow down.

Fluorescent lamps using a magnetic mains frequency ballast do not give out a steady light; instead, they flicker at twice the supply frequency. This results in fluctuations in light output and color temperature, which may pose problems for photography and people who are sensitive to the flicker.

When the fluorescent light is at the end of its life, it can flicker more, and for those with photosensitive epilepsy, it can trigger a seizure.

Today, there are a range of types of fluorescent lights. You may have gone into a Home Depot or Lowe’s and noticed displays showing you different color temperatures of fluorescent lamps.


Color Temperature

Typical incandescent lighting is 2700 K, which is yellowish-white. Halogen lighting is 3000 K.

Fluorescent lamps are manufactured to a chosen color by altering the mixture of phosphors inside the tube. Warm-white fluorescents have a color spectrum of 2700 K and are famous for residential lighting. Neutral-white fluorescents have a color spectrum of 3000 K or 3500 K. Cool-white fluorescents have a color spectrum of 4100 K and are renowned for office lighting. Daylight fluorescents have a color spectrum of 5000 K to 6500 K, bluish-white.

On my Nikon D4, in the menu for White Balance, you can choose up to seven different presets for fluorescent. I have found a significant problem trying this method; it isn’t easy to pick the right color because the monitor on the back of the camera isn’t that easy to see color in all situations.

Flicker problem

Incandescent lights burn constantly, so your color temperature is consistent, regardless of your shutter speed. However, since fluorescent tubes act as light a flash and flickering, you will get an effect different than with flash where above your sync speed part of the frame is dark.

Look at these two different photos and see the color difference.

Everything is set the same (Nikon D4, ISO 12,800, f/5.6, 1/500) in each photo, but you can see the color difference is due to the flickering of the fluorescent.

Now, besides a color shift on the whole picture, you may end up with a band across the photo. I find this more annoying since it isn’t as easy to fix in post-production. Has this happened a few times, and you are screaming at that computer and camera?

Slow Down

You can get consistent color under fluorescent if you shoot at 1/100 or slower shutter speed.

Anytime you are under Fluorescent, Sodium-Vapor, or High Temp Mercury-Vapor, be sure to shoot slower than 1/100. You may need to shoot at 1/60 with some older model lights.

Why Strobes Are Used

Sometimes, shooting at 1/100th of a second isn’t going to cut it. A great example of this is shooting sports inside under those Sodium-Vapor lights in most arenas. This is why many pro photographers are using strobes for shooting sports. They need a consistent color without streaks or bands of color shift in the photograph.

If not for this flickering problem with these lights, it would be much more practical not to use strobes with today’s high ISO cameras.

Custom White Balance

The best solution I have found shooting under these lights that flicker like fluorescent is to do a custom white balance.

My favorite way to get a custom white balance is using my ExpoDisc.


ExposDisc goes in front of the lens, and then you use it to get an incident reading rather than a reflective reading of the light.
Notice the direction of the light hitting the subject. You move to the same position to get the light reading below.
Point the camera toward the direction of the light falling on the subject.

If the subject is facing me and the light is from the side, I face the camera with the ExpoDisc on it so it is pointing toward the camera position. The chart above is to help you understand the concept, but you can modify it.

Now, do a custom white balance if you are shooting in an arena with Sodium-Vapor lights. However, do the custom setting at a shutter speed lower than 1/100. You can then raise your shutter speed to higher than that for shooting, but this will give you more consistent color over your images. Even doing this will cause problems with about 5 – 10% of the photos.

Now you know to slow down your shutter speed when shooting under this light source.

How much you can make as a photographer

Reading Time: 3 minutes

My stepson looked at his first paycheck and asked, “Who is FICA?” This was his first hard lesson about where the money goes – the cost of doing business.

Much of the money we pay for a service doesn’t stay with the service provider.

According to Dun & Bradstreet, “Businesses with fewer than 20 employees have only a 37% chance of surviving four years (of business) and only a 9% chance of surviving ten years.” Of these failed businesses, only 10% close involuntarily due to bankruptcy. The remaining 90% close because the business was unsuccessful, did not provide the level of income desired, or was too much work for their efforts.”

So many good photographers have to turn to other ways to make a living, not due to a lack of photographic skills but because of poor business practices.

Two things caused their businesses to fail:

  1. They didn’t know the actual cost of doing business and
  2. They failed to promote themselves.

In 2001, I left a staff position and started full-time freelancing. Over the past 11 years, my business has averaged a 20% annual growth rate. Many of my colleagues ask me how I do it.

I often speak to photographers about business practices, many of whom are college students. When I teach workshops on the business of photography, we conduct practical exercises to help participants.

First, I require students to calculate the cost of living for a year. I’ve found that even the older students who have been on their own for a time typically do not know what it costs them to live.

Regardless of profession, if you do not know your cost, you cannot estimate your value in the marketplace.

Once you’ve known your cost and decided how much net income you want to earn, it is easy to determine what to charge for each project to reach that goal.

Take a moment and think of everything needed to do your job. Here are some categories from the National Press Photographers’ Association list I use. Just substitute your terms for similar types to figure out your annual cost of doing business.

  • Office or Studio
  • Phone
  • Photo Equipment
  • Repairs
  • Computers (Hardware & Software)
  • Internet (Broadband, Website & email)
  • Auto Expenses (Lease, Insurance & Maintenance)
  • Office Supplies
  • Photography Supplies
  • Postage
  • Professional Development
  • Advertising and Promotion
  • Subscriptions & dues
  • Business Insurance
  • Health Insurance
  • Legal & Accounting Services
  • Taxes & Licenses
  • Office Assistant
  • Utilities
  • Retirement Fund
  • Travel
  • Entertainment (meals with clients)

Add your desired net income to your annual business expenses, and divide that total by the number of projects you reasonably expect to do in a year. The answer gives you the average per project you must charge clients to pay those bills, stay in business, and live the way you want.

Dueling Pianos is OK when it is an act, but not when you are competing for a solo show.

Now you must determine whether the marketplace will sustain this charge.

On average, you need to charge $1,000 per project to reach your goal. If the services you provide are available elsewhere, people will shop for price. If the going rate in your community is $1,200, you are in good shape. If the going rate is $900, you need to cut your overhead—you’re hoping for income, business expenses, or both.

The key to earning what you want comes down to service. You must be able to demonstrate to potential clients that you offer something more if you want/need to charge more than other photographers do.

I have found that I need to know about the subjects I cover more than other photographers do. In addition, I deliver my images much faster than most others. I also listen carefully to what clients say they want and try to meet their needs and go beyond their expectations.

It was a revelation when I first determined my cost and income goals, just as my stepson’s response to FICA and other deductions from his pay was for him.

I do my best to keep my overhead low, but even close to 50% of my gross goes to business expenses. It was shocking to see what I must charge to pay the bills. This knowledge was the fire I needed to put in the time and effort to identify ways to increase my value to clients and to attract those clients by seriously marketing myself.

Do you know what you cost?