Transitioning to a new camera system often means bidding farewell to trusted gear. As I delve deeper into the world of Nikon’s Z9 system and its accompanying Z lenses, I’ve come to realize the remarkable evolution that has taken place in lens technology. This shift has led me to part ways with some cherished DSLR lenses that have faithfully served me through countless photographic journeys.
The decision to sell my beloved lenses was a challenging one. Each of them holds a special place in my collection, embodying the craftsmanship and quality I’ve come to expect from reliable tools of the trade. Yet, the advancements in Nikon’s mirrorless offerings have been revolutionary.
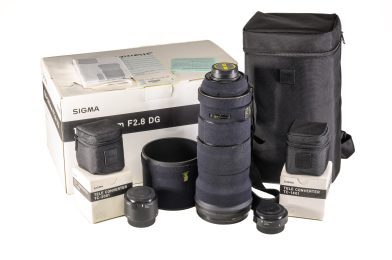
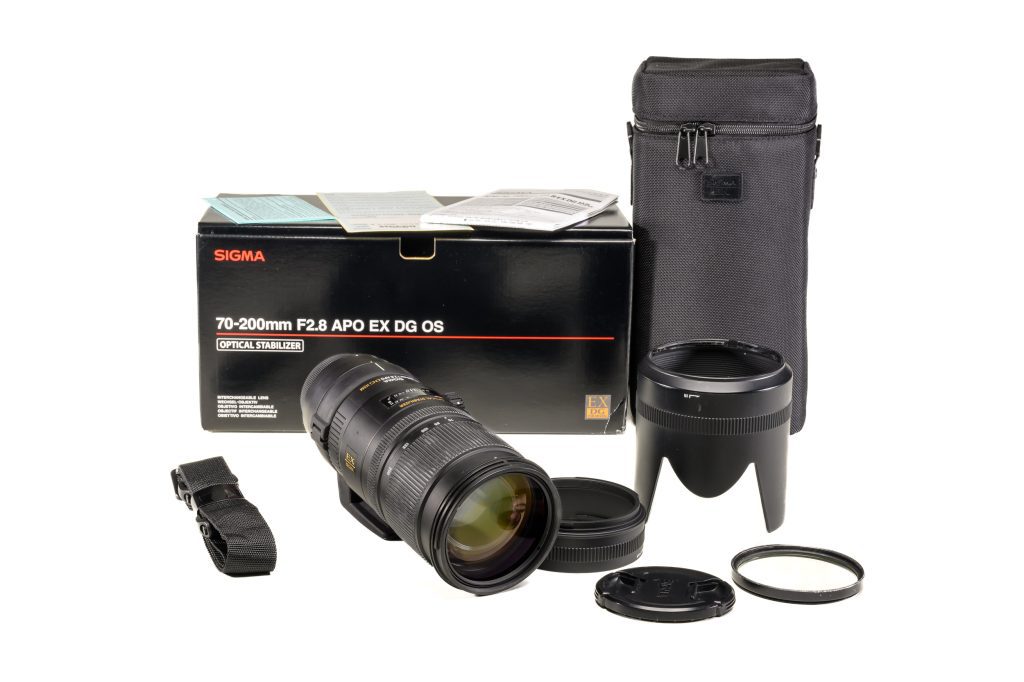
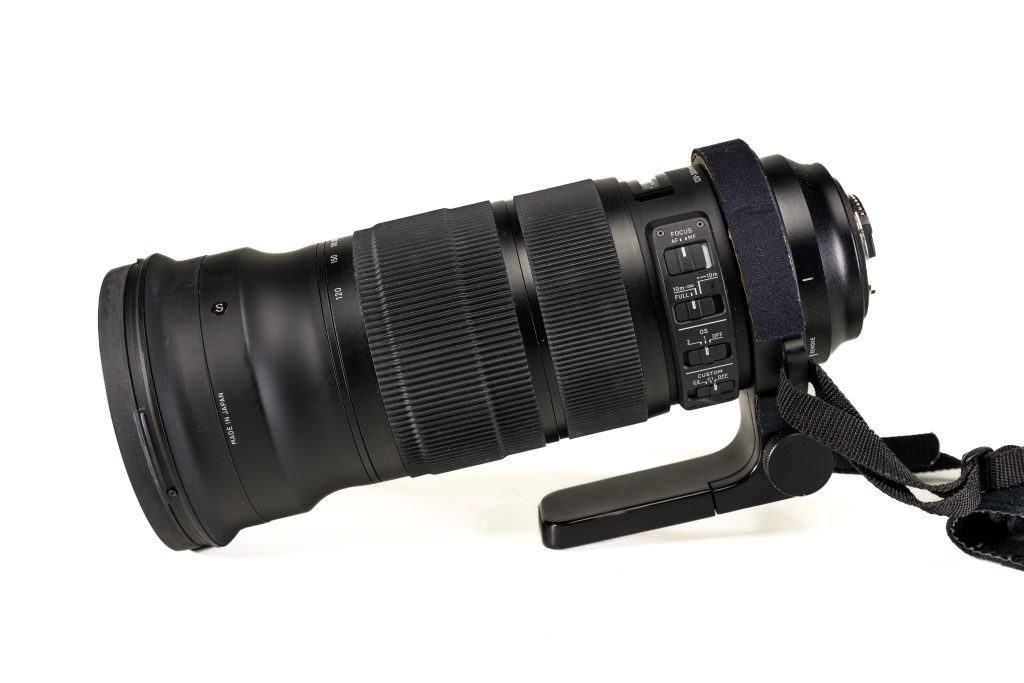
Sigma EX DG APO OS HSM 70-200mm F/2.8
The recent lineup of lenses designed explicitly for the Nikon Z series has left me in awe. The leap in quality, focusing speed, and reduced weight is unparalleled compared to the stalwart DSLR lenses that accompanied me on numerous shoots. The convenience and superior performance of the Z lenses have proven to be a game-changer, encouraging me to streamline my gear for enhanced efficiency and uncompromised excellence.
Samyang 14mm F2.8 Wide Angle Lens with an AE Chip for Nikon
While parting with these lenses feels bittersweet, it’s an acknowledgment of the exciting advancements that Nikon has made in the realm of mirrorless photography. However, I find myself reminiscing about the days when visiting the local camera store meant engaging in the ritual of trading old gear for the latest upgrades. There’s a charm in that tactile exchange that’s worth cherishing.
For those interested, these lenses, meticulously maintained and in excellent or mint condition, now seek new homes on eBay. They’ve been cherished and respected and contributed immensely to my photographic journey. As I turn the page to embrace the cutting-edge capabilities of the Nikon Z9 system, I do so with gratitude for the moments these lenses helped me immortalize.
The evolution of technology often demands letting go of the old to embrace the new. In this transitional phase, I bid a fond farewell to these exceptional lenses, confident they’ll continue to inspire and empower others in their photographic endeavors, just as they did for me.
This blog post is in response to my friend Seth, who asked me on Facebook today, “Great shots. Do you have much trouble with focusing on the wrong player?”
[NIKON Z 9, NIKKOR Z 100-400mm f/4.5-5.6 VR S, Mode = Aperture Priority, ISO 22800, 1/4000, ƒ/5.6, (35mm = 400)]
Hey Seth! Thanks for checking out the shots from the Chick-fil-A Peach Bowl game! You asked about focusing on the wrong player in sports photography, and it’s an art that’s both technical and intuitive. Let’s dive into what makes those great shots happen and why sometimes, despite all efforts, we miss capturing those pivotal moments.
[NIKON Z 9, NIKKOR Z 100-400mm f/4.5-5.6 VR S, Mode = Aperture Priority, ISO 18000, 1/4000, ƒ/5.6, (35mm = 180)]
Positioning is key. To consistently snap great sports photos, anticipation beats reaction. Balancing coverage is crucial when shooting for multiple teams, as I did in this game. Previously, focusing solely on one team allowed me to predict movements better, aiming to capture faces rather than backs and positioning strategically, like staying on the offensive end in basketball.
[NIKON Z 9, NIKKOR Z 100-400mm f/4.5-5.6 VR S, Mode = Aperture Priority, ISO 25600, 1/4000, ƒ/7.1, (35mm = 400)]
Knowing the teams inside out is like having a crystal ball. Familiarity with their plays and tendencies helps anticipate actions, whether a pass or a run, increasing the odds of having the lens trained on the action sooner.
[NIKON Z 9, NIKKOR Z 100-400mm f/4.5-5.6 VR S, Mode = Aperture Priority, ISO 25600, 1/3200, ƒ/5.6, (35mm = 310)]
Technical settings matter, too. Continuous focus and the back button focus technique ensure more shots are in focus than just following without constant adjustments. However, misses happen even with the best setup, mirroring how a defense can be deceived in a game.
[NIKON Z 9, NIKKOR Z 24-120mm f/4 S, Mode = Aperture Priority, ISO 12800, 1/4000, ƒ/4, (35mm = 96)]
Basketball? Enter remote cameras, providing different angles for coverage. Football, with its vast goal, makes this more challenging. Technicalities matter, and I’ve shared a link detailing my Nikon Z9 setup for sports photography for those interested in the nitty-gritty.
[NIKON Z 9, NIKKOR Z 100-400mm f/4.5-5.6 VR S, Mode = Aperture Priority, ISO 16000, 1/4000, ƒ/5, (35mm = 250)]
Knowing the sport inside out is the golden ticket. While understanding the game is one thing, each team’s uniqueness demands a deeper dive into their playbook. This familiarity allows for better anticipation of plays and player movements.
[NIKON Z 9, NIKKOR Z 100-400mm f/4.5-5.6 VR S, Mode = Aperture Priority, ISO 22800, 1/4000, ƒ/5.6, (35mm = 400)]
Speaking of gear, today’s cameras, like my Nikon Z9 with Z glass lenses, offer incredible focusing systems and rapid-locking motors, enhancing the number of in-focus shots. This allows quick shifts between capturing the quarterback’s throw and the receiver’s catch, minimizing missed moments.
[NIKON Z 9, NIKKOR Z 24-120mm f/4 S, Mode = Aperture Priority, ISO 450, 1/250, ƒ/4, (35mm = 52)]
So, in a nutshell, nailing sports photography isn’t just about having the right equipment and technical know-how—it’s about understanding the game, predicting actions, and being ready to adjust on the fly. The perfect shot often lies at the intersection of anticipation and preparedness.
Have you got any more questions? I am always happy to chat about the thrilling world of sports photography!
The photo above is of a finger, and the background has changed to a robot to use as an illustration with the help of generative fill in PhotoShop.
Photography, as an art and a profession, has never been static. The field has constantly evolved from its earliest days of cumbersome equipment to the era of smartphones and AI-powered image creation. Technological advancements have continually reshaped how images are captured, shared, and appreciated, significantly impacting the professional photography landscape.
One of the most notable shifts began with the advent of tools like light meters, autofocus, and various metering systems. These innovations simplified the technical aspects of photography, enabling more people to engage in capturing images. However, the monumental leap into digital capture revolutionized the industry. Suddenly, the guesswork of film was replaced by immediate results, altering the very essence of the photographic process.
The arrival of Artificial Intelligence elevated this transformation to new heights. AI now enables the creation of images that transcend reality, blurring the lines between photography and art. Yet, despite the sophistication of AI, its effectiveness hinges on human direction and input. Merely commanding it to produce a “great photo” falls short; specific prompts are necessary to translate ideas into visual realities.
Undoubtedly, the question arises: Is AI encroaching upon the domain of professional photographers? The answer is a nuanced one. While technology certainly streamlines the process, the creative prowess of individuals truly unlocks its potential. The synergy between human creativity and technological tools amplifies the impact of both.
Portrait with a Generative background generated with PhotoShop
Digital capture and mirrorless cameras democratized photography, making it more accessible. Smartphones, serving multifunctional purposes, further altered the landscape by ensuring a camera was always at hand. Consequently, the role of professional photographers evolved. They were no longer hired solely for image capture; instead, they were sought after for their ability to transcend mere documentation, offering something unique and profound.
A timeless truth lies at the heart of this evolving industry: Great photography stems from great ideas. Even when not creating the scenes they capture, photojournalists must possess a keen eye for stories and conflicts that resonate. They must understand their audience and effectively communicate the significance of their work.
A dichotomy exists within the profession – the creative visionaries and the master technicians. While AI may potentially threaten the latter, those harnessing its capabilities with creative insight will likely thrive. The future belongs to those who can merge the secret sauce of creativity with a deep understanding of technology and audience engagement.
Success in this dynamic industry is not merely about mastering the tools; it’s about comprehending why an audience craves a particular idea. The leaders of tomorrow’s photography landscape will be those who skillfully blend innovation, technical prowess, and an acute understanding of human emotion and narrative.
In this ever-evolving realm, the essence of photography persists: It’s not just about capturing an image; it’s about capturing a moment, a feeling, or an idea that resonates deeply with its audience. The fusion of human ingenuity and technological advancement is the lens through which the future of professional photography will be defined.
Photography is an art form intertwined with technology, and for Nikon camera owners, capturing moments can occasionally come with unexpected hiccups. Sometimes, those elusive glitches creep in, and the instinct is to blame the camera. But what if the answer lies not just in understanding the exposure triangle—ISO, shutter speed, and aperture—but in dissecting the intricate settings the camera used when the photo was taken?
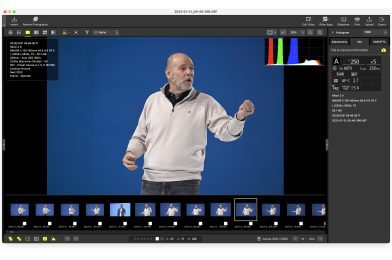
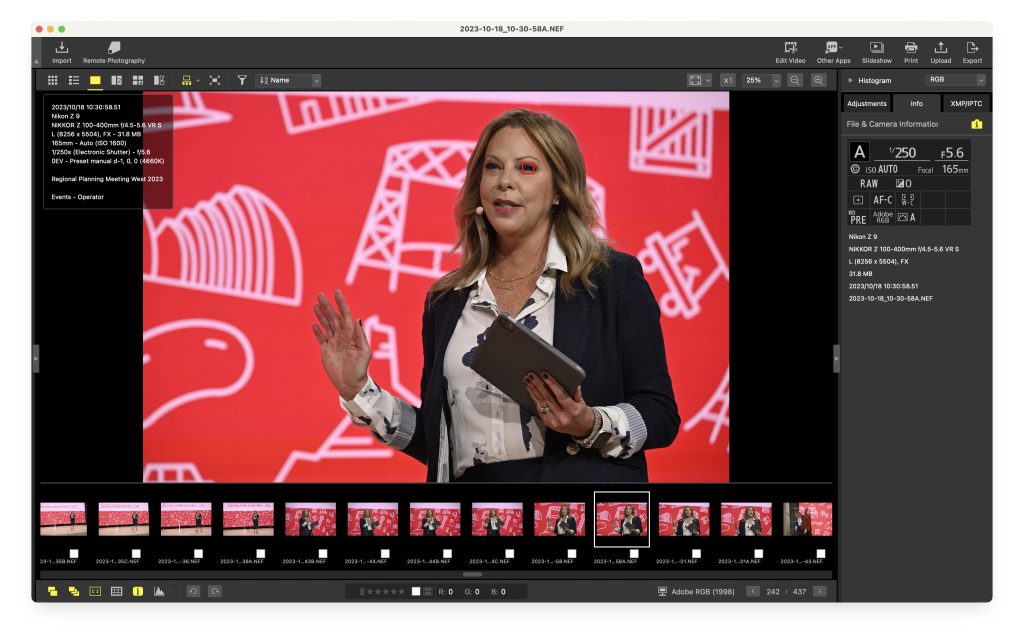
Enter the often underutilized hero: the Nikon NX software. Beyond the commonly acknowledged exposure elements, this software unravels a treasure trove of information. It doesn’t just stop at the basics; it dives into the nitty-gritty—like focus settings, where your camera locks its focus, and many other configurations.
Understanding Beyond the Basics
Sure, the exposure triangle is the cornerstone of photography fundamentals. However, focusing solely on these aspects might overlook critical details. Imagine the frustration of blaming a blurry image on the camera, only to find out later that the focus was off, not the camera itself.
With the Nikon NX software, photographers can access a comprehensive breakdown of the settings used during the shot. It’s akin to peering under the hood of your camera post-capture, dissecting each element to understand the intricate dance of settings that contributed to that specific photo.
NX Studio can show you exactly where you were focused.
Isolating the Culprit
Picture this: you’ve captured a breathtaking landscape, but upon review, there’s an unexpected graininess or an unwarranted softness. Instead of throwing your hands up in frustration, the Nikon NX software empowers you to play detective.
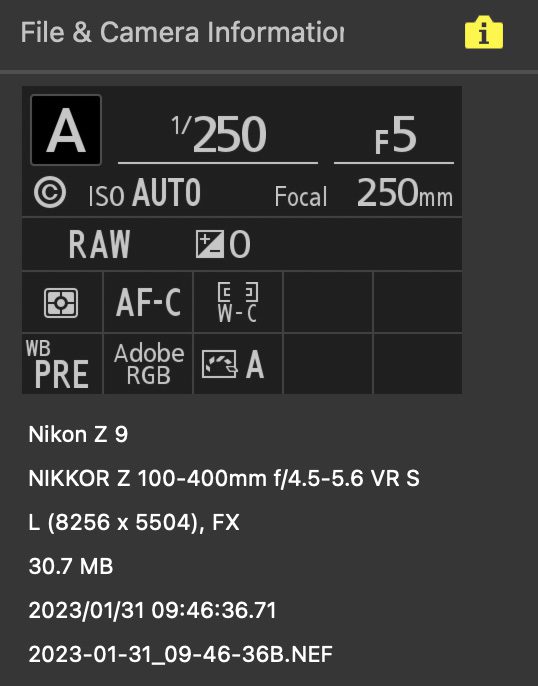
Here is all the file info for the photo above:
By scrutinizing the detailed metadata captured by the software, you can isolate the exact setting causing the issue. Was it a misguided autofocus? Or perhaps an overlooked change in ISO sensitivity? With this software, you can identify and rectify problems swiftly and accurately.
The Power of Comprehensive Analysis
Photography is more than the sum of its exposure triangle parts. It’s about the intricate interplay of settings, focus modes, and nuanced adjustments that craft the final image. The Nikon NX software offers a panoramic view of these settings, elevating your troubleshooting prowess beyond what meets the eye.
The software leaves no stone unturned, from White Balance to Picture Controls, Active D-Lighting to Metering Modes. It’s like having a backstage pass to your camera’s performance, allowing you to understand what went wrong and why.
While analyzing my photos with NX Studio, it clicked for me that I could be using Spot Metering and get more accurate exposures when using eye tracking for focusing.
Conclusion
Next time you encounter an unexpected glitch in your Nikon-captured masterpiece, resist the urge to pin it solely on the camera. Instead, harness the power of the Nikon NX software—a tool designed to demystify the intricate web of settings and unveil the truth behind each shot.
Remember, photography is a delicate dance between artistry and technology, and with the right tools at your disposal, troubleshooting those occasional hiccups becomes a smoother, more enlightening process. So, delve deeper, analyze meticulously, and let your Nikon camera reveal its secrets through the lens of the NX software.
Reading Time: 5minutesLearning to make bricks are Anna Roberts (left, age 7), Brandon Roberts (2nd left, age 10), Shaquaja Washington (3rd, age 8), and Caleb Edge (age 10) at the Habitat for Humanity International’s Global Village & Discovery Center in Americus, Georgia. [Nikon D100, Sigma 18-125mm, ISO 200, ƒ/8, 1/180]
Thirteen years ago, I had been shooting with my new Nikon D100 for just a few years. This was my first digital capture DSLR camera.
My daughter and I drove to Americus, Georgia, to photograph the Habitat for Humanity International’s Global Village & Discovery Center for Disney’s Family Magazine.
For the past few days, I have been going through my old CDs and DVDs, looking through my work. In good light, all of my digital cameras were pretty outstanding compared to my days of shooting film.
Enjoying the Tanzania House are Brandon Roberts (left, age 10), Anna Roberts (age 7), Shaquaja Washington (right, age 8), and Caleb Edge (right, age 10), at the Habitat for Humanity International’s Global Village & Discovery Center in Americus, Georgia. [Nikon D100, Sigma 18-125mm, ISO 200, ƒ/4.8, 1/80]
Indoors with that first Nikon D100, I used flash more than I would have to do today. But the results were just great.
Learning to make bricks are Anna Roberts (left, age 7), Shaquaja Washington (2nd, age 8), Caleb Edge (3rd, age 10), and Brandon Roberts (age 10) at the Habitat for Humanity International’s Global Village & Discovery Center in Americus, Georgia. [Nikon D100, Sigma 18-125mm, ISO 200, ƒ/8, 1/180]
I used the Sigma 18-125mm lens on this camera, which wasn’t super sharp but did great with that camera. I loved not having to carry a lot of lenses.
Tatiana Suarez, tour guide shows how to make bricks like they do in many third world countries to Anna Roberts (blue shirt age 7), Brandon Roberts (solid dark blue age 10) Caleb Edge (checkered shirt age 10), and Shaquaja Washington (pink shirt age 8) at the Habitat for Humanity International’s Global Village & Discovery Center in Americus, Georgia. [Nikon D100, Sigma 18-125mm, ISO 200, ƒ/3.5, 1/2500]
I was shooting wide with the 18mm on a DX cropped sensor, so I would only have hit about 27mm if it was an FX sensor. It would be a few years before Nikon introduced the entire sensor.
Tatiana Suarez, tour guide, shows the Sri Lanka house to Brandon Roberts (front, age 10), Anna Roberts (middle, age 7), and Caleb Edge (back, age 10) at the Habitat for Humanity International’s Global Village & Discovery Center in Americus, Georgia. [Nikon D100, Sigma 18-125mm, ISO 200, ƒ/8, 1/250]
I cannot say enough about Habitat for Humanity International’s Global Village & Discovery Center for those wanting to make a great day trip. You can see how people live worldwide, and Habitat builds different houses depending on the country.
David Bottomley, tour guide shows how they are building an example of the homes built by Habitat International in Mexico using a new light weight brick made of aluminum and concrete to Anna Roberts (blue shirt age 7), Brandon Roberts (solid dark blue age 10) Caleb Edge (checkered shirt age 10), and Shaquaja Washington (pink shirt age 8) at the Habitat for Humanity International’s Global Village & Discovery Center in Americus, Georgia. [Nikon D100, Sigma 18-125mm, ISO 200, ƒ/4.8, 1/1600]
Here the kids see brick made of aluminum and concrete, which they have used in Mexico.
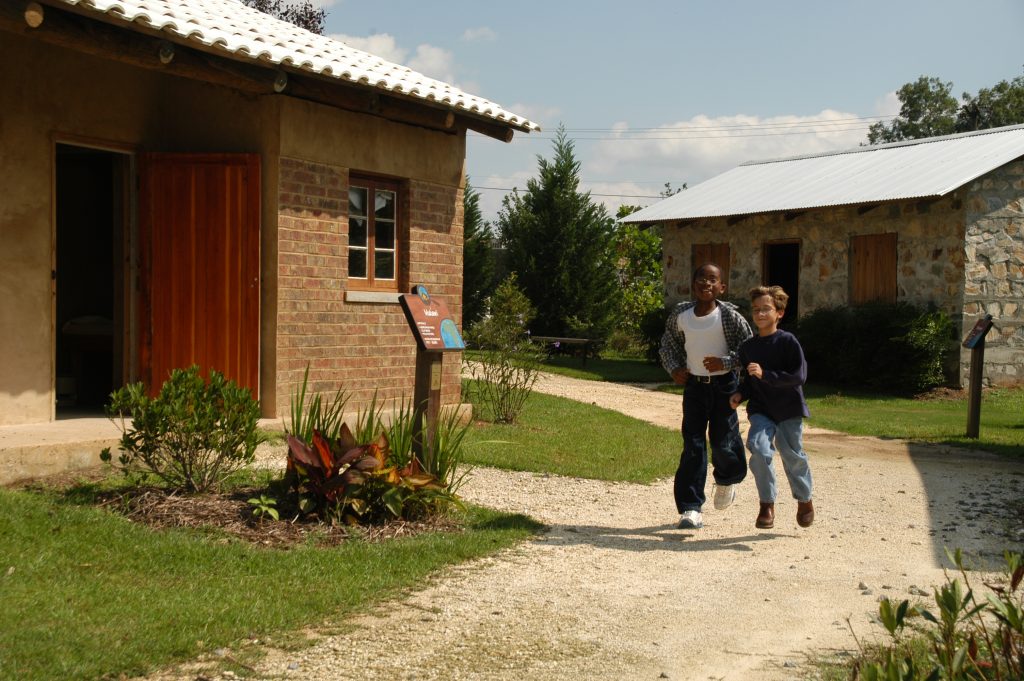
Caleb Edge (left, age 10) and Brandon Roberts (right, age 10) run by the Malawi House on the left and the Kenya House behind them at the Habitat for Humanity International’s Global Village & Discovery Center in Americus, Georgia. [Nikon D100, Sigma 18-125mm, ISO 200, ƒ/6.7, 1/640]
I think this is one of the great day trips for families to see how the rest of the world lives.
Caleb Edge (front left, age 10), Brandon Roberts (back left, age 10), Anna Roberts (front Right, age 7), and Shaquaja Washington (back right, age 8) at the Habitat for Humanity International’s Global Village & Discovery Center in Americus, Georgia. [Nikon D100, Sigma 18-125mm, ISO 200, ƒ/6.7, 1/400]
Kids and adults can see actual street scenes, homes, and other things like schoolrooms in different countries.
David Bottomley, tour guide shows the African Schoolhouse is a new experience for Anna Roberts (blue shirt age 7), Brandon Roberts (solid dark blue age 10) Caleb Edge (checkered shirt age 10), and Shaquaja Washington (pink shirt age 8) at the Habitat for Humanity International’s Global Village & Discovery Center in Americus, Georgia. [Nikon D100, Sigma 18-125mm, ISO 200, ƒ/6.7, 1/180]
When I was shooting fill flash outside with that Nikon D100, I had to shoot at 1/180 so I would not see the shutter curtain.
While the cameras today are much better, I believe that no matter what the camera is, you can get some great photos if you know what you are doing.
David Bottomley, tour guide shows the Global Village to Anna Roberts (blue shirt age 7), Brandon Roberts (solid dark blue age 10) Caleb Edge (checkered shirt age 10), and Shaquaja Washington (pink shirt age 8) at the Habitat for Humanity International’s Global Village & Discovery Center in Americus, Georgia. [Nikon D100, Sigma 18-125mm, ISO 200, ƒ/4.8, 1/1250]Tagged : Gear Tips
In 1930, Willard Van Dyke, Ansel Adams, and Edward Weston formed the Group ƒ/64.
Group f/64 was founded by seven 20th-century San Francisco photographers who shared a standard photographic style characterized by sharply focused and carefully framed images, primarily from a Western (U.S.) viewpoint. In part, they formed in opposition to the pictorialist photographic style that had dominated much of the early 20th century. Still, they wanted to promote a new modernist aesthetic based on precisely exposed images of natural forms and found objects.
The term f/64 refers to a small aperture setting on a large-format camera, which secures an excellent depth of field, rendering a photograph evenly sharp from the foreground to the background. A small aperture sometimes implies a long exposure, and therefore, a selection of relatively slow-moving or motionless subject matter, such as landscapes and still life. Still, in the typically bright California light, this is less a factor in the subject matter chosen than the sheer size and clumsiness of the cameras, compared to the smaller cameras [35mm] increasingly used in action and reportage photography in the 1930s.
One of the magazines for which I have done work over the years is Country Magazine. They require shooting at the highest depth of field for their photos. To do this on today’s DSLR cameras, you typically shoot at ƒ/22. This would be equivalent to the ƒ/64 on an 8′”x10″ that many in Group ƒ/64 used.
Stream near Great Smoky Mountains Institute at Tremont in the Great Smoky National Park, located in Townsend, Tennessee, on June 22, 2006. [Nikon D2X, Nikkor 24-120mm ƒ/3.5-5.6, ISO 100, ƒ/22, 1/1.5]
The strength of shooting with sharpness throughout the photograph is that it puts the audience into the scene. This is where you use composition and lighting to draw the audience into the picture.
While your eye may initially be drawn to where the photographer directs you, using light values and composition, your vision will wander around the scene as if you were standing there yourself.
This style was in opposition to the pictorialists of the time.
Pictorialism is the name given to an international style and aesthetic movement that dominated photography during the late 19th and early 20th centuries. There is no standard definition of the term. Still, in general, it refers to a style in which the photographer has somehow manipulated what would otherwise be a straightforward photograph to ” create” an image rather than simply recording it. Typically, a pictorial photograph appears to lack sharp focus (some more so than others), is printed in one or more colors other than black and white (ranging from warm brown to deep blue), and may have visible brushstrokes or further manipulation of the surface. For the pictorialist, a photograph, like a painting, drawing, or engraving, was a way of projecting an emotional intent into the viewer’s realm of imagination.
In photography, bokeh refers to the aesthetic quality of the blur produced in the out-of-focus areas of an image, created by a lens. Bokeh has been defined as “the way the lens renders out-of-focus points of light.” Differences in lens aberrations and aperture shape cause some lens designs to blur the image in a visually pleasing way. In contrast, others produce unpleasant or distracting blurring—”good” and “bad” bokeh, respectively. Bokeh occurs in parts of the scene that lie outside the depth of field. Photographers sometimes deliberately use a shallow focus technique to create images with prominent out-of-focus regions.
I would say that those who shoot primarily with a wide open aperture are more stylistically akin to the pictorialists of the last century and less like Group f/64, which was about preserving everything in the scene.
[NIKON D750, 85.0 mm f/1.8, Mode = Aperture Priority, ISO 500, 1/320, ƒ/1.8, (35mm = 85)]
I love that my camera allows me to shoot from f/1.4 to f/57. The ƒ/57 is when I shoot with my Nikon 60mm Micro lens. Here is a shot I did that was widely published.
“ƒ/8 and be there,” Alfred Eisenstaedt responded to the question on how to be a successful photographer.
However, the earliest record of the quote “ƒ/8 and be there” is attributed to Weegee, a famous street photographer during the 1930s, ’40s, and beyond. It represents a philosophy of keeping technical decisions simple and letting your vision take you where you need to be. The quote has been the mantra of photojournalists, travel photographers, and even nature photographers.
This suggests that you need to anticipate and be technically prepared to capture “the decisive moment.”
I advise being cautious not to treat your interviews as if you have the microphone and recorder levels set and hit record, and then you’re done.
Don’t Make Your Camera a Box Camera
Kodak made a box camera where you pushed the button, and Kodak did the rest. You had no control over the Aperture, Shutter, or even ISO.
Once you subscribe to shooting all your photos like the Group ƒ/64 or those doing BOKEH photography, you have essentially taken that costly camera and turned it into a box camera.
Exercise for you to do
Take your camera and just one lens. Find a scene and then shoot the stage at every aperture setting your camera offers. Now, as you get to a wide open gap, you know that your depth-of-field becomes very shallow, so remember to change your focus so that the focal point is on something in the scene that creates interest. We call this selective technique focus.
Now spend time doing this for several different situations. It might be able to do it with scenery at first, but then move on to people. What is fun to do is to shoot where there are many people. A good example is a coffee shop.
Your challenge is not to take one good photo in each situation, but rather to capture a great picture at each f-stop.
When you master this technique, you discover you can say something different about each situation. This will be the difference between writing a concise sentence and creating a novel with just one frame.
Will you take up the challenge?
I believe great photographers are those who know when to use which aperture to capture what they want to say about the subject.
Selective focus makes people pop out of photos or makes the backgrounds recede into a blur. And you choose what pops, what blurs, and what fuzzes over.
Where do you want the viewer to focus their attention – the hedge in the foreground, the man in the middle, or the trees in the distant background? Many professional photographers use selective focus to control the viewer’s attention.
The apertures, called f-stops, are fractions. For example, the f-stop ƒ/4 is ¼ (one-fourth) of what one-fourth is, which is a little beyond the scope of this article. Let’s say that an f-stop is a fraction, ok? (ƒ/4 = 1/4th f8 = 1/8th). Typically, these numbers are on the lens: 2.8, 4, 5.6, 8, 11, 16, 22, and so on.
Remember these are fractions: 1/2.8, 1/4, 1/5.6, 1/8, 1/11, 1/16, and 1/22. It compares how much light each number lets through the lens. Therefore, 1/5.6 allows more light through the lens than 1/22.
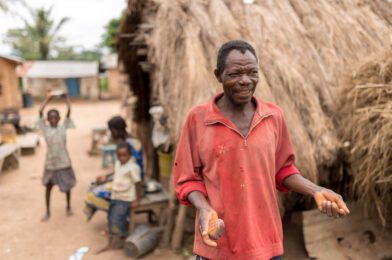
Togo, West Africa [NIKON D5, 35.0 mm f/1.4, Mode = Aperture Priority, ISO 100, 1/2500, ƒ/1.4, (35mm = 35)]
Here’s the creative part: the smaller the opening (f-stop) in the lens, the less light is allowed in. Therefore, a greater area is in focus from the foreground to the background. If you want to throw most of the background out of focus, use ƒ/5.6 rather than ƒ/22.
Today’s digital cameras allow the photographer to vary the aperture, preview the results, and then decide its effectiveness.
Togo, West Africa [Nikon D5, Nikon 85mm ƒ/1.8G, ISO 100, ƒ/1.8, 1/320]
If you want the subject to “pop,” use a larger lens opening, e.g., ƒ/4 or ƒ/5.6. Like a simple sentence, having one different subject is better.
A smaller aperture (ƒ/16 or ƒ/22) brings the foreground and background into sharper focus or a greater depth of field. It also allows for other compositional techniques to direct the viewer to the photo’s main subject.
Setting your camera’s ISO, shutter speed, and aperture provides more than a properly exposed photograph. You can use these tools to compose and say what you want to say in your pictures.
Experiment using different ƒ-stops. Try setting the camera to the aperture preferred setting. Explore the creative tools available on the camera. If the camera is always set on automatic, it becomes a costly box camera.
“I’ll fix that in post,” is the mantra for so many photographers. As long as you get the best possible exposure and shoot in the RAW mode of your camera there is a great deal that you can correct in the postproduction. However, there is one thing that cannot be fully corrected that needs attention before you push that shutter release.
If you shoot RAW rather than JPEG you can change the color temperature much easier and more precisely in the postproduction. For example when you open the photo in either PhotoShop or Lightroom the RAW image will give you a pull down menu that is similar to the white balance menu built into the camera. You can pick Auto, tungsten, fluorescent, daylight, flash or custom white balance settings. If you shoot JPEG these options are not available.
So, the mantra for the RAW shooter of, “I will fix that in post” can be done as far as white balance. The problem with being able to correct a photo after the fact can give you the false sense of security that everything is fixable in post.
If you miss the exposure even in raw you can adjust the exposure in post, but the results will not be stellar. Correct exposure will give you more dynamic range in the RAW image than one poorly exposed.
I recommend before you press the shutter to take the photo to do a custom white balance with your camera. This is where you tell the camera the perfect white balance in that setting.
ExpoDisc is used to get a incident “white balance”
Grey card is used to get a reflective “white balance”
There are different devices to help you set the custom white balance. I use the ExpoDisc as my primary device. This is a device you put on your lens like a filter, stand in the place of the subject and point the lens back towards the direction of either the light or the camera. This is called an incident reading.
Another great and inexpensive way to set your white balance is a grey card. This is a 15% grey card that is calibrated to give you what would be the absolute middle tone in your histogram. You put this where the subject is and filling the frame with nothing but the grey you set your camera to it. The card is facing the direction of the camera. This is called a reflective reading.
If you take time to get a custom white balance you will save this step in postproduction and increase the accuracy of the color in your photos.
Polarizing filter diminishes the glare in foliage
Without the polarizing filter you have glare in foliage
One thing that is not correctable in post is glare. This is often everywhere in a photo. The polarizing filter is the best way to correct for this flaw in photos.
Often fishermen wear polarizing sunglasses so they can see below the surface of the water and see the fish. It helps cut the glare of the light on the surface of the water to see the fish below.
Polarizing sunglasses also help those operating motor vehicles. The glare from the dashboard, hood and road can be removed with the polarizer.
The polarizing filter fits onto the lens of the camera and after it is attached the photographer rotates the filter while looking through the camera lens is able to decide how much of the glare they want to remove from a scene.
Besides water and driving conditions glare is everywhere. The landscape photographer uses the polarizing filter to improve the color of foliage. Leaves and grass often have glare that a polarizer helps to remove and give a richer color that is not possible to correct in postproduction.
There is one more thing that a polarizer does besides cut glare, but this is a little tricky to grasp. The polarizer can give you a darker sky, but this depends on the direction you are pointing your camera in relationship to the sun. Only ½ the sky can be darkened. Without going to a long explanation, you just need to rotate the filter to see what part of the sky is affected. If it gets darker then you know it is working and if it doesn’t get darker it isn’t working.
The one thing you want to be careful about when using the polarizer is if the sky in part of the photo is in the area that will darken and some of the sky is in the area that will not darken in the same photo.
When you listen to the weather report you often hear them talk about humidity. This is how much water is in the air. Humidity can be something a polarizer can help with as well. The water in the air can add to the glare. Using the polarizer can help in this situation. The lower the humidity the richer the color because there is less interference between the lens and subject. Where you will see this the most is in the sky. In dry climates the sky will almost be black with a polarizer.
I highly recommend you own a polarizer and use it to improve your photos—because postproduction will not fix what it will.
From the moment you click the shutter to make a photo until the final place where the photo is to be viewed, everything can make or break a photo.
After you transfer your images from your digital camera to your computer, you can view them on your computer’s screen. If you choose to change the photo’s colors, if your monitor is not calibrated correctly, you could be changing colors that need no change at all.
I use the DataColor Spyder2Express to calibrate my monitor. However, many different tools can also be used to calibrate, including Pantone Huey, X-Rite Eye-One, and other devices.
The difference between the devices is the number of monitors and the color choices that can be calibrated.
If you use Photoshop, Lightroom, or any other software to manipulate images, you need to calibrate your monitor so that you see the most accurate color possible as you work.