The Journey of the Red-Shouldered Hawks: A Personal Photo Project

Since the onset of COVID-19, many of us have spent more time at home, discovering new hobbies and appreciating the nature surrounding us for me, this period of increased home time turned into a unique opportunity to connect with and document the lives of the red-shouldered hawks that nest in our backyard.

Red-Shouldered Hawk

A New Beginning

It all started during the early days of the pandemic when I noticed a pair of red-shouldered hawks beginning their courtship in late January. With a newfound abundance of time, I embarked on a personal photo project, capturing their journey from mating to independence. Little did I know this project would become a profound and rewarding experience.

Heartbreak and Hope

Last year, the hawks’ nesting attempt ended, but the nest didn’t go well. All their eggs were lost, a reminder of the fragile balance of nature. I was determined to follow their story more closely this year, hoping for a different outcome. Equipped with my camera, I started documenting their progress, visiting the next day after day, eager to fill in the story’s gaps that I had missed the previous year.

The Stages of Growth

Whether wheeling over a swamp forest or whistling plaintively from a riverine park, a Red-shouldered Hawk is typically a sign of tall woods and water. It’s one of our most distinctively marked common hawks, with barred reddish-peachy underparts and a strongly banded tail. In flight, translucent crescents near the wingtips help to identify the species at a distance. These forest hawks hunt prey ranging from mice to frogs and snakes.

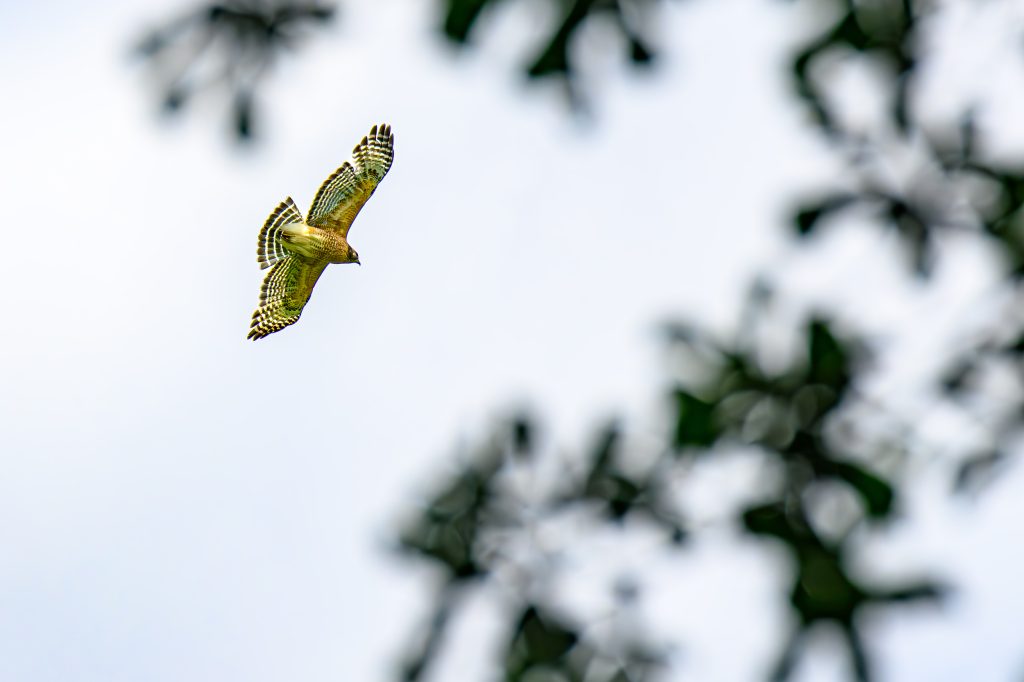
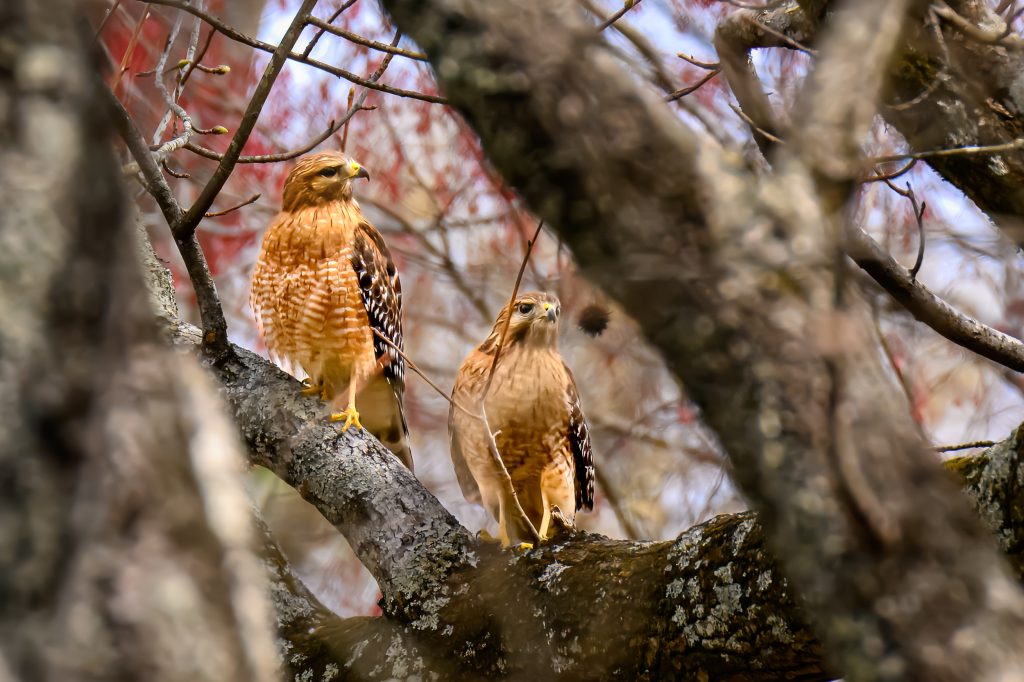
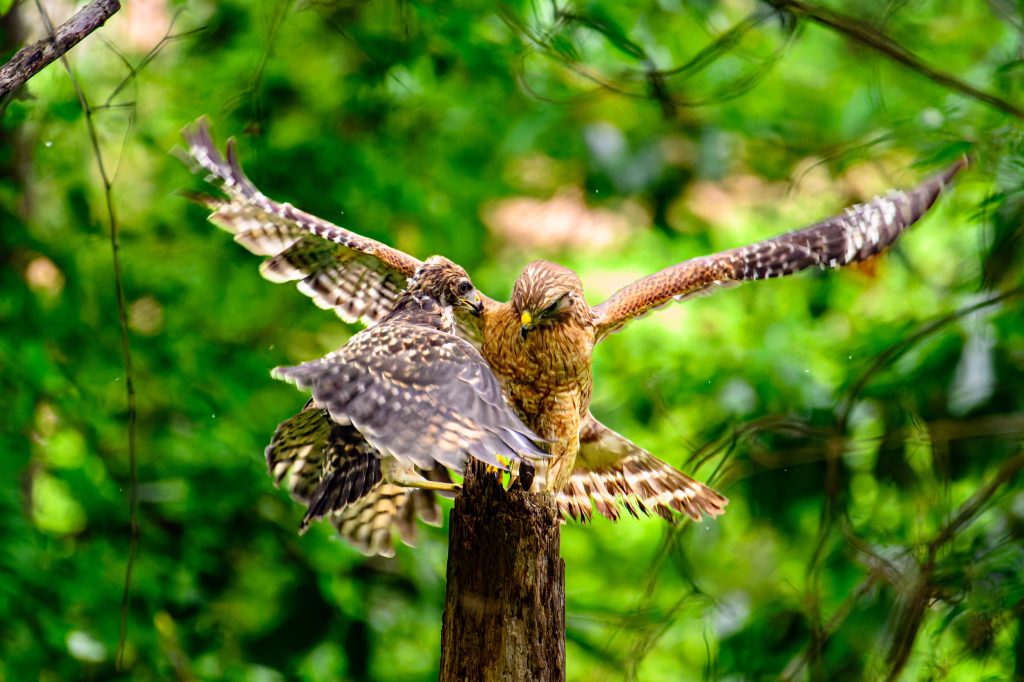
Mating (January – March)

In late winter, the hawks began their courtship. Their aerial displays and vocalizations signaled the beginning of a new cycle. This initial stage, filled with excitement and hope, was a perfect start to my photo series.

Hidden from view, moments like these remind us of the red-shouldered hawk’s tender care and nurturing instinct. Witnessing the circle of life unfold in the cozy confines of their nest is a testament to the beauty of nature’s delicate balance.

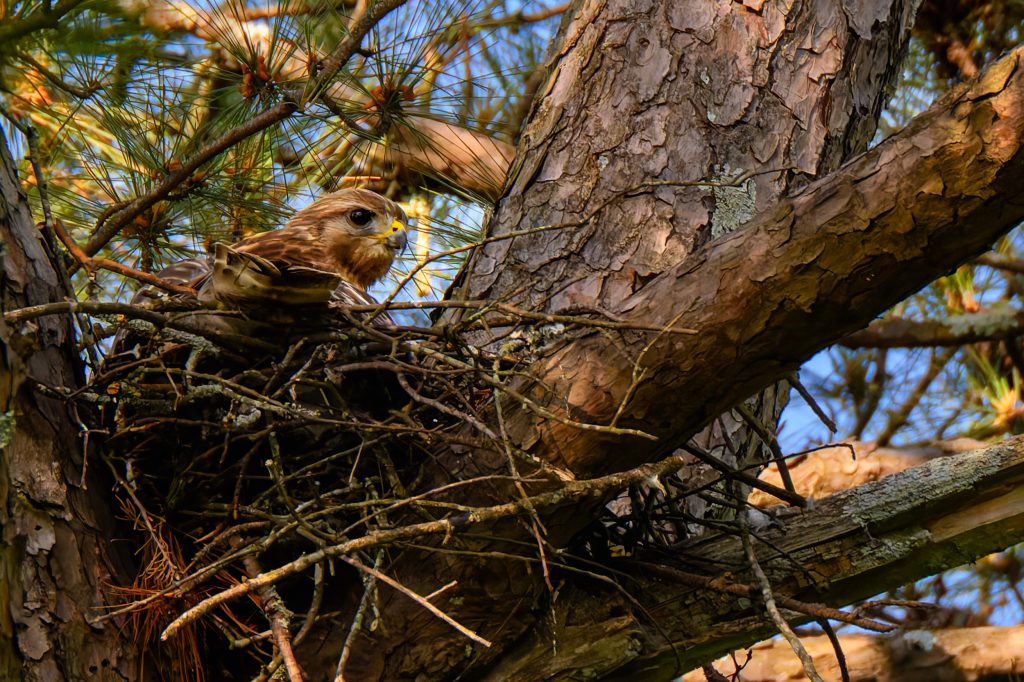
Nesting (February – April)

By February, the pair had chosen their nest site high in a sturdy tree. They diligently constructed their nest, a labor of love and precision. Capturing these moments highlighted their dedication and teamwork.

Egg Laying (March – April)

In early spring, the female laid her eggs. Over several days, 2-5 eggs appeared in the nest, each promising new life. I documented the serene beauty of the eggs nestled safely in their home.

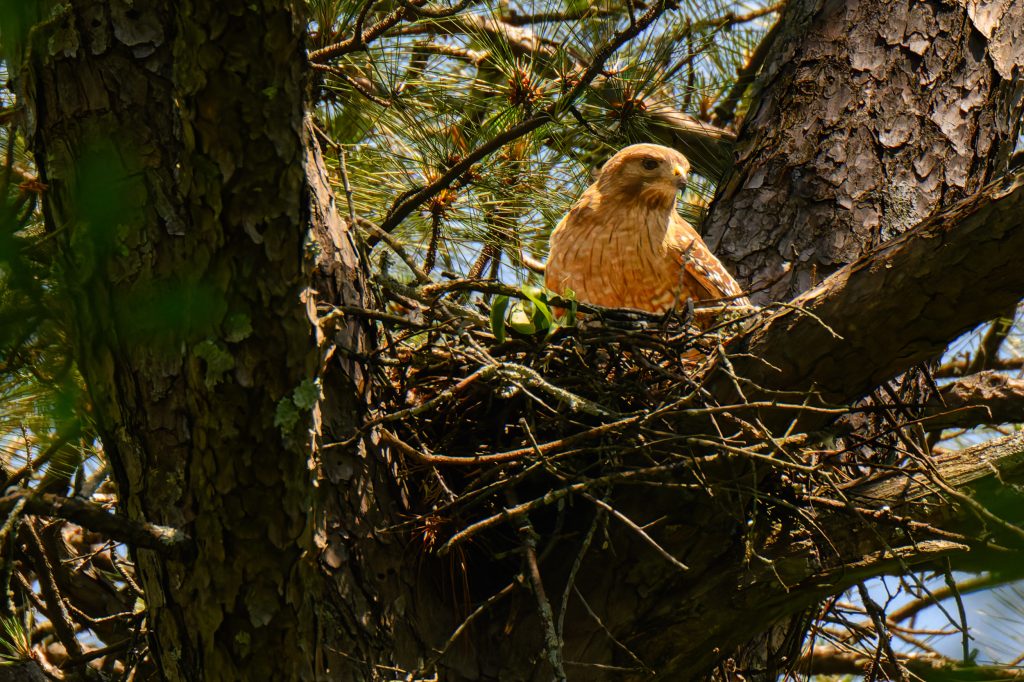
Incubation (March-May)

Incubation required patience and vigilance. Both parents took turns warming the eggs, a task primarily shouldered by the female. I captured intimate moments of this nurturing phase.

I was thrilled to capture a momentous occasion today as I finally snapped a photo of all three baby Red-Shouldered Hawks! These adorable bundles of fluff are still sporting their pristine white feathers, eagerly awaiting their next meal from their doting parents. Did you know that baby hawks, known as eyasses, rely entirely on their parents for food and protection during this stage? It’s a testament to the remarkable bond between these magnificent birds and the dedication of their caregivers.

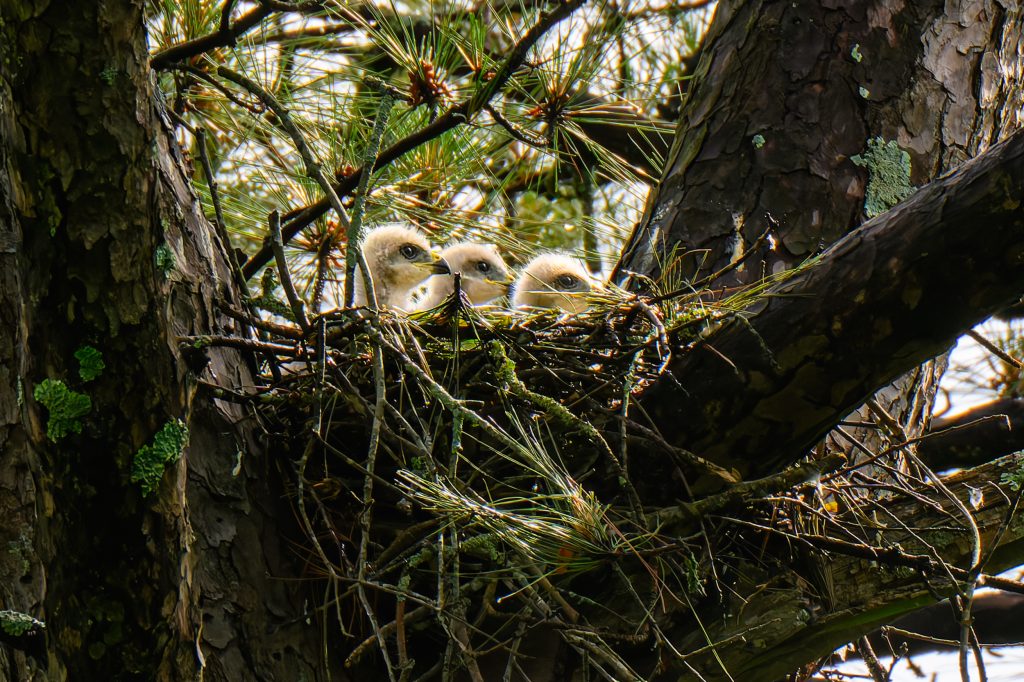
Hatching (April – May)

Late April brought the long-awaited hatching of the chicks. They emerged, fragile and downy, eyes still closed to the world. Witnessing and photographing this tender stage was incredibly moving.

Red-shouldered Hawk juvenile out of the Nest and exploring our backyard

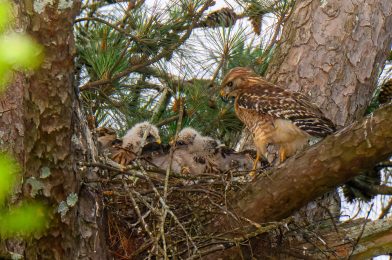
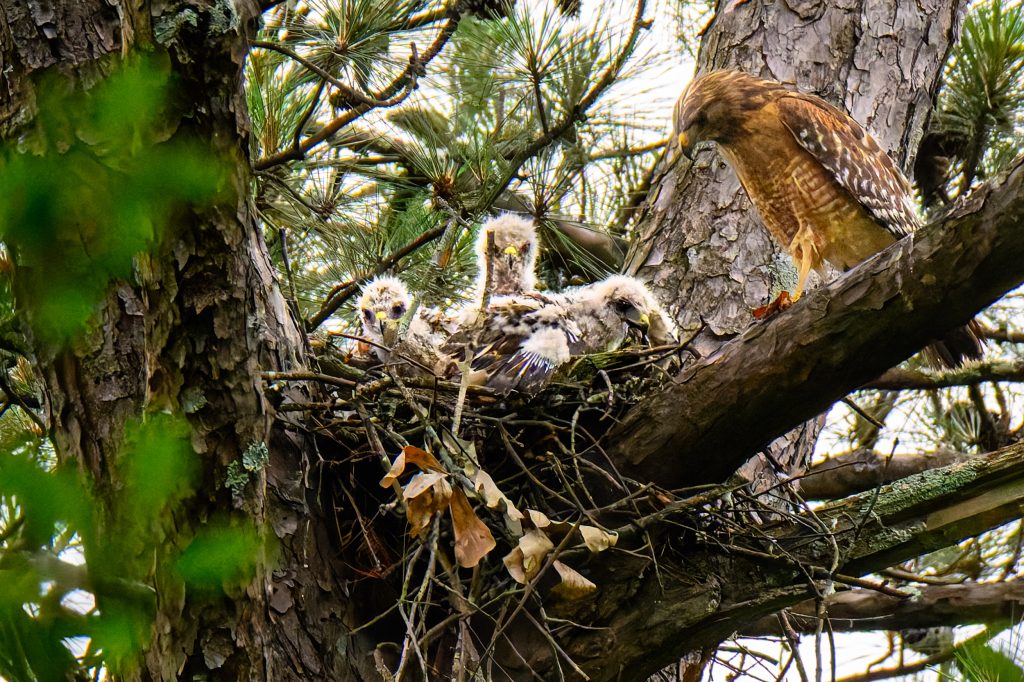
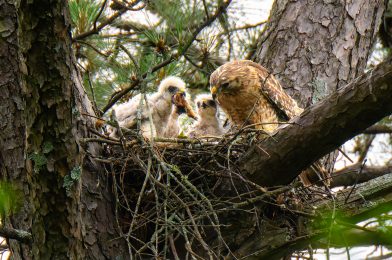
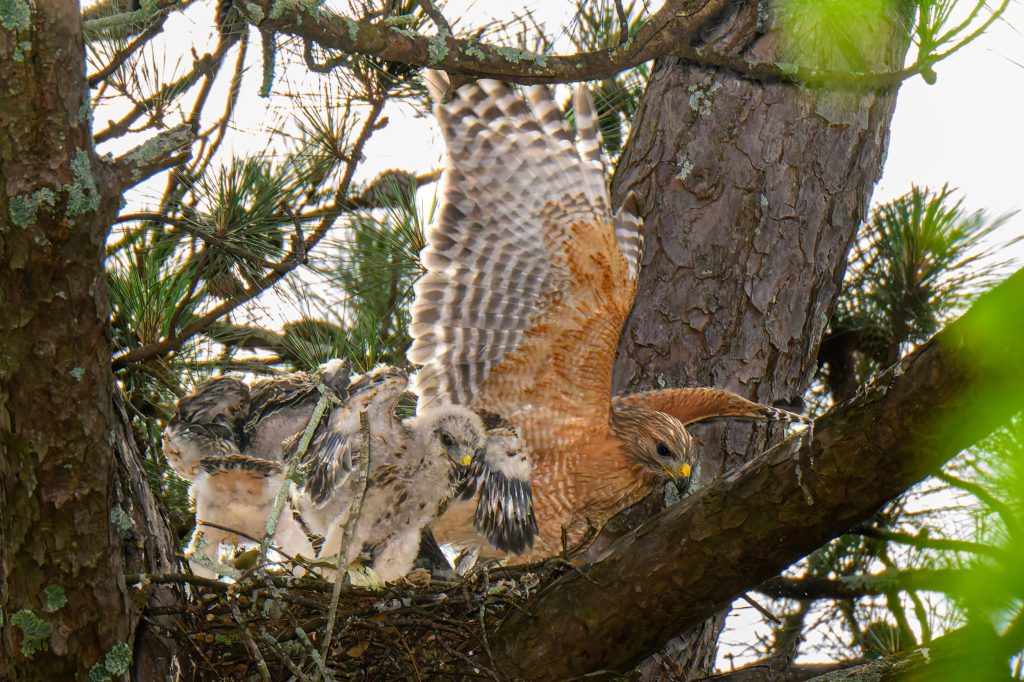
Brooding and Feeding (April – June)

The female brooded the chicks for the first few weeks while the male provided food. As the chicks grew, both parents hunted tirelessly to feed their hungry young. This period was a flurry of activity, a testament to the parents’ unwavering care.

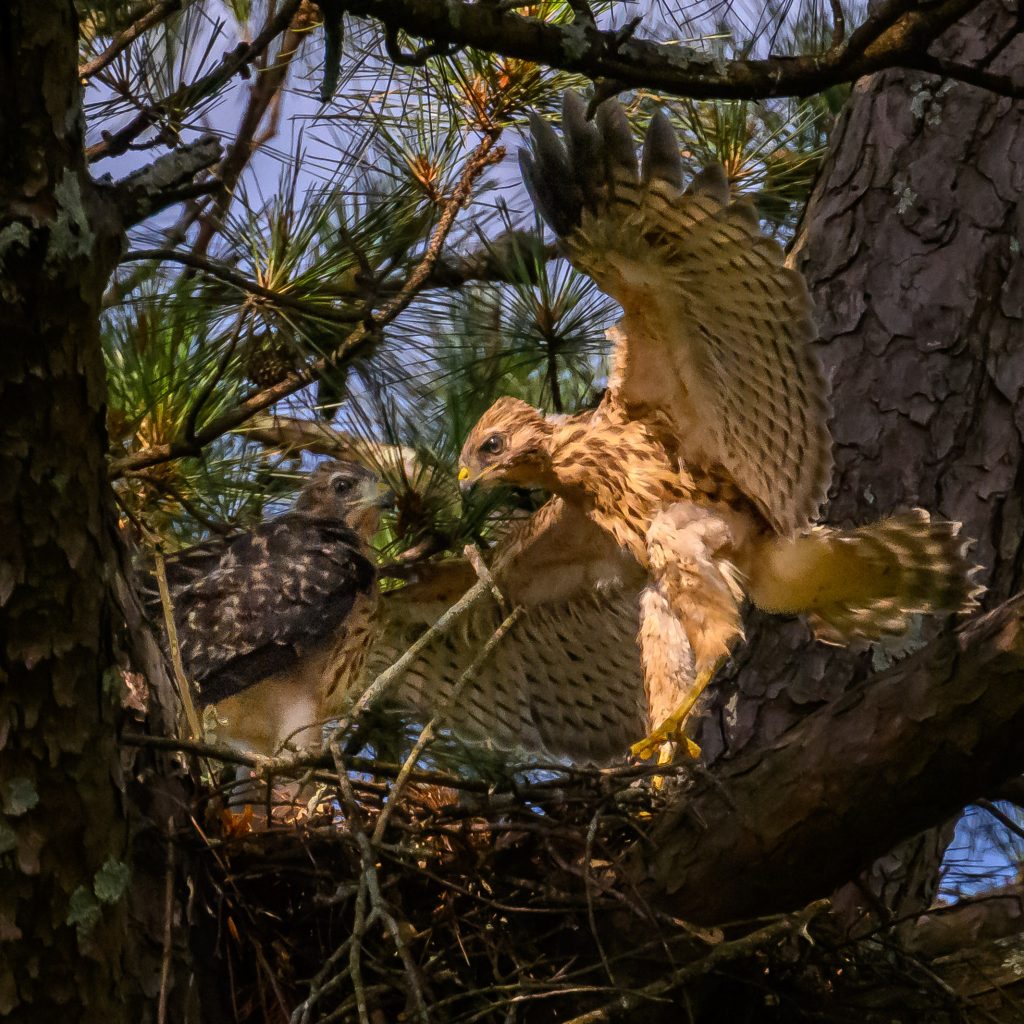
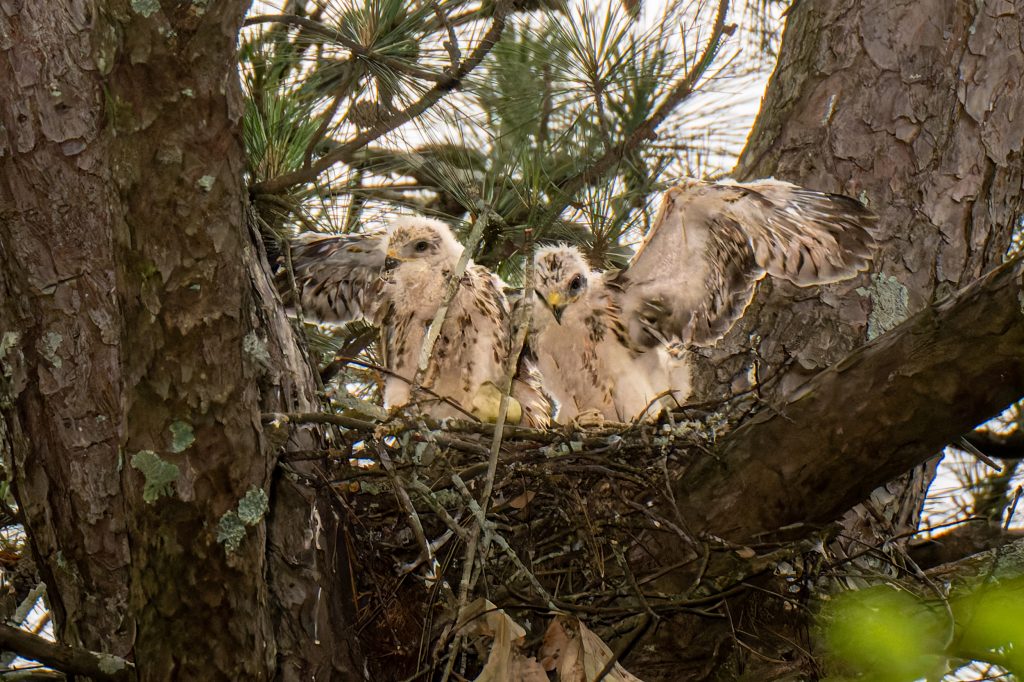
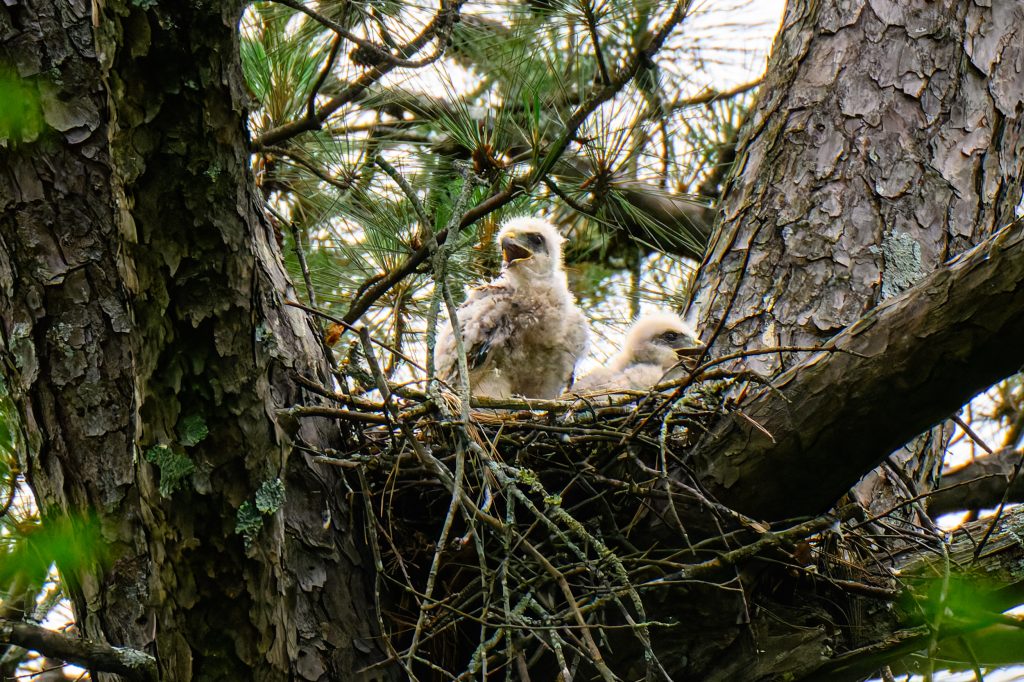
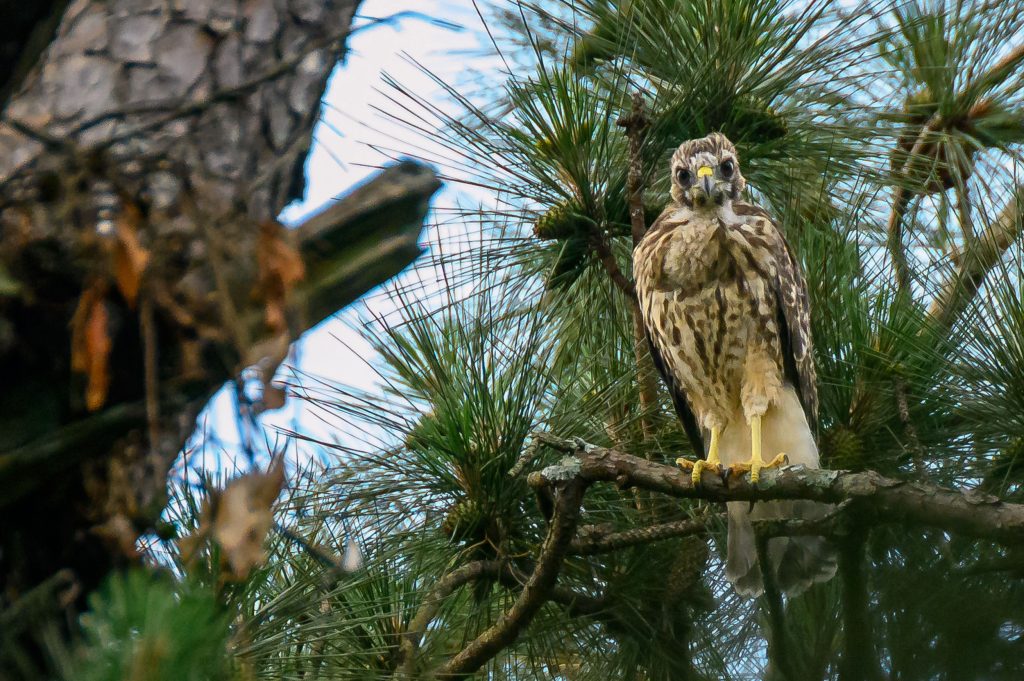
Groparents’Development (May – June)

The chicks grew rapidly in May. Their eyes opened, and they began to develop juvenile feathers. I captured their clumsy movements and curious explorations, each day revealing new milestones.

Red-shouldered hawk nestlings eagerly anticipate their next meal from their devoted parents. These adorable fluff balls are likely around three weeks old, displaying behaviors like enthusiastic feeding, wing stretching for strength, and tentative exploration of their surroundings. Their downy feathers transform into juvenile plumage as they grow, mirroring their majestic adult counterparts. Sibling squabbles and vocal calls fill the air, signaling their rapid development towards fledging.

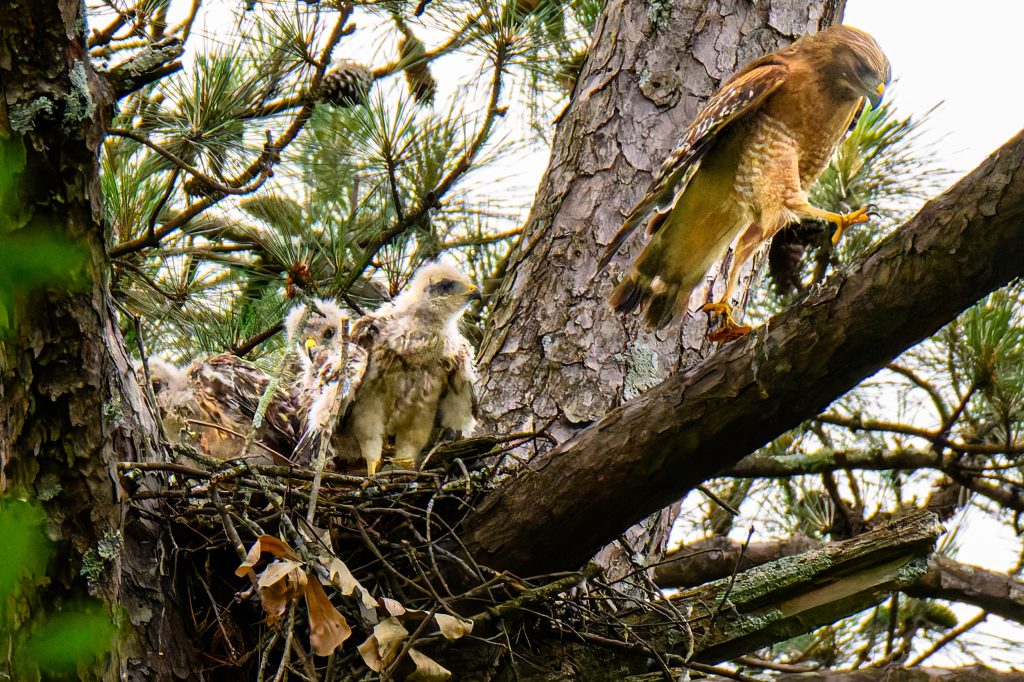
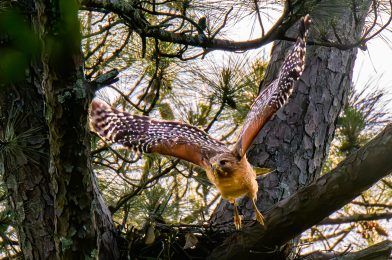
Fledging (June – July)

By late June, the chicks were ready to leave the nest. Their tentative flapping and short flights were a thrilling sight. Photographing their fledging was both exhilarating and bittersweet.

Red-shouldered hawk nestlings eagerly anticipate their next meal from their devoted parents. These adorable fluff balls are likely around three weeks old, displaying behaviors like enthusiastic feeding, wing stretching for strength, and tentative exploration of their surroundings. Their downy feathers transform into juvenile plumage as they grow, mirroring their majestic adult counterparts. Sibling squabbles and vocal calls fill the air, signaling their rapid development towards fledging.

Post-Fledging Dependency (July – September)

The young hawks stayed close even after leaving the nest, learning to hunt under their parents’ watchful eyes. I documented their growth into skilled flyers and hunters, and their confidence soared.

The juvenile red-shouldered hawks are out hunting today. I saw the parents show up and try to feed the juvenile in our backyard. If you were at our house, all you would hear is the constant screeching of the hawks.

Independence (September – October)

Red-shouldered hawk in pursuit of a squirrel in our neighbor’s yard.

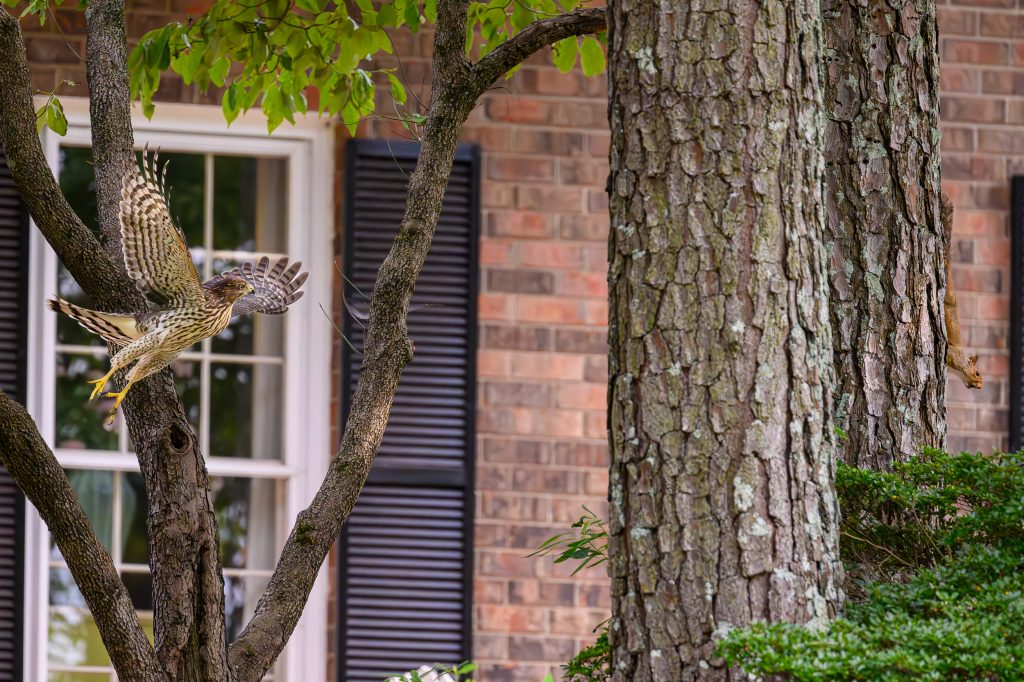
Finally, by late summer, the young hawks became independent. They dispersed to find their territories, marking the end of this year’s chapter. Capturing the year’s journey to independence was a fitting conclusion to my project.

Reflections on a Personal Photo Project

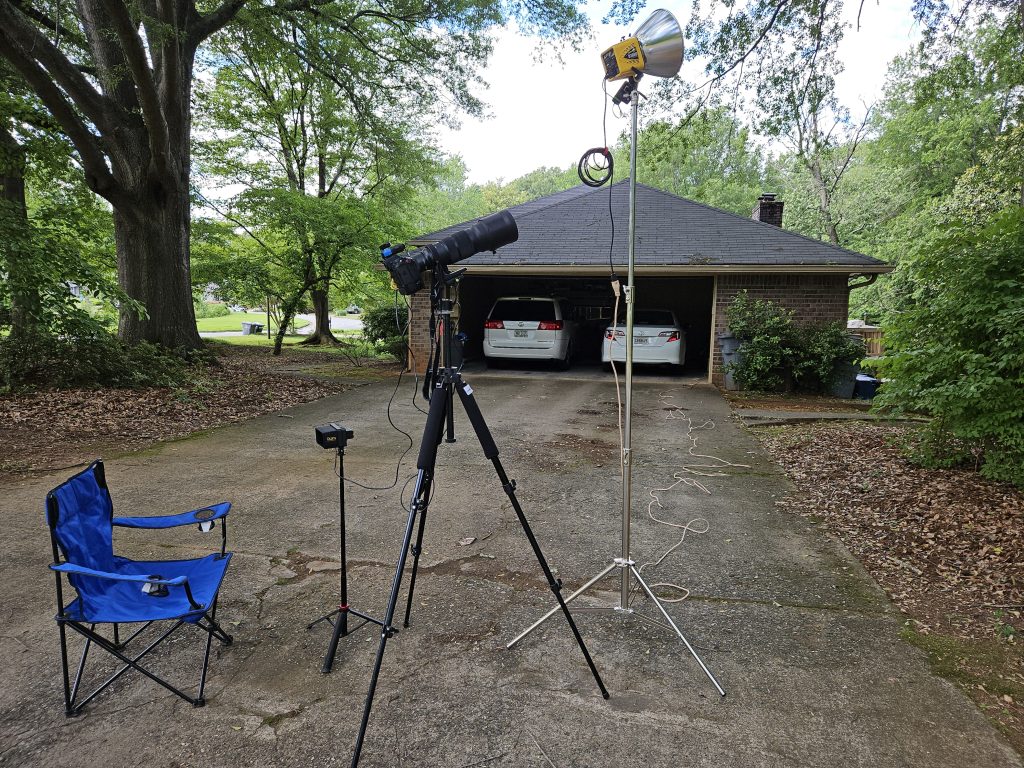
Like any personal endeavor, this photo project required time, patience, and persistence. Returning to the nest day after day allowed me to document each stage thoroughly, creating a comprehensive visual story. This project has been a reminder of the value of long-term commitment to photography and the joy of witnessing nature’s cycles up close.

Conclusion

Through my camera lens, I have come to appreciate the resilience and beauty of red-shouldered hawks. Their journey from courtship to independence mirrors the dedication required in any creative project. I hope these images inspire you to start your photo project, find stories in your backyard, and embrace the process of documenting them over time.

Stay tuned for more updates and stories from Stanley Leary, Storyteller and Brand Builder. Until then, enjoy these glimpses into the lives of our backyard hawks.

The juvenile red-shouldered hawks are out hunting today. I saw the parents show up and try to feed the juvenile in our backyard. If you were at our house, all you would hear is the constant screeching of the hawks.

I hope this blog post inspires you to look closely at the nature around you and to consider starting your project. There’s a whole world of stories to be told outside your door.

Embracing Change: My Journey of Upgrading Photography Gear

As a photographer, I’ve continually upgraded my gear over the years, but there’s one area where I’ve been slower to make changes: lenses. Unlike camera bodies, manufacturers don’t update lenses as frequently. I bought a converter to use my existing lenses when transitioning from DSLR to mirrorless cameras. My philosophy has always been to avoid debt and only purchase equipment with cash.

Early in my career, I didn’t drive the best cars. Occasionally, I had to rely on credit cards for repairs, which taught me the importance of saving. You can’t always predict disasters, so I understand when borrowing is necessary.

When I started freelancing full-time, I invested in some Sigma lenses. They were affordable and performed well. Notable lenses included the 120-300mm ƒ/2.8 Sport and the 35mm ƒ/1.4 Art lens. When I switched to Nikon Mirrorless, other brands weren’t making lenses for the Z mount, so I began transitioning to Nikon S lenses.

Two juvenile Red-Shouldered Hawks, just over a month old, stretch their wings as they prepare to leave the nest in the coming days. Though once three, these siblings now face the world together, their strength and resilience a poignant reminder of nature’s delicate balance. 🦅 #NatureWatch #WildlifePhotography #BabyHawks [NIKON Z 9, NIKKOR Z 100-400mm f/4.5-5.6 VR S Z TC-1.4x, Mode = Manual, ISO 5000, 1/3200, ƒ/11, (35mm = 560)] Cropped 2X in post

Andy Dunaway, my Nikon representative, recommended the NIKKOR Z 100-400mm f/4.5-5.6 VR S Z. I had already been impressed with the 14-30mm ƒ/4 and the 24-120mm ƒ/4 lenses. Their build quality and sharpness were remarkable.

In December 2022, I bought the NIKKOR Z 100-400mm f/4.5-5.6 VR S Z and have never felt more confident in my gear for covering events. I kept my Sigma 120-300mm ƒ/2.8 Sport with the TC-1401 & TC-2001 converters for a while. The central combination with the 2X converter weighed around 8 lbs with the camera.

The NIKKOR Z 100-400mm f/4.5-5.6 VR S Z weighs only 3.2 lbs and, even with a converter, is still half the weight of my Sigma setup. Recently, I added the Nikon Z Teleconverter TC-1.4x. Within minutes, I was outside photographing Red-Shouldered Hawk juveniles. I noticed a color difference and an improvement in image sharpness.

I chose the NIKKOR Z 100-400mm f/4.5-5.6 VR S because a 70-200mm lens wasn’t long enough for many meetings I covered. The Sigma 120-300mm ƒ/2.8 required a monopod or tripod, and 300mm was short. The 400mm range was ideal for my style.

HoldFast Gear MoneyMaker 2-Camera Harness

The 100-400mm lens is only 4.8 ounces heavier than the 70-200mm. I carry the 24-120mm on a Nikon Z9 and the 100-400mm on another Z9 using the HoldFast Gear MoneyMaker 2-Camera Harness. Adding the TC 1.4X converter gave me a 140-560mm lens at just 7.76 ounces more.

The Nikon Z Teleconverter TC-1.4x is highly praised for no image quality loss and only a 1-stop light difference. Combined with my Nikon Z9 and denoise software, I can shoot in most situations and produce usable images for clients.

So this past week, I sold my Sigma 120-300mm f/2.8 Sport lens and the 1.4X and 2X converters. Today, I knew I had upgraded and lightened my load after shooting with the Nikon Z Teleconverter TC-1.4x on the NIKKOR Z 100-400mm f/4.5-5.6 VR S.

While Nikon’s technology is impressive, Andy Dunaway’s guidance helped me make the best lens choices for my work.

The Path to Mastery: The Power of Repetition and Practice

Malcolm Gladwell wrote about the “10,000-hour rule,” asserting that the key to achieving true expertise in any skill is simply practicing, albeit correctly, for at least 10,000 hours. David Epstein’s fascinating new book The Sports Gene argues that the ten-thousand-hour idea must be average.

Psychologist K. Anders Ericsson looked at students studying violin at the elite Music Academy of West Berlin. I was interested in the general finding: the best violinists, on average and over time, practiced much more than the good ones. In other words, within a group of talented people, what separated the best from the rest was how long and how intently they worked.

I can personally attest to the fact that I am still learning. I am working on a project to review a photographer’s raw photos from 2007 to 2024. There are easily 300,000 images that I am culling through and then picking the best ones to edit.

This process is very similar to when I played trumpet regularly. In college, I practiced many hours outside of East Carolina Jazz Band class and as part of the marching band.

I didn’t just practice the music I would be playing but also practice books.

The best thing that happened for me early in my professional career was working at the Hickory Daily Record. I was shooting every day and processing it over and over and over. Before that, working for the school paper in college, I would come even close to what one week was at the Hickory Daily Record in a month at best.

So here is my tip: Repetition, and lots of it, will improve your skills more than anything else.

So shoot all you can and practice, practice, practice.

The Impact of Depth-of-Field on Composition: Mastering Aperture for Stunning Shots

As a professional photographer and storyteller, I often discuss the intricacies of photography with clients and enthusiasts. One key concept that significantly impacts composition is depth-of-field (DoF). Understanding how to manipulate DoF through your camera’s aperture can elevate your photos, whether isolating a subject or capturing a detailed scene. Let’s dive into how DoF influences composition and explore some practical applications across different genres of photography.

Shallow Depth-of-Field

A shallow DoF means that only a tiny portion of the image is in sharp focus while the rest is beautifully blurred. Achieving this effect involves using a wide aperture between f/1.4 and f/2.8. Here’s how a shallow DoF can enhance your compositions:

  1. Subject Isolation:
    • Focus on the Subject: By blurring the background and foreground, you can isolate the subject, drawing the viewer’s eye directly to it. This technique is particularly effective in portrait photography, where you want to emphasize the person and minimize distractions.
    • Creating Mood: A shallow DoF can create a dreamy, intimate, or dramatic feel, enhancing the emotional impact of the image.
  2. Bokeh:
    • Aesthetic Appeal: The out-of-focus areas can produce a pleasing blur, known as bokeh, adding an artistic element to your photo. The bokeh quality depends on the lens and the shape of the aperture blades.
  3. Simplifying the Composition:
    • Minimalism: By reducing the elements in sharp focus, you can simplify the scene, making the composition cleaner and more impactful.
Almond Standard reads at his dining room table in the log cabin home he built in Tignal, Georgia. [NIKON D2X, Sigma 15-30mm F3.5-4.5 EX DG Aspherical DF, Mode = Manual, ISO 100, 1, ƒ/11, (35mm = 22)]

Deep Depth-of-Field

Conversely, a deep DoF means that a larger portion of the image, from foreground to background, is in sharp focus. This effect is achieved using a smaller aperture, such as f/8 to f/22. Here’s how a deep DoF can enhance your compositions:

  1. Environmental Context:
    • Storytelling: When you want to tell a story by including the background and surroundings, a deep DoF ensures that all elements in the scene are in focus. This approach is common in landscape, architectural, and street photography.
    • Detail Capture: Capturing intricate details throughout the scene can add richness and context, enhancing the narrative.
  2. Layering and Depth:
    • Complex Compositions: A deep DoF allows you to create complex compositions with multiple layers of interest, leading to more dynamic and engaging images as the viewer’s eye moves through the different elements.
    • Perspective: Emphasizing the depth and perspective of a scene can make the viewer feel more immersed in the image.

Practical Considerations

  • Aperture and Light: A wider aperture allows more light into the camera, which is useful in low-light situations but can make achieving a deep DoF challenging without increasing ISO or using a slower shutter speed.
  • Lens Choice: Wide-angle lenses naturally provide a deeper DoF, while telephoto lenses can more easily achieve a shallower DoF.
  • Subject Distance: The closer you are to the subject, the shallower the DoF becomes. Conversely, increasing the distance between the camera and the subject deepens the DoF.
Jane Yandel ~ Senior Photos [NIKON D4, 85.0 mm f/1.8, Mode = Aperture Priority, ISO 100, 1/400, ƒ/1.8, (35mm = 85)]

Creative Uses

  • Portraits: Use shallow DoF to highlight the subject’s eyes and create a soft background.
  • Landscapes: Use deep DoF to ensure the foreground and background are sharp, capturing the entire scene in detail.
  • Macro Photography: Often uses extremely shallow DoF to focus on small subjects and create artistic effects.

Real-World Application: Architectural and Design Photography

Recently, I received an assignment from an architectural and design magazine. They were very specific about their requirements, emphasizing the need for deep depth-of-field in every photo. They instructed me to shoot at f/16 or f/22 to ensure all elements, from the intricate details of the architecture to the expansive backgrounds, were in sharp focus. This approach helps capture the full context and grandeur of architectural designs, allowing readers to appreciate the finer details and overall aesthetic of the spaces featured in the magazine.

Chick-fil-A Kickoff Alabama vs West Virginia [NIKON D4, 240.0-600.0 mm f/5.6, Mode = Aperture Priority, ISO 20318, 1/2000, ƒ/5.6, (35mm = 600)]

Genre-Specific Preferences

It’s important to note that different genres of photography have distinct DoF preferences. For instance, a shallow DoF is often preferred in sports and portrait photography. In sports photography, a wide aperture can help isolate athletes from distracting backgrounds, highlighting their movements and expressions. In portrait photography, a shallow DoF creates a pleasing blur that draws attention to the subject’s face and eyes, creating an intimate and engaging image.

Understanding and manipulating depth-of-field allows you to control what parts of your image are in focus, guiding the viewer’s attention and enhancing the storytelling power of your photographs. Whether aiming for a sharp, detailed scene or a soft, focused subject with a dreamy background, mastering DoF is essential for effective composition.

By honing your skills in managing depth-of-field, you can adapt to various photography genres and meet specific client requirements while creating visually compelling and emotionally resonant images.

Tips to Improve Your Photography

Lately, I’ve had the pleasure of helping a few amateurs edit their photos. One is working on a delightful project: creating a coffee table yearbook of their family’s pictures through the years, with a new yearbook for each year. Another is finally processing a large backlog of digital images they’ve accumulated but haven’t had the time to edit.

Reflecting on my early days managing a one-hour photo lab, I’ve seen thousands of photos and have given countless tips. Here are some timeless tips that have proven helpful both then and now. There is no particular order, just a collection of advice to improve your photos:

1. Take Lots of Photos

When you want that one perfect shot of a subject, don’t be shy—take lots of photos. Shooting 3 to 10 images increases your chances of capturing:

  • Better Expressions: People’s expressions can change in an instant. More shots mean more chances to capture the perfect smile or candid moment.
  • Focus: Ensures that at least one shot will be perfectly focused.
  • Camera Shake/Movement: Reduces the risk of all shots being blurred due to camera shake.
Paul Richard Dwarf House Operator after Truett Cathy. Flash outside and ƒ/16 for Greater Depth-of-Field

2. Use a Flash Outside

Using a flash outdoors can significantly enhance your photos by addressing the following:

  • Racoon Eyes: Sunlight from above can cast unflattering shadows on faces, which a flash can help lighten.
  • Backlit Photos: Adds necessary light to faces in backlit situations.
  • Color Improvement: Outdoor environments can create unwanted color casts. A flash can help correct this.

3. Review Your Images on a Larger Screen ASAP

Reviewing your shots on a larger screen as soon as possible allows you to:

  • Check Stability: Ensure you keep the camera steady to avoid blurry images.
  • Focus Check: Confirm that your intended focus point is sharp.
  • Color and Exposure: Verify that the colors and the exposure are correct.
Golden Spiral & ƒ/1.4 Shallow Depth-of-Field

4. Adjust Your Depth-of-Field

Changing your aperture to control depth-of-field can drastically improve your photos:

  • Shallow Depth-of-Field: Blurs the background, making your subject stand out more.
  • Larger Depth-of-Field: Keeps more of the scene in focus, providing context to your subject. This requires more skill in composition, so consider using these composition tools:
    • Rule-of-Thirds: Divide your frame into thirds, horizontally, and vertically, and place critical elements along these lines or their intersections.
    • Golden Ratio, Golden Spiral, Triangle: Use these mathematical compositions to create naturally pleasing images.
    • Aspect Ratio: Pay attention to the dimensions of your photo to enhance its aesthetic.
    • Diagonal, Leading Lines, S-Curves: These techniques guide the viewer’s eye through the photo.
Triangle Composition

By incorporating these tips, you’ll find that your photography skills will improve significantly. Whether creating a beautiful family yearbook or finally organizing your digital photo library, these techniques will help you capture and enhance those precious moments. Keep shooting, experimenting, and most importantly, have fun with your photography!

Elevating Wildlife Photography: Lighting Techniques for Red-Shouldered Hawk Nesting

In wildlife photography, capturing the essence of nature’s wonders often presents unique challenges. The past few days have been a journey of experimentation and innovation as I sought to elevate my photography of the Red-Shouldered Hawks nesting in our backyard. In this blog post, I’m excited to share with you how I revamped my approach, incorporating studio strobes and high-speed sync technology to overcome obstacles and enhance the quality of my images.

The catalyst for this transformation was a persistent issue I encountered—shadows casting over a significant portion of the majestic hawks, diminishing the clarity and impact of my photographs. Determined to find a solution, I turned to my trusty studio strobes, specifically the Alienbees B1600 equipped with an 11-inch Long Throw Reflector, typically utilized for illuminating indoor basketball courts.

Using the Strobes. [NIKON Z 9, VR 120-300mm f/2.8G, Mode = Manual, ISO 8000, 1/1000, ƒ/11, (35mm = 600)]

To synchronize the flash with my Nikon Z9 camera and shoot above the 1/250 sync speed, I employed PocketWizard TT5 transceivers paired with an AC3 controller to adjust the power settings and an AC9 adapter to combine with the PocketWizard TT5. A simple phone cord facilitated the connection to the back of the Alienbees B1600, seamlessly integrating the strobes into my setup.

On the left is a monitor that has a 2X cropped view of what the Nikon Z9 is capturing. Alienbees is on a light stand, and you can see the PocketWizard on the Flash and the Camera.

With this new configuration, I unlocked the potential to shoot at high shutter speeds ranging from 1/1000 to an astonishing 1/8000, effectively balancing the strobe lighting with the ambient daylight. Gone were the intrusive shadows, replaced by crisp, well-lit images showcasing the Red-Shouldered Hawks’ beauty in all their glory.

Using strobes as a fill light outside can significantly improve the accuracy of color temperature in outdoor photography. By supplementing natural light with controlled artificial light, photographers can mitigate the inconsistencies often caused by changing weather conditions and varying times of day. Strobes emit a consistent color temperature, ensuring that the subject is evenly illuminated with precise hues, regardless of external factors. This enhances the image’s overall aesthetic and facilitates post-processing adjustments by providing a stable foundation of color temperature for a more seamless editing workflow.

Since there is a lot of downtime watching the nest, I have set up a chair to relax in and the monitor to see what the Nikon Z9 is seeing and use a remote to trigger the camera.

In the spirit of transparency and progress, I’ll compare my previous photographs and those captured using the strobes. Through side-by-side visuals, you’ll witness the remarkable difference in clarity, detail, and overall image quality achieved through this innovative lighting technique.

Without a flash. [NIKON Z 9, VR 120-300mm f/2.8G, Mode = Aperture Priority, ISO 25600, 1/2000, ƒ/10, (35mm = 410)]

However, the most gratifying aspect of this endeavor is the tangible improvement in the quality of my images. By embracing technology and pushing the boundaries of traditional wildlife photography, I’ve been able to elevate my craft and capture the essence of these magnificent birds with unprecedented clarity and depth.

So, without further ado, I invite you to join me on this journey of exploration and discovery. Let’s delve into wildlife photography, where innovation meets artistry, and every click of the shutter unveils a new dimension of beauty and wonder.

Flash used. [NIKON Z 9, VR 120-300mm f/2.8G, Mode = Manual, ISO 10000, 1/3200, ƒ/11, (35mm = 600)]

The Evolution of ISO: From Grain to Gain in Photography

In the ever-evolving landscape of photography, one of the most fundamental aspects has been the sensitivity of film or, in today’s world, the ISO setting in digital cameras. Back in the days of film photography, adjusting ISO meant grappling with the tradeoff between sensitivity and grain. The higher the ISO, the more light-sensitive the film became, but at the cost of introducing noticeable grain into the image.

Fast forward to the digital era, and the concept of ISO underwent a significant transformation. Instead of grain, digital sensors introduced noise as the primary concern with higher ISO settings. However, even in the early days of digital photography, the correlation between ISO and noise wasn’t drastically different from the film days. It was a familiar tradeoff – increased sensitivity at the expense of introducing unwanted noise.

But then came the technological leap. As Moore’s Law applied its magic to camera sensors, the noise performance improved exponentially. Suddenly, higher ISO settings didn’t necessarily equate to unbearable noise levels. With each iteration of camera models, the threshold for acceptable noise is pushed higher and higher. ISO 10000 or even 12800 became feasible options without sacrificing image quality significantly.

Islamic Speakers Bureau & Atlanta Mayor Eid al-Fitr Reception [NIKON Z 9, NIKKOR Z 100-400mm f/4.5-5.6 VR S, Mode = Aperture Priority, ISO 25600, 1/250, ƒ/6.3, (35mm = 110) Processed with PureRAW 4 & Lightroom Classic]

The game-changer, however, was the advent of denoise software. Tools like Topaz Denoise, PureRAW, and Lightroom’s denoise capabilities revolutionized post-processing, almost rendering the concept of noise obsolete. What was once a dreaded side effect of high ISO settings became a minor inconvenience easily remedied with a few clicks.

So, what does ISO mean in today’s digital photography landscape? It’s a question that prompts contemplation. The traditional tradeoff between sensitivity and noise has been disrupted. The grain of film and the noise of digital sensors no longer hold the same weight they once did. Instead, adjusting ISO in digital photography is more akin to controlling volume. It’s about amplifying the signal without amplifying the noise.

My daughter and her friends during our visit to Columbus, Georgia, to celebrate Mother’s Day 2024. [NIKON Z 9, NIKKOR Z 24-120mm f/4 S, Mode = Aperture Priority, ISO 25600, 1/250, ƒ/5.6, (35mm = 24) Processed with PureRAW 4 & Lightroom Classic]

Yet, amidst this technological marvel, a lingering question remains – what is the tradeoff of ISO today? The answer isn’t as straightforward as it once was. With noise reduction software capable of miraculous feats, the boundaries of acceptable ISO settings blur. Perhaps the tradeoff now lies in the nuances of dynamic range, color accuracy, or subtle details that emerge or diminish with varying ISO levels.

Ultimately, the evolution of ISO from the grainy days of film to the noise-controlled realm of digital photography signifies more than just technological progress. It’s a testament to the ever-changing nature of photography, where what was once a steadfast rule becomes a fluid concept open to interpretation and exploration. And perhaps therein lies the beauty – in the perpetual quest to redefine and refine our understanding of light, sensitivity, and the art of capturing moments frozen in time.

Putting People First: The Key to Business Success

In business, success is often measured by profits and growth. However, amidst pursuing financial gains, it’s easy to overlook the most crucial element: people. Simon Sinek, a renowned author and motivational speaker, emphasizes the importance of understanding people and nurturing relationships to achieve business success. But how does this principle translate into actionable strategies for entrepreneurs and business owners?

Sinek proposes a paradigm shift where people are valued slightly more than profit. He suggests a delicate balance, perhaps with people holding a 51% importance over profit’s 49%. This philosophy challenges the traditional mindset that prioritizes financial gains above all else. Instead, it advocates for placing the well-being and development of employees and customers at the forefront.

Consider two hypothetical CEOs: one prioritizes growth above all, with people seen as a means to achieve financial goals, while the other places people at the center, recognizing that by caring for their employees, they will naturally drive the company towards success. Which leader would you choose to work for? The answer seems clear – the one who values people as more than just tools for profit.

This principle holds for large corporations, freelancers, and small business owners. When it’s just you or a small team, the responsibility for nurturing relationships falls squarely on your shoulders. Whether you’re a solopreneur or have a handful of employees, prioritizing their well-being is ethical and essential for business growth.

Cristina Bruma, translator (left), and nurse Tamara Bielefeldt collaborate to gather vital information for this patient’s healthcare needs at Casa de Cultură in Mărăndeni, Fălești District, Moldova.

So, how does this focus on people translate into practical business strategies? It starts with your marketing approach. Instead of solely promoting products or services, emphasize the human element. Show your audience that your business isn’t just about transactions; it’s about building meaningful connections and caring for individuals.

Moreover, when it comes to recruitment, prioritize candidates who align with your values and demonstrate a genuine concern for people. Look for individuals who not only possess the necessary skills but also share your commitment to fostering relationships and prioritizing the well-being of others.

Ultimately, business success hinges on understanding that people aren’t just a means to an end—they’re the heart and soul of your enterprise. By prioritizing relationships and demonstrating genuine care for employees and customers, you’ll drive financial success and cultivate a thriving and sustainable business built on trust, loyalty, and human connection. So, as you chart your path to success, remember: it’s not just about profits; it’s about people.

The Time it Takes: Capturing the Essence of a Story

In storytelling, time is not merely a concept; it’s a crucial ingredient that enriches narratives, adding depth and authenticity. While some stories unfold swiftly, like the turning of a page, others demand patience, unfolding gradually like a flower in bloom. As a photographer and storyteller, I’ve come to appreciate the intricate relationship between time and storytelling, primarily when chronicling the lives of our backyard visitors, the Red-Shouldered Hawks.

Every story, whether captured through a camera lens or penned on paper, has its beginning, middle, and end. However, in the vast tapestry of life, we’re often just capturing a fleeting moment—a mere slice of someone’s grand narrative. This realization struck me profoundly this year as I embarked on the journey of documenting the nesting habits of these majestic birds.

You can see that the two Red-Shouldered Hawks are different in size and little color difference. Female red-shouldered hawks are larger than males. Females are 25% larger than males. This is during the courting phase in early March.

In February, the Red-Shouldered Hawks began their annual nest-building ritual as the air still carried a hint of winter’s chill. Armed with my camera, I observed the intricate dance of courtship and the meticulous construction of their nest. Yet, little did I know that this was just the prologue to a much larger tale.

The female typically lays one egg every other day but begins incubation after laying the first. The female incubates the eggs, exchanging occasionally with the male, for 32 days, and the semi-altricial nestlings hatch in the order the eggs were laid in late April (April 24, on average).

The laying of eggs marked the next chapter in this avian saga. The nest became a cradle of life each day, sheltering the precious cargo within. Yet, unlike the instant gratification of modern life, hatching these eggs demanded patience. It wasn’t until late April that I caught my first glimpse of a newborn chick, a testament to the passage of time and the gradual unfolding of nature’s wonders.

Red-shouldered Hawk leaves the nest looking for more food for the eyasses.

As weeks turned into months, I witnessed the fledglings’ growth and transformation. From the safety of their lofty perch, they ventured into the world, their parents dutifully providing nourishment and guidance. And with each passing day, I realized that storytelling isn’t merely about capturing moments; it’s about immersing oneself in the subject’s world, understanding their journey, and translating it into a resonant narrative.

Baby red-shouldered hawks in the nest. Witnessing the intricate process of babies waiting for their parents to return reminds us of the beauty and complexity of the natural world.

The journey of storytelling, much like the life cycle of the Red-Shouldered Hawks, requires careful planning and investment of time. It’s about delving deep into the subject’s world, allowing their story to unfold organically. Here are some tips to guide fellow storytellers on their quest:

  1. Define Your Purpose: Before embarking on a storytelling endeavor, ask yourself why this story matters. What message do you hope to convey, and why is it worth telling?
  2. Craft a Story Arc: Every compelling story follows a narrative arc—introduce characters, build tension, and culminate in a resolution. Understand the arc of your story and let it guide your narrative.
  3. Visuals Speak Volumes: While words weave the narrative, visuals serve as windows into the soul of your story. Choose your visuals wisely, ensuring they complement and enhance the narrative.
  4. Invest Time: Rome wasn’t built in a day, and neither are great stories. Be willing to invest the time necessary to understand your subject and truly capture its essence.
Young Red-shouldered Hawks nestlings screaming on nest in my backyard in Chatham’s Greenway neighborhood of Roswell, Georgia.

In conclusion, storytelling is a journey that requires patience, dedication, and a willingness to embrace the passage of time. By immersing ourselves in the lives of our subjects and allowing their stories to unfold at their own pace, we unlock the true power of storytelling. So, fellow storytellers, let us embark on this timeless journey together, capturing the beauty and complexity of the world one story at a time.

Unlocking the Power of Piggyback Assignments: Maximizing Content and Collaboration

In the dynamic world of freelance photography and videography, every assignment presents an opportunity to innovate and deliver exceptional value to clients. I’m constantly seeking creative strategies to elevate my services and provide clients more than they expect. One such strategy that has proven immensely beneficial is the concept of piggyback assignments.

Imagine this scenario: I’m halfway across the globe on an international assignment for a department within an organization. Rather than confining myself to the confines of that one project, I seize the opportunity to reach out to other departments within the same organization. The goal? I aim to offer my services while I’m already in town, maximizing efficiency and value for the client.

The rationale behind piggyback assignments is simple yet compelling. Since the cost of international travel has already been incurred, extending my stay to capture additional content for another department comes at a significantly reduced rate for the client. It’s a win-win situation – the client gains extra value for their investment while I optimize my time and resources.

However, despite the potential benefits, I’ve encountered resistance from organizations hesitant to embrace this approach. Budget constraints and rigid planning often stand in the way, with many managers focused solely on their departmental goals and budgets. Yet, organizations can unlock a world of possibilities by breaking down these barriers and adopting a more collaborative mindset.

So, how can we overcome these barriers and harness the full potential of piggyback assignments? Here are some key strategies to consider:

Highlight Cost Efficiency: Emphasize the cost-saving aspect of piggyback assignments. By leveraging existing travel expenses, clients can access additional content at a fraction of the cost compared to a separate assignment.

Showcase Added Value: Illustrate the extra value that piggyback assignments can bring. Whether it’s capturing supplementary footage, conducting cross-departmental interviews, or documenting multiple facets of the organization, piggybacking allows clients to maximize their content output without breaking the bank.

Emphasize Collaboration Opportunities: Encourage clients to think beyond their departmental silos. Organizations can foster collaboration, knowledge sharing, and cohesive brand identity by coordinating coverage across various teams or initiatives.

Flexibility is Key: Highlight the flexibility inherent in piggyback assignments. Piggybacking offers a tailored solution to fit the client’s requirements, whether extending the stay on the front or back end of the primary assignment or adjusting the scope to accommodate additional content needs.

By embracing the concept of piggyback assignments, clients can optimize their resources and foster synergy and connectivity across different areas of their organization. It’s time to break free from the constraints of traditional budgeting and embrace the boundless possibilities of collaborative storytelling. Together, we can build bridges, capture moments, and unlock the full potential of every assignment. Join me on this journey, and let’s make every project an opportunity for innovation and collaboration.

Navigating the Creative Journey: How ADHD Impacts Photographers and Videographers

In the realm of creative collaboration, understanding and accommodating the unique needs of each team member is essential for fostering a harmonious and productive working environment. Recently, my journey has been influenced by three individuals with ADHD, two of whom have been formally diagnosed and are actively seeking support, while the third remains undiagnosed. As I’ve delved into educating myself on ADHD and its implications for creative professionals, I’ve realized the necessity of adjusting my approach to better accommodate their strengths and challenges. This blog post is born out of my personal experiences and newfound insights, aimed at exploring how ADHD impacts photographers and videographers and offering practical tips to enhance collaboration and productivity in creative endeavors.

As a creative professional in the dynamic world of photography and videography, every project is an opportunity to capture stories, evoke emotions, and leave a lasting impression. However, for individuals navigating the creative landscape with ADHD, the journey can be filled with unique challenges that require thoughtful strategies and support. Let’s delve into how ADHD can impact photographers and videographers and explore practical tips to help them overcome these obstacles and thrive in their craft.

Students participate in working and living at Task Force for the Homeless, where they can experience the homeless firsthand rather than just talking about it in a classroom.

Understanding the Impact

The ADHD brain, characterized by its tendency to be locked in the present and oblivious to the future, can manifest in various ways that directly affect the creative process:

  1. Trouble Cleaning/Organizing: Maintaining a clutter-free workspace and organizing equipment can be daunting for individuals with ADHD, leading to inefficiency and frustration.
  2. Starting Projects Without Completing Them: The impulsivity associated with ADHD may result in many half-finished projects, hindering productivity and leaving a trail of unfinished creative endeavors.
  3. Problems Prioritizing: Difficulty prioritizing tasks can leave photographers and videographers feeling overwhelmed and unsure of where to focus their creative energy amidst competing demands.
  4. Time Blindness: The concept of time may elude individuals with ADHD, making it challenging to adhere to deadlines and manage schedules effectively.
  5. Difficulty Maintaining a Schedule: Consistency and structure are vital in the creative process, yet ADHD can disrupt schedule adherence, leading to inconsistency and missed opportunities.
  6. Lack of Focus: Maintaining focus amidst distractions is a common struggle, impacting the quality and efficiency of creative work.
Mind Mapping

Navigating the Creative Landscape: Tips for Success

While ADHD presents its share of challenges, there are practical strategies that photographers and videographers can employ to harness their creative potential and enhance their reliability for clients:

  1. Utilize Digital Tools: Leverage digital calendars and project management apps to record activities, appointments, and deadlines. Incorporating reminders and notifications can help maintain awareness of upcoming tasks.
  2. Actionable Calendar Entries: Treat tasks as actionable appointments by scheduling specific blocks of time for creative work, editing sessions, and client meetings. Breaking down projects into manageable chunks can alleviate the overwhelm and enhance focus.
  3. Work in Sprints: Embrace the concept of working in short, focused bursts known as sprints. Set a timer for designated periods of intense productivity, followed by brief breaks to recharge.
  4. Gamify the Process: Set personal goals and milestones to infuse your workflow with elements of fun and challenge. Reward yourself upon task completion to reinforce positive habits and motivation.
  5. Ditch the To-Do Lists: Instead of traditional to-do lists, adopt a more visual and structured approach to task management. Consider using kanban boards or mind maps to organize and prioritize projects in a visually stimulating manner.

By implementing these strategies and fostering a supportive environment, photographers and videographers with ADHD can navigate the creative journey with confidence and resilience. Embracing their unique perspective and harnessing their creative talents, they can continue to captivate audiences and leave an indelible mark on visual storytelling.

The Importance of Pro Bono Work for Small Business Owners: A Story of Community Impact

It is easy to get caught up in pursuing profits and growth in business. However, for many small business owners, a more profound motivation drives their work: the desire to positively impact their community. One powerful way to achieve this is through pro bono work—offering your services for free to individuals or organizations in need. Let me share the importance of pro bono work, using my experience with the Roswell Fire Department as an example.

Building Relationships and Trust

Pro bono work provides a unique opportunity to build relationships and establish trust within your community. When I began offering my photography services to the Roswell Fire Department, I didn’t just capture images – I became a part of their team. Through my work, I forged strong bonds with the firefighters and gained their trust, leading to additional collaboration opportunities.

Showcasing Skills and Expertise

By offering your services pro bono, you can showcase your skills and expertise to a broader audience. My partnership with the Roswell Fire Department allowed me to demonstrate my ability to capture compelling images, which attracted the attention of other clients impressed by my work.

Expanding Your Portfolio

Pro bono projects offer a chance to diversify your portfolio and explore new opportunities. My experience with the fire department enabled me to add impactful images of firefighters in action to my portfolio, showcasing my versatility as a photographer and expanding my appeal to potential clients in related industries.

Making a Difference in the Community

The most rewarding aspect of pro bono work is the opportunity to make a difference in the lives of others. By volunteering my time and talents to support the Roswell Fire Department, I played a small part in honoring the bravery and sacrifice of our local heroes. Knowing that my photography could help raise awareness of their crucial work brought a sense of fulfillment beyond any financial reward.

Marketing and Publicity

While the primary goal of pro bono work is to give back, it can also provide valuable marketing and publicity opportunities. My partnership with the fire department garnered attention from local media outlets, resulting in positive press coverage that helped raise awareness of my business and attract new clients who admired my commitment to community involvement.

Conclusion: Making an Impact Beyond Profit

In conclusion, pro bono work is not just about giving back – it’s about making an impact beyond profit. By offering your services for free, you can build relationships, showcase your skills, expand your portfolio, make a difference in your community, and attract positive attention to your business. So, the next time you’re considering investing your time and talents, remember the power of pro bono work to create meaningful change in the world around you.