Shallow depth-of-field @ ƒ/9 can give great Bokeh

Nikon D3S, 28-300mm, 100mm ISO 200, ƒ/9, 1/200

When you first think of ƒ/9 you might think of the photo above where you can see from the lady to the sign behind her that most of photo is in focus, but that the far background of the building is out of focus.

I have written on this topic before in a different way and even created a video on it. Here is that link.

This is a little different perspective on the topic using the new Fujifilm X-E2.

Nikon D3S, 28-300mm, 300mm ISO 200, ƒ/9, 1/125

Now in this photo here you might not realize it too is shot at ƒ/9.  Two things helps with the silky Bokeh in the background. First, I am now shooting at 30mm verses 100mm at ƒ/9 and second the background is far enough in the background that it is out of focus.  It is about 100 ft from here.

Nikon D3S, 28-300mm, 150mm ISO 200, ƒ/9, 1/200

In this photo she is standing not too far from where she was in the first photo. However the shallow depth-of-field is helped by the distance from the building, the 150mm focal length.  

Same photo from above but just cropped

Now when you enlarge the photo you will see the eye closest to the camera is tact sharp. But the next eye is ever so slightly soft, but by her hair by her ear we are out of focus.  Things that affect the Bokeh of the background in photos

  • ƒ-stop: The wider the aperture with everything else the same, then the depth-of-field becomes shallow
  • Distance to Subject: The closer you are to your subject the shallower the depth-of-field will be.
  • Subject distance to background: The greater this distance the more likely the smoother look of the Bokeh

Fujifilm X-E2 with Nikon 85mm ƒ/1.4 using the Nikon G AFS lens to Fujifilm Fuji X-Pro1 X-E1 Adapter Aperture Control Ring to connect the Nikon lenses to the Fujifilm camera

ƒ/1.4
ƒ/2
ƒ/2.8
ƒ/4
ƒ/5.6
ƒ/8
ƒ/11
ƒ/16

All were shot on tripod at the very closest focusing distance that the lens would focus on the eyes at ƒ/1.4. The only thing I changed was the aperture and the camera adjusted the shutter speed to keep the exposure the same.

Approximately 100% view of the ƒ/1.4

You can increase your depth-of-field by just backing up from the subject and this will increase it for you. Conversely if you want a shallower depth-of-field get closer if the lens allow you.When you are super close you are not looking for BokehMacro photography you are actually needing a large aperture or the photo can look out of focus even when it is in focus.All these were shot with Fujifilm X-E2, Nikon 60mm ƒ/2.8 Micro 

ƒ/2.8
ƒ/4
ƒ/5.6
ƒ/8
ƒ/11
ƒ/16
ƒ/22
ƒ/32

Explore with your subject

Nikon D3S, 85mm ƒ/1.4, ISO 200, ƒ/1.4, 1/5000

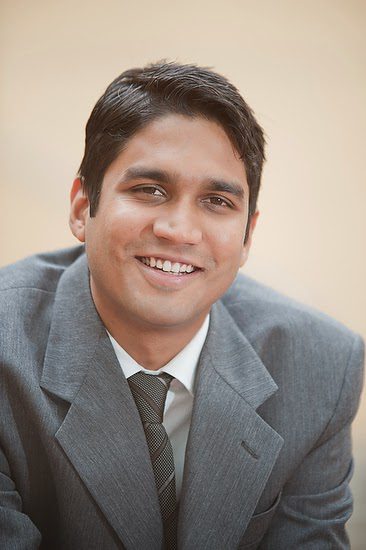
A couple of years ago, I made environmental portraits of the students in the executive MBA program at Georgia Tech. I would take about 15 minutes to walk around with the student at the campus and create the photos you see here.

The setup for all these photos is pretty simple and not all that different in each image.

KISS Method

Keep It Simple Stupid: I think TTL off-camera flash is effortless to use. If it is too bright, turn down the flash by adjusting the flash compensation to -1, -2, or whatever. If too dark, go in the opposite direction of +1, +2, or more.

You can make the background darker by underexposing the camera by adjusting the exposure compensation the same way you did the flash, except this time, you change the camera and not the flash.

Nikon D3S, 85mm ƒ/1.4, ISO 1000, ƒ/1.4, 1/8000

I cranked up the ISO a bit in this photo to lighten the background, and the flash is just winking.

Nikon D3S, 85mm ƒ/2.8, ISO 200, ƒ/1.4, 1/125

The basic setup never changed, and I moved around to get the three different looks. However, I still wanted some variety, so we moved.

Nikon D3S, 85mm ƒ/1.4, ISO 200, ƒ/1.4, 1/1600

I moved him to the street from the courtyard. I thought this caught the “executive” look a little better.

Nikon D3S, 85mm ƒ/1.4, ISO 200, ƒ/1.4, 1/1000

I like the shallow depth of field so that I am helping the subject “pop out” from the background. Shallow depth of field is a way to take a busy background and still use it but subdue it.

Nikon D3S, 85mm ƒ/1.4, ISO 200, ƒ/1.4, 1/1600

Other than changing locations and keeping the depth-of-field shallow, I kept the camera below eye level. This is because I wanted the audience to look up to him. This is my way of trying to create a sense of authority.

While the flash helped add catch light in his eyes and give some shape to his face, it also had another benefit. It assured me that I was using a full spectrum of light, helping me render the best skin tones.

Take your camera, find a subject, and shoot your own “executive” portraits.

Nikon D4 & Nikon D3S Differences

While the cameras appear very similar, there are differences with shooting still images.

Now that I have practiced shooting the past few days with the camera, I have noticed a few changes I had to get used to. First of all I prefer to have two identical cameras. I like to not have to think about any differences between cameras while working. There are some button changes on the D4 from the D3S.

Due to the buttons not being exactly alike, I can see me making some errors. So, very soon I will try and replace my Nikon D3S with another Nikon D4.

The Nikon D3s is a great camera and if it were not for the changes in all the buttons I might have been able to live with the small differences in the still image shooting of the cameras. However, while the changes might well be great improvements having to adjust my shooting from camera to camera could cost me an image.

I think Nikon did think through this and still made the changes, because some of the functions I think are improvements.

On the back are more differences than the front. While many buttons appear to be the same, they are not all the same.

I am not going into every button difference here in this post.  I just wanted to highlight some that I use all the time.

First of all the choice of metering modes is located in very different places. The choices are the same, but you now push the choice on the left top and rotate the thumb dial to choose the different metering modes.

I seldom use the average meter and am picking between spot and the matrix.

One difference is the choices with metering. The Nikon D4 has removed the dial on the viewfinder and moved it to the left top menu.

This is the back of the Nikon D3S

The next major change for me is the focusing modes. On the Nikon D3S you just flipped the dial on the back and depending if you had the camera in AF-S or AF-C you got different functions which were tweeked in the menu.

On the Nikon D4 most of the choices are now visible on the top menu as you push the AF button on the front and dial the thumb or index finger dials.

This is the back of the Nikon D4

This is the Auto Focus button on the Nikon D4.  You push the button and turn the aperture or shutter dial to change functions.

This is the Auto Focus button on the Nikon D3S

Nikon D4 – When you push the AF button on the front of the camera and rotate the thumb dial on the back you change the AF from AF-S to AF-C.

Nikon D4 – When you push the AF button on the front of the camera and rotate the index finger dial on the front you change the AF-C to many different choices. This is the 3d choice.

Nikon D4 – When you push the AF button on the front of the camera and rotate the index finger dial on the front you change the AF-C to many different choices. This is the d51 points

Nikon D4 – When you push the AF button on the front of the camera and rotate the index finger dial on the front you change the AF-C to many different choices. This is the d21 points

Nikon D4 – When you push the AF button on the front of the camera and rotate the index finger dial on the front you change the AF-C to many different choices. This is the d9 points

Nikon D4 – When you push the AF button on the front of the camera and rotate the index finger dial on the front you change the AF-C to many different choices. This is the single [ ] that you move around.

Nikon D4 – When you push the AF button on the front of the camera and rotate the index finger dial on the front you change the AF-C to many different choices. This is the auto function that locks in on faces and other subjects based on algorithms.

Nikon D4 – When you push the AF button on the front of the camera and rotate the index finger dial on the front you change the AF-S to two choices, Single or Auto.

This is the dials on the Nikon D3S.  The lock button has been changed on the Nikon D4 to the meter and the lock function is now in the menu and not a dial.

This the the Nikon D4. In some ways having the meter choice here is nice. I do miss the lock button from the Aperture and Shutter not being here anymore. It is still accessible in the menu.

This is the Nikon D4. You will notice a new red dot on a button. This is for the movie function as the start and stop function. The rest is the same.

There will be even more updates as I continue to get used to the new Nikon D4.

Why I photographed them this way (Part 3)

Nikon D3, 14-24mm, ISO 200, f/5.6, 1/1000

Flash Outside

I love to use two different Flash systems outside.

1) I use the Nikon SB900 with SU800 on my Nikon DSLR or on my Nikon P7000. I also use the Radio Popper PX system to be sure the signal is consistently firing outside.

2) I use the Alienbees 1600 with a Vagabond Mini Lithium batter and the CyberSync system to fire them.

The first photo i used by SB900 to shoot the photos. I could shoot the photo and fill-flash with the hot shoe flash quickly and move around. The flash had to be very close to the people outside to be useful.

Walk and Talk photo I like to use. Nikon D3, 24-120mm, ISO 200, f/5.6, 1/160

Walk-and-Talk

The next two photos are using a technique I learned from Jeff Smith a corporate photographer back years ago.  Back then I was shooting film and with today’s flashes this is easier to do.

I like having the subjects walk side by side talking to each other. Often as in the first photo they walk straight at me and other times like in the last photo they just follow the path of a sidewalk for example.

I have an assistant either carrying the Nikon Speedlite system or my Alienbees system.  The advantage of the Alienbees is I can have the assistant further away and still with the power of this flash fill in easily.  Actually, most of the time the Alienbees are firing at 1/16 or 1/8 power.

The assistant walks off to the side, usually lighting them at 45 degree angle to the camera.  They walk just outside the picture frame and keep an even pace with them as they walk. You need to hire an assistant who can walk and chew gum at the same time for this technique.

My portable system for Walk-and-Talk. AlienBees 1600, Vagabond Mini, CyberSync radio remote control

CyberSync Radio Remote Control

Vagabond Mini

The reason I like the Walk-and-Talk technique is it gives something to the subjects to do. I find this not only helps to focus them, but after a couple times doing this they tend to not only relax, but I get great expressions.

Tip

If you use this Walk-and-Talk technique I recommend you tell them to walk close enough to each other they feel each other occasionally touching. In addition, I recommend one person talk and the other listen. Lastly, I ask them to look into each others eyes or at each others faces.  There is a tendency for people to look at the ground or off somewhere else.  I want them to look interested in each other.

Tweaking the exposure with the Exposure Compensation

This is the location of the Exposure Compensation on the Nikon D3S. You push this and spin the dial on the back of the D3S to under or over expose the photo.

When you make a picture you need to be in the habit of checking to be sure that first photo is exposed the way you want it to look.

In manual mode you can adjust the aperture or the shutter speed to make the photo darker or lighter.  However, when you are in Aperture Mode and you change the aperture or when you are in Shutter Mode and you change the speed the exposure stays the same.

Exposure Compensation Dial on Nikon P7000

The only way to make the photo darker or lighter in Aperture Mode, Shutter Mode and Program Mode is to adjust the exposure compensation.  You can also use exposure compensation in the manual mode and it will adjust the exposure using ISO.

To understand how this works I recommend an exercise.

Take photo with exposure compensation set at 0. Take a few more photos -2, -1, +1 and +2.  Bring them into your editing software to see the different exposures.

If you shot these in RAW and then you made adjustments in your software like Lightroom or PhotoShop you will notice that the dynamic range in one of the exposure you did will give you more desirable results for your personal preference.

[youtube https://www.youtube.com/watch?v=HbV1fckAi5E]

Click on the video to see how Exposure Compensation works on a Nikon D3S

Depth of Field Preview – A tool underused by many photographers

One of the creative controls you have on the camera is aperture. We also refer to this as the f/stop.

As you change this from f/1.4 to f/16 the things become more in focus in front of the focus point and behind it. We call this area the “Depth-of-Field.” You may have heard photographer’s say they like a shallow Depth-of-Field. This means very little is in focus.

When looking through the viewfinder of a DSLR you are seeing the scene at the widest f/stop. So if you have a f/1.4 lens on the camera you are seeing the scene at f/1.4 even if you have chosen to record the scene at f/16.

If you want to see what it looks like at f/16 before you take the photo then you can depress the Depth-of-Field Preview Button (See photo above) to see the effect. In the days of film this was so important because until you developed the film you couldn’t see your results, unless you used the button.

Today you can always take the photo and evaluate it on the LCD and then make changes to your f/stop to get the effect you are looking for.

If you want to include two points in the photo at different depths and be sure they are sharp, but the background and foreground in the photo are out of focus you might need to have the focus point set in between those points. A good example is a group photo with two rows of people.  You want the front and back row in focus.

It would be quite easy to just crank the f/stop up to f/22, but then everything is in focus.  If you use manual focus and adjust the f/stop while depressing the Depth-of-Field Preview Button you can adjust until just the two rows of people are in focus and the sharpness falls off just in front and behind them.

Another way to see this today is on cameras that have ‘Live View” like the Nikon D3S. I have recorded what you can see doing this exercise in the video. You don’t have to have your camera hooked up to a computer to use this function. I did this so I could record what you would see on the screen and also the camera controls so you can see them all in action.

The white arrow points to the bishop which is the focus point in the video. At f/40 the front and rear focus points are in blue as to where the photo is still sharp. You will notice this is about 1/3 in front of the focus point and 2/3 behind the focus point.

Click on the video to see the Depth-of-Field in action on the camera, great way to see how it affects the sharpness in a photo before clicking the shutter.

Have you been using the Depth-of-Field creatively when you shoot?  Do you always shoot wide open at f/1.4 or always at f/8? How often are you using this creative tool to give you different results in sharpness in your photos?

Remember that the less you use these tools and modify them the more you have a simple box camera or closer to what your camera phone gives you. Use these controls to get something better with your DSLR

Use dark objects to learn how to light

If you like this image I will walk you through the steps to get here. (Figure 1)
I started here and got the exposure to pretty close to the tones in the carving. (Figure 2)
By just adding one light off to the right I got the next image. (Figure 3)
I liked the result, but wanted a little more color in the bowl than I have in this photo. (Figure 4)
Here you can see that the statue is back lit naturally, but can see the first light to the right that I added and the second fill light I added just next to the lens on the left. (Figure 5)

The reason I chose a dark object to light is because it is much more difficult, but also shows you how the light dramatically improves the object.  It works similarly with a lighter object, but the results are harder to see sometimes.

I had the object back lighted to be sure you understand the light I am adding truly helps.  This is like having people looking at the camera and it is the best angle, but the sun is behind them.  By just turning on the flash you get a better result, but there is little to show the shape of the object as compared to getting the flash off the camera.

One flash off camera give nice shaping to the face. (Figure 6)
By adding a fill light just beside the lens on the left, we help not only fill in the shadow side, the photo transforms from an almost black and white look to a color feel. (Figure 7)

Now for all the photos above the exposure compensation was used at -2 stops under what the auto exposure was reading.  I had my flashes under exposed or 0.  The reason is the camera wants to make the statue a neutral gray when it is actually darker.  To compensate I under exposed to fool the meter to get what was correct.

I am using the Mini ColorChecker by x-rite so you can see the color as shot in each situation with this series.  This will not just help you see proper exposure, but the color space for each photo. (figure 7)
I wanted you to see you can just use a reflector to help improve the photo, but please pay attention to not just the shadows being improved, pay attention to the colors. (Figure 8)
Shot with fill and you can see not just exposure but color temperature will be different with reflector or flash. (figure 9)
Here with one flash to the right of the camera and one behind the statue you can see ho it improves the tones and the color space.  This is why I prefer using strobes over reflectors alone for portraits.  Another major benefit with strobes over a reflector, is the reflector gives a constant light source which will cause most folks to squint. (Figure 10)
This is the final result. Shot with Nikon D3s and 85mm f/1.4. (Figure 11)
This was the setup for Figure 11. By the way, I shot this with my Nikon P7000 with the flash on for fill. (Figure 12)
I thought the light behind the golfer was a little distracting, so I moved it to the left out of the photo 180 degrees opposite the main light to the right.  The Nikon TTL system is balancing the background -2 Stops under to the flashes which are normal of 0 setting. (Figure 13)
This is the setup for Figure 13.  Again I shot this on the Nikon P7000 with the pop up fill flash to help the statue and the camera gear to have some definition. (Figure 14)

Practice lighting with some objects that are dark or even black. See if you can change the mood of the situation by just positioning the lights in different places. Maybe you use the X-Rite Mini ColorChecker to see if you are setting the camera’s white balance correctly to get the best color.  If you shoot in Raw you can correct this later, but if you shoot in JPEG you can change it later, but the results are noticeably poor.