Reading Time: 4 minutes
 |
| If you like this image I will walk you through the steps to get here. (Figure 1) |
 |
| I started here and got the exposure to pretty close to the tones in the carving. (Figure 2) |
 |
| By just adding one light off to the right I got the next image. (Figure 3) |
 |
| I liked the result, but wanted a little more color in the bowl than I have in this photo. (Figure 4) |
 |
| Here you can see that the statue is back lit naturally, but can see the first light to the right that I added and the second fill light I added just next to the lens on the left. (Figure 5) |
The reason I chose a dark object to light is because it is much more difficult, but also shows you how the light dramatically improves the object. It works similarly with a lighter object, but the results are harder to see sometimes.
I had the object back lighted to be sure you understand the light I am adding truly helps. This is like having people looking at the camera and it is the best angle, but the sun is behind them. By just turning on the flash you get a better result, but there is little to show the shape of the object as compared to getting the flash off the camera.
 |
| One flash off camera give nice shaping to the face. (Figure 6) |
 |
| By adding a fill light just beside the lens on the left, we help not only fill in the shadow side, the photo transforms from an almost black and white look to a color feel. (Figure 7) |
Now for all the photos above the exposure compensation was used at -2 stops under what the auto exposure was reading. I had my flashes under exposed or 0. The reason is the camera wants to make the statue a neutral gray when it is actually darker. To compensate I under exposed to fool the meter to get what was correct.
 |
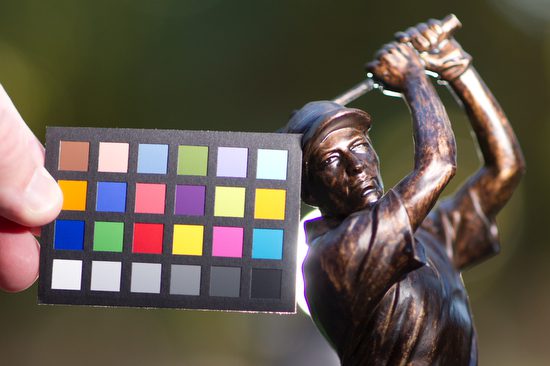
| I am using the Mini ColorChecker by x-rite so you can see the color as shot in each situation with this series. This will not just help you see proper exposure, but the color space for each photo. (figure 7) |
 |
| I wanted you to see you can just use a reflector to help improve the photo, but please pay attention to not just the shadows being improved, pay attention to the colors. (Figure 8) |
 |
| Shot with fill and you can see not just exposure but color temperature will be different with reflector or flash. (figure 9) |
 |
| Here with one flash to the right of the camera and one behind the statue you can see ho it improves the tones and the color space. This is why I prefer using strobes over reflectors alone for portraits. Another major benefit with strobes over a reflector, is the reflector gives a constant light source which will cause most folks to squint. (Figure 10) |
 |
| This was the setup for Figure 11. By the way, I shot this with my Nikon P7000 with the flash on for fill. (Figure 12) |
 |
| I thought the light behind the golfer was a little distracting, so I moved it to the left out of the photo 180 degrees opposite the main light to the right. The Nikon TTL system is balancing the background -2 Stops under to the flashes which are normal of 0 setting. (Figure 13) |
 |
| This is the setup for Figure 13. Again I shot this on the Nikon P7000 with the pop up fill flash to help the statue and the camera gear to have some definition. (Figure 14) |
Practice lighting with some objects that are dark or even black. See if you can change the mood of the situation by just positioning the lights in different places. Maybe you use the X-Rite Mini ColorChecker to see if you are setting the camera’s white balance correctly to get the best color. If you shoot in Raw you can correct this later, but if you shoot in JPEG you can change it later, but the results are noticeably poor.