| |
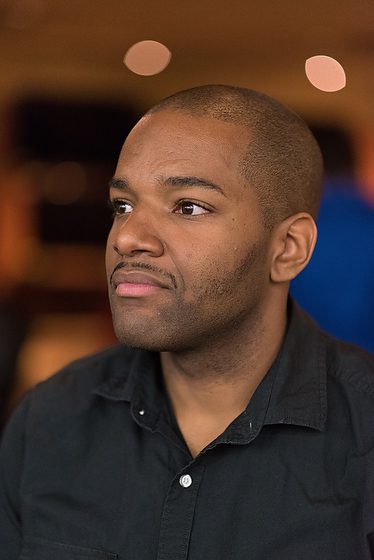
| Nikon D750, Nikon 85mm ƒ/1.8G, ISO 10000, ƒ/1.8, 1/500 |
BEST BUY® DIGITAL PHOTOGRAPHY WORKSHOP
Today I taught a workshop at the Best Buy 850 Cobb Place Boulevard Nw, Kennesaw, GA 30144. After a brief overview, we divided into two groups. We would rotate from Portraits and Low Light to Sports and Macro.
Andrew was the first model that each of the students shot.
We were in the TV section, which can get pretty dark the farther back you go, which we eventually would do.
This photo was a typical first shot for most of the students. Guess what the first lesson was teaching? Use your feet and get closer. I shot the top photo as an example and asked them to compose their shot this way first. Even after they shot their second photo, most still were too far back.
 |
| Nikon D750, Nikon 85mm ƒ/1.8G, ISO 10000, ƒ/1.8, 1/500 |
I then shot this photo and showed them the person doesn’t have to move, but you can clean up your background. I am shooting these at ƒ/1.8. They were to shoot wide open and then take a photo at ƒ8 or even ƒ/11 to compare their backgrounds.
 |
| Nikon D750, Nikon 85mm ƒ/1.8G, ISO 7200, ƒ/1.8, 1/500 |
I even went behind the subject slightly to show even more angles.
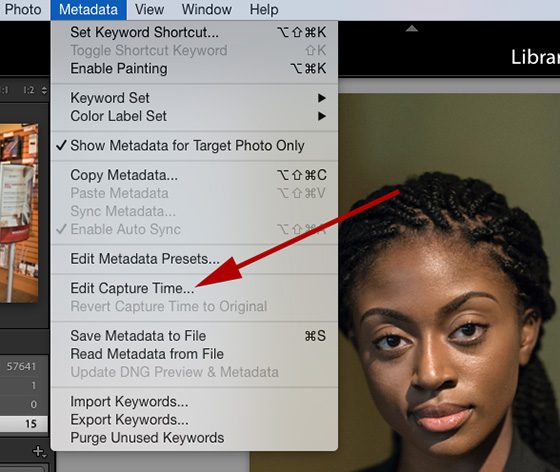
I also taught them how to set the white balance other than using AWB [Auto White Balance] by choosing a preset like Tungsten, Daylight, or Fluorescent. Then I showed them the best way was to do a custom white balance. Here are earlier blog posts that cover this for you.
For even more blog posts, just put your topic like “White Balance” in the search field at the top right of this page to search my blog for even more posts.
 |
| Nikon D750, Nikon 85mm ƒ/1.8G, ISO 6400, ƒ/1.8, 1/500 |
We then changed groups and models, and I repeated the same information. Here I moved the model to a different location to get a plane wall behind her and used the existing track lights in the ceiling for the lighting. Again, it looks like I did this in a studio.
We talked about keeping the eye closest to the camera in focus as a tip.
 |
| Nikon D750, Nikon 85mm ƒ/1.8G, ISO 6400, ƒ/1.8, 1/500 |
I also talked to the group about having one shoulder closer to the camera rather than perfectly squared up for a more flattering photo. But, as always, these are guidelines and not complex fast rules.
 |
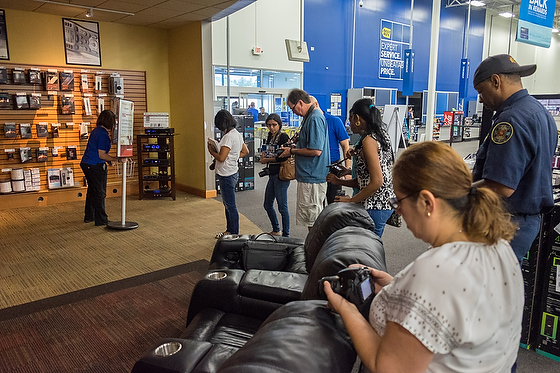
| Fujifilm X-E2, FUJINON XF 18-55mm, ISO 6400, ƒ/3.2, 1/160 |
I also showed them how to make an environmental photo by pretending this model was the leader of this department. This example was to help them know when they may want the more cluttered background. To help make the lady stand out, we had her closer to the camera and not just close to the environment.
 |
| Nikon D750, Nikon 85mm ƒ/1.8G, ISO 4500, ƒ/1.8, 1/500 |
After they made the “environmental portrait,” I asked them to leave her where she was and to move around and make a portrait. Here I walked to her side, cleaned up the background, and used a shallow depth-of-field.
 |
| Nikon D750, Nikon 85mm ƒ/1.8G, ISO 5600, ƒ/1.8, 1/500 |
Then I walked to the other side. I found that the students only started to grasp the idea of using their feet to recompose after I showed them. Slowly they began to explore and look for better images.
No strobes and shot all this in the busy Best Buy store showing how it is thinking about what you want to capture and not just a magical camera setting that will make them better photographers.