
One of the creative controls you have on the camera is aperture. We also refer to this as the f/stop.
As you change this from f/1.4 to f/16 the things become more in focus in front of the focus point and behind it. We call this area the “Depth-of-Field.” You may have heard photographer’s say they like a shallow Depth-of-Field. This means very little is in focus.
When looking through the viewfinder of a DSLR you are seeing the scene at the widest f/stop. So if you have a f/1.4 lens on the camera you are seeing the scene at f/1.4 even if you have chosen to record the scene at f/16.
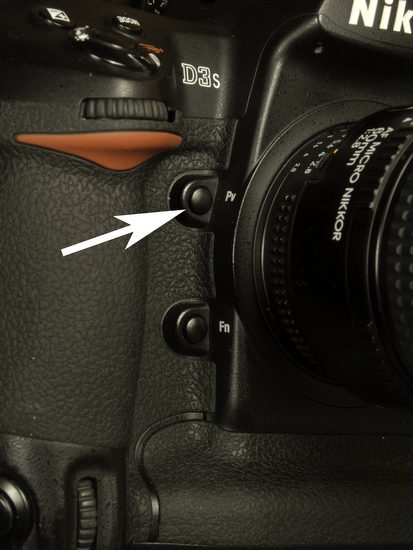
If you want to see what it looks like at f/16 before you take the photo then you can depress the Depth-of-Field Preview Button (See photo above) to see the effect. In the days of film this was so important because until you developed the film you couldn’t see your results, unless you used the button.
Today you can always take the photo and evaluate it on the LCD and then make changes to your f/stop to get the effect you are looking for.
If you want to include two points in the photo at different depths and be sure they are sharp, but the background and foreground in the photo are out of focus you might need to have the focus point set in between those points. A good example is a group photo with two rows of people. You want the front and back row in focus.
It would be quite easy to just crank the f/stop up to f/22, but then everything is in focus. If you use manual focus and adjust the f/stop while depressing the Depth-of-Field Preview Button you can adjust until just the two rows of people are in focus and the sharpness falls off just in front and behind them.
Another way to see this today is on cameras that have ‘Live View” like the Nikon D3S. I have recorded what you can see doing this exercise in the video. You don’t have to have your camera hooked up to a computer to use this function. I did this so I could record what you would see on the screen and also the camera controls so you can see them all in action.
 |
| The white arrow points to the bishop which is the focus point in the video. At f/40 the front and rear focus points are in blue as to where the photo is still sharp. You will notice this is about 1/3 in front of the focus point and 2/3 behind the focus point. |
Click on the video to see the Depth-of-Field in action on the camera, great way to see how it affects the sharpness in a photo before clicking the shutter.
Have you been using the Depth-of-Field creatively when you shoot? Do you always shoot wide open at f/1.4 or always at f/8? How often are you using this creative tool to give you different results in sharpness in your photos?
Remember that the less you use these tools and modify them the more you have a simple box camera or closer to what your camera phone gives you. Use these controls to get something better with your DSLR