Concert photography: Better known as the Black Hole

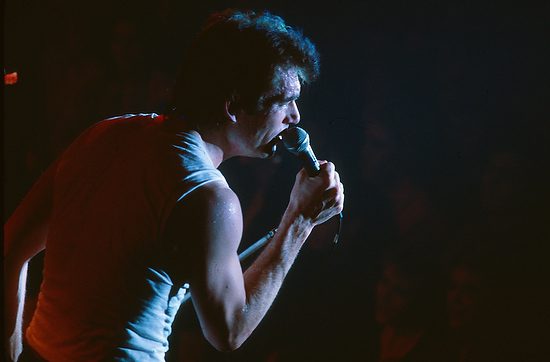
Huey Lewis and the News 1982 in Greenville, NC

At least I found ONE photo for the paper

I remember being in the darkroom, looking through my concert photo shoot, and struggling to find one image I could give to the editors.

When I was photographing bands in the 1980s, I was starting this career. Every time I pushed that button, it cost me about 50¢ to 75¢ a photo. The cost depended on if I was shooting black and white, color negative, or color transparency film. It was standard for me to avoid a concert with only a handful of keepers’ images.

The learning curve for me was pretty steep compared to today. You had to wait to see your results.

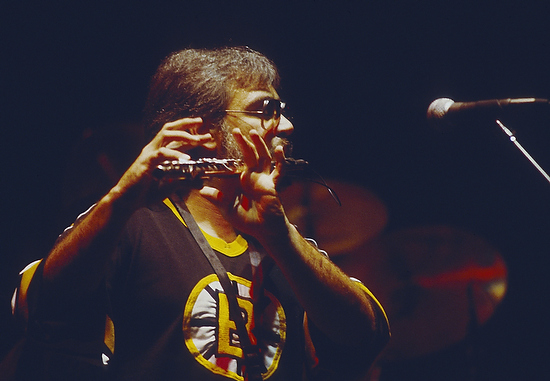
Joe Jackson, 1983 at Great Adventure in Howell, NJ.

With film, the time from me taking the photo to see if it was usable was a few hours at best and, usually with color transparency, a couple of weeks.

I should have written down all my camera settings and, when looking at the photos, know what I did, but I didn’t. So I knew the shutter speed was too slow, and my images were not sharp.

Brice Street at the Attic in Greenville, NC, 1983

The camera’s metering systems were not as sophisticated as today. So getting a good reading on the face of the singer using a spot meter in your camera that we have today was not on those Nikon FM or FM2 cameras I had back then.

I was shooting tungsten color transparency film since tungsten temperature lights lit most stages. I was shooting ISO 160 being pushed to ISO 320. I had a Nikon 80-200mm ƒ/4 lens and got a few usable images back then.

I made a lot of mistakes in those first five years. Sometimes I hunted through contact sheets for just one image that could run in the school paper. I remember a time or two handing in photos that were slightly out of focus or had more motion blur than I should have.

Charlie Daniels Band at East Carolina University 1984

The Attic in Greenville, NC, had a good number of rock bands come through, and since it was such a small venue, the lights were closer, and the light was decent. However, the light wasn’t much better when the school had concerts like the Charlie Daniels Band.

I was getting very few usable images in those days. But, you see, shooting in the bright sun was much easier than going into some nightclubs where the light was scarce.

Late Night Reading at Swayze’s in Marietta August 2012 [Using off-camera strobes]

Even with today’s cameras, you will not walk into the venue and walk out with all your photos in focus, sharp, and well lighted because of the new cameras. So I am drawing upon all those years of mistakes today. I am showing up with lights in my car, so I can get to set up as needed.

When I went to Swayze’s in Marietta, GA, to photograph a boy band, I walked into worse lighting than I had in the 1980s. So, after trying to shoot with the available light, I went to the car to get some strobes. I knew that was the only way to get usable images like the one above of the bass player from the band Late Night Reading.

Five lights in the ceiling on the band. Four in front and one behind the drummer. Also, there were footlights in cases that the guitar and bass player jumped on, lighting them more than the lights in the ceiling. [Nikon D4, 28-300mm @ 125mm, ISO 5000, ƒ/5.6, 1/60]

Here is the overall shot of the stage showing their lighting. I had a few photos in focus because they were a punk band. They didn’t stay still like some bands. Their heads were banging as fast as the music. My experience told me to shoot the available light and get all I could see without lights before setting up lights. Too many photographers jump too quickly to strobes and try to shoot at low ISO all the time.

[Nikon D4, 14-24mm @ 14mm, ISO 5000, ƒ/5.6, 1/60, with off-camera strobes firing] You can see the footlights here.

What I learned through the years

If I had not been shooting bands on stage for years, I would not know what stage lighting should look like. I realized some concerts; the bands paid attention to the lighting. Huey Lewis and the News, the lighting was excellent. For a Rita Coolidge concert, the lighting was great. For the Charlie Daniels band not so great. With Charlie Daniels wearing a hat and the light from above, he never had a good morning on his face. 

Rita Coolidge 1983

Later, when I didn’t use a flash to photograph Marc Brousard, I was equally screwed until he looked up into the light as here below.

Knowing what good light looks like makes it much easier to understand how to create it later with strobes or hot lights. I learned from shooting stage lighting that I wanted good morning on the performer’s face, which often meant a light that wasn’t being blocked by hats.

  1. I have learned to consistently shoot the available light first before adding lights.
  2. I learned that the light changes as the artist move around the stage. So sometimes the light is excellent, and sometimes it sucks–depends on your timing and luck.
  3. I try to shoot faster shutter speeds for sharp photos. Then, of course, I may experiment with slower shutter speeds to show motion, but when I do, I know that is what I am looking for in the photo.
  4. I shoot more variety of shots today–wide, medium, and tight photos.
  5. I shoot the reaction to the stage as well as the stage.
  6. I shoot each type of shot until I have some variety, not just a photo here and one there.

While shooting what is on stage from different angles can give your clients some variety, what happens off the stage is just as compelling when put into a package.

You don’t get credit for lighting professional productions as a photographer. However, not getting good skin tones and technically in-focus, sharp, and well-exposed photos will keep you from making a living in this profession.

By shooting the crowd, you are visually capturing how they sound. The group is into it if they are good, as we see above, with their hands in the air. Getting people up and dancing is another way to show how the music moved people. The point is the action isn’t always on the stage.  

I can tell you from my earlier years I didn’t know how to shoot the crowd’s reaction to the music. That is one of the best signs of the seasoned pro–broad coverage.

I am thrilled when the light is excellent, like when I photographed the comedian Tim Hawkins. My job is so much easier. I don’t have to light the stage. You don’t get credit for the lighting if you have great shots at venues like this. 

Comedian Tim Hawkins. [Nikon D4, 70-200mm @ 135mm, ISO 5600, ƒ/5.6, 1/500]

When you start, you will be terrified when you show up at events with little or no light. You will make mistakes and lots of them. Most likely, the people hiring you don’t know how difficult the job is. They hired you to shoot.

You will be sick as you edit your work, hoping you have enough images to show the client and pray they are satisfied enough.

As you get more experience, your anxiety will diminish. You will come to jobs with more gear for those difficult moments you anticipate. You now know how bad it could get.

Just know all professions have a lifecycle that you grow into becoming a veteran.

The lifecycle for the professional photographer

  1. First five years–Lots of mistakes and primarily the way we learn
  2. Second five years–Still making mistakes, but now learning to round out our coverage
  3. Third five years–Have a style that is established that is professional.
  4. Forth five years–Nailing most assignments and not just delivering what is expected, but now experimenting with stretching beyond
  5. Fifth five years–Going after new markets and often trying new things to add to our portfolio of skills. 

You will notice that every five years, you will have mastered a new skill you started and added this to your portfolio of skills. This is because to remain competitive, you add a new skill every five years and take about five years to perfect it.

Some skills that you might add over time

  • Lighting with hot shoe flash
  • Using studio strobes in a studio setting
  • Portrait Lighting
  • Product lighting
  • Location lighting
  • Video

Checklist for Sharp Photos

Squeeze the shutter  Don’t punch the shutter release

Keep the camera as still as possible. If you can shoot with a tripod, all the better. If you can shoot with a monopod. One of the biggest reasons most people’s photos are not sharp is camera movement.

Shutter Speed and Focal Length work together.

If you are paying attention to which lens you have on your camera and how this affects your shutter speed, your photos may be more sharp than they are. The rule of thumb is to turn your lens into a fraction and use that to set your shutter speed. Put one over the focal length and then use the shutter speed closest to that as the slowest for hand-holding the camera.

A 200mm lens should give you 1/200 shutter speed. A 50mm should be held at least 1/50.  If you do not have 1/200 and the closest shutter speed is 1/250, use this, and don’t go under 1/125.

Nikon D4, Sigma 120-300mm ƒ/2.8 with Sigma 1.4 converter, ISO 900, ƒ/5.6, 1/2000

Subject Speed

Photographing a building versus a race car is a big difference. You can have a shutter speed that lasts for hours and not affect the sharpness of a photo, but stopping a bullet in flight might require 1/10,000 to freeze the action. I had always heard 1/500 to stop action. From my personal experience, the razor-sharp photos of sports tend to be about 1/2000 for me. 

Aperture 

The depth-of-field you choose can make a photo appear out of focus even if it is in focus. For example, when you shoot at ƒ/two and the subject is 15 inches from the lens, the sharp area in front and behind the point you are focusing on is most likely less than an inch. However, move that subject to 15 feet, and your depth of field may now be a foot or more.   Find the balance between ƒ/16, keeping everything in focus and wide open ƒ/2.8 with great Bokeh throwing the background out of focus. I often shoot ƒ/four on a Nikon 400mm ƒ/2.8 to get more usable images. Focus Miss On many cameras today, you can have multiple focus points. My Nikon D4 has 51 different points for focusing. 

Depending on my focus mode, it is either more straightforward to focus or more difficult. The point is that people often need to tell the camera where to focus. When doing portraits, I use the eyes as my focus. If they are turned slightly to the camera, one eye is closer than the other, and I always try to get the closest eye in focus. This is when I may change my aperture to be sure they are both in focus.

With Nikon Capture software, I can check where I was focusing later and see if I missed my focus. After using this to help me, I realized I needed more focus due to me and not the camera’s capability.

96:one “We Believe” Farewell Concert Historic Sanctuary

Post Processing

I use either PhotoShop unsharp mask or Lightroom to sharpen the image for how it is being used. Most images could use just a little sharpening. If you overdo the sharpening, it will not look good. A little will give it a bit of a sharpness “kick.” Use a small radius (perhaps a pixel or less) and a large amount.

Most photos are only processed with sharpening once I export out of Lightroom.

If I post the photos to the web, I choose the setting here when I export Screen and Standard.

You can make other choices when you export paper quality and influence your choice.

Success as Independent Photographer—Requires People Skllls

According to the Portland Business Journal, people skills are described as:
Understanding ourselves and moderating our responses
Talking effectively and empathizing accurately
Building relationships of trust, respect and productive interactions.

Running a successful business requires good people skills. I think the Portland Business Journal has it right when they describe what it is.

Earlier I wrote here about where my time goes as a photographer.  The majority of my time is spent using people skills to engage with: 1) potential clients; 2) clients or 3) subjects.

If you are insecure then you are going to have to take some risks and get out of your shell or find another career, because your success will be directly connected to your people skills.

Nikon D2X, Sigma 120-300mm with 1.4 converter, ISO 400, ƒ/4, 1/5000

Understanding ourselves and moderating our responses

Understanding ourselves is really about knowing our elevator speech. Why do I want to talk to you and what is my objective. You have to know what you want to accomplish or you will be unintelligible to people.

It isn’t all about you either. You have to learn to moderate your responses so that you are connecting to people and what is important to them.

Centenary assistant coach Adam Walsh talks to Justin Glenn (33) during timeout against Georgia Tech during the first half at Alexander Memorial Coliseum. [Nikon D2X, Sigma 120-300mm, ISO 400, ƒ/7.1, 1/200, 4 Alienbees B1600 with sports reflectors, Pocket Wizards used to trigger them]

Talking effectively and empathizing accurately

The first time I talked about anything with people, I made mistakes. I analyzed what I did and why it failed. I started reading books and going to seminars to learn how to be more effective on whatever I was trying to do.

I went through premarital counseling and discovered this alone didn’t prevent mistakes. It was through mistakes I became more effective and developed more empathy.  You see others made mistakes with me and hurt me.

When I did my first few jobs I discovered people abused me if I didn’t have a good contract in place. I learned to communicate expectations I understood from the client and my expectations and have them written for both of us to sign.

When I first contacted people I was asking do you have any jobs for me. Today I research clients more and come to them with ideas of how I could do something for them. I learned over time to learn what was important to others more than what was only important to me. I was learning to empathize.

Nikon D2X, Sigma 18-125mm, ISO ISO 400, ƒ/7.1, 1/350

Building relationships of trust, respect and productive interactions

I have learned that the more people get to know me the more they trusted me. The more transparent the better my business became. I also learned over time that too transparent and letting people hear your thoughts all the time can backfire.  It took years of mistakes to learn how to have more productive interactions.

I learned the more I was helping the client get what they needed or wanted helped me to pay my bills.

I learned that you can share your expertise carefully and they client will appreciate your thoughts. The balance was learning to live with their choice when I didn’t agree with their choices. I was learning to respect their thoughts and opinions.

Even when clients told me they thought I was the expert didn’t mean they would always do what I suggested. What I learned was they were listening and sometimes the timing wasn’t good for reasons I didn’t know.

I started to watch years later my ideas being done by clients. I also learned to not have to get the credit all the time. When they would come back to me later with an idea that I had given to them, I was learning over time to smile and tell them what a great idea.

I also learned to share a little of my personal life when appropriate with clients. I found that they wanted to know about my family, just not all the time.

If you want to be a successful photographer, then develop your people skills.

Nikon Firmware Updates: Two Main Places to Check

First go here to check for your camera’s firmware updates.  It will look like the screen capture above minus the red arrows.  However those two arrows direct you to those two updates you need to check on: 1) DSLR & 2) Distortion Control Data.

Here are the shortcut links for you:

Firmware download links: Mac | Windows
Installation instructions: Mac | Windows
What is barrel and pincushion distortion?

from Nikon’s website
– Barrel distortion normally affects images shot with wide angle lenses and results in an image that appears to have details that bow outwards, away from the centre of the image.
– Pincushion distortion normally affects images shot with telephoto lenses and results in the image appearing as thought it is being pulled towards the centre.

An example of Barrel Distortion


An example of Pincushion Distortion 

Nikon D4

You need to know what firmware you have on your camera. Check your manual, but for the most Nikon DSLR just go to the wrench icon and then look for firmware.

Here I am showing you the screen that shows up once you have downloaded the firmware update and put this on the memory card and then into the camera.  When you go to firmware it will ask if you want to update.

Here you can see that I updated my Lens Correction from 1.004 to 1.009.

If you attach your flash as I did on my camera and check firmware you will have four different software updates possible.

What do all these refer to on the Nikon D4

A: I/O processor
B: Expeed processor
L: Lens Distortion Control Data
S: Flash

If you shoot RAW the RAW file doesn’t have the corrections, but the JPEG thumbnail does have the corrections. For the most part if you use Nikon Capture, Adobe PhotoShop or Adobe Lightroom you can apply these corrections to the RAW file there.

Flash

The Flash I had on the camera for the 5.002 firmware was my Nikon SB-900.  

Photographer Public Speaking Tips

Next month I am speaking at Grandfather Mountain’s Camera Clinic. As I was preparing for this, I realized each time I speak I am trying to improve over the time before.

Many years ago Dennis Fahringer asked me to be a guest instructor in the Youth With A Mission Photography School. The very first time I spoke to the group I felt like I was not connecting with the class. By the end of the week teaching I was connecting. If you would like to attend that school Dennis Fahringer created a web page for all your questions here.

What I learned during that first time teaching in Kona, Hawaii were a few things. If you find yourself asked to do public speaking to groups here are some tips that I found have worked for me.

Break your talk up into segments. Think of beginning, middle and end or like chapters of a book.

Example of your work

I believe the very first thing people need to hear and see from me is what I do. This is why I am often asked to speak.

[youtube https://www.youtube.com/watch?v=pMUlWq7EImY]
Create a visual elevator speech. I’m sure you are familiar with the concept of the “elevator speech.” The idea is that — if you are asked what you do for a living or what your company does — you should be able to give a complete, compelling answer in the time it takes to ride an elevator to your destination.

I have many small multimedia presentations and one of those is a 2-minute elevator speech. I like to start with this and then quickly show one of my most recent multimedia presentations to warm up the audience.

This approach helps establish my credentials and why I am speaking to the group on a topic.

[youtube https://www.youtube.com/watch?v=KEgIfIMyrK0]
Your Story

While people are interested in what you do, they are equally interested in your story on how you came to this career.

If you were in the audience you will have noticed that I first had you look at a screen for about 7 minutes showing my work with just a brief setup for the multimedia shows. You will now notice that I have gone to a black screen and now visually shifted your attention from the screen to me talking.

Rather than just telling my story I engage the audience with my story. Since I am usually talking to adults, I tell the group how I didn’t talk at all until I was three years old and this was a major concern for my parents. I ask them what this often means about a child.  Usually someone in the audience knows the answer—I most likely am autistic.

Autism is a disorder of neural development characterized by impaired social interaction and verbal and non-verbal communication, and by restricted, repetitive or stereotyped behavior. The diagnostic criteria require that symptoms become apparent before a child is three years old.
—Wikipedia

I then share how ironic it is that someone with autism is a professional communicator.  After a few comments on how I still have some quirks in my personality due to autism I find the audience is much more sympathetic and appreciative that I have been so open.

This takes about seven minutes to share.

My topic

I try my best to keep my core presentation to 18 minutes. Why? Well I think the TED talks format seems to resonate right now with most audiences.

TED curator Chris Anderson says:

It’s long enough to be serious and short enough to hold people’s attention. It turns out that this length also works incredibly well online. It’s the length of a coffee break. So, you watch a great talk, and forward the link to two or three people. It can go viral, very easily.

The 18-minute length also works much like the way Twitter forces people to be disciplined in what they write. By forcing speakers who are used to going on for 45 minutes to bring it down to 18, you get them to really think about what they want to say. What is the key point they want to communicate? It has a clarifying effect. It brings discipline.

Often this is when I go back to the projector and setup the topic with establishing first there is a problem.

Then I follow it with a solution.

Next step is I establish another problem.

Then I follow it with a solution.

This method is great for moving people through the subject to me showing my problem solving techniques and solutions I have come up with for the problems I see in the industry.

I learned this technique from Nancy Duarte who uncovered the structure of great storytelling.

[youtube https://www.youtube.com/watch?v=1nYFpuc2Umk]

Questions

I try to allow for about 10 minutes of questions at the end of my talks. If no one is asking questions, I go into my Socratic method to get them thinking and ask questions to the audience on the topic.

I hope this helps you when you prepare to give your next speech.

Need a speaker?

Give me a call if you need a speaker for your next event.

What to include or leave out of a photo

Nikon D2X, 70-200mm, ISO 100,  ƒ/20, 1/8 Tripod Used

I really enjoy photographing science and technology. When I go into a lab I am often having to create the photo.

Lighting Diagram

In these photos we were wanting to show the tools this manufacturer makes to help with clear retainers. The difficulty in the photo was to show the blue flame to heat up the tools so they can make adjustments to the clear plastic retainers. This is why I used a tripod to keep the camera still during the 1/8 shutter speed exposure.

I used a soft box to light the subject and tools. I used a separate light with a blue gel for the background.

The elements that I included was the square plastic which was used to make the retainer the technician is holding. I have included the different trimming tools and the Dental Burner used to heat the tools.

Nikon D2X, 70-200mm, ISO 100,  ƒ/20, 1/8 Tripod Used

I also gave the client another version without the technicians face and the background light was turned off. I had the plastic square placed to help separate the clear retainer from the background.

Every type of photo should cause the photographer to think about what to include and exclude in a photograph. You can do this by moving around the subject, your lens choice and how close or far away you choose to be from the subject.

What needs to be in the photo?  You should always be asking this question and being sure your composition helps to guide the audience to the important parts in the photo.

Photographer’s best composition tool

Nikon D4, 28-300mm, ISO 12800, ƒ/5.6, 1/125

Objective?

Why are you taking a photo? What do you want to accomplish with the photo? Those are just some of the questions you should be asking yourself before you start pushing the shutter release.

My daughter’s choir had their last dress rehearsal for the parents before they took off for their choir trip this summer. Like every parent my first priority for taking a photo was to capture a good moment of my daughter. So the first photo here is of her solo performance.

Nikon D4, 28-300mm, ISO 12800, ƒ/5.6, 1/125

Just a couple years ago when they first started the group only about 11 singers and only about 8 of them went on that first choir trip.

Nikon D3, 14-24mm, ISO 5000, ƒ/5.6, 1/80 [April 29, 2011]

While getting up high and showing the singers gave an idea who was in the choir I still was missing some people.

Nikon D4, 28-300mm, ISO 12800, ƒ/5.6, 1/125

The two choir directors would switch out for who played the piano and who conducted. Here you can see the pianist.

Nikon D4, 28-300mm, ISO 12800, ƒ/5.6, 1/125

To capture a good overall shot I was in the balcony of the historic sanctuary and going wide I was able to show to the far left the three musicians, the choir and all the families that came to support their family.

Nikon D4, 28-300mm, ISO 12800, ƒ/5.6, 1/200

I also wanted to show they were leading in message and not just music for the worship services. So I captured some of them reading scripture and giving a message.

Nikon D4, 28-300mm, ISO 12800, ƒ/5.6, 1/125

Now when I was on the same floor level as the choir, depending on which side of the room I was on determined what members I could see. Here you can see some people are blocked by the director. However, from this perspective I was able to show a proud father getting some photos of his child singing.

Nikon D4, 28-300mm, ISO 12800, ƒ/5.6, 1/125

While I am there to capture my daughter I am also using my talents to bless the other families. Many of them just cannot get as good of a photo as I am able to get of their child. So, I am also trying to get as many photos of each person in the group for their families to enjoy them as much as I enjoy good photos of my daughter.

Nikon D4, 28-300mm, ISO 12800, ƒ/5.6, 1/125

We are also so grateful for the leadership and one of the ways I try to let them know how much we appreciate them is to get the best photos I can of them doing their best leading our children. I also believe these moments will help recruit more families to want to participate in the music program of our church.

What is that secret composition tool?

Your feet. Yes the best thing you have to make your photos better is for you to move around a room and around your subject. It is by exploring different perspectives that you not just get a better photo of the subject, you also have a better chance to tell a more complete story.

Capturing the memories of our lives

[youtube https://www.youtube.com/watch?v=zJg3WDieNS0]
This is a quick video to help give you a feel for the evening’s events.

Is everybody Happy? H-A-P-P-Y

Last night we welcomed home our son the soldier and 1st Lieutenant after serving for the past 9 months in Afghanistan.

This is an incredible event for everyone on so many levels.  What was so cool was the number of decisive moments went up so dramatically.

Every knock at the door at home was cause for panic this past year, for fear of the worst. I am not sure, but I think this might have been about the most polar opposite to going to a funeral.

My step-son was smiling as big as I have ever seen him smile. My wife was so thrilled to get a genuine hug that surpassed all she had ever had before by him.

I saw many little boys dressed in their fatigues waiting for their daddy to come home. I think their dads could see how proud these boys were of their dads and their service for our country.

It was a visual event. I do not think any radio station could have done this justice.

It seems like many people came with their signs to be sure their soldier knew where to find them [so it was big] and how much they cared. I love this moment when this friend of our son tells him about her sign. I think you can see the pleasure in her face and body language about how she wanted to wear her emotions on her sleeve for this event.

What was different with all these hugs were the joy in each persons face for not just the other person, but the deep emotions they felt from their friendships. Here is my step-son Nelson give a bear hug to his friend from The Citadel James Harrell.

These moments were powerful to see where the emotions inside of folks were too much to contain and all their actions showed the deep affections people had for one another.

Social media is helping everyone share these moments with their friends. As we posted these photos to our social media accounts my wife Dorie is saying I cannot keep up with the comments. The likes were off the chart as compared to any other photos we have ever shared.

Here you can see Sarah Kohut Harrell, Dorie Griggs and Lynn Essert enjoying some of the photos and comments already Dorie is getting from friends from all over the world.

These are the times we want to capture and hold so dearly.

This is why I love being a photographer. My work is to capture people living life to their fullest and this is one of those big milestones we put on our the walls of our homes.

Always take your camera to events like these, they are too precious not to capture to remember forever. Also, remember how you present yourself can be very welcoming or you can put people off. 

Record keeping made easy for the photographer

If you have enough business then the paper work can overwhelm you. If you are finding you have a lot of paper work then this is a solution for you.
IRS tips
I wrote earlier on book keeping suggestions. Here is that post for you https://picturestoryteller.com/2013/03/photography-tax-tips.html
This post is on how to speed up that process even more for the successful photographer needing to get control of paper work in a timely fashion.  If you are starting out just a cheap scanner will work until you need to save time.
The paper work

If you are one who hates paper work as much as I then anything that can simplify the process is worth doing.

There are two different places that I must be ready to show receipts for business expenses: 1) IRS & 2) Clients.
I have found that every penny counts when it comes to collecting for expenses from clients.  Many clients want to see copies of your receipts before reimbursing you for those expenses. 
When I was on staff and filling out reimbursement forms I had to have every receipt or not get reimbursed.  When I made so little in those early years this actually helped me get into the habit of collecting those receipts.
While the IRS will accept business journals and credit card statements as proof of expenses in audits, these will not work with some clients.
If the dollar amount of items you purchased and deducted from your taxes was in excess of $75, the IRS will need to see the receipt to warrant the deduction. 
If the penny amount of items you purchased and want reimbursed from the accounts payable department is 1¢ or more they want a receipt.  
Scan your receipts
The best advice I can give you is to scan your receipts–all of them. This way you can easily create a PDF with your invoice and attached all the receipts. 
The best thing I have done to streamline all my book keeping was scanning of my receipts.  While putting as many receipts on a page and scanning them as one document works for business expense reports for invoicing, that really wasn’t working well to keeping track for the IRS.
I use Quicken Home & Business software to handle my banking, credit cards and invoicing.  A few years ago they made it possible for you to attach receipts to each transaction. In addition each transaction could be associated with the correct category on the Schedule C for taxes.
By scanning receipts and using the software Quicken I was able to make filing for taxes just a few hours each year than days it used to take.
Time is money
Well I had actually shifted a lot of that book keeping to spending time every couple of weeks scanning receipts one-by-one. This was taking a lot of time. 
Not all that long ago a new scanner appeared on the market NeatDesk, but the price tag of $399.95 was a deal breaker in my mind. I had a Canoscan scanner that I paid $50 and it was doing the job.
I finally was tired of spending so much time scanning. I decided I would try the NeatDesk and if it didn’t work I would return it and at most pay the restocking fee.  After just a few minutes I was sold.  
I stacked the maximum amount of receipts it would take at a time. NeatDesk will scan in your receipts, business cards, or documents at a speedy 24 pages per minute. Scan up to 50 pages at once – 1 or 2-sided, color or B&W, single or multi-page. Capacity with paper tray:  15 business cards + 15 receipts + 15 letter-size documents.
The really cool thing is it not only scans but reads the text and helps with file naming and categorizing your receipts.
In addition to receipts I used it to scan stacks of model releases and then it created a PDF of them that I put with the photos online for my clients.  
Neat reads and extracts the information from whatever you scan. Receipts become digital records with vendors and amounts, business cards become digital contacts, and documents become fully keyword searchable.
expenses page2
Scan and attach a copy of all your receipts for the client
Saving the best for last
The second most important person on a job beyond the contact to get the job is the accounts payable person. 
Just as you get more jobs with a client by taking more off of their desk that they must do, the faster you get paid when you make the life for the accounts payable people easier.  

Photojournalism has given me better perspective and focus

Job 42:5
My ears had heard of you but now my eyes have seen you.

What a privilege

I am reminded over and over as I do my job as a photojournalist how really cool it is to be invited into people’s lives and get to see how they live, work and play.

Sometimes I have been invited into people’s lives during tragedy as I was years ago to photograph the Newberry family. Their son Philip contracted spiral meningitis and due to this Philip lost both hands and feet to the disease.

What was a devastating experience became such a walk of faith by a family. How powerful of a story to see a family transformed in such a positive way.

When I get invited into homes I do not see the poverty as much as I am seeing a person sharing the most intimate space of their lives. What impacts me over and over is how most people with so little are so happy in life.

While in West Africa in Burkina Faso I met a husband and wife with their newborn child. This one room hut with a dirt floor was filled with the love of a mother and father for their child.

When I traveled to the Yucatan I was invited into the home of a family where they all lived in one room.  I thought it was so cool to see how they made use of space using hammocks at night for sleeping. During the day those hammocks can be moved to give room for the kitchen or work they might do in the same room.

Early I would be so hesitant to ask to photograph families in their homes that showed such poverty. Today I realize they are as proud of their homes as I am of where I live. Here a teenager is proud of his own room.

Comparing his situation to the families living in the space he calls his room lets me know he is better off than many people around the world.

I was excited to be invited to photograph Almond Standard who built his log cabin home in his late 60’s. He was so proud of being able to use his skills to build this home from scratch all by himself. The only thing he didn’t do himself was the roof.

Perspective Shift

Meeting people from all walks of life and seeing how they live around the world makes me appreciate my situation so much more. I also realize that I live so much better than most of the world. Had I never traveled to distant places my perspective would be based on living in the suburbs of Metro Atlanta. I would see how so many live better than me and that I was more towards the bottom of the socio economic scale.

Now having more of a broader perspective I know I am living way above most of the world in my lifestyle.

While you may be able to take vacations that are designed to see exotic locations I recommend you go and experience the world from another perspective. Get involved with a non-profit and volunteer your time. Travel with the non-profit to another part of the world and help give back. You will start to broaden your horizons and this will change your life forever. It changed mine.

New Focus

I want my time to count now days after the experiences I have had in life. I want to live a life of doing something positive. I hope to use my camera to help those who are voiceless and marginalized by the world.

I want you to know these people so you too can feel more in touch to the world and not just in touch with your neighborhood alone.

Impulsive Behavior vs A Plan

Personal

We can see where impulsive behavior can get us into trouble in various parts of our lives.

One of the first things we learn about money as a child has to wait for something until we can afford it. Most parents even teach their children how to save and plan for purchases.

However, too many people discover credit cards and often get into financial trouble from needing immediate gratification.

Another area of our lives we also tend to satisfy immediately is our mouths. Unfortunately, too many of us have overindulged with our wants for food rather than what we need to remain healthy.

Marketing

I have watched many people react to opportunities to market their businesses. Unfortunately, this is the equivalent of overindulgence.

Just like money and food, we need a plan for our marketing endeavors.

If you have worked out your plan for your business, then you have worked through the criteria for what you will do for marketing.

You may have chosen not to mail a postcard to all of your contacts for budget reasons but rather target a small segment of your communications with postcards.

Now, if a great opportunity arises for a person with a marketing plan, they can easily weigh this opportunity against their agenda. But, on the other hand, sometimes you may have a great possibility that you know you shouldn’t pass up.

The key to knowing if it is a great opportunity is you have a plan to use for comparison.


What I learned from Teaching

I earned my master’s in communication through the education department. Due to being in that department, I took education courses. These proved to be the most valuable to me in my studies.

One thing I learned about lesson plans and Teaching is that when you have a clear objective, you can quickly know how to turn that divergence into a teaching moment when someone asks a question.

The Socratic method teaches by asking the students questions and letting them pull upon their life experiences to help them discover new concepts. Then, if the teacher has a good objective, they can easily navigate the dialogue and direct the process.

However, if you are unsure of the objective and know you need to cover these steps, then you cannot teach by the Socratic method. You will want just the answer as specific as possible. Looking for a particular solution will only frustrate the student and you as the teacher.

Vision

Knowing where you want to take your business can develop a solid business plan. But, of course, part of that plan will be how you plan to market yourself.

Like you must eat every day, so must you have an active marketing plan and not just occasionally done, or your company will die just as you would if you didn’t eat regularly.

Plan your marketing just like you do your diet and checkbook. Then and only then will you recognize an “opportunity.”

Once you have a plan, work on the plan, and success will likely follow.

How To Correct Leaning Buildings In Lightroom 5

How often do you take pictures where the buildings are falling away from you. Before digital there were two ways to correct this.

By using a 4×5 camera you would get the film to be parallel to the building and then adjust the tilts and swings of the lens mount to get you a photo where the building looks straight.

You could also while printing the photo adjust the easel until you also made the building look correct.

Using Lightroom I was able to take the above photo and correct it to the lower photo.

Here is a video showing you how I did that correction.

[youtube https://www.youtube.com/watch?v=QPhR6kGPxp8]