We have all seen photographs with too much “stuff” in them. Because the photographer does not attempt to select one subject, the image fails to communicate. It’s the visual equivalent of a run-on sentence.
A close-up of detail frequently reveals more of the subject than a picture of the whole issue. So many photographers want to shoot general views because they believe they offer “good composition” or capture beautiful light. The detailed photograph can have more impact and communicate more because the photographer is forced to be interpretive with the detail. The isolated part can tell more, be more emphatic, and be more quickly appreciated and understood. It tells the story in a compressed, sometimes dramatic, fashion by scaling down to point out a specific idea to the most significant effect.
Nikon D3S, ISO 3200, f/5.6, 1/4000, 24-120mm, SU800 with SB900 off camera flash
In approaching a subject, decide how much to include in the camera’s viewfinder. Force yourself to look around the subject and at each of the corners and everything within the viewfinder’s frame. If anything detracts from the theme, move in closer to eliminate it; if there is not enough to tell the story, drive back to include more. The key to this process is to know what you want; the details will fall naturally into place, and “composition” is achieved.
I have found the following exercise effective with my students at Reinhardt College. First, shoot a large scene, then close in on it and cut it in half. Close in repeatedly until you finally isolate the most crucial subject and thus make a statement about the main thing in the scene. In this way, you learn that much of what you see in a picture may not be that important — and how to select the part or parts that are most meaningful.
Nikon D3S, ISO 3200, f/5.6, 1/4000, 24-120mm, SU800 with SB900 off camera flash
Great photographers know that composition is a matter of feeling rather than of rules learned by rote. You will develop this feeling as you gain experience, but you will never really “know it all” because you will emphasize different things as you learn more about life. Composition, ultimately, is just another way of looking at life.
The key to group photos is planning — and how big you plan to use the photo can make a big difference in your planning. We don’t hang wristwatches on the wall, because their faces are so small you cannot tell time with them. In most family rooms, you could have a three-inch face clock and tell the time. In a classroom, you might need a 10-inch face. The clock face size is a good rule of thumb for determining whether someone will be recognized in a wall print at a normal viewing distance.
Agnes Scott Basketball [NIKON D2X, Sigma 120-300 mm f/2.8, Mode = Manual, ISO 400, 1/200, ƒ/16, (35mm = 202) + 4 Alienbee B1600s]
The more you show in a photograph other than people’s faces, the larger the photo needs to be to recognize the people, because their facial size will diminish. If your group photo is primarily for identification, getting everyone close together so you can see their faces should be the primary goal. Then you can run the photo in a publication, and people can tell what everyone looks like.
Truett Cathy, Dan Cathy, Bubba Cathy Perry Ragsdale, Steve Robinson, Buck McCabe, & Tim Tassopoulos
On the other hand, if your photo is more about creating a mood for a poster of, say, a hip-hop band, you will shoot much looser, spacing the people out and letting their body language help establish the mood. For these concept/mood photos, I like to spread people out and put people at different heights (relative to their faces). I like to think in triangles. If you were to connect the dots (faces) between people, do they make triangles? Create depth by having some people closer to the camera and others further away. This will give it a more three-dimensional feel.
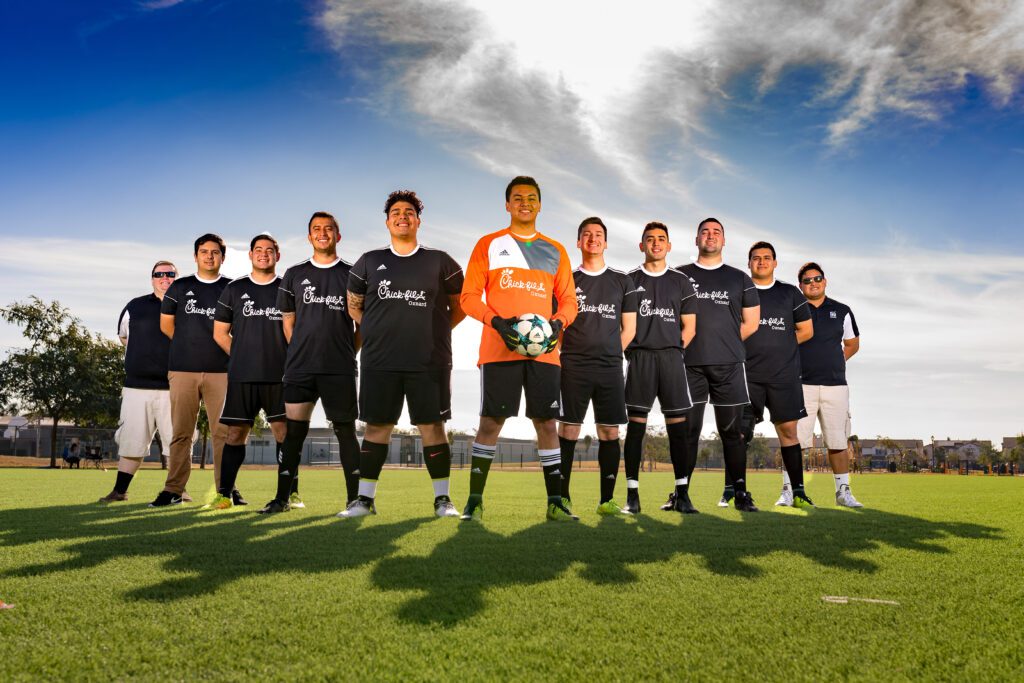
Matt Ellenberg supports a Soccer Team for his employees.
Matt Ellenberg | Operator
Oxnard FSR
Chick-fil-A | Oxnard, CA
If you go to the music store and look at CD covers of music groups, you can see some of the leading work done in the industry. Try copying some of these until you get the hang of it and can come up with your own concepts.
If you plan ahead, have a good idea, and take people’s sizes into consideration, you will move pretty quickly through the process. If you don’t, it moves slowly, and your photo may fall apart because you will lose the attention and interest of the people in it.
When scouting locations in advance, you are not only choosing one for the scenery; you are also ensuring you are there at the best time of day for a group photo. Having the sun right behind the group isn’t the best technical photo. Sometimes, a location won’t work simply because the group isn’t available at the right time of day to make the photo.
Nikon D2X, 24-120mm, ISO 100, ƒ/16, 1/200–4 Alienbees shooting through white umbrellas
I have found that if you have done your homework, you can pretty much make any group photo in 10 to 15 minutes. You may get to the location earlier, but the people in the photo should be able to be placed into position immediately, and then you are just looking for good expressions.
One last thing that can make a great impact on the quality of your photo: either have a laptop computer or a TV on location to view the images as you shoot. Virtually all digital cameras will plug into a TV and let you see the image big enough to assess the smallest details — enabling you to move people only inches and improve the final product.
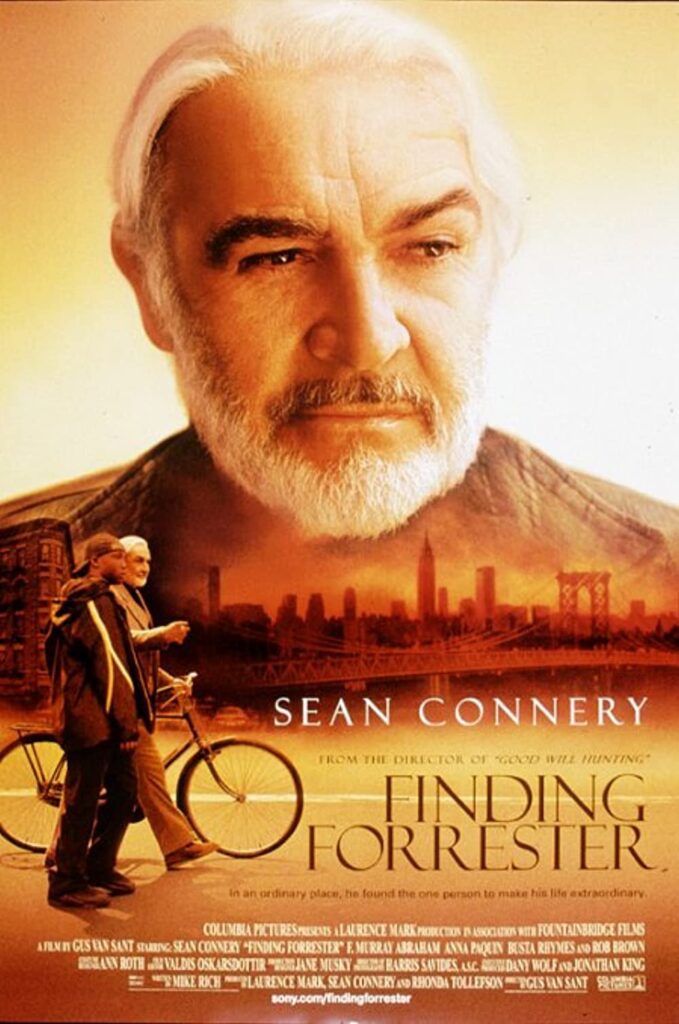
Finding Forrester is one of my favorite films. In the movie, William Forrester, played by Sean Connery, is a reclusive Pulitzer Prize-winning novelist who never gave the world a second novel. Forrester befriends a 16-year-old inner-city basketball player named Jamal. Jamal, an aspiring writer, visits Forrester’s apartment to seek the author’s wisdom. In one scene, Forrester and Jamal have a lively discussion about writing rules, such as “You shouldn’t start a sentence with ‘and.'” They talk about how breaking the rules can create a significant impact. If overdone, however, it also can have a devastating effect.
This is so true in photography. Photographers must study and know the rules of good visual composition like writers study and learn the rules of good writing composition. Once you understand the rules, your ability to break them helps you have a better impact on your photos.
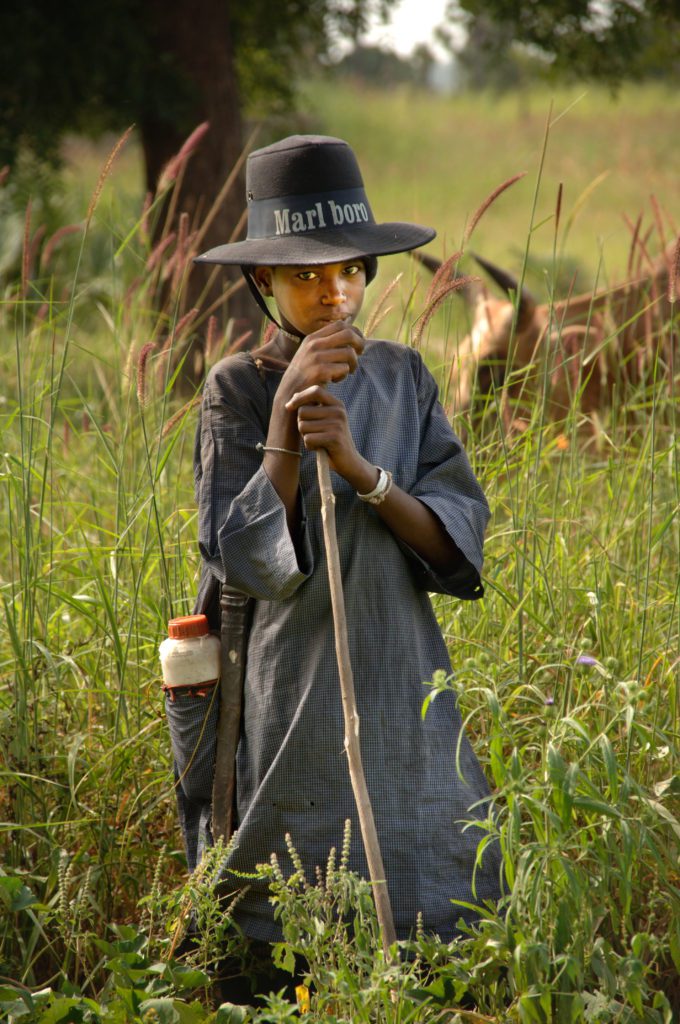
This little boy shepherd is part of the Fulani tribe known for being herders and working in the village of Soubakamedougou, Burkina Faso, on October 15, 2005. The Marlboro company gives hats to the young boy cowboys to promote their product in Burkina Faso. [NIKON D2X, 18.0-125.0 mm f/3.3-5.6, ISO 100, ƒ/5.6, 1/90, Focal Length = 187]
Breaking the rules can create visual surprises. Tom Kennedy was the director of photography for National Geographic magazine when I showed him my portfolio many moons ago. While my work was professional and of excellent quality at the time, Kennedy commented that he wanted more surprises.
Community Garden
[NIKON D4, 14.0-24.0 mm f/2.8, Mode = Aperture Priority, ISO 125, 1/250, ƒ/14, (35mm = 14)]
Kennedy had seen just about everything in his role at National Geographic. When Kennedy said he wanted to see more surprises, he wanted — for example — to see shots that weren’t taken from my average standing or sitting height. One of the things his critique had me doing right away was looking for the extreme. I started shooting with my camera on the ground and finding ways to get up high. I also started to shoot extreme close-ups, another change in what I’d been doing.
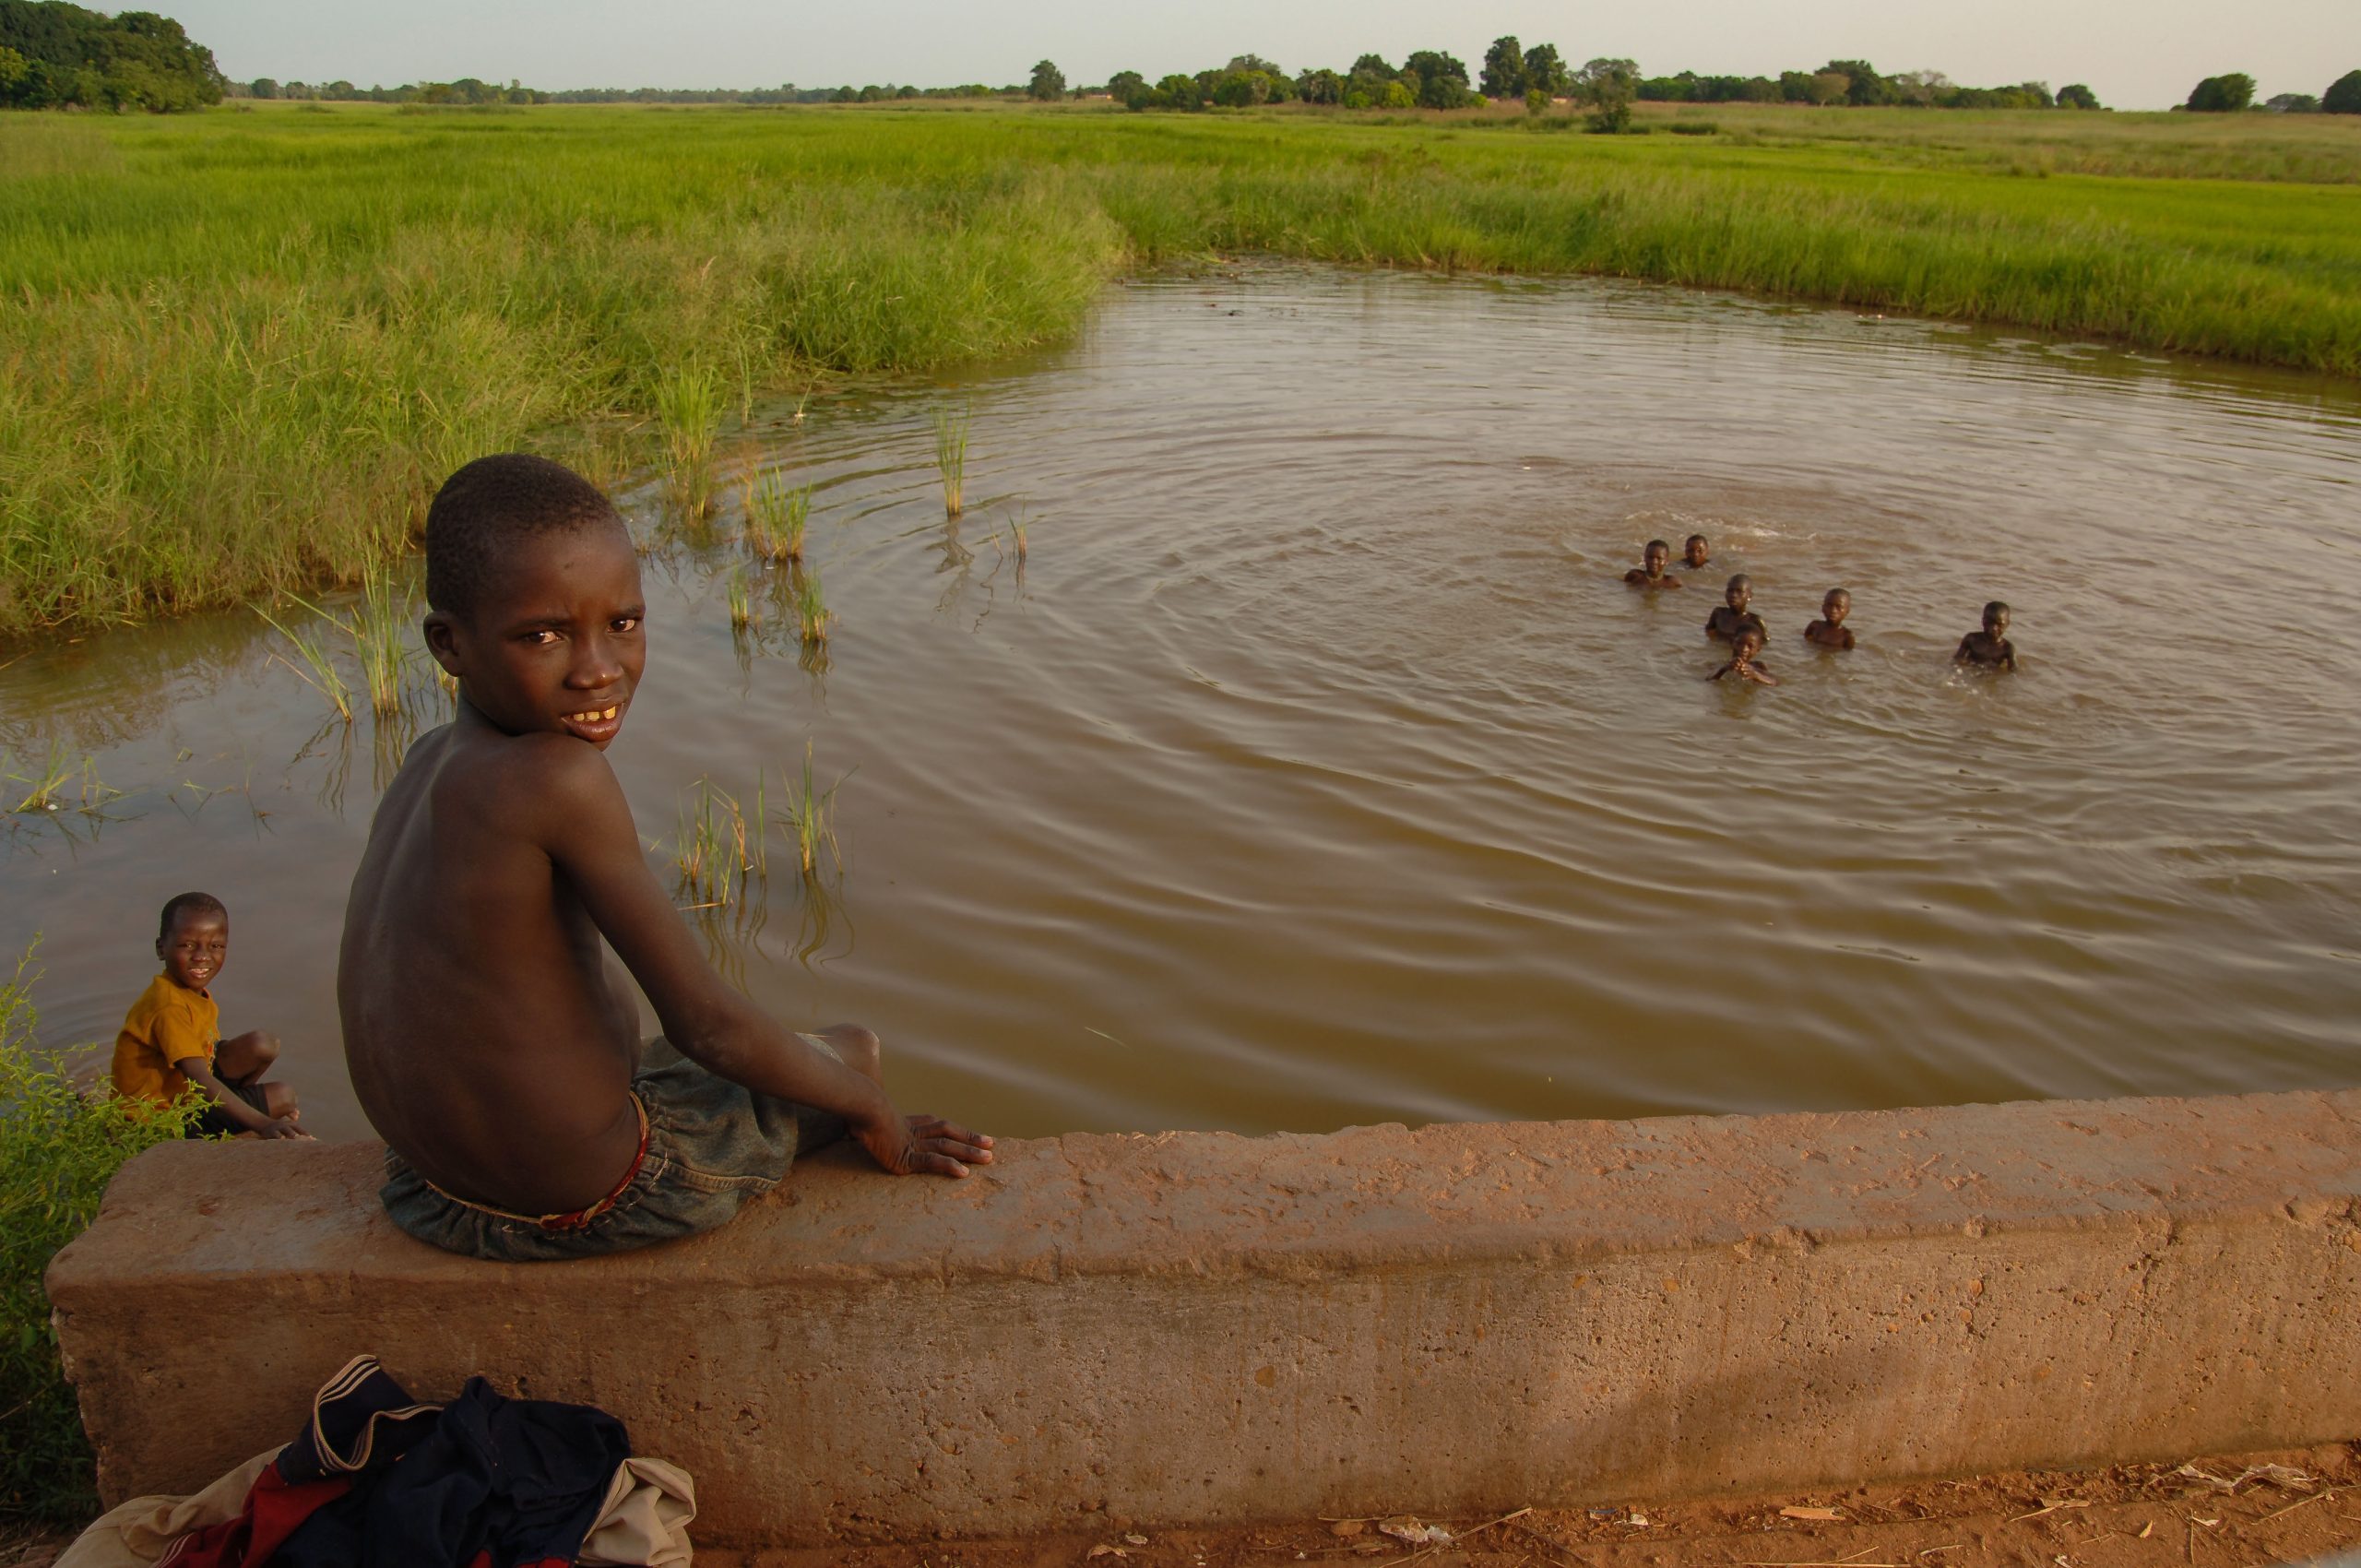
These boys are enjoying the stream just outside the village of Konadouga, Burkina Faso. They were surprised to see the white man with the camera taking their photo. In just ten miles, we went through 30 languages spoken by the tribes in the area. (Photo By: Stanley Leary) [NIKON D2X, AF Zoom 18-50mm f/2.8G, ISO 100, ƒ/6.3, 1/90, Focal Length = 27]
There comes the point in your photographic journey where you begin to find your voice. In the movie, Forrester had Jamal use a typewriter to copy Forrester’s work simply. The author started doing this after he set down a typewriter in front of Jamal, and the pupil just sat there waiting for something to come into his head. When Forrester saw Jamal wasn’t typing, he asked Jamal, “What are you doing?”
“I am thinking,” said Jamal.
“No thinking,” Forrester replied. “That comes later.”
Forrester gave him some of his work to copy to get the juices flowing. Through punching the keys and going through the actions, Jamal loosened up and slowly, after copying the job, started to write his work.
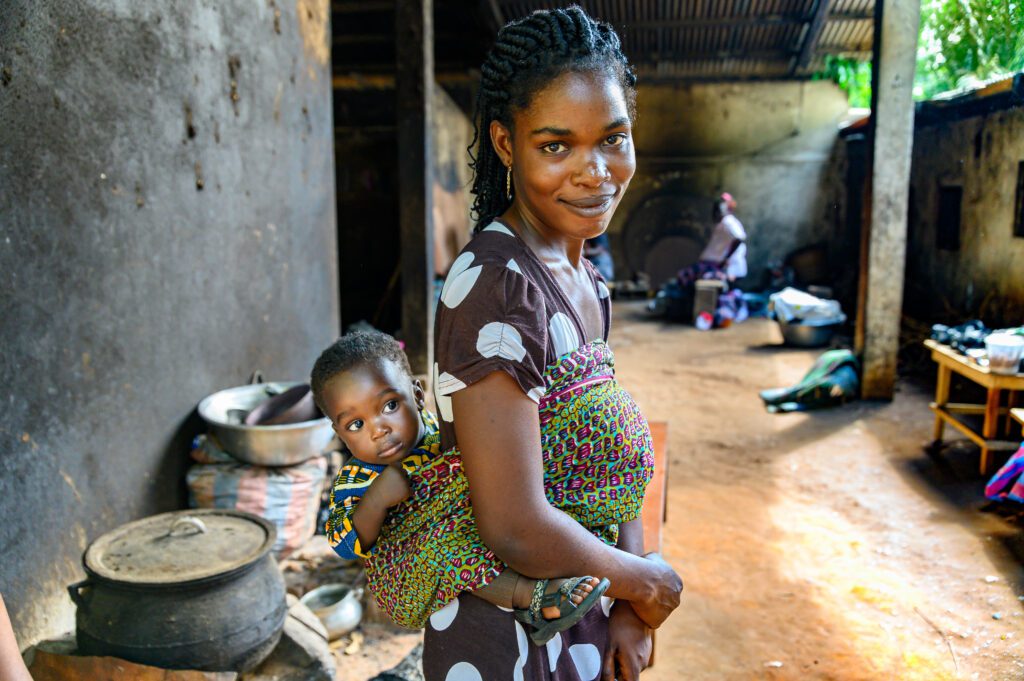
Mother and her little boy carried in kitenge. They are staying here at the Hôpital Baptiste Biblique in Tsiko, Togo, West Africa.
[NIKON Z 6, 24.0-105.0 mm f/4.0, Mode = Aperture Priority, ISO 1800, 1/200, ƒ/4, (35mm = 32)]
Photographers do the same thing. We copy other people’s work to learn how they did it and then add the underlying technology to our long-term memory to use later. Most arts require mastering specific skills before you can create your original works. This typically takes about five years. You can see this as musicians learn to play an instrument like a piano.
After copying the concepts of other photographers, you soon learn that your work is no better or worse than many others. This is when you realize that to stand out from others, you must do something unique — your surprise.
Forrester had a great quote that made me think; he asked, “Why is it the words we write for ourselves are always so much better than the words we write for others?” As photographers, we don’t always receive assignments that challenge us; there’s only so much you can do with a check presentation, for example. Most of the great photographers I know have a secret to their work — personal projects that sustain their creative juices.
The key to surprising others is first to surprise yourself — to take risks and look through your camera differently, not being afraid to break the rules. Stretch your way of looking and see if there is a better perspective than you usually take when taking photos. Who knows what you might discover?
First, when covering a football game, I like to stand behind the end zone, so the team I’m focusing on is facing me. That way, I am already where they are trying to go.
You can get two types of photos of a team from this vantage point — defense and offense. The great thing is you can see the players’ faces, which for me is very important.
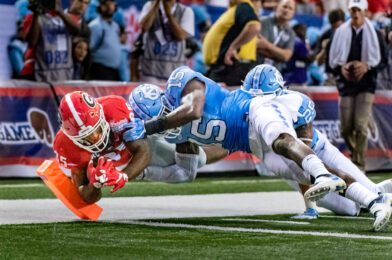
In this photo, for example, Boston College wide receiver Kevin Challenger spins loose from Georgia Tech defensive back Avery Roberson, setting up Boston College’s first touchdown. What I like in the photo is you can see Challenger’s face, along with the defensive player he left in the dust and the ball.[Nikon D2X, Sigma 120-300mm f/2.8 DG EX APO IF HSM, Sigma 2x EX DG APO Autofocus Teleconverter, ISO 1600, ƒ/4, 1/500]
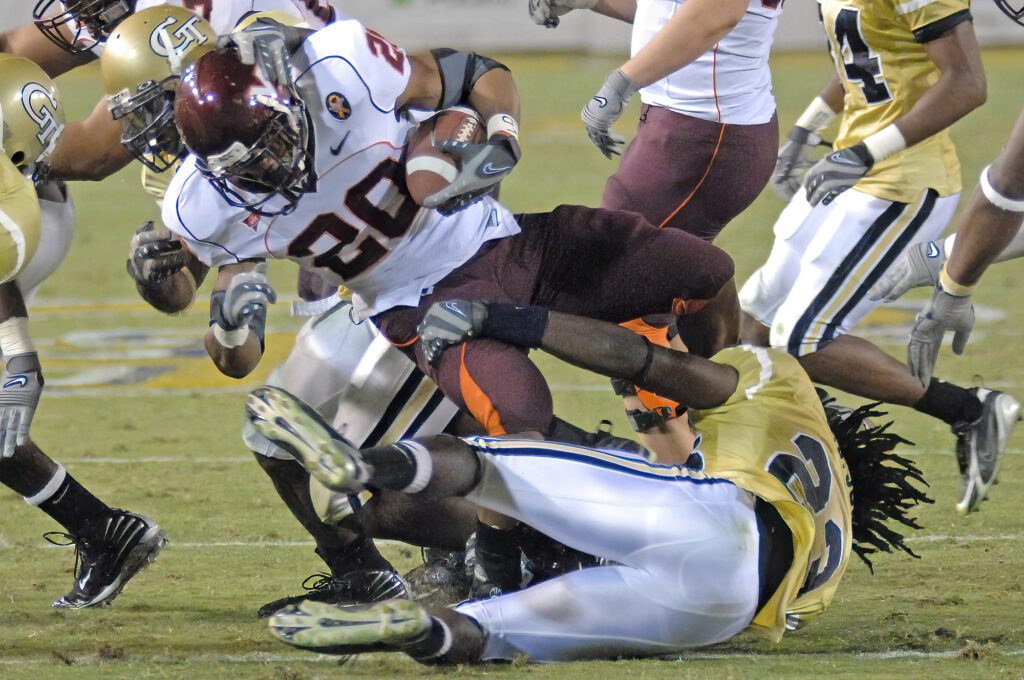
In sports with a ball, I am typically looking for three things: (1) peak action, (2) the ball, and (3) competition. Sometimes you can’t get all three in a picture, but if one element stands out, the photo will still work.
In this photo, Georgia Tech safety Djay Jones and teammate cornerback Pat Clark tackle BC receiver Rich Gunnell after a catch. While you cannot see the ball or their faces, the peak action of the players’ feet off the ground communicates the effort. [Nikon D2X, Sigma 120-300mm f/2.8 DG EX APO IF HSM, Sigma 2x EX DG APO Autofocus Teleconverter, ISO 1600, ƒ/4, 1/500]
After one team is ahead in a game, I often begin to focus on the other team to see if there is a play that changes the whole game. Of course, this can happen at any moment when the game is close. However, with a blowout, the latter part of the game is harder to cover since not much will happen to change the outcome of the game.
After you shoot a game, it’s essential not to editorialize in your captions — but to provide concise descriptions of what’s taken place. Concise but chock-full of information.
Today, databases require writing captions so the software can pick keywords from the caption so that editors can find the photos. One thing to remember, for example, is to list both teams in the caption. This way, you are informing the editor. In addition, it is common for editors to search for a few photos and then put them in a folder, and well-written captions help them with the necessary information.
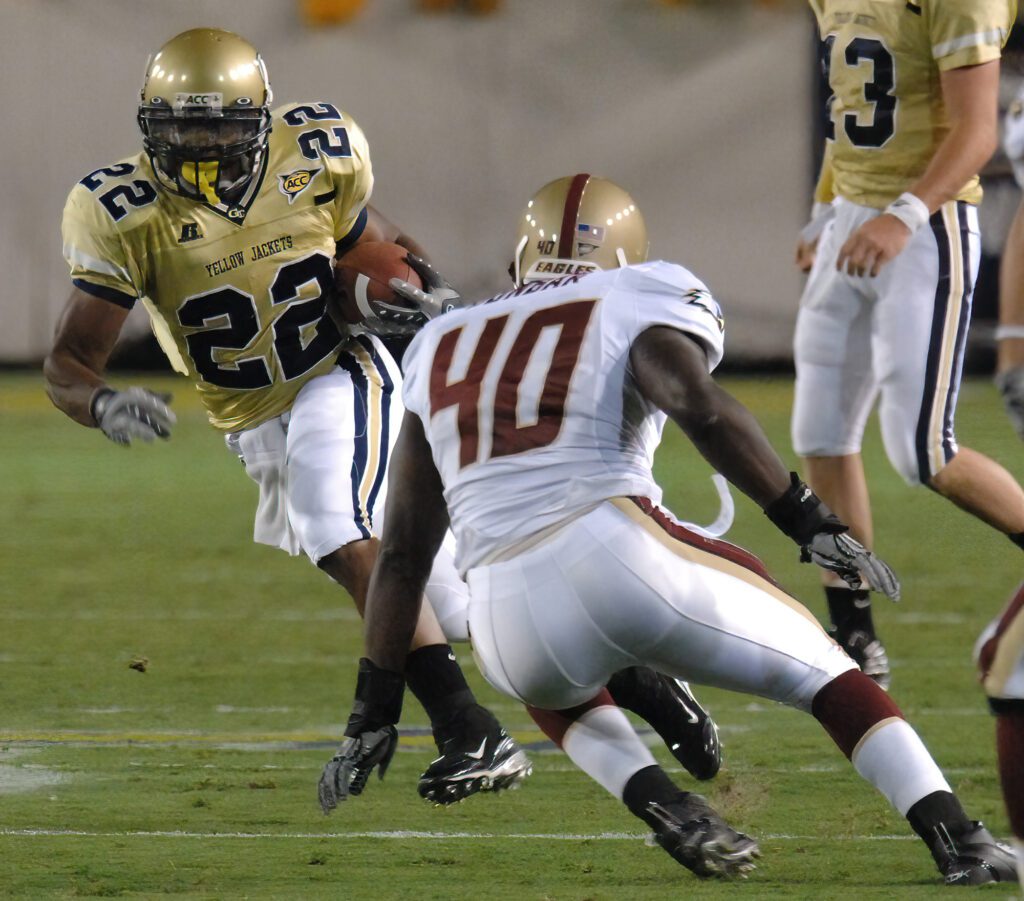
Sept 15, 2007; Atlanta, GA, USA; Georgia Tech is running back Tashard Choice (22) cuts on Boston College linebacker JoLonn Dunbar (40) during the first quarter at Bobby Dodd Stadium. [Nikon D2X, Sigma 120-300mm f/2.8 DG EX APO IF HSM, Sigma 2x EX DG APO Autofocus Teleconverter, ISO 1600, ƒ/4, 1/500]
Getting a significant moment in the camera is only part of the story; it is the caption that fills in the rest.
A final note about the picture above; like all of these, it’s taken at night, which is a bit more complicated. But it communicates all three elements: He’s carrying the ball, it contains peak action, and you can sense the competitive pressure he probably feels from the defensive player pursuing him.
Fuji X-E2, 18-55mm, ISO 6400, ƒ/2.8, 1/50 [What happens when I leave my camera sitting around]
Many in today’s iGeneration have had a childhood of T-ball, soccer, and dance classes expect a trophy if they just participated. I assume most people know there is more to life than showing up on time – but you’d be surprised how often meeting minimum standards will put you ahead of the competition.
I just handed in the grades for a class I taught in photojournalism at Reinhardt College. Real-world projects are what I assigned to the students. They had three assignments: an environmental portrait, covering an event, and a photo story.
I ask the students to turn in their assignments as if submitting them to an editor. First, they needed a cover letter to tell me about their proposal. Next, they required a folder with their selects and another with all the images they shot. The selects needed to have a caption embedded in the IPTC fields. Most editors enjoy being able to send a photo to the designer who already has the caption in the picture.
Some students forgot the captions; some forgot the cover letter, and some were late handing them in. So, while most had everything done correctly, we still had somewhere the captions lacked the essential five Ws.
I continue to hear horror stories from clients about photographers who didn’t meet their minimum expectations. I even know photographers who did the work and never handed in an invoice! It is incredible how excitement will be received by ensuring all the elements are done for a project and turning them in on time (or early!).
One of my favorite creative directors is Tony Messano. He gives sage advice. I can understand why he was judging advertising work all over the world.
Tony expects a photographer to shoot the assignment the way Tony conceives it – but his favorite photographers not only give him what he wants; they go beyond his concept and shoot it their way. Often, they will shoot it just as he says and push the idea further with lighting composition or another element. They bring something extra to the table.
If you are meeting the expectations of your clients, you are doing better than most others in the industry. But, to rise to the top, go a little beyond the expectations.
Don’t be satisfied with the trophy everyone gets for just showing up. Instead, be the person singled out for going beyond the call of duty. Never stop looking for a unique approach or something different. The stretching will keep you youthful and agile in today’s ever-changing marketplace.
My wife Dorie was standing in line at a local drugstore and overheard a customer complain about his photos. He asked, “Why is their head chopped?” The clerk told him the photo technician was off but could help him tomorrow.
As I walked up to Dorie, she told the customer that I was a professional photographer and could probably help. Many years ago, I managed a one-hour photo lab in Texas, where customers were asking this same question almost daily.
Figure 2 – This is an 8×10 crop of the Figure 1 photograph
Missing heads (and other disappearing objects) are standard when making prints. The reason? Digital cameras create pictures of a particular shape and a height-to-width ratio. When we order prints, say a 4 x 6 or an 8 x 10, the body or ratio is different for each size image.
Unfortunately, the machine that prints the pictures doesn’t know how to crop the images in the best way because it’s a machine — so heads go missing from the edges of our photographs. To overcome this problem, photographers need to understand that parts of our photos will be cropped off and allow for this when we make the picture.
An aspect ratio is the relationship of an image’s width to height. For example, Digital cameras produce files with an aspect ratio of 4:3 or 2:3 in most cases. But standard print sizes have different aspect ratios. For example, a 4 x 6 print has an aspect ratio of 3:2; an 8 x 10 has an aspect ratio of 5:4.
To avoid having people arbitrarily clipped by your software or photo printing service, you should crop the photo to the correct aspect ratio, the way you want it to look, before printing. Most of the newer software will have preset aspect ratios for standard photo print sizes in the crop tool.
In Photoshop and Photoshop Elements, for example, you can enter the height and width in the options bar before making a crop selection to crop to a specific aspect ratio — but avoid putting a number in the resolution field if you don’t want the image re-sampled when you cut it.
If you don’t have Photoshop, try using a lab such as PPRPix. Labs of this nature have the software you use through your Web browser to crop before you order your prints. This software has a crop-and-preview tool. It allows you to see crops instantly of all photo sizes. Since Photoshop costs more than $600, this free tool can be a great option, particularly for photographers just starting.
My favorite thing to do when I was in school was the field trip. I remember going to the fire station when I was in kindergarten, sitting on the fire truck, and seeing the firefighters go down the sliding pole.
I remember so much from these trips because I could see what I was learning. Sometimes I even got to sample things — like a hot dog in a meat-packing plant.
Photojournalist
As a photographer/photojournalist, I get up each day and go on a new field trip. Each time I learn something new. The excitement I feel while on these adventures is what I hope to capture with the camera. I need to take the readers of publications to places they may never go in their lifetimes but can experience through photographs to expand their world.
As a photographer, you must tune in with your ears and eyes. You must try to understand as much as possible and then capture those things that help not just document what you saw but also grab the excitement you felt when learning about the place.
Assignments also can be a little overwhelming — like trying to write a term paper the day before it is due. In these cases, it helps to know the subject before you arrive. If you have done research in advance, you can use the experience as icing on the cake, not the cake itself.
Researching before every assignment is not always possible, which is why it helps to find your niche or expertise. Formal education in a subject can be one of the ways to become an expert.
Social Work
I studied social work to understand people better. I later did my master’s in communication at a seminary, which helped me work with people of faith. Another subject I have devoted a lot of time to is sports and, specifically, basketball. I enjoy playing basketball, which gives me insights into the game that I would probably not appreciate as much as a spectator alone.
In school, we all did research papers. We were learning to do reports on my hobbies or interests made it enjoyable and a better message.
Mastering a subject is true for photographers, too. After you have learned an issue, transfer your skills to a new topic, and in time you will have diversified your clientele and turned your passion into a career.
When the camera merged with the computer to create digital photography, the skills needed to be a successful photographer changed dramatically. Before digital photography, professional photographers only had to know how to use a camera.
Almost everyone who worked before the computer became commonplace has experienced this phenomenon. After that, integrating computers into many people’s jobs was commonplace. As a result, everyone has had to learn how to do word processing and e-mailing on the computer to maximize their efficiency for work, depending on their comfort level with computers.
Transitions
Some didn’t handle this transition well. Many employees always had to ask the office’s resident “computer guy” to help them with everything, including merging emails, printing envelopes, attaching documents to emails, and so on. They became less valuable employees because they didn’t learn, while the computer guy became more useful.
Recessions
In 1990, the publishing industry took a big hit. I lost my job due to the recession. My friends also lost their jobs since newspapers dropped like flies; many two-newspaper towns lost one of their publications.
Fortunately, I had computer skills to fall back on. These skills helped me sell computer systems to corporations in Long Island for Tandy Corporation. I used my knowledge to help design client networks and create mass-marketing databases. I enjoyed the photography forums on CompuServe long before 1993. It was 1995 when the World Wide Web took off. I took a class at Georgia Tech on designing websites and created my Website in 1995.
Scanning
In the early 90s, I scanned transparencies and film to digitize photos for publication. Once the digital camera surpassed the quality of this process, it was easy for me to make the transition. Today, I speak to my peers at conferences and workshops as an expert on digital photography and how to use the computer to run their businesses.
Since moving from a staff position to a full-time freelancer, I have watched my business grow at an average of 20 percent annually. Many friends have been losing their businesses and staff jobs during this time. I’ve realized that the most significant single factor in my success is my knowledge of computers as it relates to photography. Those who have failed have generally not kept up with technical developments.
The successful photographer today is the integrated photographer. In technology, “integrated” refers to two or more components merging into a single system. The integrated photographer is a professional who has combined mastery of the camera with computer skills.
From the beginning, digital SLR users have been frustrated by dust. Those little specks are like blood clots in the digital workflow—they can slow you down or ruin your best work. Sure, you can remove imperfections in Photoshop, but when dust gets on your sensor, you must fix it until the problem is addressed.
You’re better off preparing on the front end, aren’t you? Here are six steps to ensure a dust-free photo shoot:
1. Always keep the body cap or a lens on your camera. Having an SLR camera dangling around your neck without a lens is the No. 1 reason photographers spend hours using the cloning tool or healing brush in Photoshop to remove dust from their images.
2. Don’t mess around when changing lenses. Keep the new lens close by and ready to switch out.
3. Clean your camera bag. Dust in your bag will eventually end up on your SLR, so make sure it’s as clean as you want your images.
4. Check your sensor for dust. Your camera is not airtight. Zooming a lens can create a suction that pulls dust into the camera and onto the sensor. It is inevitable dust will get onto a sensor. Here is how you can check it:
Attach a telephoto lens or zoom and set it at the longest, most extended, and smallest aperture.
Manually focus on the closest setting on the lens.
Using the manual setting, set the exposure to one stop over the normal exposure. Photograph a clear sky, white wall, or white paper. The camera shake will not affect this at all; it will still reveal the specs of dust.
Ingest to your computer and increase the contrast to the highest — it will help reveal the dust.
View the image at 100 percent and review the entire image.
5. Use a hand blower to remove the dust. Do not use compressed air, which can damage the sensor or camera. Read your camera manual on locking up the mirror and keeping the shutter open to reveal the sensor. After this step, check your sensor for dust again.
6. Use a brush or swab to remove any remaining specks. If you’re not experienced in cleaning your camera and cannot remove all the dust with a hand blower, you may wish to turn the job over to a professional at this point. But if you want to clean it yourself, you will need special brushes like those at VisibleDust or Copper Hill Images. Using a swab, which uses methanol, is another way to get rid of stubborn dust; you can find one at Photographic Solutions. The methanol will clean the sensor and not leave streaks like water or other products often do.
Following these steps at least every few weeks can avoid the computer cloning and healing that can slow your workflow to a crawl. This will help you focus on the subject, not the speck in your camera’s eye.
I remember the moment clearly. I had just finished playing Haydn’s Concerto In E-Flat Major For Trumpet for the first time without any mistakes.
“Now you are ready to start working on it,” my music teacher said.
I was so disappointed; I thought I had nailed the piece and was ready to move on to something else. But while I had played each note on the page correctly, I was being taught an important lesson: I could only avoid sounding like a robot on the instrument by mastering the nuances.
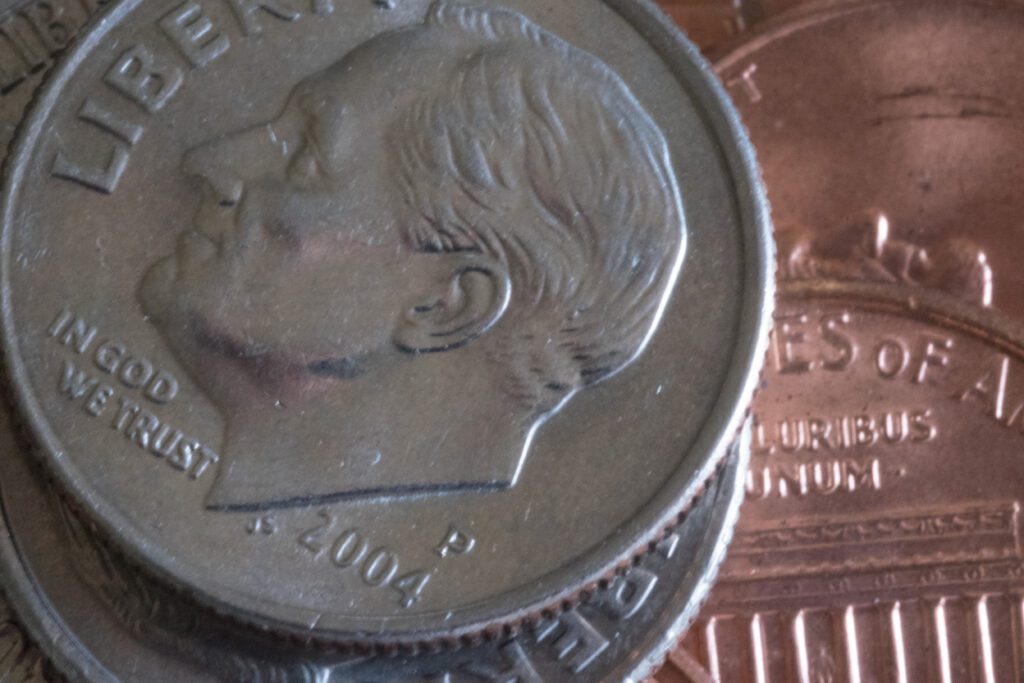
Artists look at things differently than non-artists do. We notice detail; we appreciate nuance and beauty. Artists respond differently to things than non-artists do. We tend to be more sensitive.
Ring Weekend for the seniors at the Citadel
Nothing can sharpen your understanding of the nuances of photography more than macro photography. This is where you photograph objects extremely close, where the image projected on the “film plane” (i.e., film or a digital sensor) is the same size as the subject. We would say the image is a 1:1 ratio.
There are a few ways to get this close to the subject with a camera. You can buy a macro lens, which gives you 1:1 or even closer. You can buy a set of close-up filters that you screw onto the front of your lens that lets you get closer. Extension tubes also go between your lens and camera to let you get closer. Another tool is a bellows that acts like a zooming extension tube. The last way to get closer is using a teleconverter. These teleconverters increase the magnification of the lens and come in 1.4 or 2.0 powers. They go between the lens and the camera to work.
Once you choose the way you want to do macro photography you will soon discover the closer you get to the subject the less depth-of-field you have. This is to say the amount of area that is sharp in front of the point you choose to focus on to the space behind that point is quite shallow. You typically will need a ƒ/number of ƒ/11, ƒ/16 or even greater for just the subject to look like it is in focus.
Since you will be working with such a small aperture (ƒ/number), you will need a lot of light or a good tripod to keep the camera from moving while taking the photo.
Today’s flashes, which you can buy for your camera, are so advanced that they can make this a lot of fun. Before, you had to be a physicist to understand all the math to make a good exposure. Now buy the flash with the TTL feature, and the camera and flash together will give you the perfect amount of light to make your photo.
I recommend buying the extension cord, which lets you take the flash off the camera and put it where you need the light — right in front of the lens.
Once you have all the equipment, you will be where I was when I finally learned how to play all the notes of Haydn’s trumpet concerto — ready to unleash the artist within by discovering the nuances of a subject.
Cookie Consent
We use cookies to improve your experience on our site. By using our site, you consent to cookies.


