Creating a Custom Keyword List for Nonprofits: Enhancing Photo Metadata

Reading Time: 6 minutes

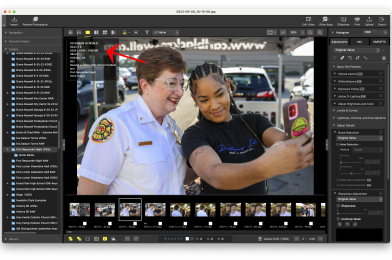
For nonprofits, compelling storytelling is not just about the images themselves but also about making those images easy to find, share, and reuse. Properly managing your photo library requires a thoughtful approach to metadata. Keywords are essential for helping your team, donors, and supporters discover the right images, but they are only part of the equation. In this post, I’ll walk you through creating a custom keyword list for your nonprofit and explore the additional fields you should use to optimize your photos.

Step 1: Define the Purpose of Your Keywords

Before diving into the keyword list, it is essential to understand how your photos will be used. Are they primarily for social media, newsletters, annual reports, or fundraising campaigns? The purpose will help shape your keywords to ensure they align with your nonprofit’s goals.

  • Audience Focused: Are your target audiences donors, volunteers, or beneficiaries? Keywords should reflect the type of people you want to engage with the photos.
  • Project-Based: If your nonprofit works on specific projects or campaigns, these should be included in your keyword list. Think about the different causes or events your photos represent.

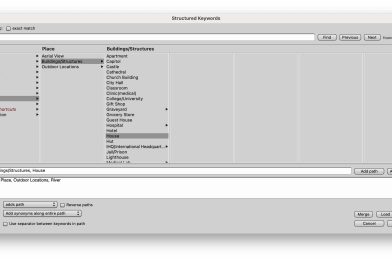
Step 2: Categorize Your Keywords

Create different categories of keywords to ensure a comprehensive tagging system:

  1. Who: People involved (e.g., staff, volunteers, partners, beneficiaries).
  2. What: The action or event captured in the photo (e.g., fundraiser, community outreach, educational workshop).
  3. Where: Locations, whether it’s the name of the city, a specific venue, or the broader region.
  4. When: Keywords like seasons, years, or notable events in the nonprofit timeline.
  5. Why: The causes behind the image include “environmental sustainability,” “poverty relief,” and “child education.”

This organized approach ensures your photos are easily searchable and usable across various platforms.

Step 3: Create a Consistent Format

Your keywords need to be standardized to make sure everything is clear. Please decide on formats for locations (e.g., city name, country name), abbreviations, and singular vs. plural forms of words. For example, decide whether to consistently use “volunteer” or “volunteers” throughout your library.

Beyond Keywords: Other Important Metadata Fields

While keywords are essential, there are several other fields you should use to enhance the searchability and utility of your photos.

1. Title

A brief, descriptive title can be just as helpful as keywords. The title should summarize the content in a few words, such as “2023 Annual Gala Event” or “Community Garden Volunteer Day”

2. Description

A more detailed description adds context to the photo, describing who is in it, what’s happening, and why it’s significant to your nonprofit. This field is crucial to ensure that anyone searching your archives can understand the image without needing the whole backstory. For example:

“Volunteers distributing meals to homeless individuals in downtown Atlanta during our summer outreach program.”

3. Copyright Information

Don’t overlook the importance of crediting the photographer or your organization for the images. This field ensures that your nonprofit’s work is appropriately attributed whenever the image is shared externally.
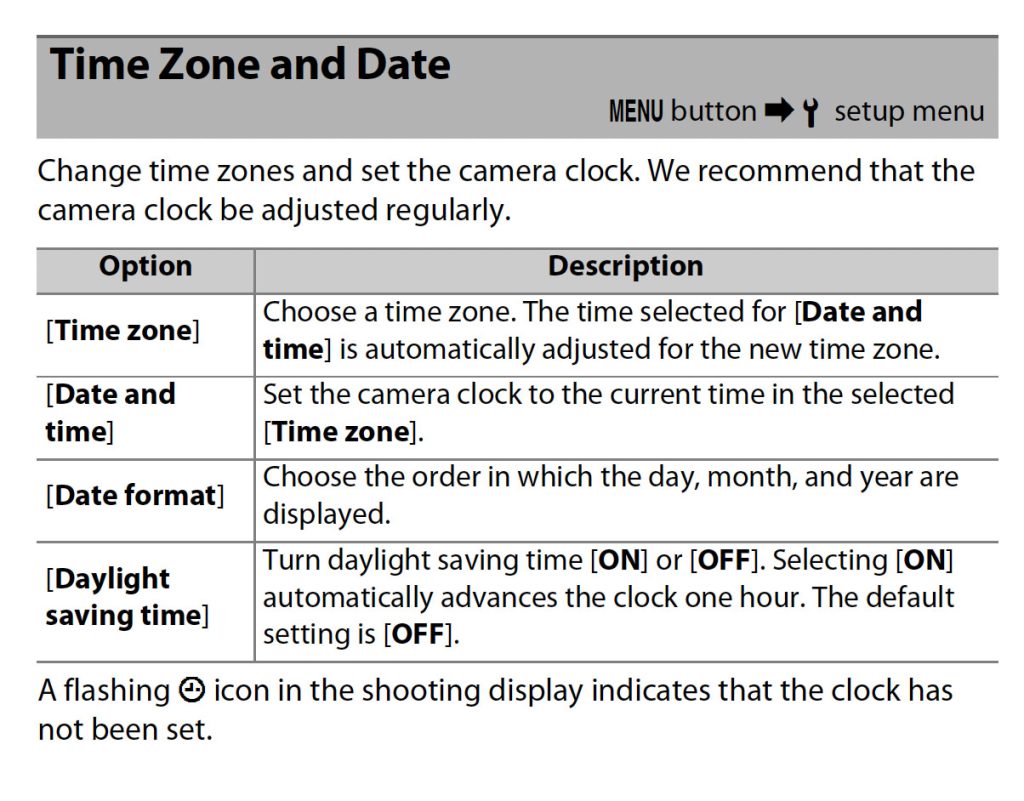
4. Date Created

The date field ensures that you can quickly locate photos by the time they were taken. This is especially useful for annual reports, event recaps, or when tracking the progress of ongoing projects.

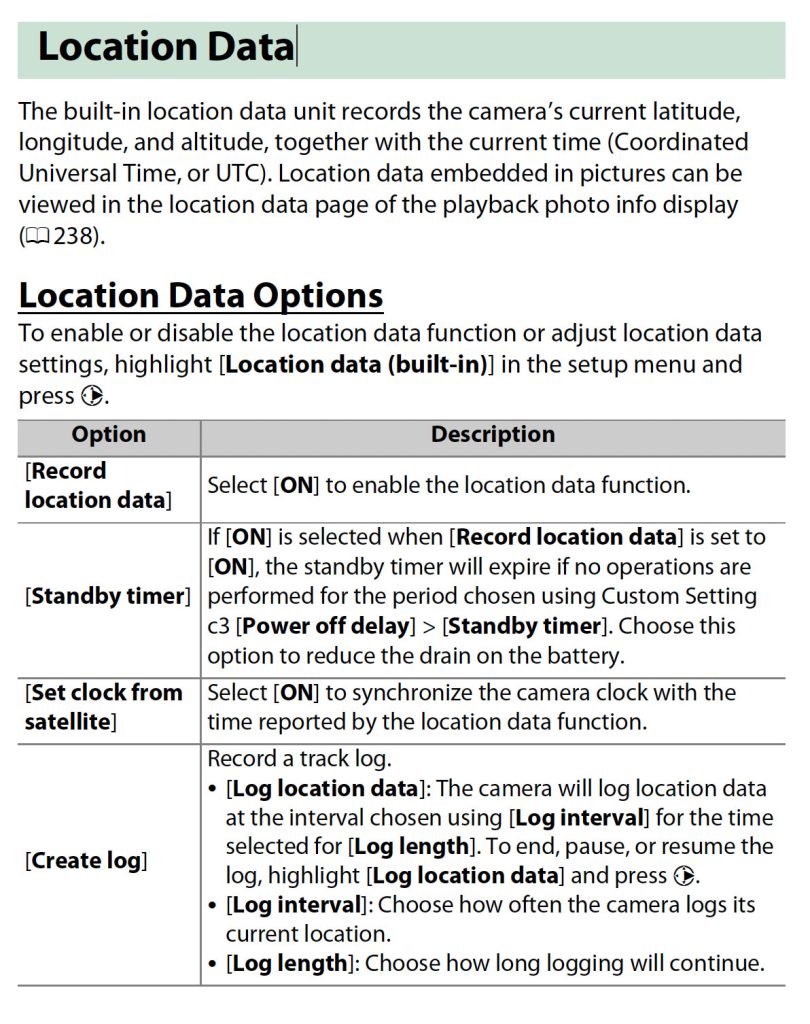
5. Location (GPS or Geotagging)

GPS coordinates or general location fields are handy if your nonprofit works in multiple regions. It allows for filtering by location, which can be helpful for localized campaigns or reporting on geographic impact.

6. Usage Rights

If your photos come with specific usage restrictions (e.g., for internal use only, not for social media), having a field to track usage rights will help prevent misuse or accidental distribution of sensitive images.

7. Tags for Accessibility

Consider accessibility metadata, such as alt text or descriptions for people with visual impairments. Including this information in your metadata ensures that your content is inclusive and accessible to all audiences.

Who Should Be Adding Metadata and Why It Matters

Now that we’ve covered the importance of keywords and other metadata fields, the next question is: who should be responsible for adding this information? Metadata is critical to ensuring your photo library remains organized, discoverable, and valuable. Let’s look at the roles that might be responsible and why their involvement is crucial.

Storytellers Abroad Multimedia Missions Workshop in Togo, West Africa.

1. Photographers

If you’re working with professional photographers—whether staff or freelancers—they should be responsible for adding some of the initial metadata, particularly technical and location-based information. As the creators, they are best positioned to include accurate details like the date, location (GPS data), and any specific copyright information. It’s also helpful for photographers to add essential keywords or titles that reflect the context of the shoot.

Why Photographers?
Photographers are often the first point of contact with the images. Adding accurate metadata during the upload or post-production process ensures that the files are well-organized and saves time for anyone using the photos later.

2. Content or Media Managers

Content managers, communications staff, or media librarians typically manage your nonprofit’s digital assets. They should refine and expand the metadata added by the photographer, ensuring it aligns with your nonprofit’s broader communication strategy. This includes adding campaign-specific keywords, titles, and descriptions that make the images relevant and accessible to the organization.

Why Content Managers?
They understand the organization’s messaging, audience, and goals. Content managers ensure consistency across all assets, enabling seamless integration of visuals into newsletters, social media, or reports. They can also ensure that metadata standards are upheld, keeping the library organized and usable long-term.

3. Project Leaders or Department Heads

Sometimes, it’s beneficial for department heads or project leaders to review or add metadata related to specific initiatives. For example, if a photo is part of a health outreach program, the person leading that project might add critical context that only they would know, such as names of participants, key milestones, or grant-related information.

Why Project Leaders?
They bring subject matter expertise that can add depth to the metadata. By providing specific details related to the project or initiative, they ensure that the photos accurately represent the impact of your nonprofit’s work.

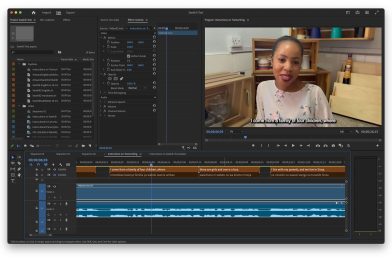
4. Marketing and Social Media Teams

Once photos are uploaded and fully tagged, marketing teams often add metadata fields related to social media or future campaigns. They might adjust tags to fit SEO best practices or add campaign-specific terms that increase the discoverability of images for fundraising, advocacy, or donor engagement.

Why Marketing Teams?
Metadata helps ensure that the right images surface for different platforms or purposes. If social media visibility is essential, the marketing team can ensure that keywords are aligned with trending hashtags or relevant calls to action for specific audiences.

Conclusion: Metadata as a Shared Responsibility

The task of adding metadata should fall on more than one person. It is a shared responsibility that involves photographers, content managers, project leaders, and marketing teams. Each role brings its unique perspective, ensuring that your nonprofit photos are fully optimized for both internal use and external storytelling.

Having a well-structured approach to who adds what metadata keeps your library organized and maximizes the impact your photos can have. With the right keywords, descriptions, and contextual information, your nonprofit can tell its story, engage supporters, and showcase your meaningful work.


Crediting photographers

Photographers retain intellectual property rights over their images, and proper credit acknowledges their ownership. This respect for their work is legally essential, ensuring nonprofits aren’t infringing copyright laws.

By giving credit, nonprofits foster strong relationships with photographers. Whether the photographer is a volunteer, staff member, or freelancer, showing appreciation through credit helps maintain goodwill and encourages future collaboration.

Nonprofits rely on public trust, and crediting photographers is part of demonstrating transparency. By attributing the source of their images, nonprofits show that they respect and value the contributions of all their partners, including creatives. This enhances the organization’s reputation and professionalism.

When photographers are credited for their work, they are more likely to provide high-quality images, knowing their name and talent will be recognized. This is particularly important for nonprofits, as compelling imagery is crucial for effective storytelling and engagement.

Nonprofits often align with missions that support fairness, community, and collaboration. Crediting photographers aligns with these values, as it acknowledges the creative contributions of individuals and helps support their livelihoods, especially when working with freelancers or smaller creative teams.

Many nonprofit photos are shared widely across social media, websites, reports, and news outlets. Crediting the photographer ensures that, as the images get distributed, the creator continues to receive recognition for their work. This also helps avoid any misrepresentation or confusion about who took the image.

In summary, crediting photographers not only upholds legal and ethical standards but also strengthens professional relationships, ensures transparency, and encourages the creation of quality visuals—all essential for the success of a nonprofit’s storytelling efforts.


Tagged :

Syncing Time: Why Your Camera Needs a Little Help

Reading Time: 3 minutes

In our connected world, smartphones do a remarkable job of keeping time. They sync to the correct time and adjust automatically to the local time zone, thanks to their integration with cellular networks and GPS. However, a bit of manual intervention is still required when it comes to cameras, even high-end models like my Nikon Z9.

The Nikon Z9: GPS-Enabled But Not Fully Automatic

The Nikon Z9 is an incredible technology with a built-in GPS that syncs with Greenwich Mean Time (GMT). This is a fantastic feature for ensuring your camera’s internal clock stays accurate. However, there’s a catch: while the GPS can sync to GMT, it doesn’t automatically adjust for your local time zone. This means you must still go into the settings and manually set the correct time zone.

This extra step is essential, especially for photographers who travel frequently or work across different time zones. Without adjusting the time zone, your images might be stamped with the wrong time, leading to confusion later when organizing your photos.

Setting the Time on Other Cameras

Most cameras, even those without the advanced GPS capabilities of the Nikon Z9, allow you to set the time manually. The process is typically straightforward, but it varies depending on the make and model of your camera. The best way to ensure accuracy is to consult your camera’s manual. If you don’t have the manual on hand, it’s easy to find online—search for your camera brand and model, and you should be able to locate the instructions.

This small step of accurately setting your camera’s time can save you many headaches down the road.

The Benefits of Accurate Time Stamping

Accurate time stamping on your images offers several significant benefits, especially regarding cataloging and teamwork. Here are a few examples:

  1. Efficient Cataloging: When your images are time-stamped correctly, it becomes much easier to organize them chronologically. This is particularly useful when sorting through thousands of photos from a long shoot or a multi-day event.
  2. Seamless Collaboration: Having all cameras set simultaneously ensures everyone’s photos are in sync if you’re shooting with a team. This is crucial for events like weddings or sports, where multiple photographers might capture the exact moment from different angles. Consistent time stamps make creating a timeline of events simple without confusion.
  3. Geo-Tagging Accuracy: For cameras like the Nikon Z9 that include GPS, accurate time settings are essential for precise geo-tagging. This feature can be invaluable for photographers who need to track the exact location of their shots, whether for documentary purposes or location-based projects.

In conclusion, while our phones may make timekeeping effortless, our cameras require more attention. Taking the time to ensure your camera’s clock is accurate—and set to the correct time zone—can make a world of difference in your photography workflow. So, before your next shoot, take a moment to check your camera’s time settings. It’s a simple step that can save you much trouble later on.

Tagged :

How to Translate and Create English Captions from a Swahili Interview Using AI Tools

Reading Time: 2 minutes

If you’ve ever needed to translate and create captions from a Swahili interview—or any other language not natively supported in Adobe Premiere—you’ll be pleased to know that it’s easier than you might think, thanks to AI technology. Here’s a step-by-step guide to help you through the process.

I created this guide for the students in our upcoming Storytellers Abroad Multimedia Workshop, traveling to Dar es Salaam, Tanzania, in a few weeks. These students will be capturing powerful stories from local nationals who primarily speak Swahili. Given the language barrier, I wanted to equip them with the tools and knowledge to effectively translate and create English captions for their interviews, ensuring that a global audience can understand and appreciate the voices and stories they document.

Step 1: Set Up Your Amazon Web Services (AWS) Account

You’ll first need an account with Amazon Web Services (AWS), which offers powerful translation tools. Setting up an account is straightforward:

  1. Create an AWS Account: Go to the AWS website and follow the simple instructions to create a free account. AWS supports translation for 75 languages, making it a versatile tool for many projects beyond just Swahili.

Step 2: Create a Free ChatGPT Account

Next, you’ll want to use ChatGPT, an AI tool that can assist you in refining translations and creating captions. Follow these steps to get started:

  1. Visit the ChatGPT Website: Click here to navigate to the ChatGPT site.
  2. Sign Up: On the homepage, click the “Sign Up” button to create your account.
  3. Verify Your Email: You’ll receive an email verification link after signing up. Click it to confirm your account.
  4. Configure Your Account: Complete any additional account setup steps as prompted.
  5. Explore Subscription Plans (Optional): While a free account is sufficient for most tasks, there are paid options if you require advanced features.
  6. Test ChatGPT: Once your account is set up, you can use ChatGPT to test and refine your translations.

Step 3: Translate and Caption Your Video

Now that your accounts are set up, you can translate and caption your video. Here’s how:

  1. Download Swahili Video: Video to use to practice
  2. Use Adobe Premiere: Edit the video so that the voice is clear. I recommend using “Enhance” in the Audio Panel. Export the video or just the soundtrack.
  3. Use AWS for Translation: Upload the Swahili audio to AWS’s translation service, selecting Swahili as the target language.
  4. Refine with ChatGPT: Once you have a basic translation, use ChatGPT to translate the SRT Swahili into English SRT. I recommend, “Translate Swahili into English keeping SRT format exactly.”
  5. Create Captions: After finalizing the translation, you can generate captions that are easily integrated into video editing software like Adobe Premiere.

This is a video walking you through all the steps

Expanding to Other Languages

The process outlined here isn’t just limited to Swahili. With AWS supporting 75 languages, you can apply these steps to translate and caption interviews in a wide range of languages, even those not directly supported by Adobe Premiere.

This method allows you to bridge language gaps in your video content, making your work accessible to a broader audience. Try it, and see how AI can simplify your translation and captioning needs!

Tagged :

Why Your Smartphone Beats Your High-End Camera in One Critical Area: GPS

Reading Time: 2 minutes

I’ve spent years as a photographer using high-end digital cameras to capture stunning images. While these cameras excel in many areas, GPS functionality is one surprising aspect your smartphone often outshines.

The Power of GPS in Your Smartphone

Your smartphone has a GPS that tags each photo with precise location data. This metadata includes coordinates, altitude, and even the direction you’re facing. High-end digital cameras often lack this feature unless equipped with an additional GPS module.

Why GPS Metadata Matters

  1. Easier Image Organization: GPS data can be beneficial for organizing your photo library. You can quickly find images based on location, making it a breeze to recall precisely where you took a particular shot.
  2. Enhancing Storytelling: For photographers who emphasize storytelling, like me at Storyteller & Brand Builder Stanley Leary, location data can add context to your photos, enriching the narrative.
  3. Professional Workflow Integration: Photo Mechanic and Lightroom can convert GPS coordinates into more readable street, city, state, and country information, streamlining your workflow.

Integrating Smartphone GPS with Your Digital Camera

Even if your high-end digital camera lacks GPS, you can still use your smartphone’s capabilities. Here’s how:

  1. Take a Reference Photo: When shooting with your digital camera, take a single reference photo with your smartphone. This photo will have the GPS data you need.
  2. Syncing Metadata: Import your photos into Photo Mechanic or Lightroom. You can then use the reference photo to copy the GPS data to your digital camera photos. This way, all your images will have the exact location information.

The Nikon Z9 Advantage

One of the reasons I love my Nikon Z9 is its built-in GPS functionality. It tags my photos with location data whenever a satellite is visible. Additionally, the GPS keeps the camera’s time accurate by allowing me to select the appropriate time zone. This feature ensures my metadata is consistent and reliable, even when shooting in different locations.

Tips for Maximizing GPS Data Use

  1. Keep Your Smartphone Handy: Always have your smartphone ready to capture a reference photo, especially when your camera lacks GPS.
  2. Regularly Sync Time: Make sure your camera’s clock is synchronized with your smartphone. This helps in accurately matching the GPS data later.
  3. Use Dedicated Apps: Several apps can track your location and later sync it with your camera’s photos, making the process even more seamless.

Bonus Tip for Professional Photographers

As professional photographers, creating and maintaining comprehensive metadata for all your photos is crucial. Embedding copyright information, captions, keywords, and location data protects your work and makes it easier for clients to find and use your images. GPS data can add significant value by providing precise location context, enhancing storytelling, and streamlining workflow.

Adobe Lightroom features a powerful Map Module that leverages GPS data to display the locations where your photos were taken visually. This module integrates with Google Maps, allowing you to see precise geotags on a map. By simply clicking on a photo, you can view its exact shooting location, making it easier to organize and search for images based on geography. This feature is especially useful for travel photographers or anyone who shoots in multiple locations, as it provides a visual representation of your photo shoot journeys, helping to enhance your storytelling and organization efforts.

Conclusion

While high-end digital cameras are unparalleled in many aspects of photography, smartphones offer an edge with their integrated GPS functionality. You can enhance your photo organization and storytelling capabilities by leveraging your smartphone’s GPS data. And if you’re lucky enough to own a camera like the Nikon Z9, you get the best of both worlds.

Happy shooting!

Tagged :

Why More People Should Be Using a Flash to Improve Their Photos

Reading Time: 4 minutes

In the world of photography, light is everything. As a professional photographer, I often edit client photos and notice one common theme: ineffective lighting. This is where using a flash can make all the difference. Let’s dive into why you should embrace the flash and how it can elevate your photography.

The Importance of Flash in Photography

Flash isn’t just for dark rooms or night shots; it’s a powerful tool that can enhance your photos in various lighting conditions. Here are a few reasons why incorporating flash can benefit your photography:

  1. Consistency: Natural light can be unpredictable, changing from one moment to the next. A flash provides a consistent light source, ensuring your photos are evenly lit.
  2. Detail Enhancement: Flash helps to highlight details that might be lost in shadows or low light. It can bring out textures and colors, making your subject stand out.
  3. Professional Look: Using a flash can give your photos a polished look. It helps to avoid common issues like graininess and blurriness in low-light conditions.

Tips for Using On-Camera Flash

Whether indoors or outdoors, an on-camera flash can significantly improve your photos. Here are some tips to get you started:

Flashes were added to the front of the group to offset the shadows created by the lights directly overhead of the group.

Indoor Photography

  1. Bounce the Flash: Aim your flash at the ceiling or a wall to bounce the light. This diffuses the light, creating a softer, more natural look.
  2. Use a Diffuser: Attach a diffuser to your flash to spread the light evenly. This reduces harsh shadows and glare.
  3. Adjust Flash Power: Most modern flashes allow you to adjust their power. Experiment with different settings to find the right balance for your scene.

Outdoor Photography

  1. Fill Flash: Use your flash as a fill light to brighten up shadows, especially in bright sunlight. This technique helps to avoid the harsh contrasts that can occur in the midday sun.
  2. Backlighting: When shooting with the sun behind your subject, use flash to illuminate their face and avoid silhouettes.
  3. Control Ambient Light: Use flash and ambient light to create a balanced exposure. You can adjust your camera settings to control the background light and use the flash to light your subject.

Getting the Flash Off-Camera

While an on-camera flash is convenient, getting the flash off the camera can significantly enhance your photos. Placing the flash at a 45º angle to the left or right of your camera is a great starting point. Here’s why this technique is beneficial:

  1. Depth and Dimension: Off-camera flash creates more interesting shadows and highlights, adding depth and dimension to your photos.
  2. Control: You have greater control over the direction and quality of light, allowing you to shape it to suit your subject and scene.
  3. Separation: Off-camera flash helps to separate your subject from the background, making it stand out more prominently.

Standing Out from Smartphone Photography

Smartphones have made incredible strides in computational photography, but there’s no substitute for a well-placed flash. Using a flash, especially off-camera, can produce results that smartphone cameras can’t match. Here’s how:

  1. Precision Lighting: While smartphones can enhance images through software, they lack the precision and control that a dedicated flash provides.
  2. Creative Flexibility: Off-camera flash allows for creative lighting setups that give your photos a unique look, something smartphones struggle to replicate.
  3. Professional Quality: The quality of light from a flash can’t be replicated by a smartphone’s tiny LED light. Flash lighting can highlight details and create a professional finish that separates your photos.

The Importance of Test Shots

Always take a test shot before diving into your photo session with Flash. Here’s why:

  1. Before Adding Flash: Be sure the photo needs the flash help.
  2. Avoiding Mistakes: A test shot helps you spot potential issues with your lighting setup, such as overexposure, harsh shadows, or unwanted reflections.
  3. Fine-tuning: It allows you to adjust your flash power, positioning, and camera settings to get the perfect shot.
  4. Confidence: Taking a test shot gives you confidence that your lighting is right, so you can focus on capturing the best possible image.

In conclusion, flash can significantly improve indoor or outdoor photos. By understanding how to use on-camera flash effectively and experimenting with off-camera flash setups, you can achieve the quality and creativity that sets your work apart from smartphone photography. Remember, always take a test shot to ensure your lighting is spot-on. Embrace the flash, and watch your photography skills shine!

Tagged :

Exploring the Art of Low-Key and High-Key Photo Editing

Reading Time: 4 minutes

As a storyteller and brand builder at Storyteller & Brand Builder Stanley Leary, I’m passionate about the different photo editing styles and how they can be used to convey unique narratives. Two prevalent styles in photography are low-key and high-key editing. These techniques influence the mood and feel of an image and reflect different approaches to exposure and post-production. Let’s dive into these styles, their origins, and how they can be effectively utilized in your work.

Low-Key Editing: Preserving Highlight Details

Origin and Concept: Low-key editing is a technique that emphasizes retaining all the details in the highlights. This method originated from the era of film photography, particularly with transparency films like slides. Unlike negative films, slides required precise exposure because overexposed highlights could not be recovered. Photographers had to be meticulous with their exposure to ensure that the details in the brightest parts of the image were preserved.

Shooting Technique: Photographers often underexpose their shots slightly to achieve a low-key effect. This technique ensures that no part of the image is blown out. When shooting low-key, you might use a narrower aperture or faster shutter speed to limit the light hitting the sensor. Additionally, spot metering can help focus on the brightest part of the scene to ensure it’s not overexposed.

Post-Production: In post-production, low-key editing involves carefully adjusting the exposure and highlights to maintain detail. Tools like Adobe Lightroom or Photoshop are essential for fine-tuning the highlights, shadows, and mid-tones. The goal is to create a balanced image where even the brightest areas retain texture and detail.

Practical Example: Imagine you’re photographing a landscape at sunset. By exposing it for the bright sky, you ensure the clouds and sun rays retain their intricate details. In post-production, you can then bring up the shadows to reveal more of the landscape without losing the highlight details.

High-Key Editing: Embracing Blown-Out Highlights

Origin and Concept: High-key editing, on the other hand, emerged prominently from wedding photography. Photographers often prioritized capturing flattering skin tones over retaining all the highlight details. This approach led to images where the background and other elements might be overexposed, creating a dreamy, ethereal look.

Shooting Technique: Photographers generally overexpose their images slightly when shooting for a high-key effect. This can be achieved using a wider aperture, slower shutter speed, or increasing the ISO. Evaluative or matrix metering can help balance the exposure across the entire frame, but it’s often adjusted to prioritize the main subject, like the bride and groom in wedding photography.

Post-Production: In post-production, high-key editing enhances the overexposed areas to create a bright and airy feel. Adjusting the exposure, highlights, and whites in editing software can help achieve this look. The key is to ensure the subject, especially skin tones, remains well-exposed and flattering while allowing the background or other less critical areas to blow out.

Practical Example: Consider a bride in a white dress standing in front of a window. By overexposing slightly, you focus on her glowing face and dress while letting the light from the window create a soft, overexposed background. In editing, you enhance this effect to emphasize the bright, joyful atmosphere of the moment.

Modifying Your Shooting and Editing Approach

Low-Key Adjustments:

  1. Shooting: Use spot metering to expose the brightest part of your scene. Underexpose slightly to protect highlights.
  2. Editing: Carefully adjust highlights and shadows to retain detail across the image. Use tools like the highlights slider to bring back detail in the bright areas.

High-Key Adjustments:

  1. Shooting: Use evaluative metering and slightly overexpose your image to prioritize skin tones and the main subject.
  2. Editing: Increase exposure and highlights to enhance the bright, airy feel. Ensure skin tones remain flattering and well-exposed.

Conclusion

Both low-key and high-key editing styles offer unique ways to tell your story through photography. Low-key emphasizes detail and precision, creating rich, textured images. A high-key, bright, and airy feel can convey emotions like joy and elegance. By understanding and mastering these techniques, you can expand your creative toolkit and better serve the diverse needs of your clients.

Whether you’re capturing the intricate details of a landscape or the ethereal beauty of a wedding, these editing styles will help you tell your story in the most compelling way possible. Happy shooting and editing!

Tagged :

The ƒ/16 Challenge: Elevate Your Photography Through Composition

Reading Time: 3 minutes

As a photographer, I’ve always believed in pushing the boundaries of creativity and honing our skills to capture compelling stories through our lenses. Today, I want to introduce you to an exciting exercise that will challenge your eye for composition and elevate your photographic artistry: the ƒ/16 Challenge.

Why ƒ/16?

When we shoot with a shallow depth of field, such as ƒ/2.8 or ƒ/1.8, it’s easier to create visually appealing images because the background blurs into a creamy bokeh, isolating the subject and minimizing distractions. While this technique can produce stunning portraits and close-ups, it doesn’t always push us to explore the full potential of our compositional skills.

Almond Standard built his log cabin home himself. It is located in Tignal, Georgia. [NIKON D2X, Sigma 15-30mm F3.5-4.5 EX DG Aspherical DF, Mode = Manual, ISO 100, 1/4, ƒ/13, (35mm = 33)]

Enter the ƒ/16 Challenge. By setting your aperture to ƒ/16, you’ll achieve a deep depth of field, meaning the foreground and background will be in sharp focus. This requires you to carefully consider every element in your frame and use your compositional prowess to guide the viewer’s eye through the image.

Composition Tools for the ƒ/16 Challenge

Here are some compositional tools to help you create compelling images with a deep depth of field:

  1. Leading Lines
    • Use natural or manufactured lines to draw the viewer’s eye through the image. Roads, rivers, fences, and shadows can all serve as leading lines.
  2. Rule of Thirds
    • Divide your frame into a 3×3 grid and position key elements along these lines or at their intersections. This creates a balanced and engaging composition.
  3. Framing
    • Incorporate elements in your scene to frame your subject, such as natural frames like tree branches or architectural frames like doorways and windows.
  4. Symmetry and Patterns
    • Look for symmetrical scenes or repetitive patterns that can create a sense of harmony and rhythm in your images.
  5. Foreground Interest
    • Include interesting elements in the foreground to add depth and guide the viewer’s eye into the scene.
  6. Depth and Layers
    • Arrange your composition with distinct foreground, middle ground, and background elements. This creates a sense of depth and dimensionality.
  7. Contrast and Color
    • Use contrasting colors and tones to highlight your subject and create visual interest. Bold colors can make elements pop, while subtle contrasts can add nuance.
  8. Negative Space
    • Embrace negative space to give your subject room to breathe and create a minimalist aesthetic.
[NIKON Z 6, 14.0-24.0 mm f/2.8, Mode = Aperture Priority, ISO 100, 1/1.7, ƒ/8, (35mm = 14)]

Are You Up to the Challenge?

The ƒ/16 Challenge is not just about technical settings; it’s about training your eye to see the world differently. Here’s how to get started:

  1. Set Your Aperture to ƒ/16
    • Switch to aperture priority mode (A or Av) or manual mode (M) and dial in ƒ/16.
  2. Choose Your Scene
    • Find a scene with potential for depth and interesting elements from foreground to background.
  3. Compose Your Shot
    • Use the composition tools listed above to create a balanced, dynamic image.
  4. Shoot and Review
    • Take your shot, then review it on your camera’s screen. Adjust your composition if needed and shoot again.
  5. Analyze and Improve
    • Review your images later on a larger screen. Analyze what worked and didn’t, and think about how to improve next time.
These people dressed in white are going to the Eny River to be baptized and become members of the First Baptist Church in Novosibirsk, Siberia. Thirty-five people are in the group. The person leading them is a deacon in the church. His name is Vladimir Korniyshin. Photo by: Don Rutledge

Embrace the Depth

Taking on the ƒ/16 Challenge will push you to be more mindful of every element within your frame. By mastering the art of composition with a deep depth of field, you’ll become a more versatile and thoughtful photographer, capable of crafting images that tell compelling stories regardless of your aperture setting.

So, are you up to the challenge? Grab your camera, set that aperture to ƒ/16, and let’s see the world through a new lens.

Happy shooting!

Tagged :

Why Not Everyone Will Benefit from Upgrading Their Camera

Reading Time: 3 minutes

In photography, the allure of the latest camera gear is hard to resist. With each new release promising higher resolutions, faster autofocus, and better low-light performance, it’s easy to feel that upgrading is the only way to stay ahead. However, the truth is not everyone will benefit from upgrading their camera. Here’s why:

Higher ISO Isn’t Always Necessary

For many photographers, shooting at high ISO settings isn’t a daily requirement. Most digital cameras today perform exceptionally well at lower ISOs, providing crisp and clear images without needing the latest model. If your photography rarely involves dim lighting or fast-moving subjects, an upgrade might be more about wanting the latest gadget than needing it.

Tripod-Based Photography

If your work involves using a tripod and your subjects are stationary, such as in landscape, architecture, or product photography, the benefits of upgrading from a crop sensor to a full-frame camera might be minimal. When you’re shooting with controlled lighting and stable setups, the difference in sensor size becomes less critical. Your current gear can likely deliver the quality you need.

Studio Portraits

For portrait photographers who primarily work in a studio setting with controlled lighting and flashes, upgrading your camera might not significantly improve your work. Studio flashes offer ample light, allowing you to shoot at low ISO settings where most modern cameras excel. The resolution and dynamic range provided by even mid-range cameras are more than sufficient for stunning portraits.

Other Photography Genres That Thrive at Low ISO

  1. Still Life Photography: Life involves careful composition and controlled lighting, like product photography. The need for high ISO is rare, making most modern cameras perfectly adequate.
  2. Macro Photography: When shooting macro, you typically control the lighting and your subject’s movement. This allows you to use lower ISO settings and longer shutter speeds with a tripod, minimizing the need for the latest camera tech.
  3. Food Photography: Often involves well-lit environments, whether natural or artificial. With controlled lighting setups, there’s no need for high ISO performance, and your current gear will likely do the job well.
  4. Astrophotography: While it might seem counterintuitive, astrophotography relies more on long exposures and precise settings than high ISO performance. Using a stable tripod and techniques like stacking images can yield excellent results without needing the latest camera model.
  5. Fine Art Photography: Often created in controlled settings, fine art photography can benefit more from the photographer’s vision and technique than the camera’s specifications. Low ISO and careful post-processing are key elements.

Conclusion

Upgrading your camera isn’t always the key to better photos. Assessing your specific needs and understanding the strengths of your current equipment can save you money and help you focus on improving your skills. For many genres of photography, mastering the basics and using the gear you already have will bring more significant improvements to your work than the latest camera upgrade.

Remember, the storyteller behind the camera, not the camera itself, makes a compelling image. Happy shooting!

When Upgrading Your Camera is Worth It

Consider upgrading your camera if you find yourself in any of these situations:

  1. Low-Light Conditions: Frequently shooting in dim environments such as:
    • Event Photography
    • Wildlife photography at dawn or dusk
    • Indoor sports
    • Concert photography
  2. High ISO Performance: Better sensor technology is needed to reduce noise and improve image quality in low-light settings.
  3. High-Resolution Demands: Requiring extremely high resolution for:
    • Large prints
    • Detailed commercial projects
    • Fine art photography
  4. Advanced Autofocus Systems: Benefiting from faster and more accurate autofocus for:
    • Action photography
    • Sports photography
    • Wildlife photography
  5. Meeting Client Demands: When your current gear limits your ability to deliver the quality and detail your clients expect.

If any of these scenarios apply to you, investing in an upgrade can be a wise decision to enhance your creative potential and professional capabilities.

Tagged :

Embracing High ISO with the Nikon Z9: Breaking the Myth of Low ISO for Low Noise

Reading Time: 3 minutes

As a professional photographer and storyteller, I constantly push the boundaries of my gear to achieve the best possible results. The Nikon Z9, my camera of choice, has shattered many long-held beliefs about ISO settings and noise. The notion that you must always shoot at the lowest ISO for the best low-noise images is outdated. Here’s why embracing higher ISO settings can transform your photography, especially when combined with flash.

High ISO, Low Noise: A New Reality

With the Nikon Z9, I can comfortably shoot at ISO 5000 and even higher in certain situations, delivering images with acceptable noise levels. This is a game-changer. When viewed as the public typically sees them—on a phone screen filling the frame rather than zoomed in at 200%—the noise is barely noticeable, if at all. This capability allows for greater flexibility in various shooting conditions.

Chelle Leary at Krog Street Tunnel in Atlanta, Georgia [NIKON Z 6, 24.0-105.0 mm f/4.0, Mode = Aperture Priority, ISO 10000, 1/160, ƒ/4, (35mm = 24)]

Flash Photography and ISO: A Perfect Pair

Combining the Z9 with flash photography, I often start my ISO around 400. Here’s why:

  1. Efficient Flash Use: At ISO 400, my flashes don’t need to output as much light as they do at ISO 100. This results in faster recycle times and extends the battery life of battery-powered lights, reducing the worry of running out of power during a shoot.
  2. Lighting Large Spaces: Sometimes, I need to light a large room and might only have my Godox V860IIN instead of the more powerful Flashpoint XPlor 600 HSS TTL. Increasing the ISO allows me to light a larger area effectively.
  3. Battery Longevity: Higher ISO settings like ISO 400 with my Flashpoint XPlor 600 HSS TTL ensure longer battery life. This is particularly useful for extended shoots, such as real estate interiors, where I need consistent lighting throughout.
Roswell Fire Department––Ole Timers’ Dinner
[NIKON Z 9, NIKKOR Z 14-30mm f/4 S, Mode = Aperture Priority, ISO 6400, 1/100, ƒ/5, (35mm = 20)]

Practical Tips for Testing ISO and Flash

To see the benefits for yourself, try this simple exercise:

  1. Set up a scene with your Nikon Z9 on a tripod to eliminate the camera shake.
  2. Shoot the same scene at different ISOs, keeping the aperture constant, and observe at normal viewing distances when noise becomes noticeable.
  3. Repeat the exercise using a flash. You’ll likely find you can push the ISO even higher without significant noise issues.
A Staff Celebration at the Delta Museum [NIKON Z 9, NIKKOR Z 24-120mm f/4 S, Mode = Manual, ISO 5000, 1/125, ƒ/5.6, (35mm = 46)]

Dispelling Old Myths

Forget the advice from old photography books that insist on shooting at the lowest ISO. Those guidelines were relevant in the film days and early digital era. In 2024, with advanced cameras like the Nikon Z9, you can comfortably shoot at higher ISOs. I’ve found that noise only becomes a concern around ISO 6400, and even then, tools like DXO Pure Raw 4 can effectively reduce it.

High ISO in Action: Sports Photography

When shooting sports, I often use manual settings with a fast shutter speed (1/2000 or 1/4000) and a wide-open lens, relying on Auto ISO. This approach ensures I capture the action with minimal blur. If noise appears at high ISOs like 25600, noise reduction software cleans up the image.

Conclusion: Redefining ISO for Modern Photography

The Nikon Z9 empowers photographers to break free from the constraints of low ISO settings. By embracing higher ISOs, especially when paired with flash, you can achieve better lighting efficiency, extended battery life, and faster recycle times. Don’t let outdated advice hold you back—explore the possibilities of higher ISOs and discover a new realm of creative potential.

Happy shooting!

Stanley Leary Storyteller & Brand Builder

Tagged :

Embracing Change: My Journey of Upgrading Photography Gear

Reading Time: 3 minutes

As a photographer, I’ve continually upgraded my gear over the years, but there’s one area where I’ve been slower to make changes: lenses. Unlike camera bodies, manufacturers don’t update lenses as frequently. I bought a converter to use my existing lenses when transitioning from DSLR to mirrorless cameras. My philosophy has always been to avoid debt and only purchase equipment with cash.

Early in my career, I didn’t drive the best cars. Occasionally, I had to rely on credit cards for repairs, which taught me the importance of saving. You can’t always predict disasters, so I understand when borrowing is necessary.

When I started freelancing full-time, I invested in some Sigma lenses. They were affordable and performed well. Notable lenses included the 120-300mm ƒ/2.8 Sport and the 35mm ƒ/1.4 Art lens. When I switched to Nikon Mirrorless, other brands weren’t making lenses for the Z mount, so I began transitioning to Nikon S lenses.

Two juvenile Red-Shouldered Hawks, just over a month old, stretch their wings as they prepare to leave the nest in the coming days. Though once three, these siblings now face the world together, their strength and resilience a poignant reminder of nature’s delicate balance. 🦅 #NatureWatch #WildlifePhotography #BabyHawks [NIKON Z 9, NIKKOR Z 100-400mm f/4.5-5.6 VR S Z TC-1.4x, Mode = Manual, ISO 5000, 1/3200, ƒ/11, (35mm = 560)] Cropped 2X in post

Andy Dunaway, my Nikon representative, recommended the NIKKOR Z 100-400mm f/4.5-5.6 VR S Z. I had already been impressed with the 14-30mm ƒ/4 and the 24-120mm ƒ/4 lenses. Their build quality and sharpness were remarkable.

In December 2022, I bought the NIKKOR Z 100-400mm f/4.5-5.6 VR S Z and have never felt more confident in my gear for covering events. I kept my Sigma 120-300mm ƒ/2.8 Sport with the TC-1401 & TC-2001 converters for a while. The central combination with the 2X converter weighed around 8 lbs with the camera.

The NIKKOR Z 100-400mm f/4.5-5.6 VR S Z weighs only 3.2 lbs and, even with a converter, is still half the weight of my Sigma setup. Recently, I added the Nikon Z Teleconverter TC-1.4x. Within minutes, I was outside photographing Red-Shouldered Hawk juveniles. I noticed a color difference and an improvement in image sharpness.

I chose the NIKKOR Z 100-400mm f/4.5-5.6 VR S because a 70-200mm lens wasn’t long enough for many meetings I covered. The Sigma 120-300mm ƒ/2.8 required a monopod or tripod, and 300mm was short. The 400mm range was ideal for my style.

HoldFast Gear MoneyMaker 2-Camera Harness

The 100-400mm lens is only 4.8 ounces heavier than the 70-200mm. I carry the 24-120mm on a Nikon Z9 and the 100-400mm on another Z9 using the HoldFast Gear MoneyMaker 2-Camera Harness. Adding the TC 1.4X converter gave me a 140-560mm lens at just 7.76 ounces more.

The Nikon Z Teleconverter TC-1.4x is highly praised for no image quality loss and only a 1-stop light difference. Combined with my Nikon Z9 and denoise software, I can shoot in most situations and produce usable images for clients.

So this past week, I sold my Sigma 120-300mm f/2.8 Sport lens and the 1.4X and 2X converters. Today, I knew I had upgraded and lightened my load after shooting with the Nikon Z Teleconverter TC-1.4x on the NIKKOR Z 100-400mm f/4.5-5.6 VR S.

While Nikon’s technology is impressive, Andy Dunaway’s guidance helped me make the best lens choices for my work.

Tagged :

Elevating Wildlife Photography: Lighting Techniques for Red-Shouldered Hawk Nesting

Reading Time: 3 minutes

In wildlife photography, capturing the essence of nature’s wonders often presents unique challenges. The past few days have been a journey of experimentation and innovation as I sought to elevate my photography of the Red-Shouldered Hawks nesting in our backyard. In this blog post, I’m excited to share with you how I revamped my approach, incorporating studio strobes and high-speed sync technology to overcome obstacles and enhance the quality of my images.

The catalyst for this transformation was a persistent issue I encountered—shadows casting over a significant portion of the majestic hawks, diminishing the clarity and impact of my photographs. Determined to find a solution, I turned to my trusty studio strobes, specifically the Alienbees B1600 equipped with an 11-inch Long Throw Reflector, typically utilized for illuminating indoor basketball courts.

Using the Strobes. [NIKON Z 9, VR 120-300mm f/2.8G, Mode = Manual, ISO 8000, 1/1000, ƒ/11, (35mm = 600)]

To synchronize the flash with my Nikon Z9 camera and shoot above the 1/250 sync speed, I employed PocketWizard TT5 transceivers paired with an AC3 controller to adjust the power settings and an AC9 adapter to combine with the PocketWizard TT5. A simple phone cord facilitated the connection to the back of the Alienbees B1600, seamlessly integrating the strobes into my setup.

On the left is a monitor that has a 2X cropped view of what the Nikon Z9 is capturing. Alienbees is on a light stand, and you can see the PocketWizard on the Flash and the Camera.

With this new configuration, I unlocked the potential to shoot at high shutter speeds ranging from 1/1000 to an astonishing 1/8000, effectively balancing the strobe lighting with the ambient daylight. Gone were the intrusive shadows, replaced by crisp, well-lit images showcasing the Red-Shouldered Hawks’ beauty in all their glory.

Using strobes as a fill light outside can significantly improve the accuracy of color temperature in outdoor photography. By supplementing natural light with controlled artificial light, photographers can mitigate the inconsistencies often caused by changing weather conditions and varying times of day. Strobes emit a consistent color temperature, ensuring that the subject is evenly illuminated with precise hues, regardless of external factors. This enhances the image’s overall aesthetic and facilitates post-processing adjustments by providing a stable foundation of color temperature for a more seamless editing workflow.

Since there is a lot of downtime watching the nest, I have set up a chair to relax in and the monitor to see what the Nikon Z9 is seeing and use a remote to trigger the camera.

In the spirit of transparency and progress, I’ll compare my previous photographs and those captured using the strobes. Through side-by-side visuals, you’ll witness the remarkable difference in clarity, detail, and overall image quality achieved through this innovative lighting technique.

Without a flash. [NIKON Z 9, VR 120-300mm f/2.8G, Mode = Aperture Priority, ISO 25600, 1/2000, ƒ/10, (35mm = 410)]

However, the most gratifying aspect of this endeavor is the tangible improvement in the quality of my images. By embracing technology and pushing the boundaries of traditional wildlife photography, I’ve been able to elevate my craft and capture the essence of these magnificent birds with unprecedented clarity and depth.

So, without further ado, I invite you to join me on this journey of exploration and discovery. Let’s delve into wildlife photography, where innovation meets artistry, and every click of the shutter unveils a new dimension of beauty and wonder.

Flash used. [NIKON Z 9, VR 120-300mm f/2.8G, Mode = Manual, ISO 10000, 1/3200, ƒ/11, (35mm = 600)]
Tagged :

The Evolution of ISO: From Grain to Gain in Photography

Reading Time: 3 minutes

In the ever-evolving landscape of photography, one of the most fundamental aspects has been the sensitivity of film or, in today’s world, the ISO setting in digital cameras. Back in the days of film photography, adjusting ISO meant grappling with the tradeoff between sensitivity and grain. The higher the ISO, the more light-sensitive the film became, but at the cost of introducing noticeable grain into the image.

Fast forward to the digital era, and the concept of ISO underwent a significant transformation. Instead of grain, digital sensors introduced noise as the primary concern with higher ISO settings. However, even in the early days of digital photography, the correlation between ISO and noise wasn’t drastically different from the film days. It was a familiar tradeoff – increased sensitivity at the expense of introducing unwanted noise.

But then came the technological leap. As Moore’s Law applied its magic to camera sensors, the noise performance improved exponentially. Suddenly, higher ISO settings didn’t necessarily equate to unbearable noise levels. With each iteration of camera models, the threshold for acceptable noise is pushed higher and higher. ISO 10000 or even 12800 became feasible options without sacrificing image quality significantly.

Islamic Speakers Bureau & Atlanta Mayor Eid al-Fitr Reception [NIKON Z 9, NIKKOR Z 100-400mm f/4.5-5.6 VR S, Mode = Aperture Priority, ISO 25600, 1/250, ƒ/6.3, (35mm = 110) Processed with PureRAW 4 & Lightroom Classic]

The game-changer, however, was the advent of denoise software. Tools like Topaz Denoise, PureRAW, and Lightroom’s denoise capabilities revolutionized post-processing, almost rendering the concept of noise obsolete. What was once a dreaded side effect of high ISO settings became a minor inconvenience easily remedied with a few clicks.

So, what does ISO mean in today’s digital photography landscape? It’s a question that prompts contemplation. The traditional tradeoff between sensitivity and noise has been disrupted. The grain of film and the noise of digital sensors no longer hold the same weight they once did. Instead, adjusting ISO in digital photography is more akin to controlling volume. It’s about amplifying the signal without amplifying the noise.

My daughter and her friends during our visit to Columbus, Georgia, to celebrate Mother’s Day 2024. [NIKON Z 9, NIKKOR Z 24-120mm f/4 S, Mode = Aperture Priority, ISO 25600, 1/250, ƒ/5.6, (35mm = 24) Processed with PureRAW 4 & Lightroom Classic]

Yet, amidst this technological marvel, a lingering question remains – what is the tradeoff of ISO today? The answer isn’t as straightforward as it once was. With noise reduction software capable of miraculous feats, the boundaries of acceptable ISO settings blur. Perhaps the tradeoff now lies in the nuances of dynamic range, color accuracy, or subtle details that emerge or diminish with varying ISO levels.

Ultimately, the evolution of ISO from the grainy days of film to the noise-controlled realm of digital photography signifies more than just technological progress. It’s a testament to the ever-changing nature of photography, where what was once a steadfast rule becomes a fluid concept open to interpretation and exploration. And perhaps therein lies the beauty – in the perpetual quest to redefine and refine our understanding of light, sensitivity, and the art of capturing moments frozen in time.

Tagged :